To all you folks out there who adore grommet curtains, I applaud your persistence in attempting to make one yourself. Don’t worry, I’ll walk you through the process of making grommet-topped curtains step by step in this article.
We all know that grommets give a level of sophistication and individuality to any curtain panel. It’s possible that grommets will cost more than traditional curtain drapes.
Bạn đang xem: How To Make Curtains With Grommets? Easy Step-by-step Guide
It’s as simple as ABC to add a grommet to store-bought or home-made curtains. You don’t need to be an expert to get started. It’s doable even for beginners.
A well-tailored grommet on your curtain necessitates that you use grommet tape. This simplifies the process of stitching on grommets and other embellishments.
How to Make Curtains With Grommets
Step #1:
The first step in learning how to make grommet curtains is to gather all of your supplies. The supplies you’ll need can be found at any neighborhood curtain or hardware shop with ease. Any trustworthy e-commerce site can also be used to make an online purchase.
You’ll have to:
- Iron
- Using the same thread
- Sewing a pair of matching garments
- Pins
- Kit of grommets: Plastic ones.
- Tape for grommets
- The curtain slat
- Scissors
Grommet tape can be purchased at any curtain or fabric store or online. Yards of grommet tape are available for purchase. Consider how you want your curtains to look when deciding how many yards you need. You’ll need additional grommet yards if you want your curtains to appear larger.

The diameter of the holes on the grommet tape should match the diameter of the grommets you purchase. This is quite crucial.
Step #2: Take Measurements
Measurements are the next step in the process of making grommet curtains. Determine the size of your window before putting grommets on your panel.
If you’re building a curtain panel, the length should be 8 inches. To accommodate the additional folds required to support the grommets, you should do this.
The hem allowance and the curtain’s height should be taken into account while taking the measurements.
Step #3: make Panel Fold
The curtain panel will need to be folded in the next step. To finish each curtain panel, fold and push the top 4 inches inward.
Step #4: Add the Grommet Tape
The grommet tape is the next step in how to build a curtain using grommets. Pin the grommet tape to the center of the four-inch double fold. To prevent any holes at the edge, begin this process midway between the two holes.
Step #5: Cutting
Cutting out the grommet holes is the next step in the process of making a curtain with grommets. To cut the fabric, you can use scissors or any type of fabric cutting tool.
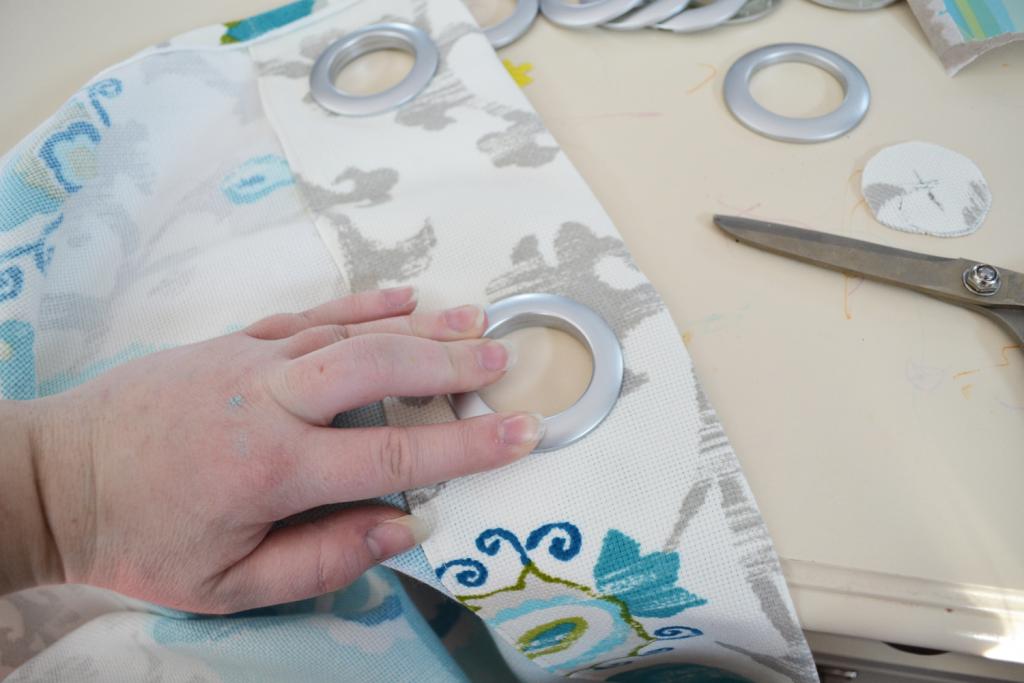
Step #6: Add the Grommets
The grommets will be attached in this phase. Once the grommets are in place, you should insert the prong side of each grommet across the middle of each grommet hole on the curtain’s back-end. Pressing down on the pedal is the final step.
Step #7: Hang the Curtain
The final step in creating a grommet curtain is to hang it. Sewing is required to complete the project after the grommets have been added. Sewing machines aren’t always necessary. When everything is in working order, it’s time to hang the curtain. Have fun with your drapes.
How Far do I Place Grommets on Curtains?
To begin, the normal distance between grommets is 6 inches measured center to center.
You should measure and mark the center of your curtain panel and indicate the spacing of your grommets before you begin cutting the fabric.
You can still use a 6-inch gap between the curtain’s first and last grommets when hanging it on the wall.
What Size of Rod do I use for Grommet Curtains?
The larger the grommet, the easier it is to move on a curtain rod. A 1 3/8-inch diameter rod is recommended for use with a 1 5/8-inch diameter grommet.
How can I Hang my Grommet Curtains Without Using a Rod?
Curtains with grommets can be hung in a variety of ways. These are a few examples:
- In this case, a rope is used.
- Clips for your toenails
- Tacks for upholstery
- Hooks
- Pipes made of copper
- Athletes’ gear
- Branches of a tree
Can I Use a Curtain Ring With Grommets?
Flat panels benefit from curtain ring clips. If you like, you can pair them with rod pocket curtains. In order to open and shut the grommets on panels, curtain rings are often required.
How do I Measure the Width of my Grommet Curtains?
To determine the grommet curtain width, you’ll need these items:
- Calculator
- Tape
- Towel ring
- Tools for putting things together
First, find the grommet’s center points.
Take a tally of your findings.
The curtain rod is hung on the wall in the second step.
This is the third and last step in the process of creating a cover. In order to cover a larger area, you may need to add additional curtains to your arrangement.
The next step is to multiply the space by 1.5 inches. This will add fullness to a standard grommet curtain panel.
How to make curtains with grommets [and lining]
We’re going to talk you how to build grommet curtains today.
DIY curtains have the power to completely transform a space, which I find fascinating. Or perhaps it’s because, despite my love of large-scale prints, I’ve never attempted to sew one into a garment. Sewing your own curtains is a great way to give a room a unique look and feel while also saving money.
Curtains, on the other hand, aren’t that difficult. Curtains can be sewn by anyone who can stitch a rectangle. Grommet curtains are my favorite to make out of all the curtains I’ve created. The grommets on these curtains make it much easier to open and close them than with other types of curtains.
You will learn how to make lined grommet curtains in this post. Grommets and setting tools will be discussed, as well as the important interfacing that you’ll need, before we start sewing.
Learn how to make grommet curtains by grabbing a mallet and getting started.
In order to earn advertising fees by advertising and linking to Amazon.com, elizabethmadethis.com is a participant in the Amazon Services LLC Associates Program. ’ Qualifying purchases allow me to earn money as an Amazon Associate. I will be compensated if you make a purchase using one of these links (at no additional cost to you). I only promote items that I use and love myself, and that I believe my readers will enjoy as well. For your continued support, I appreciate it.
But what if you’re not quite ready to start sewing just yet? Select “Pin Me” from the toolbar.
Should you buy metal or plastic grommets for curtains?
Xem thêm : How To Make Inverted Pleat Curtains? Easy Step-by-step Guide
Both plastic and metal grommets are available when it comes to curtain grommets.
Although plastic grommets are more readily available, I prefer the aesthetic of metal grommets. Plastic grommets are very convenient because they don’t require any additional tools.
However, if you enjoy the aesthetic of metal grommets, purchasing a setter isn’t a bad idea.
When purchasing grommets for curtains, make sure to choose the largest sizes available, such as #12 (1 9/16′′ inner diameter) or #15 (2′′ inner diameter). Grommet curtains in these two sizes will look the nicest and have the most realistic appearance.
Check out these Dritz plastic grommets. Try these metal grommets and the grommet setter from Home Sewing Depot if you want to go metal.
How to measure for curtains
When sewing curtains, you need to know both the width and the length.
Measure the width of the window where your curtains will hang with a tape measure. Add 1.5 to this number. You may achieve a gathered effect to your curtains by multiplying the width of your window by two.
For the sake of this essay, I will use:
width is equal to the width of the window multiplied by 1.5.
In this case, you’ll need a 54-inch wide piece of fabric for a 36-inch window. As a matter of fact, practically all home decor fabrics come in this width! Don’t worry if it’s a tad wider. It’s a breeze.
Tape measure the distance from a few inches above your window to the floor, then multiply that number by two hundred fifty-one. To accommodate for hems, add 6 inches to this total.
Curtain Length = Height Above Floor + 6 Inch
I’ve found that 2.5 yards per curtain panel is just about right in my home.
What kind of fabric should I use for curtains?
That’s an excellent one. The options here are extensive.
Canvas prints for home decor, such as those from Premier Prints, are an excellent option. In my search for nice curtain prints, I’ve spent a lot of time, and Premier Prints provides a great collection at a reasonable price.
Heavy cottons like sateen or twill can also be used for curtains. Also wonderful are combinations of linen and linen, like this 85/15 linen/cotton wavy print. Grommet curtains can be lined with denim, although a lighter weight denim or omitting the lining is preferable.
Also, I’ve had great success with Kona cotton. My “before” photo shows a curtain I fashioned from a Kona cotton I block printed years ago that still hangs in my home. Even after more than a decade of use as a curtain, this fabric is still in excellent condition.
Muslin or cotton voile can be used as a lining.
Observe that all of the fabrics I’ve chosen to propose feature natural fibers. These, in general, will look and feel better. The process of making DIY curtains out of natural fibers will be a lot simpler as well. When making curtains, there is a lot of fabric wrangling because there is a lot of fabric. Do you really want to sew with a cloth that refuses to hem or becomes all squiffy? It’s a no-go.
Supplies for sewing grommets with curtains
- 2.5 yards of 54-60-inch broad cloth
- Cotton voile or muslin lining: 2.5 yards
- 8-12 grommets of either plastic or metal.
- the device needed to properly install metal grommets
- Cutter from the Olfa brand (strongly recommended)
- Tape made of buckram (iron on or not)
- thread for sewing machine that matches the pattern
- Sewing needles for the Universal 80/12
- Envelopes in Manila
- Pencil and rule
- IRON!
How to sew curtains with grommets
Prepping your fabric
Here, the most time will be spent preparing things. With a little bit of patience, you’ll have the job done in a jiff.
Afterwards, you’ll need to square the top edge of your fabric. The top edge of your jumbo rectangle will be on one of the shorter sides.
In this stage of How to Sew Curtains the Easiest Way, I show you how to do this with a ruler and a gridded mat like I do.
You can also cut a little slit near the top and pull it out. You should be able to tear a straight line through the top of most woven materials.
It doesn’t matter which method you use, your fabric will hang straight.
Prep the lining fabric
Next, trim the cotton voile’s top edge to a square.
Cut the voile a few inches shorter than the curtain fabric. My hem was 6 inches long, therefore I had to shorten it by 6 inches for me.
From here, iron the entire exterior and lining cloth.
Press the sides
Next, fold the outer fabric’s selvage toward the wrong side and press. Afterwards Most home decor prints have their printing cut off at the completed edge of the selvage, which is usually 1 to 1 1/2 inches wide. A double-turned hem can be made with this amount of fabric.
On both the long and short sides of the outer fabric, press a double-turned hem.
Cut down the width of the lining
It’s important to do this if your voile is broader than your outer fabric (mine was).
When you place the voile on the wrong side of the pressed curtain panel, be sure to match up the edges. Hold everything in place with a few pins.
Adjust one of the voile’s long ends so that the first pressed line of one of the hem’s sides is even with the voile’s long end. Two or three pins should be inserted through all layers of fabric on the side that has been overlapped.
A slight vertical slit is all that is needed for the voile to slide under the pressed edge of the second hem and match the first pressed line.
To tear a straight line down the length of the voile, pull on the cloth.
Our lined grommet curtains are now ready to be sewn!
Adding buckram [Don’t skip this step]
Add buckram over the outer cloth to finish it off.
What on earth is buckram, I hear you cry?
Xem thêm : How To Make Regular Curtains Blackout? Complete Step-by-Step Guide
When grommets are added to the outside fabric, buckram will keep the fabric from tearing. The grommets themselves will be supported by the buckram, and the curtain will fold into neat vertical folds as a result.
On the wrong side of your cloth, draw a line that is about half an inch away from the top. This is where you’ll need to set the iron-on buckram glue side down and press it into position with your iron.
I used a glue stick to hold the buckram in place for the next few steps because I was using sew-in buckram.
Sew the top of the curtain
Right-side up, attach the voile to the outer fabric. Next, stitch the two pieces together.
Using a 1/2′′ seam allowance, sew the top edge.
When you press the seam toward the lining, flip the lining toward the inside of the curtain. The buckram will be completely obscured.
Sew the sides
Put your curtain on a large flat surface next. I’m sorry, but this is probably a circumstance where you’ll have to work on the floor. I said I would do some fabric wrangling, and here it is.
Make sure the long edges of the voile are folded inside and tuck them under the hem. Pin both sides of the voile to the outer hems to keep it in place and prevent it from slipping out of place.
The hems on the long edges should be stitched down through all layers from here on out. On both sides of the curtain, sew from the top to about 1 inch from the bottom of the lining.
Stitch the top of the curtain 1/8 inch away from the edge with a straight stitching machine. This is also a good time to sew horizontally across it at the bottom of the buckram. Stitch directly on a horizontal line you’ve drawn using a marker for nice results.
Marking the grommets
The manila envelope contains multiple 3′′ wide strips of paper. Long enough to cross the curtain’s top with tape.
Draw a horizontal line through the middle of the image. Make two 3′′-long vertical lines at the ends of each of the two sides.
The remainder of the room must be divided evenly among the grommets in your curtain. With ten grommets to deal with, I drew vertical markings every 5 3/8′′ on the fabric.
Grommet sets with 8 grommets should be spaced 6 5/8′′ apart. Grommets should be spaced no more than 4 3/8′′ apart for a set of 12 grommets.
your old clothes
It’s inevitable that you’ll wear out your old clothes. With this step-by-step sewing Eguide, you can easily transform them.
Use a compass to draw a 1.5′′ diameter circle at each intersection. If you’re going to use an Olfa rotary cutter, you may skip this step. In that case, simply cut off the circles.
To transfer the marks to the curtain, begin by flipping the curtain over. The template should be placed at the top of the page. Using a fabric marker or a fine-tipped marker, trace the circles directly into the fabric at each place.
To cut the circles out of the curtain, either use scissors to cut through all of the layers or an Olfa rotary cutter set to the smallest setting.
The grommets are ready to go!
Setting the grommets
The grommet has two sections. The grommet on the outside, and the ring inside.
The outer grommet of a metal grommet should be placed face down on top of the setter’s base when using one.
It is now time to insert the grommet backward so that it protrudes from the fabric on the wrong side. Make sure that the grommet’s ring teeth face down and that the male part of the setter goes through the grommet’s back end.
Use a mallet to hammer in the grommet into place while working on a padded surface. The grommet won’t budge once you’ve given it a good smash with your hammer.
This procedure should be followed for each and every grommet.
If you’re using plastic grommets, fit the grommet front to the right side and then pop the second side around it. It’s a breeze.
Check the curtain length
The curtain should be hung up on the curtain rod before you finish it.
Make sure the bottom of the fabric is level with the lining. Pinch and overlap the lining and the fabric by half an inch. Make sure it’s the right length.
I prefer curtains that fall to the floor, but you may want them a little bit longer or shorter.
A small horizontal cut can be made at the bottom of the outer fabric, and then ripped straight across the bottom of the curtain for a clean cut edge. Before moving on to the next step, double-check the length.
Finishing the hem
When you’ve finished the top of the curtain, turn it inside out through the lining.
The bottom of the hem should be aligned with the right side of the curtain. In order to finish the bottom of the garment, sew a 1/2′′ seam allowance all the way across. The outside cloth should be left unstitched on both sides.
Using one of the bottom corners, flip everything over. When sewing the liner and exterior fabric, press the seam.
Bring the pressed edges of the outside cloth together to complete the look. Tuck the lining cloth into the sides of the garment.
Using a pair of scissors, cut a little snip into the inside layer of the curtain fabric, but don’t cut into or through the seam line of the curtain lining.
Sew from top to bottom, tucking everything in and sewing through the unsewn edges. To complete the project, apply pressure to the entire curtain.
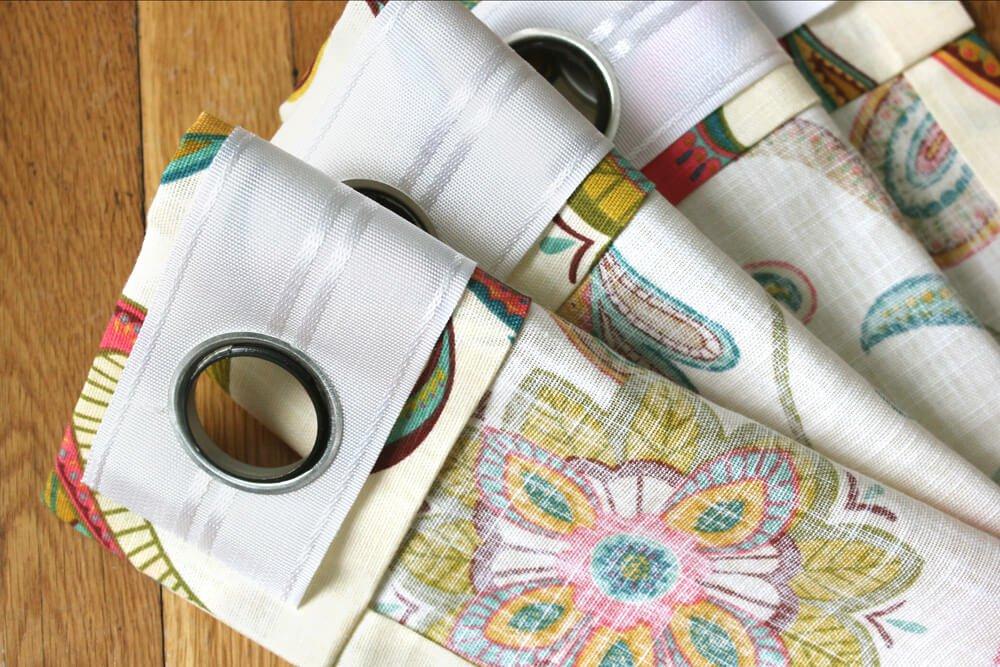
Voila! Grommet curtains are now a piece of cake for you! Simply hang them up and enjoy the simple delight.
Conclusion
It has a six-inch spacing between the grommets in the center. Insert the first and last grommets in the space required for returning and in front of the window. Hopefully, you’ve learnt how to make curtains using grommets after reading this article.
Nguồn: https://iatsabbioneta.org
Danh mục: Curtains


