The act of placing lights behind your curtains as a do-it-yourself activity is comparable to embarking on an epic journey by yourself. You don’t need to be an electrician to complete this project, but you should be an adult who understands the fundamentals of electrical wiring.
This post will show you how to hang lights behind curtains in a straightforward step-by-step manner. You can begin by creating the power source for the lights you intend to hang behind the curtains.
Bạn đang xem: How To Hang Lights Behind Curtains? Step by Step Process
There are two options: you may either utilize pre-made light strings or create your own, which offers you complete control over the final product.
Step by Step Process Of On How To Hang Lights Behind Curtains
Before you begin, you’ll need these items:
- Wire SPT1 or SPT2 Cord
- Inline SPT1 or SPT2
- Zip Connectors, Both Male and Female
- Knives or wire cutters
- Lights on a String
Using the Zip Cord Wire and Inline Zip Plugs, create a power source for your curtain light. Cut a length of zip wire that is equal to the length of your space. To ensure that your light can reach the outlet while it hangs, you may want to take off your zip cord wire and add more feet to your line.
Lay out your wire straight, starting at one end and taping it at the point where you can hang your lights is the next step. A piece of tape can be used to add a foot of distance between your light strings.
Using a female inline zip plug, connect each of the tape markers.
Install a male zip plug on one end of the wire, and a female zip plug on the other end of the wire. Avoid inline plugs, which require the wire to enter from one end and exit the other, for these devices.
When you’re adding the inline zip plugs, make sure to test each one. Use a single set of lights to see if the plug has a strong enough connection before plugging in many sets. Remember to disconnect the cord before adding any additional plugs.
To complete step 6, attach a power supply to the surface from which you will be hanging the lights. In order to hold yourself to an awning metal bar, you can use zip ties to do so.
It’s a good idea to cut a piece of wood or acquire a metal bar that can hold the weight of your wire, plugs, and the string lights when you’re hanging them if the area where you plan to hang your curtain lights does not have a naturally structured support for hanging your wire.
Light strings can now be plugged in. Hanging the lights is the final step in the process of hanging lights behind curtains! It’s up to you what you’d like to do.
It’s up to you whether or not you want to buy pre-made light strings or construct your own. We can either go all out or we can keep it simple and light it up! There are several options for customizing your curtain light colors, from adding extra large bulbs to making your own.
How do you Hang Sheer Curtains With Lights?
Simply hang the lights on the curtain rods closest to the window. Your sheer curtains should be hung close to the road.
Which Lights Work Best for how to Hang Lights Behind Curtains?
String lights are the best and most commonly used lights for holiday décor, but you can also use them to provide soft illumination behind curtains in your home’s rooms.
You may dangle these lights from the ceiling down behind curtains to create a personalized design that is both entertaining and functional.
In addition to the typical wall design, string lights can be used to create a basic outline, zig-zag, or other pattern. You can’t help but relax after the string lights are strung behind your drapes.
How do you Hang Ceiling Lights From Curtains?
Xem thêm : How To Make Theater Curtains? Step by Step Instructions
Install curtain hooks every two feet along the perimeter of your ceiling (61 cm). When hanging lights, use adhesive-backed cable hooks to avoid damage the ceiling.
Apply pressure to the ceiling by peeling off the backing from the hooks and pressing them into place. Once you’re certain it’s secure, hold on for around 30 seconds. Hooks should be placed across your room’s ceiling every 24 inches, or 2 feet, to complete the task.
Spoiler Alert! DIY Curtain Lights are Easier Than You Think!
Crafting curtains with your own DIY lights is like reading a novel where you get to decide the outcome. To begin, you must first create a power source for your lights. After that, you are presented with a decision. It is up to you whether you want the convenience of premade light strings or the adventure of building your own light strings that are ideally tailored to your environment as well as providing unlimited possibilities for personalization. There is only one right way, and that is the one that best serves your needs!
In terms of complexity, we’d say this adventure is suited for most adults, but it does require some knowledge of basic wiring accessories (you don’t need to be an electrician to understand this!). as well as being cool with the finale being spoiled for you. This journey has been wonderful, and we can’t wait to share its conclusion with you.
Instead of us trying to describe the utter joy of reaching the conclusion, connecting your curtain light project for the first time, and witnessing a beautiful wall of cascading lights so brilliant it nearly feels alive… Let me show you.
String Light Curtains with LEDs
Curtains with Globe String Lights
Let us know if you haven’t already come up with your own ideas on where and how to decorate with a shimmering wall of string lights!
Let us know if you haven’t already come up with your own ideas on where and how to decorate with a shimmering wall of string lights!
- Choosing the Best Places to Hang Curtain String Lights
- Doorways or Entrances
- Arches
- Gazebos
- Weddings and other celebrations
- There will be a baby shower with blue and pink lights for boys and girls, respectively.
- Backdrop for a Photo Booth
- As a Window Treatment
- Covered Deck or Porch
- A Bar in an Indoor or Outdoor Setting
- Celebrations for the birthday of a loved one
- Haunted House for Halloween
Getting started with your DIY curtain light project has never been easier. Symmetry is the key to flawless curtain lights, and that’s where our journey begins. We’ll develop a power supply to connect all of those lights in a single straight line to accomplish symmetry.

DIY Curtain Lights: How to Make Your Own
Supplies
- Supplies
- Male and female SPT1 or SPT2 inline zip plugs
- Knives or wire cutters
- DIY Light String Supplies or String Lights (see below)
DIY String Light Kits.
- Cuttable SPT1 or SPT2 light strings
- Lighting Fixtures
- Male and Female SPT1 and SPT2 Plugs
- Tape for Electricity
- Knives or wire cutters
Zip cable wire and inline zip plugs can be used to create a power source for curtain lights.
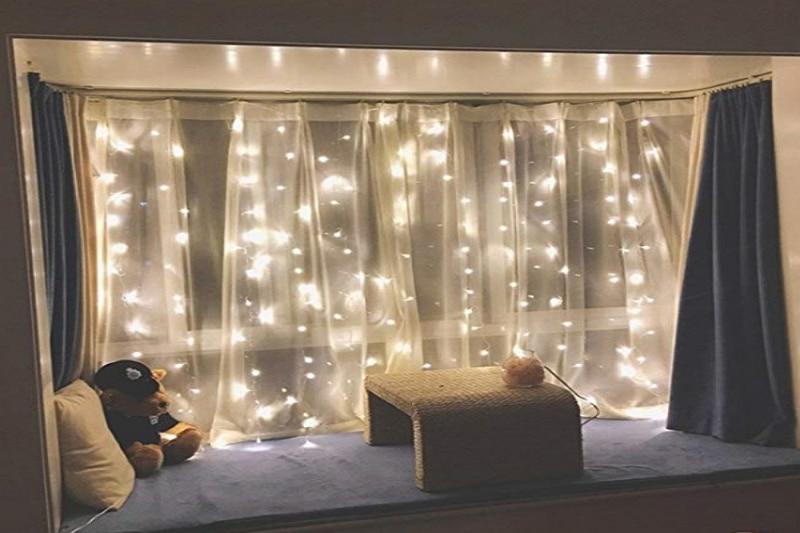
- Zip wire can be used to extend the length of a room. The awning shown in the pictures above is 14 feet long, however we wanted extra length to hang down and reach the outlet, so we cut our wire at 20 feet.
- When you’ve measured your space, cut a zip wire to fit. In order to hang down and reach the outlet, we cut our wire at 20 feet instead of the 14 feet depicted in the photos.
- Each tape marker should have a female inline zip plug installed. Inline zip plug installation instructions can be found here or by scrolling down.
- Install a male zip plug on one end of your wire, and a female zip plug on the other end. Because the wire can only enter one side of the plug and cannot exit the other, these should not be inline plugs. Detailed instructions on how to attach a zip plug to the end of your wire may be found here.
- Plug in a set of lights to each inline zip plug as you attach it to ensure a proper connection. Before adding a new plug, be sure to unhook the previous one.
Install a Power Supply for Your Devices
- Use a power supply to connect to your hanging object. Zip ties were utilized to fasten our wire to the metal bar that ran the length of the awning. Consider cutting a piece of wood or finding a metal bar to support the weight of your wire, plugs and hanging string lights if there is no natural support for your wire in the area where you are hanging your DIY curtain lights.
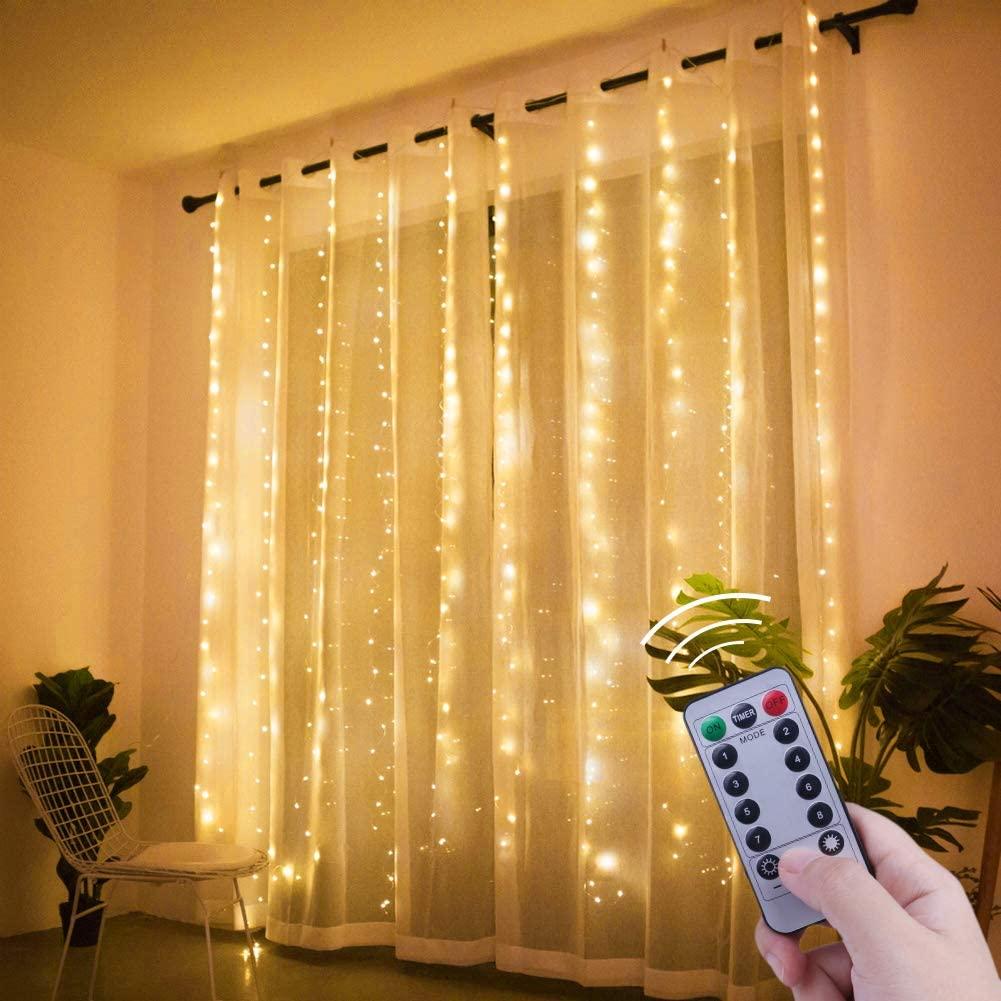
- Make sure you turn on your lights! Weigh your options: do you want to utilize pre-made string lights or create your own? We used 8-foot LED light strings in one version of our installation. Instead of purchasing pre-made light strings, you can cut existing ones to the correct length and add connectors to the ends if you like larger bulbs or bespoke colors. String lights built from globe patio bulbs can be found by clicking here or scrolling down.
In light of this decision, how are you progressing on your journey? Welcome! You should know a few things about light strings and zip plugs before we get started.
You can get 15′-1000′ lengths of light strings and spools and have them cut to your specifications. Seven 8-foot-long light strings were required for our project. SPT2 light strings with six-inch spacing between sockets were used. It was more than enough to cut each 50-foot light string into six 8-foot sections, but it never hurts to have a little extra on hand! To accommodate our modest G30 globe lights, we selected a six-inch socket spacing. However, larger G50 or C9 bulbs may necessitate a 12-inch gap.
Xem thêm : How To Hang Curtains And Sheer? Comprehensive Guide
You may have noticed that the light strings are designated by a series of numbers and letters, such as SPT1 or SPT2. This notation refers to wire insulation, which is a significant consideration when planning for long-term lighting systems. Generally speaking, SPT1 wire is best for low to moderate light applications, whereas thicker SPT2 wire is better for areas with more harsh weather patterns and temperatures since it can accommodate greater wattage lights.
To complete this project, wire insulation is also critical because zip plugs must be insulated to match your wire’s. Because we used SPT2 wire to make our light strings, we also used SPT2 male and female zip plugs. As a precaution, you should wrap the end of your line with electrical tape and make sure there are no exposed wires.
Additionally, you’ll need wire cutters to cut the wire, which we found to be the most efficient method.
String Lights You Can Make At Home
- Measure and cut your curtain wire to the desired length. Zip plugs can be attached to the ends of the line. Our 50-foot strings were divided into six 8-foot pieces, with 16 sockets in each.
- One end of the cable should have a male zip plug attached. Zip plug installation instructions can be found here or by scrolling down.
- Make sure to secure the exposed end of the wire by wrapping it in electrical tape or by installing a female end plug.
- Check your wire’s functionality by inserting a bulb into one of the sockets and plugging the male zip plug into an adjacent outlet once you’ve finished installing your zip plugs and wrapping any exposed ends. Make more light strings by unplugging your wire and unscrewing your bulb, then repeating the procedures above.
Instructions for installing ZIP PLUG
How to Connect a Male and a Female Plug Adapter
- The zip plug’s backing can only be removed in one direction, so be aware of this when you remove it.
- Locate the two “vampire fangs” that protrude from the channel that spans the length of your zip plug by looking inside your zip plug During the assembly of the plug, these teeth pierce the cord. These teeth are out of place. The wide prong or receptacle is attached to one of them, while the thin one is connected to the other.
- You’ll also want to inspect your power cord. A closer inspection reveals that it is in fact two separate wires. The edge of one wire has a high “rib” (you may have to feel for it). The neutral wire is responsible for ensuring that the current in the circuit remains polarized. To connect the neutral wire to the wide prong or receptacle, we’ll use the ribbed edge.
- Use wire cutters or a knife to cut the zip cord’s end to separate the wires, and then pull them apart a few centimeters.
- Using the ribbed wire to align with the wide blade or receptacle of your plug, press the end of the electrical cord into the well along the closed end of the plug and turn on the appliance. If your electrical cord has split ends, you can use the plastic divider that’s down there to keep them apart.
- After that, lay the cord into the channel that runs the length of your plug by bending it over. In some cases, it may be necessary to gently squeeze the electrical cord into the channel so that it does not run across the vampire teeth.
- Reattach the plug’s backing by sliding it back on. Make sure to apply some pressure or pliers to get it to seal. Vampire teeth will be firmly held in place by the backing when you slide it over the vampire teeth.
Back to building a Curtain Lights Power Source by clicking here.
To return to the steps of making your own string lights, click here.
In-Line Plugs: How to Connect Them
- Remove the inline plug’s backing by sliding it off.
- Two metal prongs, or “vampire fangs,” can be found inside the plug. Take note of the plug’s polarized receptacles. Inline zip plugs have the same polarity requirements as male and female plugs.
- Lay the electrical cord into the plug and align the ribbed wire with the vampire tooth linked to the broad receptacle.
- Reattach the plug’s backing by sliding it back on. The unusual shape of the inline zip plug allows the electrical cord to flow through the back and exit both ends.
Back to building a Curtain Lights Power Source by clicking here.
In other words, you’ve finished the journey and have arrived at the point where you can look back on everything you’ve accomplished and be proud of the results you’ve achieved. We’d love to see your finished DIY curtain lights now that we’ve been on this road together! Post pictures of your curtain lights in the comments or on social media and don’t forget to share this post with your friends if you enjoyed it!
Hang Your Curtains In 7 Easy Steps
When it comes to hanging your own curtains, you don’t need a power tool prowess. It’s a lot simpler than you think! With our step-by-step guide, you’ll be hanging curtains like a pro in no time at all. In addition, you’ll learn how to choose the right fabrics, lengths, and styles. What are you waiting for?
Materials you’ll need:
- Using a tape measure
- Pencil
- Level
- A stud finder is what you need.
- Drill
- Screwdriver
- Using an allen wrench
- Determine the length of your curtain rod by taking a measurement of the window’s width.
- On each side, add 1-3 inches.
- Take a measurement 4 inches above your window. The brackets will be placed here.
- To secure drywall to the wall, use a Phillips head screwdriver to insert anchors.
- Fasten screws into the studs by aligning your brackets with their holes.
- Put your rod up! Make sure to attach your curtain pole pockets, hidden tabs, or grommets before hanging them. After hanging the curtain pole, attach the curtain with ring clips.
- Using an Allen wrench, tighten the bracket screws to secure the rod.
- If desired, finish the ends with finials.
That’s all there is to it! Your curtains are now operational.
Quick tips:
- Hidden tabs give a more official appearance.
- Pole pockets are more relaxed.
- With a grommet top, you get a more contemporary look.
- All types of sheers are able to let in a great deal of light.
- Blends of cotton and linen, as well as jacquards, produce a natural appearance with varying degrees of texture.
- In addition to blocking light and noise, thicker textiles like wool and velvet help to keep heat or air conditioning in.
- What if you’re in between curtain lengths? Always go with the longer size and hem it yourself.
What if you don’t want to do it? For just $129, our curtain installers will put up two sets of drapes. Make an appointment at westelm.com/style-service or ask a store employee.
Conclusion
You may need to know how to hang lights behind curtains for any of the following two reasons. They’re the most amazing, simplest ways to improve the aesthetics of your house.
First, you may choose to put curtain lights behind your curtains in order to create a warm atmosphere with indirect light.
Hanging lights that hang behind your curtains can also be used as photo backdrops for parties or small gatherings of friends.
Nguồn: https://iatsabbioneta.org
Danh mục: Curtains


