As a result, I may receive a tiny share of the sale at no additional cost to you. When it comes to recommending products, it’s just those that I’ve tried and enjoyed. I really appreciate it!
WHY SEW PLEAT TAPE INTO YOUR CURTAINS?
Pleat tape can be sewn into your curtains for a variety of reasons. Pleat tape allows you to hang your curtains in a variety of ways.
Bạn đang xem: How To Pinch Pleat Curtains? Complete Step-by-Step Guide
After sewing the pleat tape into place, you’ll be able to create several different pinch pleat styles. Pinch pleats, box pleats, goblet pleats, knife pleats, box pleats, and many more are available.
Pleats, as you can see, may get a little complicated. You can’t go wrong with any of these selections. Pleat tape and hooks are universal and can be used for a wide variety of pleats.
In addition to adding depth and dimension to the top of your curtains, all of these options will allow them to gently ripple and rest elegantly against your wall.
When compared to plain gathered, grommeted, or tab top curtains, I greatly like this style.
When compared to those options, sewing in the pleat tape was hands down the easiest curtains that I’ve ever sewn.
Sewing in the pleat tape was by far the easiest part of making these curtains, especially in comparison to the other two options.
HOW TO MAKE PINCH PLEAT CURTAINS FOR YOUR LIVING ROOM
I’ve fashioned our living room drapes using of cloth yardage that I purchased. Pure linen in a dark natural tint is heavier and more durable than regular linen.
I’m sure by now you’ve figured out that I have an unhealthy preoccupation with linen. In fact, I’ve just launched a new shop selling my handmade linen goods to you. Check out the new items and colors that I’ve just introduced!
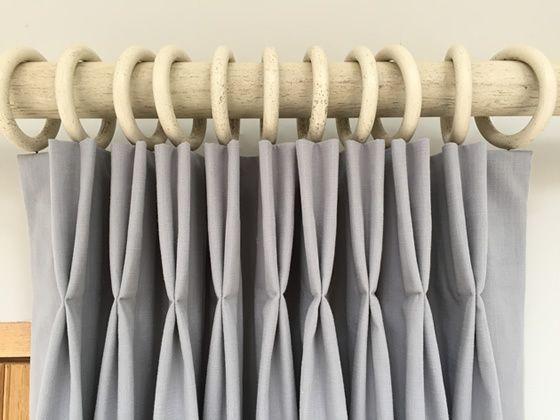
To obtain my best look, I experimented for a long time with my hooks after sewing in the pleat tape. I ended up loving this really tight gathered look, that is a lot like a casual goblet or cartridge pleat.
I only needed to insert one prong at a time to achieve this effect. Then I numbered five pleat places to insert the prong’s other side. Below and in my video above, you’ll be able to watch this technique in action.
In contrast to typical pinch pleats, which are firmly gathered and then spaced apart, this one provided a wonderful continuous pleated or gathered effect that I found appealing.
SUPPLIES FOR DIY PINCH PLEAT CURTAINS
Here is a step-by-step guide on making curtains, with a list of materials you’ll need.
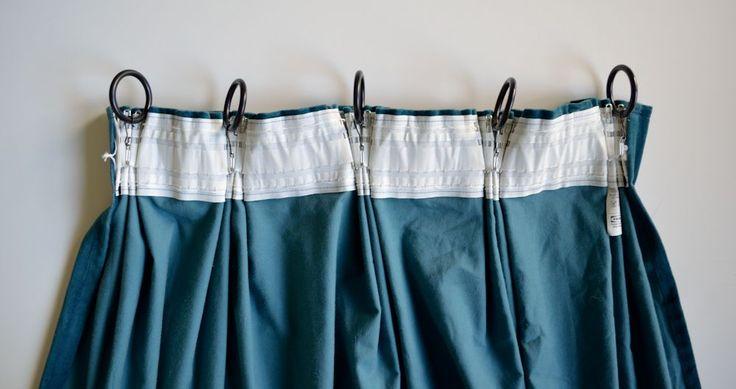
PLEAT TAPE
Pleat tapes come in a wide variety of styles. An inch apart is how far between the pleat casings are on this basic, multi-purpose model.
If you want a super-tight pleated effect, you can buy pull pleat tape with strings attached.
This basic pleat tape, on the other hand, can be used in a variety of ways.
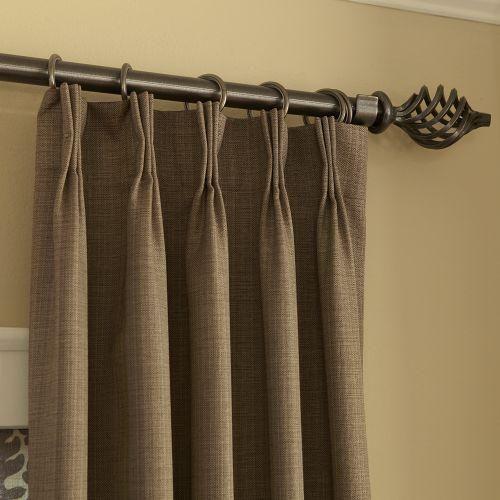
PLEAT HOOKS
In addition, pleater hooks are available in a variety of styles. The four-pronged hooks are my favorite all-purpose hooks.
CURTAIN RINGS
Curtain rings with an eyelet hole will work best for hanging with pleat hooks, so be sure to purchase the correct size rings for your curtain rod.
FABRIC
Finally, the fabric or pre-made curtains are a necessity.
If you’re planning on using pleats, you’ll need to account for at least half the width of the curtain panel.
Despite the fact that my fabric was 50 inches wide, I realized that half of it would not be enough to fill the pleats. My panel started at 100 inches wide since I bought two yards of fabric and stitched them together along the long edge of my panel.
The pleating gave the top a nice fullness.
In fact, I bought a half-yard more than I needed, hung them on the floor, and then hemmed them to my desired length.
HOW TO MAKE PINCH PLEAT CURTAINS WITH SEWING MACHINE
You’ll also need some basic sewing supplies. Pressing is essential for professional results, so make sure you have your iron on available.
STEP 1: PREPARE FABRIC
As a precautionary measure, I washed and dried my material before using it to make curtains. Linen gets softer and tastier after being washed.
I had to press my cloth really hard to remove all of the wrinkles, especially around the edges, because it was so wrinkly.
STEP 2: HEM SIDES
Initially, I simply hemmed the sides of the fabric by tucking in the raw edges.
STEP 3: HEM THE TOP OF PANEL
When I was ready to attach the pleat tape to the top of the curtain, I simply lowered the raw edge by a half-inch and stitched it in place. That raw edge can be encased before beginning to pin the pleat tape in place with this.
STEP 4: PIN IN PLEAT TAPE
On the ironing board, I folded over the panel’s top edge where the pleat tape was supposed to be, and then pressed it down.
To determine how far to fold it over, I used the pleat tape, making sure there was at least 14 inch of extra fabric on either side of it.
After pressing that fold down, I began pinning the pleat tape in place by pressing it down as I went. Rather than exposing the raw edges of the pleat tape, the tape’s edges are folded over.
STEP 5: SEW EVERYTHING TOGETHER
After that, I sewed the pleat tape into place along the panel’s top, bottom, and edges using my sewing machine.
The only caution is to avoid sewing the prong apertures into the pleat tape, since this will prevent the prongs from being able to be inserted.
Xem thêm : How To Hang Pocket Rod Curtains With A Pin Hook? Step-by-Step Tutorial
Keep an even seam allowance all the way around so it looks great from the other side as well.
Afterwards, I recommend ironing all of the hems and seams to ensure that the panel looks clean and polished.
In order to replicate my casual pleat method, I inserted prongs into every fifth pleat position along the full panel width.
In order to attach the rings to the hooks, you first need to insert the prongs.
It was easier for me to insert the rod through the rings from the ground rather than when hanging.
It’s time to show off your hard work by hanging them on the wall!
ARE DIY PINCH PLEATED CURTAINS RIGHT FOR YOU?
One caveat to pleated curtains… Your curtains won’t close properly to conceal your window because they are pressed together.
Pleated curtains have one drawback… Despite their best efforts, your curtains won’t close properly to conceal your open window since they’ve been pinned shut.
These are the Bali Natural Shades in Spree Studio from Blindsgalore.com. They can be raised and lowered without the use of any ropes or pulleys. Their blinds are gorgeous!
Pinch pleat curtains can be made by sewing pleat tape into your curtains. I hope you found this tutorial helpful. Yes, it’s absolutely worth a shot
Just in time for the holidays, my living room has finally come together.
To keep up with the progress of my seasonal décor and the reveal of my living room, please come back later.
HOW TO CHEAT AT PINCH PLEATED CURTAINS (MINIMAL SEWING REQUIRED!)
When it comes to the classic aesthetic of pinch pleated curtains, there’s no need to go through the trouble of making them yourself. Pinch pleat store-bought drapes with the help of this simple DIY method. You may create your own curtain rings out of binder rings and paper clips with my instructions. In addition to being almost free, these rings are a lot more utilitarian than their predecessors.
If any of the following apply to you:
- Sloppy curtains aren’t something you’d want in your home.
- Pinch pleated curtains have a sophisticated style, but you can’t afford the price tag!
- If you’re like me, you have no sewing experience at all!
- To wash your curtains, you need to be able to remove them quickly and simply.
As an Amazon associate, I receive a commission on purchases made by customers who qualify. You may read my complete disclaimer RIGHT HERE).
IF YOU ARE CURIOUS OR IN A HURRY:
Those are exactly the pleater tape and pleater hooks that I prefer. These are the best options for this tutorial, which covers various types: Pleat Tape, with short neck hooks for pleating.
HOW TO PINCH PLEAT READY-MADE CURTAINS
Pleated curtains elevate a space to a higher level of elegance. They add classic elegance that will never go out of style. Think of Reese Witherspoon as Miss Mustard Seed.
When it comes to window treatments, they’re not necessarily the most cost-effective option for those of us who aren’t willing to compromise on style. Fortunately, I found a way to combine the convenience of store-bought curtains (Target) with the elegance of a pinch pleat. Sewing is a term I use loosely.) (This is doable for anyone who can stitch in a straight line.)
HOW DO PINCH PLEAT CURTAINS WORK?
In order to get a more fitted look, pleats are added to the bottom of the curtains, allowing them to flow freely and not take up too much room in the window. Because they keep your curtains from seeming messy, they naturally give them a more defined look.
Plaids are traditionally constructed by folding, pressing and pinning several times before they’re hemmed and stitched shut. It is, in fact, really difficult. The classic method of making pinch pleated curtains may be found in the following article: How to Make Pleated Curtains.
POPULAR TYPES OF PLEATED CURTAINS
You can choose from a variety of pleated curtain styles depending on your personal preferences. It’s also worth noting that technically, all curtains have pleats.
- This type of pleat is the most common type of flat drapery. Also, the term “Flat Panel Curtains” may be heard from time to time.
- For today, we’re going to be building a French Drapery Pleat (or Pinch Pleat). This is the most typical design of curtain pleat, which makes two or three folds and then joins together 3 to 5 inches from the top.
- Curtains with grommets are called Grommet Pleats, and they are the most common type.
- With a rod pocket, the fabric gathers when it is pressed to one side, creating a beautiful drape. Some drawbacks include the difficulty of opening and closing them, as well as the fact that they can only open as far as the gathering at the top allows.*
This post concludes with instructions on how to transform rod pocket curtains into pinch pleats.
Check out this article on Drapery Pleat Styles for more curtain options.
DIY PINCH PLEAT CURTAINS: SUPPLIES NEEDED:
If you’re looking for a specific sort of pleating tape, you’ll want to acquire this one: Pleat Tape for Draperies
The greatest kind of pleater hooks is this one, however there are many more kinds and designs to pick from. Hooks for Short Neck Pleats in Traverse
Binder Rings of 2′′
3/8-inch Paperclips
The Rustoleum Metallics Oil-Rubbed Bronze spray paint is my personal favorite.
Curtains can be made to match any type of thread.
Purchased Drapes – (see links to mine below).
Have a budget of less than $10 and are looking for curtain rods? Check out my piece on curtain rods inspired by Restoration Hardware. This post also includes my favorite low-cost brackets and DIY finial ideas.
STEPS TO ADD A PINCH PLEAT TO STORE-BOUGHT CURTAINS
STEP 1: PREP YOUR CURTAIN HARDWARE
Stop! Take a before photo before you do anything. Let me see the before and after photos once you’re finished, please!
The best time to spray paint your binder rings and paper clips is now so they can dry while we finish the curtains.
Spray paint your rings and paper clips the same color as your curtain rod in a well-ventilated environment. See my post on how to make your own Restoration Hardware-inspired DIY curtain rods for less than $10 here: DIY Curtain Rods.)
Xem thêm : How To Hang Curtains On A Metal Door? Step-by-Step Tutorial
For at least 24 to 48 hours, let the spray paint to cure.
WHY I USE PAPER CLIPS AND BINDER RINGS FOR CURTAIN HARDWARE:
- While a set of curtain rings can set you back about $14.00, these are almost free.
- QUICK AND EASY TO WASH CURTAINS – You don’t have to remove the entire curtain rod from the brackets to pull down your curtains. It’s as simple as undoing each binder ring! You can see how to create your own bay window curtain rods on a budget here: DIY Bay Window Curtain Rods on a Budget.
- Binder rings and paper clips for curtain rod hardware are great since they can be easily adjusted to a different height to hang your curtains from. There are two places to hook the pleater hooks onto the paper clips because of the two loops on the clips.
“So, Karin, what’s the point of all of this?” Have you ever hung curtains only to discover that they were shorter on one side than the other? That’s what happened to me. Using paper clips, you can attach the longer side to the upper loop on that side. A fresh set of curtains or rehanging your brackets isn’t necessary because of this.
Has washing curtains ever caused them to shrink? Instead of purchasing new curtains or rehanging brackets, you can simply hang your curtains from the lower loop on the brackets.
How many times have you replaced your floor coverings only to find that all of your drapes are now either too short or long? As a result, you don’t have to re-hem every curtain in your house anymore! Simply alter the loop you hook them on.
We had a flood a few years back, and the entire house had to be re-floored due to the damage. A major change in our flooring meant that all of our curtains were now excessively long. So, instead of having to re-hem all 28 curtain panels or reposition the brackets, I just hung them on the lower level when it was time to put them up again.. It was just fantastic! Paper clips and binder rings are amazing time and money savers.
STEP 2: BUY CURTAINS OR USE YOUR EXISTING CURTAINS AND ADD A PINCH PLEAT
HOW TO PINCH PLEAT STORE-BOUGHT CURTAINS
There are two ways to accomplish this. Measure the desired curtain height, taking into account the rings and paper clips, before making your purchase. Here are some pointers on how to determine the proper curtain rod height: Curtain Rods That Are Simple to Make At Home
HOW TO PINCH PLEAT YOUR EXISTING CURTAINS
If you are using rod pocket curtains, you might need to move up your brackets because now we have to take into account the height of the paper clips and rings. If you did not wash your curtains before hanging them, now is a great time to do that because they might shrink a tad which would work in your favor!
If your curtains include rod pockets, you may need to raise your brackets to accommodate the paper clip and ring heights. Before hanging your curtains, if you haven’t already done so, it’s a wonderful time to wash them because they may shrink slightly, which will be in your advantage.
A quarter-inch from the top and a half-inch from the edge are ideal placements for the pockets. Remove any remaining tape.
Make sure the pleater hooks will fit into the small holes on the bottom of the tape. Please inquire as to how I can tell you this is very crucial!
STEP 3: HOW TO PINCH PLEAT CURTAINS WITH TAPE
Sew your pleater tape to the top gold seam and hem the tape’s edges there. I also prefer to hem the bottom two gold seams there. Make certain that the openings for the small pockets at the bottom are not hemmed. Use thread that matches the color of your drapes. ‘
STEP 4: HOW TO ATTACH PINCH PLEAT CURTAIN HOOKS
Your DIY pinch pleat curtains are ready for hooks now that you’ve completed sewing the pleater tape on them.
To identify the halfway point of your curtain, fold it in half lengthwise. In this spot, place your center hook.
Tip for Pleater Hooks: Instead of pushing the hooks up one end at a time, insert all four hook ends into the small pockets first and then press the hooks up.
In your package of hooks, you will see four end hooks. Put one of these on each end at the first pocket.
You’ll find four end hooks in the package of hooks you’ll get. To begin, insert one into each of the first two pockets.
STEP 5: HOW TO HANG PINCH PLEAT CURTAINS
You may now hang your curtains, as all of your pleater hooks have been positioned evenly. To change the spacing of your hooks, simply remove them and reposition them in a new location. That’s an advantage of this approach!
This is how you may attach your binder rings and paper clips to your rod.
Now all that is left to do is to hang the curtains.
DON’T FORGET TO TAKE A PICTURE!
Now that you are done, I’d love to see how it turned out! Post your before and after photos here!
MAKING A PINCH PLEAT CURTAIN LOOK EVEN BETTER WITH DRAPERY WEIGHTS
I’m eager to see what you’ve accomplished now that you’ve finished. Pictures of the before and after are welcome!
They didn’t even need to be sewn. They were really easy to attach with a little hot glue! Isn’t that a cinch to do?
I used the following curtain weights: Lead Weights for Drapery
HOW TO ADD A PINCH PLEAT TO CURTAINS – FAQ’S:
CAN YOU WASH DIY PINCH PLEAT CURTAINS?
That’s a given. Pinch pleated curtains are notoriously difficult to clean, but the homemade version is far simpler. When it comes to take down the curtains for cleaning, the binder rings are a godsend.
CAN YOU CONVERT ROD POCKET CURTAINS TO PINCH PLEATED CURTAINS?
Using rod pocket curtains from Target, I achieved the same result. Instead of hemming the pleater tape on the inside back of the curtains, I just ignored the pockets at the top. Once the pleater tape has been sewn on, you can use a seam ripper to remove the extra hem from the rod pockets. Because they are scarcely discernible, I decided to exclude mine.
HOW TO CONVERT PINCH PLEAT CURTAINS TO ROD POCKET?
Just remove the pleater tape with a sewing needle and add a hem approximately 2 inches from the top of the curtain to serve as your rod pocket if you ever change your mind about using pleated curtains again.
How big should my pinch pleat curtains be?
In most circumstances, you’ll anticipate that each curtain will cover half of its real width once it has been pleated, depending on the distance between your pleater hooks. So, keep this in mind, especially when it comes to functional drapes. As a result, curtains are only used for decoration in my house. Nonetheless, you’ll presume that each panel will cover half of its true width when pleated.
RENOVATED THINKING:
In the past, I’ve said that I’m not a great seamstress. I can hem the bottom of a curtain and maybe even construct a throw cushion with the sewing skills I have.
At the same time as I was attaching the tape to the top of my curtains, I was thinking of a few lyrics from one of my favorites:
“Hems us in, behind and before,” says our heavenly Father. I’d heard that expression before, but never really thought about it.
It occurred to me that even in the midst of today’s unrest, God provides us with the kind of guidance and tranquility that comes from His Hand.
We are not the result of random circumstances, but rather because of our relationship with God, he protects, secures, and provides for us.
He vigorously defends our course. He guards us and intercedes for us when we are in need. Our future is uncertain, but he provides us with a sense of security and comfort in the present.
For those of us who live in a chaotic world, we can take comfort in knowing that our God is in charge and would never abandon us.
Nguồn: https://iatsabbioneta.org
Danh mục: Curtains


