Making quilted pillow shams is a simple three-step process, so if you’re intrigued, read on. Pillow shams are always a good idea, but why not make quilted ones? Make no mistake, this method is simple and straightforward!
What’s the point of making a quilted pillow sham, you ask? The quilted sham is more difficult to make than a standard sham. Because you have so much control over the cloth, you get a softer and cozier product.
Bạn đang xem: How To Make Quilted Pillow Shams? Step-By-Step Guide
How To Make A Quilted Pillow Sham
Step #1. Prepare
It’s important to gather your supplies in advance before beginning any activity. To make a quilt, you’ll need to cut a lot of fabric pieces. Fabric squares in your choice of color and two 19 by 21.5-inch rectangles for the back flap closure are needed for this project. You’ll also need three two-inch strips and four rectangular pieces of fabric for binding.
There should be two pieces that are 2×18.5 inches and one piece that is 2×27.5″ for the pillow border. As for batting and muslin, they’ll have a combined dimension of 27 inches by 33 inches. If you prefer a smaller or larger cushion, you can always alter these specifications.
Step #2. Arrange
You should be able to arrange your quilted sham once you’ve measured and cut your materials. To begin, arrange your squares into six rows, keeping in mind the design and the colors you want to use. After that, stitch the rows together and add the border fabric strips to finish them off.
In this case, you’ll use the larger strip to cover the top and bottom, and the smaller strip to cover your sham’s left and right sides. Starting with the muslin, then the batting, then the sham top fabric, and finally, the quilt. For a more polished look, trim the sham’s borders and sew the long fabric rectangle edges that will become the flap at the back of the pillow.
Step #3. Construct
The next step is to sew your quilted pillow sham together, right side up, on top of your bed or couch. Make sure the sham’s flaps are facing the proper way up by placing the unfinished side of one of the back pieces. To construct the sham’s overlapping flap back, place the second back piece right side up on top of the first piece.
You don’t need to sew a zipper or leave an open end on your quilted pillow sham because the flap back serves as your opening. Removing the sham will be easier with the flap in place to conceal the pillow form. You’ll pin the sham’s edges and sew it with the front up, bind, and then insert the pillow insert.
What Is Quilting?
Quilting isn’t just for bedsheets; it may also be used to make pillow shams. Underlayment refers to the process of adding an additional layer to an already-existing top and batting before sewing them together. It is becoming increasingly fashionable to utilize quilted shams since they allow for a variety of pattern combinations and the inner batting further increases the overall softness and comfort of a cushion.
You can unleash your inner artist by merging different fabric pieces in the above craft. Colors and patterns can be combined in a variety of ways, from monochrome to multicolored. You can also decide on the sort of cloth based on the style of your home, couch, or bed.
Types Of Pillow Shams
Shams can be classified into several sizes to accommodate a variety of cushions. However, the overall design of these covers can also be used to distinguish them. In addition to the knife-edge and quilted versions, there is also the flanged variety.
Quilted pillow shams
You just learned how to construct a quilted pillow case, which is one of the greatest cases for ornamental pillows because of its layers and stitching. You’ll also receive a luxurious finish that’s appealing to the eyes and the touch thanks to the additional layer. Quilting the layers can be done by hand or with a machine, and the design can be either abstract or grid-like.
Standard pillow shams
If you prefer the more conventional look, you can choose a patterned or textured fabric to dress up your standard pillow shams. Embroidery or laces can be added to the sham if the finish is too plain. As the name suggests, the sham is referred to as “knife-edge” because of the knife-edged openings that range from the flap to the zipper.
Flanged pillow shams
Xem thêm : How To Add Cording To A Pillow? Step by Step Instructions
The flanged pillow sham is another common design. However, there is an additional piece of material around the edges so that it does not appear to be a regular sham. It’s also possible to fill, ruffle, or add decorative cording to the flange.
Simple Quilted Pillow Sham Tutorial
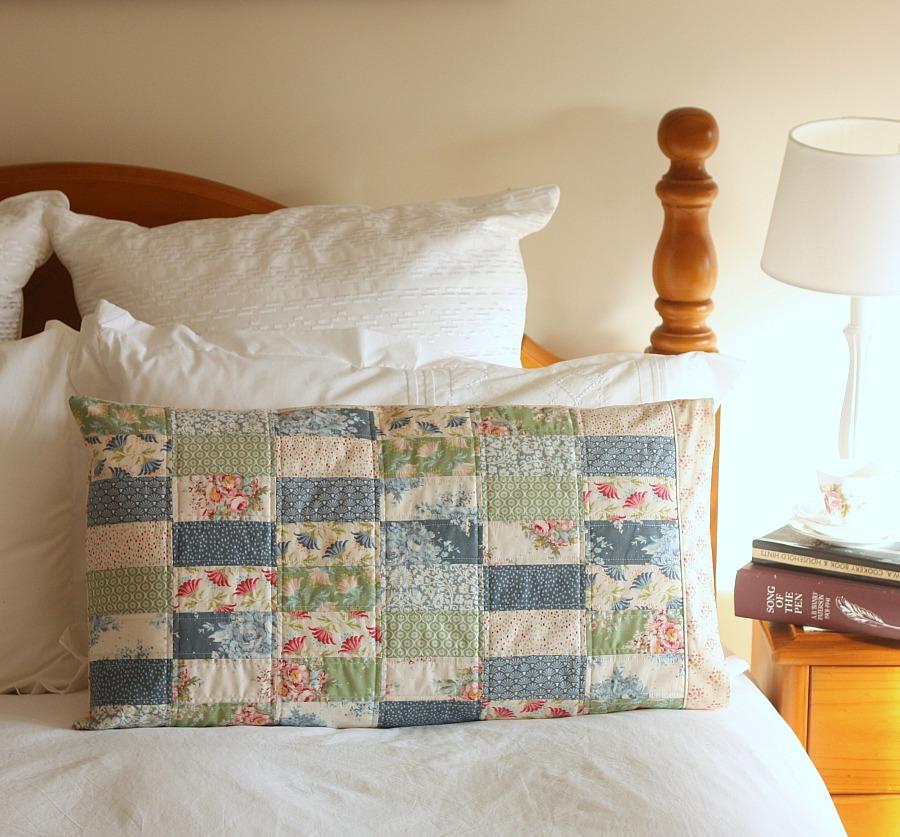
Hello, and welcome to the weekend! It was initially published in June 2018 and revised in June 2021). Today, I’m excited to show you how to make a simple quilted pillow sham. When I have scraps of fabric from quilts, I like to make quilted pillow cases out of them. A selection of cushions of various sizes can also be used to enhance the look of these shams.
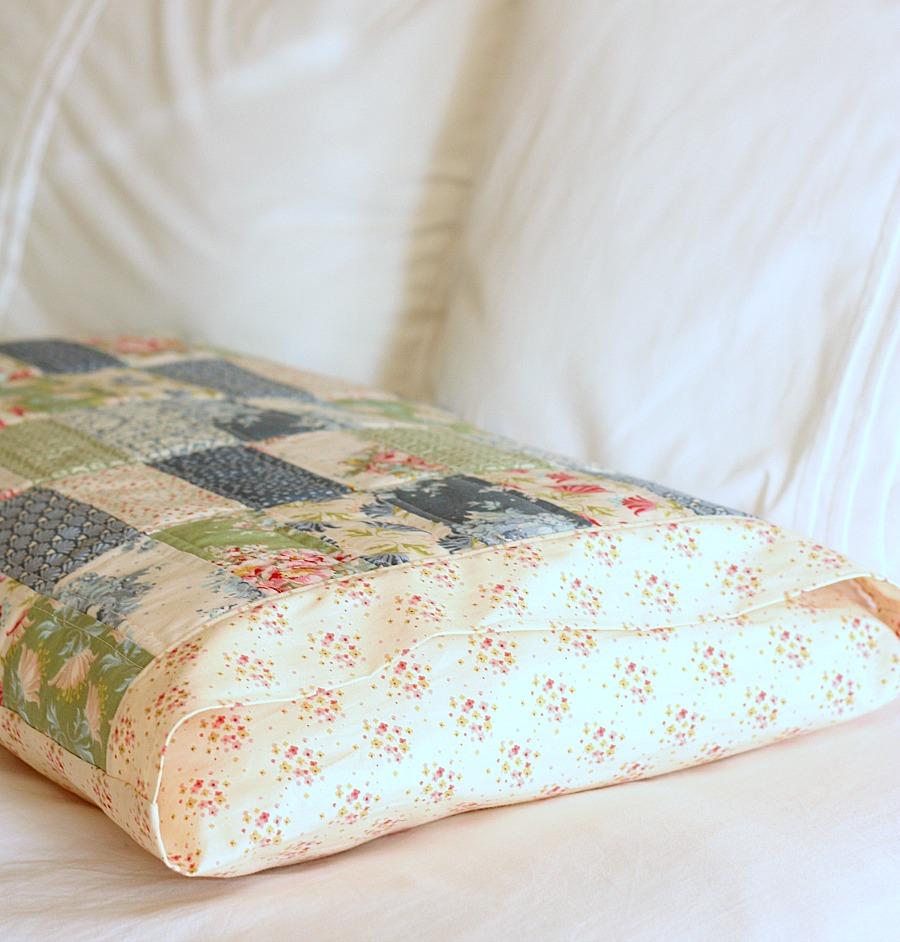
Last week, I showed you how to make these pillows using simple patchwork. After I dropped them off at my friend Gail’s house, she was able to finish the quilting the same day, and I went to work on the pillow flap backs and binding! (I’m also working on the Christmas ones, which I’ll post about shortly!)
There are certain areas where it reads almost as solidly as a solid navy pattern, but it still lends an attractive finishing touch. It’s quick and easy to affix binding to a cushion, and the finished product looks extremely polished.
My Nested Churn Dash quilt, which uses some of the same fabrics as the shams, goes perfectly with the shams in our master bedroom. As a result, I moved my quilt and shams into our guest room where the lighting is better. One of my summer tasks is painting this headboard with chalk paint! Love how the patchwork squares don’t take attention away from the quilt, which is supposed to be the centerpiece of the ensemble!
Because you may only need one sham to fit a twin or even a full-sized bed, the materials list supplied here is only for one. My patchwork part has also been improved by the addition of little borders. If you prefer a more tightly packed sham, omitting the borders is an option. I wanted a more relaxed, unstructured appearance, so I included the little borders.
Materials for One Simple Quilted Pillow Sham:
- At least forty-eight squares in a range of tones 3 1/2′′ × 3 1/2′′ (I aimed for a 50/50 blend of light and medium/dark colors)
- 2 rectangles 2′′ x 18 1/2′′ and 2 rectangles 2′′ x 27 1/2′′ for pillow borders (optional)
- For the binding, cut a quarter of a yard into three 2 1/4′′ x the width of the cloth strips and piece them together.
- Batting Dimensions: 27″ x 33″
- 27″ x 33″ muslin cloth
- a third yard of fabric (cut into two rectangles 19″ x 21 1/2″) for the flap back closure
- Pillows of the standard size
Piecing Instructions for the Simple Quilted Pillow Sham:
- The 48 squares should be arranged in six rows of eight squares each. To ensure an even distribution of your prints and colors, you can reposition the squares as necessary. In fact, I sewed all of my squares together in pairs, alternating medium/dark patterns with light ones. Before settling on a final layout, I sewed the pairs together into fours and laid them out.
- The easy quilted pillow sham center is made by sewing rows of squares together and then sewing the rows together.
- If desired, add a 2′′ x 18 1/2′′ border band on either side of the sham. It is best to press out towards the boundary.
- If desired, sew a 2′′ x 271′′ border around the sham’s top and bottom edges. It is best to press out towards the boundary.
Finishing Instructions for the Simple Quilted Pillow Sham:
- Once the muslin, the batting, and the pillow sham top have been laid out, quilt the pillow sham to your liking. My shams were embellished by my friend Gail with an all-over medium floral motif.
- The next step is to cut the quilted pillow sham to match the sham front’s edges.
- Fold one end of a 21 1/2-inch side of the flap back pieces in half and press. Topstitch to secure the folds. Repeat this process for both back flaps.
- Pillow sham front right side down. Afterwards, align one of the flap back parts’ unfinished 21 1/2-inch edges with the sham front’s outer edge. Right-side-up placement of the flap rear part is required. With borders, your flap back section will be a little more expansive. For best results, make sure the side edges are lined up.
- Place the second flap back part on top of the first, with the correct side facing up. Reverse side of pillow with the unfinished 21 1/2′′ edge. When you’re done, the flap back parts will overlap, allowing you to insert a pillow.
- Secure the edges with pins or Clover Wonder Clips. The front of the pillow sham should be sewn 1/4′′ away from all edges. After stitching the pillow sham, trim the pillow flaps to the same length as the pillow sham front.
- Finally, use your prepared binding to bind your book. Here’s a link to my tutorial on binding… and here’s how to make a scrappy binding!
After that, all you have to do is add a cushion and relax in your new quilted pillowcase! To make it simple for you to return to this guide, I’ve included a Pinterest graphic.
Post your questions in the comments box below, and I’ll respond as soon as I can. Thank you for visiting, and have a wonderful time quilting!
How to Make a Lined and Quilted Pillow Sham
Home decorators have the unique chance to personalize their bedscapes with quilted pillow shams, which are made of complementary or contrasting fabric. These rich quilted shams serve as the backdrop to the focal point of the bed, and they support the decorative pillows that are arranged on top of them. Use tassels, trim, or a blend of traditional and wacky fabrics to make a unique statement.
Measure your pillow’s width and length, then multiply each dimension by twice the required flange width, plus 3 inches for seam allowances. Add 9 inches to the width and length of the top of the sham to get a 3-inch flange, for example.
To make the sham back, cut two pieces equal in size to the pillow measures plus twice the flange width and one inch for seam allowances. ‘ It is not common for sham backs to be quilted.
Measure and cut two pieces of lining for each of the shams, one for the front and one for the back.
Remove the center panel from the sham and replace it with an equal-sized piece of 4-ounce quilt batting.
Front parts should be layered. Make sure that the wrong side of the liner is exposed. The right side of the sham fabric should be visible when the quilt batting is laid on top of the lining. Use pins every 5 inches in each direction to hold the layers together. Having extra length and width allows for take-up during the quilting process.
Xem thêm : How To Hump A Pillow? Complete Step-by-Step Guide
Using your choice quilting technique, finish the front piece. A geometric pattern can be created by sewing parallel lines using a self-erasing fabric marker and machine-outlining or hand-stitching around the cloth design. Sew all the layers together.
Using a rotary cutter, cut a new rectangle from the quilted material equal to the pillow’s width and length plus twice the flange’s width + 1 inch. The sham front piece should be recut to the pillow’s width and length + 7 inches, following the example.
To begin, lay out the back and lining pieces on a table with their incorrect sides facing each other. Make a 1/2-inch turn over the short edge of one of the layers and treat the two layers as one. Sew through all of the layers after pressing the creases.
Using the wrong sides together, fold the two hemmed edges 4 inches inward and press the folds together.
Pin the rough edges of the folds to keep them in place.
Display the right side of one back on the table. Make sure to overlap the folded sides of the second back piece on the table before placing it on the floor. It’s important to make sure the length of both pieces is equal to the pillow’s length plus the flange’s width and the seam allowance.
Make sure the overlapped sections of the two pieces are pinned in place before you begin sewing.
Pin the raw edges of the front quilted piece to the back piece, right sides together.
Using a 1/2-inch seam allowance, sew across the outside borders.
The quilted seam allowance should be no more than 1/8 inch in thickness.
Press on the sham with the right side facing up.
Use an eraser-safe fabric marker to mark the flange width all the way around the sham.
Create a flange by sewing through all the layers one at a time.
Conclusion
Quilting is the greatest craft for those who enjoy blending patterns and colors. In addition, you can learn how to make quilted pillow cases by following these instructions. As you’ve read, the process is pretty simple and only requires three steps to complete.
Measure and cut your materials ahead of time to ensure a stress-free session. After that, just put them together and sew them together. This tutorial shows you how to make a flap back clasp so that the sham is much easier to remove for cleaning or replacing the pillow form.
Nguồn: https://iatsabbioneta.org
Danh mục: Pillow


