I think we can all agree that window treatments are hard. Between choosing your blinds or shades, picking out the right curtains for your space, and actually installing and hanging everything, getting window treatments just right can be a challenge.
- How Are Shower Curtains Measured? Tips for Choosing the Best Shower Curtain
- How To Make Thermal Lined Curtains? A Step-by Step Learning Guide
- How To Hang Curtains On Concrete Walls? Step-By-Step Guide
- How To Hang Beaded Curtains? Easy Step-by-step Guide
- How To Hang Curtains To Divide A Room? Complete Guide
All of us know how difficult window treatments can be. Choosing the proper blinds or shades, finding the right curtains for your room, and then actually hanging and installing them all can be a challenge.
Bạn đang xem: How To Use Clip Rings For Curtains? A Perfect Guide For You!
An affiliate link disclaimer is included below. You will not be charged any additional fees if you click on the link and purchase an item. In order to get money as an Amazon Associate, I have to make purchases that meet certain criteria. All of the goods and brands I recommend on stay home style are ones that I have personally tried and thoroughly tested.
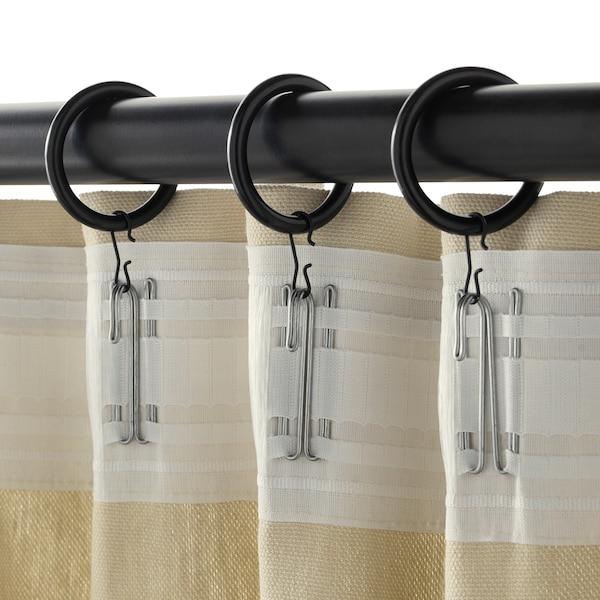
The employment of rings in the hanging of designer curtains is a common occurrence, if you’ve ever paid attention. Their rings, on the other hand, don’t fit into a regular ring clip since they don’t clip on. A drapery hook can be threaded through an eyelet on the rings, allowing the drapes to hang from them. This way, you just see the ring itself, not how the ring is fastened.
In contrast, drapery pins were something I only recently discovered. In order to give you a little background on how I came across these, I recently purchased a $129 Pottery Barn curtain panel for $15. When I went home and unzipped the curtain, I saw small clear plastic loops around the back of the panel. I’ll tell you more about that later. Let me just say that I had no idea what these curtains were for when I bought them. When my second panel from eBay arrived, I discovered a set of drapery hooks hidden within the box. Surely, I thought, these are the things that go in the small plastic loops, but how am I supposed to put them to use? My natural instinct was to check Google, who informed me that they come in pin form, so you can connect them to any curtain panel, not only the fancy looped ones!
This set of curtain pins worked flawlessly on both my upscale curtain panels and a basic set of rod pocket panels. Adding a few of them to your home would undoubtedly give it a more refined look and feel. Don’t get me wrong, the quality of the curtains themselves has a lot to do with attaining a designer curtain look, but so can the way you hang them.
With the use of common ring clips and drapery pins, you can achieve that designer look on a budget with this easy-to-follow tutorial.
HOW TO GET THE LOOK
1. CHOOSE YOUR CURTAINS
Here, I’ll show you how to hang two sets of curtain panels using the same technique, so you’ll see images of both sets of curtain rings. We recently purchased new curtains for our office and guest room, and I documented the installation process by snapping images of the rings and pins as they were being inserted into the office curtains, as well as some more finished shots in the guest room (because, as I write this, our office is still in the process of getting a glow up ).
We utilized Pottery Barn curtains in both the office and guest room, although the Broadway Curtains cost less than the Seaton Curtains (if purchased at retail price). I bought a 96′′ Seaton Curtain Panel with a blackout lining for for $14.99 at our local Pottery Barn during their closing sale. That blew my mind considering Pottery Barn sells this one panel for $129 on their website. Of course, with such a wide window, one panel isn’t going to cut it, so I turned to my go-to source for such items: eBay! For about $85 on eBay, I acquired another 96-inch Seaton Panel with a blackout liner. One panel costs an eye-watering $85… I get it. Even though two of these panels cost less than one, I’m calling it a success. I’d highly recommend these if you want to make a long-term investment in high-quality curtains. Broadway curtains are also a great alternative if you’re on a budget. The 96-inch set costs $89 and comes as a pair of two, which is unusual for a store like Pottery Barn. Thick and luxurious, they have a canvas-meets-linen feel.
Okay, let’s get back to business.
Here are a few things to think about if you don’t currently have curtains.
- To hang a curtain, you’ll need one with a rod top. In order to cover the drapery pins, you need two layers of cloth, which is why you need two drapery pins. Avoid drapes with grommets and those without pockets or tabs (like drop cloth curtains).
- Choose a length and width that will allow you to hang your curtains high and wide, while still having the curtains just touch the floor (and maybe even pool a little bit). The higher and wider you hang your curtains, the larger and grander your room will feel. If you don’t have crown molding around the top of your walls, I would recommend hanging your rod as close to the ceiling as possible and choosing curtains the length of your ceiling height. If you have thick crown molding like we do, I would recommend choosing curtains 1′ shorter than your ceiling height and hanging your curtain rod as high as you can while still allowing the bottom of your curtains to “kiss” the floor. For example, we have 9′ ceilings with 6″ crown molding, so we hung our curtain rod right around the 8′ mark and used 96″ curtains. If I had 9′ ceilings with no crown molding, I would have hung my rod as close to the ceiling as possible and gotten 108″ curtains. As far as width goes, I think most designers recommend extending the rod 6″-12″ beyond the window on each side to make the window feel larger and to let in as much natural light as possible. Let me add, standard curtain lengths are usually 84″, 96″, and 108″, so based on the assumption that you are choosing between these standard heights, this is how I would choose my curtain length. If you go the custom curtain route, you can hang the curtains as high as you want and have your curtains made to the exact length you need, so I would err on the side of taller is better in that case.
- The length and width of your curtains should be such that they may be hung both high and broad, yet still be able to reach the floor when they are drawn (and maybe even pool a little bit). Curtains that are hung higher and wider will provide the impression of a larger, more luxurious space. Hanging your curtain rod at the ceiling’s closest point is the best option if you don’t have crown molding at the top of your wall. If you have thick crown molding like we do, I would propose buying drapes 1 foot shorter than your ceiling height and hanging your curtain rod as high as possible but still allowing the bottom of your curtains to “kiss” the floor. In our 9-foot ceilings, we positioned our curtain rod at the 8-foot mark and used 96-inch curtains. Without crown molding, if my ceilings were 9 feet high and there was no crown molding, I would have used 108-inch drapes. Typically, designers advocate extending the rod 6′′-12′′ beyond the window on either side to make the window appear larger and to let as much natural light into the room as possible, although this is a personal preference. According to the normal 84-inch-to-96-inch-long curtain lengths (84-inch-to-108-inch-long curtains are also available), here is how I would determine my curtain length. In this scenario, I recommend going with curtains that are built to order since you will be able to set the height of the curtains whichever high you need, and the curtains will be custom-made to your exact measurements.
2. PICK YOUR SPACING AND LAYOUT WHERE YOUR PINS WILL GO WITH A PENCIL
If everything is ready, you’re ready to start working. Make a plan first before you start pinning and poking holes in the fabric. Starting at one edge and concluding at the other, a decent rule of thumb is to space the pins 4′′-6′′ apart. Depending on the width of the curtain, a rod pocket or tab option may be available, and the number of tabs can range from six to eight. As a result, ring clips are frequently offered in sets of seven, although this was insufficient for the panel’s spacing. Having ordered a few additional clips to be safe, I found myself having a few extra clips left over. Because the clips are so inexpensive, this wasn’t a huge concern.
Despite the fact that the Seaton and Broadway curtains were both 50 inches wide, I made sure to space them differently.
Seaton’s thick, elegant curtains already included loops for drapery pin attachments. Due of the lack of additional space, I simply used what was already there (which resulted in using 9 rings).
Because there were no loops in the Broadway curtains, I chose to go with a 5′′ spacing (which resulted in using 11 rings, because you want to attach one to each end).
Make vertical lines every 5′′ (or whatever spacing you picked) from one end of the panel to the other to make inserting pins quick and easy while keeping things uniform across the panel. In addition to these lines, you need create horizontal marks 1.25′′ up from the bottom of the rod pocket over each vertical one. The drapery pin should be inserted at this point. It is important to note that this measurement is based on a rod pocket of 3.25′′. You may need to move the pin if your pocket is too large or too little. When inserting the pin, you want to make sure that it doesn’t protrude too far out of the top, but doesn’t lose too much length.
3. INSERT DRAPERY PINS
You’re ready to begin inserting the drapery pins once you’ve marked the panel. You only need to thread the pin through the back side of the rod pocket, which is rather simple to do. In order to weave the pin into this pocket, first separate it by drawing the rear away from the front, then separate it again. Inside the pocket, the pin should not be visible at all to the outside world.
Make sure you’re aware of the potential dangers here, as well. I was clearly in a hurry, and as a result, I stabbed myself multiple times.
4. USE PLIERS TO CLOSE THE EYELETS TOGETHER ON THE RING CLIPS
To close the eyelet, you may require pliers depending on the sort of ring clips you’re using. In order to keep the drapery pins from falling out of the eyelet when hanging, it is necessary to allow a small gap between them and the rings.
5. THREAD THE PINS THROUGH THE RINGS
Xem thêm : How To Make Back Tab Curtains? Comprehensive Guide
To attach a ring to a curtain, all you need to do is thread the pin through an eyelet! The most difficult part of this project is not letting the rings fall off the curtain when you’re finished. To carry the curtain to the rod, I suggest looping the rings around your finger and holding it like this.
6. HANG THE CURTAIN ON THE ROD
From here, all you have to do is put the curtains on the rod and take in the view. I normally slide one or two rings to the side of the curtain rod bracket so that the curtains can be pushed all the way to the end of the rod. Even if you have to steam or modify the curtains in order for them to fit your needs, it’s all finished once you’ve had them in place.
SHOP
Just for fun, I thought I’d share some of the best deals I’ve found in my years of searching for bargains with my readers:
- I bought it for $60 at an antique store when I was in high school and have had it ever since, through college, graduate school, and now into our first home together as a married couple. I intend to keep it for a long time.
- A gold table lamp with a hot pink shade was found on bargain at Target a long time ago. The appropriate lamp for my first college apartment was made by my mum by sewing the fabric from another shade onto the bright pink shade. After six years, we’re still going strong!
- If you’re in the market for some X-Leg Stools, you’ve come to the right place! They were only $25 each on Facebook Marketplace, so I couldn’t resist! At the foot of a guest bed, they are perfect.
- On Facebook Marketplace, someone sold me this Queen-sized metal bed for for $20. That’s a save of more than $200!
- Rugs by Loloi – TJMaxx.com has an 8′ x 10.5′ Loloi rug for for $129!
- By now, you’ve probably figured out what happened with the Pottery Barn Curtains. Nevertheless, the $15 Seaton curtain panel remains an obstacle.
- This is a must-have for all of you. On Facebook Marketplace, my mom found this for about $10! What a deal! This lamp cost me a total of $25 after I purchased the shade for $15 from Dirt Cheap. It’s a wonderful combination of weight and comfort.
- Dirt Cheap had this linen mix duvet for half off, originally purchased at Target. Fieldcrest, I believe, is the name of the company that used to sell it. I’m a linen girl through and through.
- This fringed throw retails for around $25, but I bought a used one on Amazon for around $15! It was brand new and in excellent shape when it arrived. To this plain white bedding, it adds just the right amount of texture with its plush size and warm feel.
That’s all there is to drapery pin and ring clip curtain hanging instructions. Make your curtains look more professional for less money by using this simple and inexpensive method!
However, I’m intrigued… How many of you were aware of drapery pins before this article? I’m curious whether anyone has used or heard of any of them before, or if I’ve just been living under a rock when it comes to window treatments, as I had no idea they existed.
Pin Placement and Its Importance
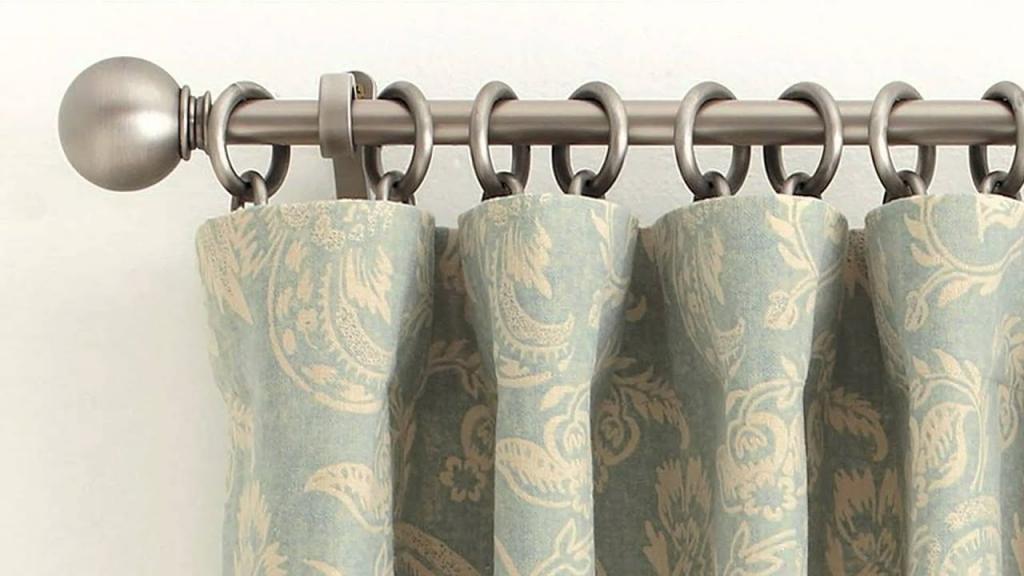
A little metal loop is usually found at the bottom of a typical drapery ring. A clip can be found on a few of them as well.
Pay attention to the metal loop – this is where most people commit a huge design error. It’s imperative that this metal loop be kept out of sight. Consequently, the metal pin is often inserted at a distance equal to or less than 3/8 inch below the top of the draperies in many offices.
That way, the heading appears as it does here. A wooden drapery ring is all you can see, not the other metal elements that are beneath it.
Drapery rings should be hung correctly. Drapery in a light blue Euro pleat.
Drapery rings and metal pins are commonly arranged in a grid pattern under each pleat of the drapery when it’s turned over.
The front of our pinch pleat drapes…
View from the rear of the same pinch pleat drapery
What About Clip-On Rings?
Keep in mind that the clips on clip-on rings will be exposed and easily seen. This method leaves a bigger space between the rod and the drapes than the previous one.
Clip-on rings for draperies.
Converting Rod Pocket Draperies Into Flat Panel Draperies Using Rings
Flat panel drapes can be made from rod pocket drapes. However, three things should be kept in mind.
In time, the drapes will lose part of their fullness. When gathered, a 50-inch wide flat drapery can cover anywhere from 24 to 28 inches of breadth. Only roughly 15 to 24 inches of the drapery’s breadth will be covered by its rings. This dress can still be worn at the original length of 24 to 28 inches if desired, however the top of the dress is noticeably more flat than it was before. Since the fabric will drape differently, that’s the reason.
Between the rings, you’ll need to make deep, wave-like folds in order to generate depth rather than width.
There may be a need to strengthen the fabric. Using sharp metal pins in the back of curtains may cause the fabric to shred over time if you continuously pulling on them. You may want to think about this before proceeding. The curtains should be considered if you have children or pets or if they are located in a high-traffic area of your home.
This isn’t a big deal if you’re using heavier materials like linens or duck cottons, but if you’re using a thinner fabric like silk or imitation silk, you’ll need to strengthen it. In spite of the fact that I’m a professional drapery maker and I’m giving you this advice, you can always sew some header tape under the top header and make sure it isn’t visible when looking at the drapery from any angle, whether you’re inside or outside.
The length of the drapes will increase. It’s rare to hear anyone complain about this, however bear in mind that if you add drapery rings, the drapery will automatically get longer. Two inches of drapery length can be achieved by using rings that are about 2-1/2 inches wide and placing the pins about half an inch below the drapery’s surface.
As a result, a tiny 2-inch puddle on a floor-length curtain is suddenly possible. As a matter of fact, I’ve got photos to demonstrate how a rod pocket drape may be transformed into a flat panel drape to create a 2-inch puddle.
What Size Drapery Rings Do You Need?
When it comes to drapery rings, there’s no hard and fast rule about how big they should be, but it’s always a good idea to think about scale and proportion. You can use 2-1/2-inch rings and a 1-3/8-inch drapery pole to hang a drapery that is 9 feet off the ground. Our light blue Euro pleat drapes at the start of this post and the cream and black ones above were made with this technique.
240-inch-long drapes may necessitate an upgrade in hardware if they’re installed in a two-story living room with high ceilings. As a result, it will be more difficult to detect the hardware, and its size may appear out of scale in comparison to the extra-long drapes.
More fabric also means more weight that needs to be supported, so the hardware will need to be substantial, too.
And Don’t Forget – the Last Ring Must Be Secured
More fabric also means more weight that needs to be supported, so the hardware will need to be substantial, too.
The heavier the fabric, the heavier the hardware will have to be to support it.
QUICK TIP TUESDAY:: HIDING THE CLIPS ON CURTAIN RINGS
What’s up, folks!
Regardless of whether you’ve seen this method before, it’s completely changed my life.
Curtain ring clips are a favorite of mine because of how simple it is to use them to hang curtains, and the fact that the clips are visible never bothered me the way it does for some.
I stenciled our dining room drop cloth drapes with these.
In our master bedroom, they’re strung from my DIY curtain rods.
…and I’ve used them over and over again in all of my residences. For curtains that are frequently drawn closed, rings work well because they glide on the rod easily. Clips work well for adjusting the length of a curtain since you can fold over the top and get the right length.
There are no clip rings hanging these curtains in my 15-year-old daughter’s room because the panels have rear tabs that the curtain rod glides into. My daughter was unable to get a good night’s sleep since the unlined panels didn’t block out the sun, preventing her from snoozing her way through the summer.
Along with having a mother who likes to open all the curtains in the house at once
This time, I used clip rings to hang Ikea Merete curtains that were lined with Target curtains. Even though the Merete curtains are meant to be light-blocking, my sleep lover found that they were not.
Using “lined” curtains on rings for drapes that are frequently opened and closed has shown to be an excellent solution.
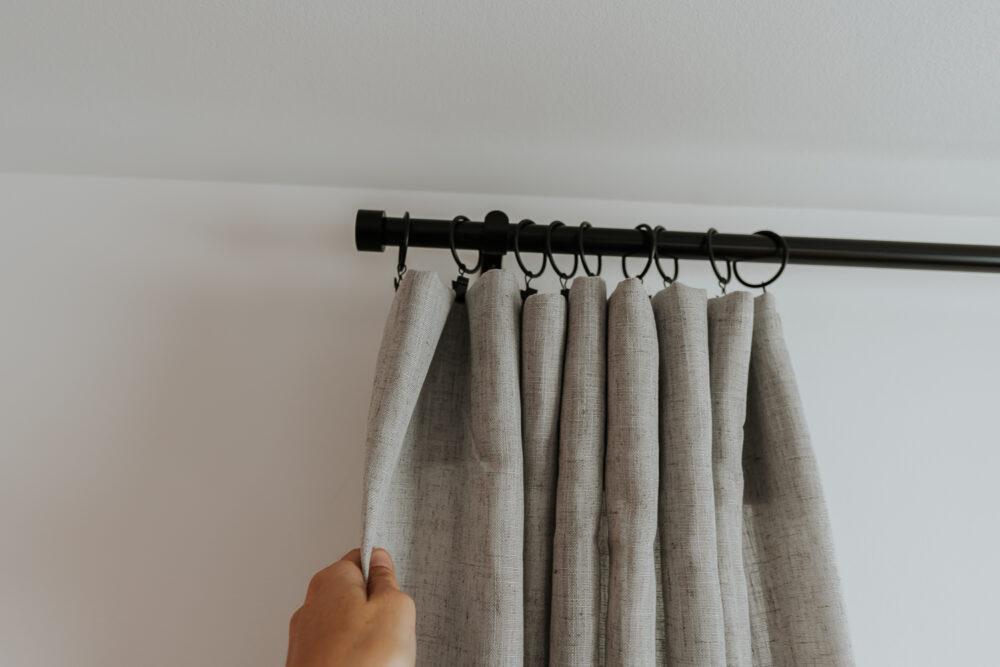
HERE’S THE QUICK TIP ON HOW TO HIDE CURTAIN RING CLIPS:
Just pinch the back of the curtains and clip the rings about an inch or so down from the top of the curtain rods..
Before hanging the curtain, you can slide the rings onto the rod and then hang the curtain.
You can either attach curtain rings to a rod and then clip the curtains in place; this option is more time-consuming, though.
I love how the curtains look this way, with just a touch of a ring at the top.
Have a great day today!
Nguồn: https://iatsabbioneta.org
Danh mục: Curtains


