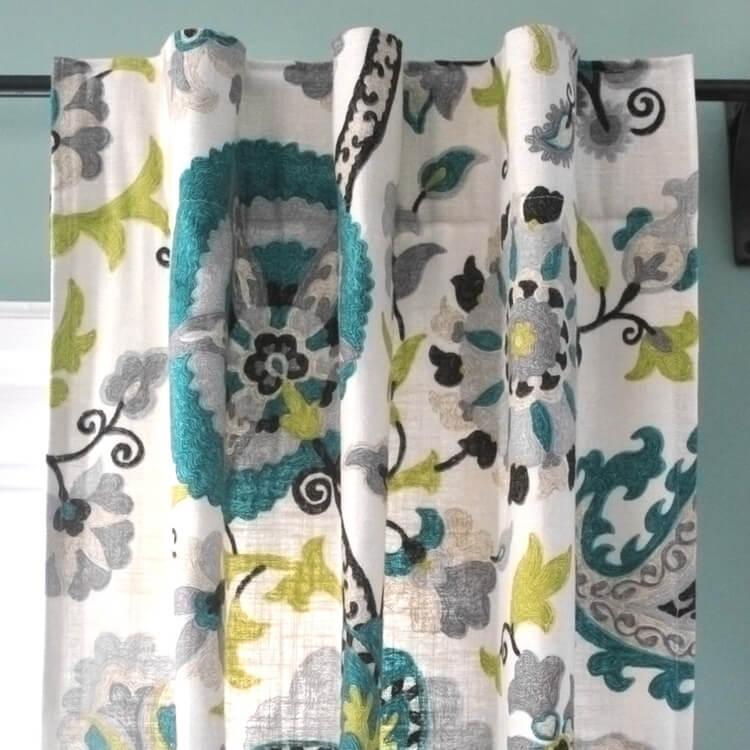
Back tab curtains are easy to create. Continue reading!
- How To Layer Curtains In One Rod? Complete Guide
- How To Decorate Curtains With Ribbons? Complete Step-by-Step Guide
- How To Keep Outdoor Curtains From Blowing In The Wind? Comprehensive Guide
- How Much Does It Cost To Dry Clean Curtains? Everything To Know!
- How To Make Pleated Curtains? Complete Step-by-Step Guide
You may save money by making your own curtain panels.
Bạn đang xem: How To Make Back Tab Curtains? Comprehensive Guide
Draperies, as you may be aware, may be very pricey at times.
For the most part, the time and money required to make your back tab curtains will be negligible.
In addition, you’ll be able to design your window treatment in whatever way you choose.
In addition, you may check that it will fit the room’s dimensions and design. Do-it-yourself projects are plenty.
You don’t have to spend a lot of money or time to remodel your room with these sewing ideas.
Just pick a fabric and measure the height and breadth of your window to get started.
Back tab curtains can be made from any fabric. Just make certain that it goes well with the room’s general design.
We’ll show you how to make your back tab curtain in a few simple steps at the end of this page.
What Are The Things Needed?
Prior to anything else, you must be aware of what you need to do to prepare.
The key to completing the project quickly is to ensure that the necessary tools and materials are close at hand.
The following is a list of supplies and tools you’ll need to complete the project:
- scissors for fabric
- Measurement with a tape
- This is a fabric paint.
- Pins that are straight like a straight pin
- Ruler
- machine for sewing
- Iron
- Thread
- Fabric
6 Steps To Make Back Tab Curtains
Once you’ve gathered all of the necessary supplies and equipment, you’re ready to travel.
Back tab curtains are easy to create.
Once you’ve decided on the style of curtain you want, these are the procedures to follow:
Step #1. Measuring the window space
When shopping for fabric, you must first determine the dimensions of your window.
Decide on the length of your back tab curtains before you buy them.
If you currently have a curtain rod installed over your window, you can use that measurement to add seven more inches to the overall length.
This number is helpful when determining how much fabric to buy in order to complete your project.
If you’re unsure of how much fabric you’ll need, see this guide for figuring out yardage measurements.
Just keep in mind to check the width of your window and buy enough fabric to fill the space when the curtain is closed.
Step #2. Cutting the curtain pieces
Trim the edges of the cloth panels that you purchased.
You’ll need to cut eight pieces for each panel of curtain tabs when you’re making them.
Each piece should be a square of five inches.
Xem thêm : How To Layer Curtains In One Rod? Complete Guide
You’ll also need to cut 5-inch-long pieces matching your panel’s width while making the facing piece that hides the tabs.
You’ll need sixteen 55 tab pieces and two 5-inch facing pieces that are the same width as your panels to get started.
Two curtain panels will be adequate.
Step #3. Preparing the tabs and the facing pieces
You can begin by folding the centre of each tab piece with the rough sides together and stitching a one-inch seam.
After then, it’s time to flip it over.
It’s now time to apply some pressure to the middle of it.
Fold the short edge of the facing pieces by two inches, iron it, and then unfold.
After pressing the line, fold it in half and sew it again.
After that, you have to create a half an inch crease by pressing one of the longer edges.
Step #4. Pressing and pinning the tabs and panels
The next step is to press one of the longer edges to form a half-inch fold.
Then, lower it by an inch.
Starting about one inch from the fold, begin stitching.
Stitch the longer sides of each panel first, and then evenly space the tabs along the shorter ones.
Then, on the fabric’s front side, attach the tabs with pins.
Keep the panel and right sides aligned and make sure the raw edges are facing up.
After that, you may begin pinning the facing pieces to the tabs.
Pin and sew about a half-inch seam across each tab in order to finish the project.
Step #5. Pressing and stitching across the panels
Start pressing the face piece and the tabs into place on the back of each panel.
You can now begin stitching over the entire width of the panel.
You can tuck the tabs’ ends under with a seam as wide as a half-inch.
Step #6. Finishing
Every panel’s bottom half is now yours to complete.
This will help you with hemming and sewing.
You can finally admire your hard work after completing the hemming of your back tab curtains.
Do you want to learn more? Click here.
I think that’s about all.
How to Sew Lined Back Tab Curtains
MATERIALS
- Drapely material
- Fabric used to line curtains
- Edge of the cliff
- Ironing board and iron
- A rotary tool
- Scissors
- Cutting the mat
- This is a fabric paint.
- Sewing needle size (optional)
- Pins
- A measuring tape or ruler.
- Thread
RELATED PRODUCTS
INSTRUCTIONS
Step 1: Measure & cut the fabric
Xem thêm : How To Hang A Valance And Curtains? Complete Step-by-Step Guide
In order to establish how long your primary fabric should be, multiply your finished length by 10. On get the finished panel width you want, add 3 inches to each side.
I’ll be constructing three sets of curtains, each with two panels, for this project. When completed, each panel will measure 25″ x 95″. The main fabric is 10 yards long, and the lining is 9 yards long.
Determine the length and height of your curtains based on the size of your room.
In order to establish how long your primary fabric should be, multiply your finished length by 10. I’m going to cut 105″ for this 95″ panel. In order to have a little more wiggle space when hemming the bottom of the curtain, you may wish to add an extra inch.
On get the finished panel width you want, add 3 inches to each side. I’m going to split the cloth in half to create two 28-inch pieces for my 25-inch panels. In addition to the standard 54-inch width, I’m utilizing the selvage edge to add a few extra inches to the fabric.
Afterwards, I cut my lining to 95″ x 25″ to match the final proportions of the panels.
Step 2: Make the tabs
The tabs should measure 4.5″ x 6″ and should be cut in half. Tabs will measure 2″ broad when they are finished. I’ll need 4 tabs per panel to accommodate the recommended tab spacing of around 6 inches.
Fold one of the pieces in half so that the right sides face each other. Using a 1/4″ seam allowance, sew along the raw edge. At the beginning and conclusion of the piece, use back stitches.
As an alternative, you may use a 6″ long piece of wide ribbon cut in half to make the tabs.
Right-side-up, remove the tube. Place the seam in the middle and iron it flat. Once you’ve completed all the tabs, put them in a separate location.
Step 3: Pin fabric and lining
Put 5 inches on each end and 1.5 inches on each side on either side of the center of the lining, which should be facing down on the main fabric. Pin all the way around.
Step 4: Sew the sides & bottom
Fold each side 3/8″ over and iron. Afterwards, fold it over 3/8″ and iron it.
From the inside fold, sew down the length by 1/8″ to 1 1/4″. Repeat on the opposite side.
Fold the cloth twice over 4″ if you want a double-folded hem, which will add some weight to the bottom. When trimming the length of the fabric, take this into consideration.
The bottom hem is done by folding the fabric in 1″ and ironing it flat. Once this is done, fold it in half again, and iron it.
To ensure that the bottom hem falls precisely where you desire, hang the panel first and then add the bottom hem. As a result, you’ll have a better idea of how much you can afford to shorten your shirt.
From the bottom of the fold, sew over to the next corner, making a pivot at the top. Make a second pivot and sew down the side of the fabric to the bottom corner.
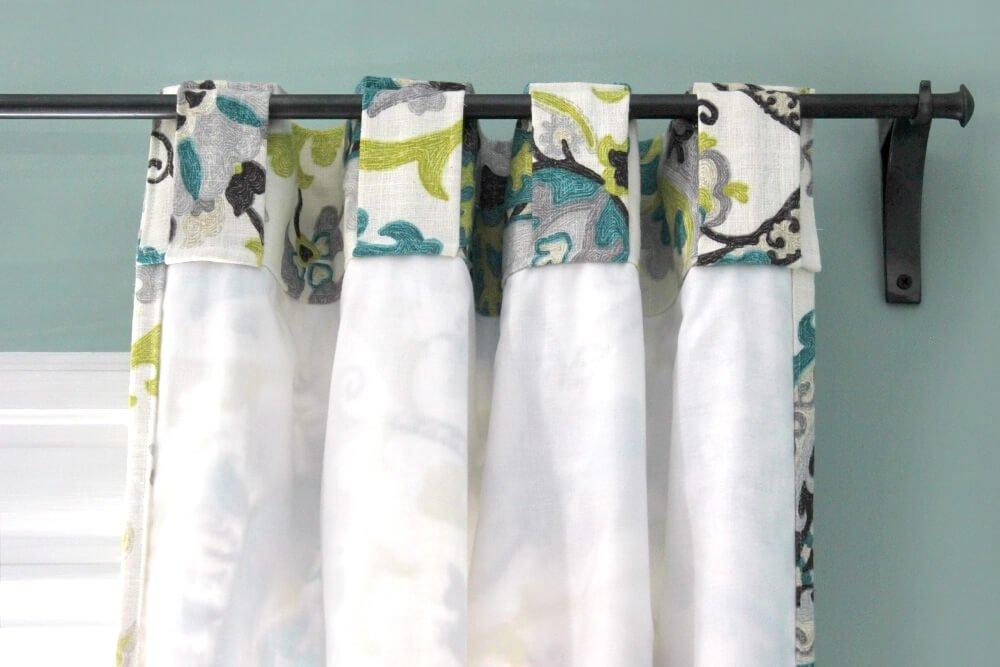
Step 5: Sew top & tabs
Stop before sewing the top, then follow the same instructions as the bottom. One inch of a tab should be folded over and ironed.
To finish, fold the folded end under the bottom fold and tuck it under the fold on top. You can repeat this process for the rest of the items, spacing them out evenly. Secure with a pin.
Then, fold the tab’s top end beneath the curtain’s hem to match the curtain’s height. A hammer and a pin. Continue with the remaining tabs.
Sew the tabs in place by sewing around the top of the garment from top to bottom. Finally, the curtain panel is done!
It’s A Wrap!
In just six easy steps, you can create your back tab curtains. Very simple, right?
In just six easy steps, you can create your back tab curtains. Very simple, right?
Your back tab curtains may be made in just six simple steps. Isn’t it obvious?
I hope this article “How to make back tab curtains?” was helpful to you.
Nguồn: https://iatsabbioneta.org
Danh mục: Curtains


