I’ve been using the same grommet-topped curtain panels in every room of our house since I was a kid. As a result, we can easily add similar panels in the future if necessary, and our home as a whole benefits from some uniformity. For whatever reason, when I recently tried to hang a curtain rod using Command Hooks, my typical grommet-topped panels wouldn’t hang correctly. Consequently, I had to experiment with new ways to hang my curtains for the first time in years, which is how I discovered curtain rings! This is a wonderfully easy way to hang curtains on rings that looks great as well as results in a perfectly straight and neatly finished hem…all without sewing! This is very simple, I’ll show you!
Curtain panels topped with grommets have been my go-to option for many years now. As soon as they’ve been correctly hemmed (see my failsafe hemming process), they’ll pleat pretty much on their own and be easy to make consistent.
Bạn đang xem: How To Put Rings On Curtains? Easy Step-by-step Guide
In our master bedroom, I recently built a curtain rod with Command Hooks and my grommet panels didn’t function since the rod was too close to the wall. As a result, I decided to use rings to hang the curtains.
The ease with which I was able to hang my curtains, as well as the quickness with which I was able to create a wider curtain display with perfectly-hemmed edges, has led me to believe that curtain rings had “opened my eyes” to their brilliance.
Why Consider Curtain Rings
Double-up my grommet-topped panels on each side of the window to give it a more substantial aspect (since a standard panel only produces four pleats). Instead of deciding how many pleats you want, you may use curtain hooks to choose how wide your curtains are! Curtain rings (left) and grommets (right) are seen side-by-side (right).
Isn’t there more to it? Even though I didn’t have to hem the curtains (in the traditional sense), the panels that resulted from my use of curtain rings were precisely the right length! See what I mean?
Supplies Needed
To hang curtains from rings, you’ll need the following supplies.
- A pre-installed curtain rod at the required height.
- At least floor-to-ceiling curtains
- Curtain rings – I like 1″ rings since they hold the panels closer up toward the rod. This massive bulk set is what I got.
- Linen needles or sewing needles, for example
- An ironing board and an iron
- Ruler
Hang Your Curtain Rod Where You Want It
Prior to hanging your curtains (and adjusting them, if necessary), you should hang the curtain rod where you want it (and then adjust them, if necessary). To help you figure out how high and broad to hang your curtain rod, we’ve put together a handy guide here!
Always buy longer curtains than you think you need, because it is much easier to make them shorter than it is to make them longer.
Determining How Many Curtain Hooks to Use
As previously stated, the number of pleats you obtain when you hang curtains using grommets or back-tabs is predetermined (and therefor, how wide your curtain panel sits). It’s a lot easier to regulate the style of your curtain if you can choose where the rings are placed.
Your panel’s width, how wide you want it to sit on the rod, and how tight you want the pleats to be all affect the number of rings you need. The following are some general guidelines:
- In general, the panel will sit wider on the rod if there are more curtain rings.
- Less rings mean less pleats, which means the panel will hang slimmer from the rod when it is made with fewer rings and pleats.
- Pleats are more likely to appear uniform if there are more rings/pleats than if there are fewer.
- When there are fewer rings and pleats, the cloth will hang looser and possibly sag in the areas between them.
- If you want a certain number of pleats, divide the total number of clips by 1.
Always insert a clip in each corner of the curtain panel and then evenly distribute the rest of the clips. It may be worthwhile to experiment with the number of rings on your particular panel before continuing.
On my white 56-inch wide panels, I used 10 clips (for 9 pleats) and 9 clips (for 8 pleats) for each panel.
Step 1: Hang Curtains Upside-Down
We’re going to assume that your curtains are too lengthy for this instruction. Steps 1–3 can be skipped if your curtains are the right length for your rod (when hung on the rings).
Xem thêm : How To Iron Curtains? Comprehensive Guide
First, you’ll need to hang the drapes sideways. (You’ll get the hang of it as you go along with the tutorial!) Aim to arrange your clips fairly equally and use the correct amount of clips for the number of pleats and depth of pleats you want, as stated above.
The grommets in the shot below should be ignored. The non-grommet side of my panel will be “hemmed,” thus it is technically hanging upside-down.
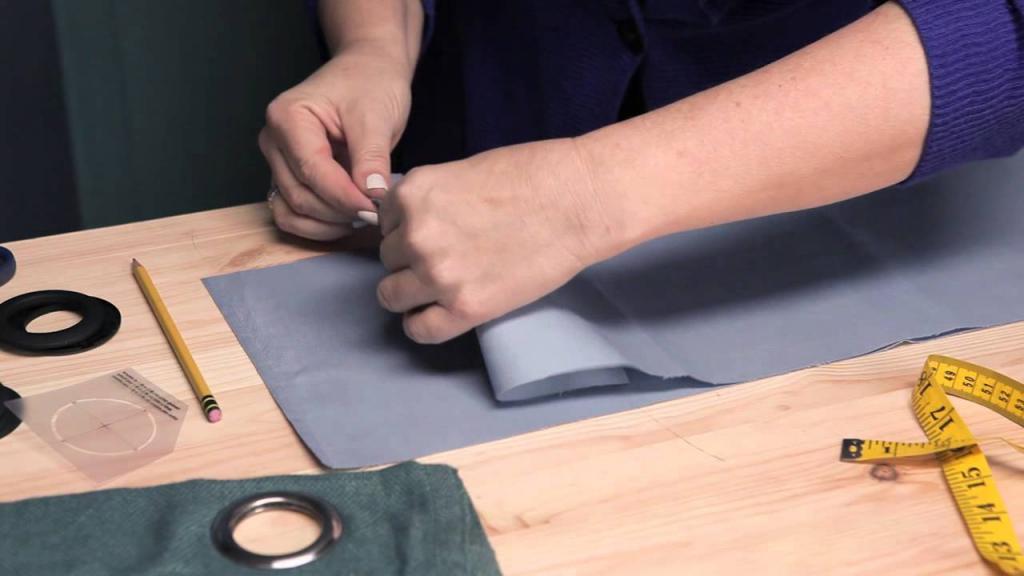
Step 2: Pin Hem
Straight pins or a fabric pen can be used to mark the exact spot where the curtain panel meets the floor/baseboard, as demonstrated in this sewn hem tutorial and this non-sewn hem tutorial. As you work your way across the breadth, be sure to gently pull the panel down straight so you can pinpoint the exact point where it hits the floor. It’s important to note that the hem line you just pinned should be at the top of the curtain panel, as we hung it upside-down.
Removing the curtain panel and rings from the rod is now the time to do so.
Step 3: Iron Hem In Place
(If your curtain is really wrinkled, you can iron it all immediately.)
Using an ironing board or other heat-safe surface, lay the panel right-side-up and pin its top hem to the top of the curtain rod. Right-sides together, fold along the pin line, as indicated in the image below.
TIP! Because the Cricut Easy Press’s heat plate is so much larger than an iron’s, I enjoy using it for curtain projects.
Are you still in awe?
Step 4: Space & Place Clips
Curtain rings should be hung on the folded/ironed curtain panel next. You should use a ruler this time to ensure that your rings are evenly placed across the top of the panel. Keep in mind that you want one ring on either side of the edge, all the way around the circumference. It’s important that the remaining rings are spread out evenly.
Step 5: Pleat & Train the Curtains
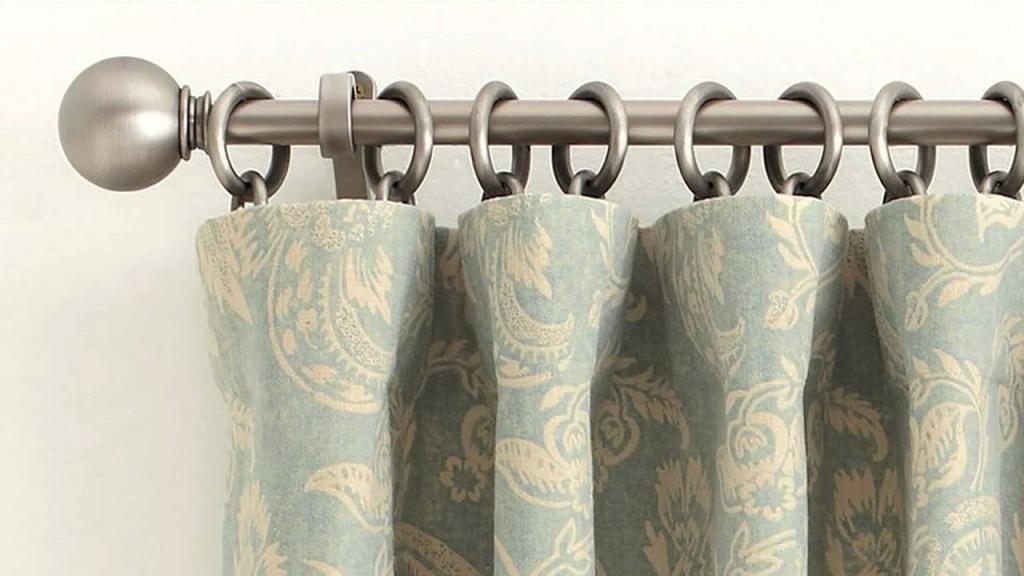
Put the curtains back on the rod and close them. Begin by putting the rings on the rod and then yanking the fabric through each ring as you go. The ring-free pleated fabric should face away from the wall, while the curtain rings should face the back or wall.
To construct lovely, firm pleats, use the extra weight and bulk provided by the doubled-over fabric at the panel’s top (remember, it was doubled from the hem! ).
Using your hands, create pleats all the way down the curtain’s length after the top ones are in place. Using a string (or a hair clip, in my case) to keep the pleats in place is all that is needed. Curtain “training” keeps their beautiful pleats for a long time after they’ve been hung.
Let go of the string/clips and adjust the curtain rings to your liking after a few hours of training!
As a result, your curtains have been hemmed, pleated, and then hung with chic rings. That was ridiculously simple, wasn’t it?
Xem thêm : How To Choose Curtains?
Then, after seeing the effects for myself and learning how simple it is to hang curtains on rings, I’ve decided to give it another go. I’m thinking of switching to curtain rings instead of grommets.
When hanging curtains, what method do you use? As for my top-hemming trick, how do you feel about it? Hmm, I’m beginning to think I’ll never sew another hem again.
To ensure that yours is precisely hung, check out these tips!
- Take a look at your windows
To begin, you’ll need to measure the size of your window. To give your area a sense of height, choose window treatments that trail beneath your sills. For a more traditional appearance, use panels that reach all the way to the sill. When it comes to width, traditional pinch pleat drapes should be as close to your window as possible. Pocket curtains can be made to exactly match the window’s width or to surpass it in order to create beautiful folds and waves.
Flat panels should be matched in width for easy coverage. In order to maximize your privacy, use sheers with black-out panels. You may also use a variety of colors and patterns to create an eye-catching effect.
- Select a fishing rod
Whichever style of decor you’re going for—midcentury modern or Art Deco—or whether you’re going for a coastal look or an Asian feel—you’ll want a curtain rod that fits right in. Curtain rod finials in glass or brass go well with sophisticated patterns and deep hues, while those in metal or wacky shapes look great.
Instead of a rail with a track for them to pass on, you’ll need a rod to slide circles over. The rod should be long enough to cover the width of the window, plus a few inches on either side for hanging hardware.. Once you have the rod, attach the hanging hardware and the center support, if necessary, to either side of the window. Do not hang the rod, however.
- Decide which rings suit best with your drapes.
It’s possible to use the curtain ring clips for both flat and rod pocket curtains. Close the pocket and secure the panel’s top edge with the clips. Instead of using curtains, try bohemian tapestries, hemmed strips of interesting fabric, or even recycled sheets. When panels have grommets, they need rings that can open, slide through the grommets, and then snap closed. The grommets can be slid straight over the rod. When utilizing pinch pleat drapes, go for eyelet rings with hooks that may be attached to pin-on drapery hooks.
- Realize the ramifications of the diameter of the ring
They all need to slip over your rod with ease when you’re using curtain rings, eyelets, and basic rings. You want the ring to be about half an inch larger than the rod’s diameter. Rings that are only slightly larger than the diameter of your rod will function, but smaller rings will not glide as well along the rod.
- Use rings to secure your window coverings.
If you’re hanging sheer panels or heavy curtains, it’s crucial to evenly disperse the weight. Make sure to divide the rings equally among the second or third pleats of pinch pleat drapes by the number of pleats they have.
Each panel should have seven to ten clips if you’re utilizing round rings with clips. Please spread the panel out to measure its breadth. Divide the panel’s width by the number of clips you’ve got, then spread out the clips accordingly. A 70-inch screen divided by seven equals 10 inches, for example. Clips should be spaced 10 inches apart, starting at the panel’s edge.
- Put up the drapes.
Until the rings are on the rod, remove the finial from the other end of the rod. Slip the rings over the rod and replace the final. Tighten the rod’s hanging hardware to ensure that it stays in position, then sit back and enjoy your view. Start searching for home decor that will complement your new window treatments.
What do you call the rings on the curtains?
In either case, the fabric panel is attached to the top of the ringed panel via grommets, sometimes known as grommets.
What is the best way to make curtain rings slip more easily?
Make your curtains slide more easily by following a few simple steps. Dry silicone spray, curtain sliding tape, measuring tape, and a custom-cut curtain rod are a must-have for this project….
Conclusion
To hang rings on your curtains, simply follow these simple instructions. This procedure doesn’t necessitate a significant investment in terms of supplies and machinery.
Nguồn: https://iatsabbioneta.org
Danh mục: Curtains


