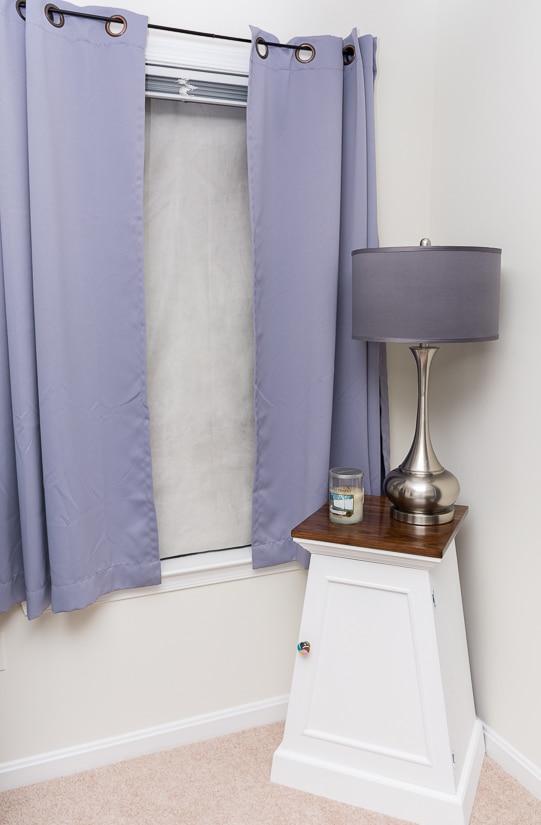
A one-hour DIY project to produce insulating curtains is all you need to get started. It’s important to remember that you don’t even need to be an expert in sewing to participate.
DIY insulating curtains can be made by anyone, from a novice to an expert. Step-by-step instructions on how to construct insulating curtains are provided here.
Bạn đang xem: How To Make Insulating Curtains? Step by step procedure
Your windows are 10 times more efficient at losing and gaining heat than your walls are at the same place. Traditional single-pane windows may lose significantly more heat than modern insulated double-pane windows in older homes.
Both types, on the other hand, let cold air out, which has the reverse effect in the heat. In order to reduce the rate at which energy is lost, we’ll need some insulating window treatments. You can save money by making your own window coverings rather than purchasing ready-made ones.
Step by step procedure on how to make insulating curtains
If you have the following supplies and tools on hand, you can begin:
- Backed with insulating substance
- Material for the decorative cover
- Dowel or curtain rod made of wood or metal (You can select a light bar with a diameter of between a quarter and a half inches.) Side draw designs do not necessitate the inclusion of this step.
- Dowel or curtain rod brackets
- Shower curtain rings or curtain rings.
- Velcro
- An ironing board and a sewing machine
- Thread
- Pins
- Scissors
- Measurement with a tape
- Grommets and a grommet punch
- 1′′ x 2′′s would be ideal for mounting the curtain to the wall. The side-draw design does not necessitate this.)
- In the upper portion of your window, the cap prevents air flow (by preventing a convection current). If you’re using the side draw design, you’ll need this.)
In order to use insulating curtains, you will need to measure your windows. Make sure your dimensions are precise when determining the yardage of curtain fabric.
Step 2: Choose your batting material, including the ornamental fabric option. It is best to utilize sustainable and recycled materials since a strong fabric material that does not stretch or rip is excellent. Prior to making insulating curtains out of decorative fabric, wash it first.
Using the measurements you took from your window, cut out your batting and your fabric curtain as precisely as possible. You should leave a two-inch buffer around the area of your cloth decoration. Having a little extra cloth on hand is better than having none at all.
Sewing is required in Step 3 of the process for making insulating curtains. On begin sewing, pin the curtain fabric to the batting material and sew it in place. Using this method, sewing can be a lot less time-consuming. Make sure your batting material is facing the fabric’s decorative side during this stage.
Step #4: Sew the curtain fabrics to the batting material using a sewing machine. Flipping the curtain reveals the curtain’s exterior after sewing three edges together.
On the edge, you didn’t sew anything. Just fold the flipped curtain over and sew it together with the remaining material. So, you’ll end up with a finished curtain that has the seam on the inside.
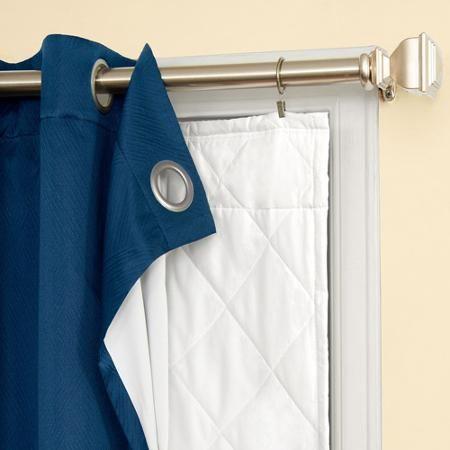
You’ll need to hammer in the grommets you’ve made holes in your curtain fabric material in order to keep it in place.
If your curtain panels need to be hung on a wall, sew Velcro on both sides of each panel. Velcro should be placed and fixed on the walls in accordance with the curtain panels’ functions. Your curtains will be more energy efficient as a result of this procedure.
7: Install the curtain rods and attach the curtain rings to the hanging rod.
Step #8: Put up your new insulating drapes you just produced.
Make curtain ties out of leftover material, if you have any, and use it to tie back your drapes when not in use.
Do Insulated Curtains keep Cold Out?
You can create insulating drapes that keep the chilly air from entering your home by following these simple instructions on how to build insulating curtains.
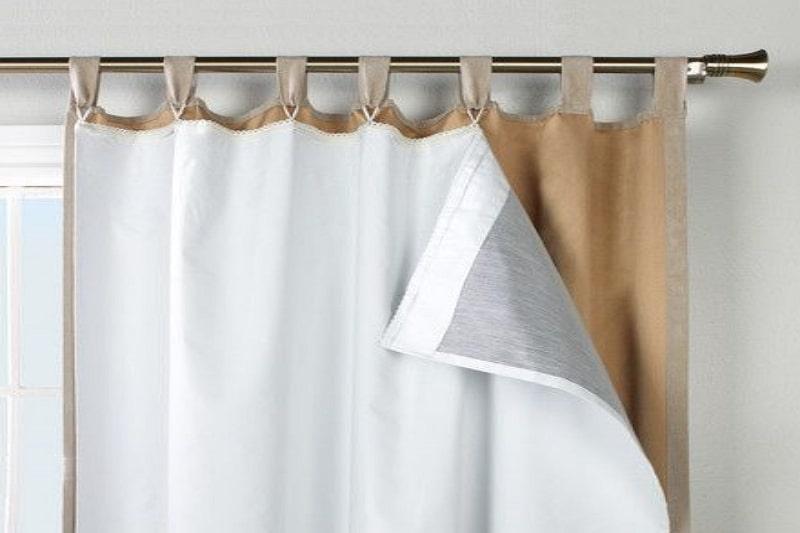
Decorative exterior curtain fabric with a reflective film layer is used to deflect heat into your room as well as an insulating vapor barrier.
What is the Difference Between Insulated and Thermal Curtains?
Thermal curtains reduce air infiltration and heat transfer by creating dead air between the window and your dead room.
Insulating curtains can help keep the heat in your home throughout the winter months. In the summer, it serves to dissipate the heat emitted by the sun.
How to make awesome thermal curtains
Various visual and procedural ways for making your own thermal curtains have been incorporated into a single page for ease of use. Different authors at different times wrote the writings, all with a same objective: to help you reduce heat loss, save money on heating, and create a great appropriate-technology project that you may enjoy for years to come. Those that prefer schematics to the following photographs and descriptors will get more out of the more in-depth technique that follows.
Check out Quick and Dirty Thermal Curtains if you’re in a cold dorm or just need a quick remedy for a cold apartment, house, or attic.
Why Use Thermal Curtains?
The Facts
Windows are the most common source of heat loss in most homes. Glass has an R-value of 1, making it a poor insulator (for single panes). The seal surrounding the frame of older windows might be deteriorated, allowing heat to escape. Thermal curtains can improve the insulative value of your windows by up to seven times (R-value of 7), allowing you to retain more heat in your house. Thermal curtains are the most cost-effective and efficient method of reducing heat loss.
Additionally, thermal curtain design is simple, inexpensive, and you’ll save money and energy by reducing your need to heat your home with these curtains. Design and assembly of thermal curtains are critical to their ability to effectively insulate windows. It is necessary to combine an insulating, vapor barrier, and cover fabric in order to make thermal curtains (this part is optional). To prevent air leaks around the curtain, the material must be fastened to a hanging mechanism and sealed to the window frame.
The Economics
Compare Window Treatment Options in Price
- Homemade thermal curtains cost between $40 and $70 to produce.
- Installing a custom-made curtain costs anything from $70-200.
- A window with two panes (installed) $150-500
The Science
The thermodynamic principles of conduction, convection, and infrared heating all play a part in window insulation. For windows in a home, the pane of glass can lose heat to the cold outside air by conducting it. Because heated (high-energy) air particles naturally attempt to shift into lower-energy states, conduction occurs (colder, less energetic air particles). Heat loss through conduction is followed by cooler air that sinks and pulls in more heated air. This mechanism, known as convection, creates a steady flow of cool air through your house at all hours of the night. Solar heat radiates through your windows and into your home in the form of infrared radiation. You can store solar heat energy inside your house even while it’s gloomy outside.
The Necessary Materials
- Warm Windows or CCAT at Cal Poly Humboldt can provide you with insulating batting material.
- Material for the decorative cover
- Ideally, a thin weight bar of wood or metal for the curtain rod or dowel 25 to.5 inches in circumference. When using a side-draw design, this isn’t necessary
- Dowel or curtain rod brackets
- Shower curtain rings or curtain rings.
- Velcro
- Thread, pins, scissors and a tape measure are needed for sewing.
- A set of grommet punches
- Scissors for cutting fabric
- To hang the curtain, you’ll need a piece of mounting board that is the same length as the curtain. This does not apply to side-draw designs.)”””
- Air cannot flow around the top of the window due to a convection current being blocked by a cap. If you’re using a side-draw design, this isn’t necessary.)
Tips
Prior to creating your home’s thermal curtains, you’ll need to pick which windows they’ll be used to cover. North-facing windows and large windows in the northern hemisphere produce the most heat, so covering them will have the most impact. You’ll need to take measurements of the windows’ height and width. Make sure your curtains stretch beyond the window in order to get the finest benefits..
As a side note, keep in mind that cold air will flow down from the window and warm air will flow up from the inside of the house through the drapes. Because of this, adding a pelmet above your curtains can help to stop the air (and consequently chilly drafts) from cycling about the room. The pelmet functions as a curtain valance to conceal the hardware (rail, etc.).
Alternatives to our Awesome Thermal Curtains
Xem thêm : How To Make Valance Curtains? Easy Step-by-step Guide
If you’d rather see how to build thermal curtains in a different way, the following diagrams can help. There are three ways to accomplish this: side draw, roll-up, and Roman shades.
Preparing Curtain Shades
For Purchase
The Warm Company’s Warm Windows thermal curtain fabric is the best pre-assembled thermal curtain fabric on the market (954 East Union St, Settle Wa. 98122). A mylar vapor barrier, a thin canvas-like lining material, and many thin insulating layers (synthetic batting) are all included in their offering. Sew a decorative cover fabric over Warm Windows on the side facing the room to complete the curtain shade cloth (this is only for aesthetic purposes, and will not affect the performance). Warm Windows is available in widths of 3.75 and 5 feet and costs roughly $22/yard. CCAT sells it, and it may also be found in large fabric stores.
For Construction
As an alternative, you can build your own curtains out of synthetic materials (such as old quilting batting or sleeping bag filler) and a material that reflects heat and resists water absorption (such as plastic sheeting) and a cover layer of fabric of your choice.
Don’t try to add a mylar layer to your own product. To use a sewing machine, it is exceedingly tough to deal with and tears very readily. Instead, use plastic sheeting to minimize water absorption and find something that already has reflective material in it (a excellent sleeping bag that someone is done with).
Layers in direct touch with windows should always be made of synthetic materials. Condensation on the glass will not lead to mildew growth in this way.
Cutting your fabric
It is important to measure your window’s frame and then add 2 inches on each side. Please add 6 inches on the top and 4 inches on the bottom of the roll-up or roman shade design (for the weight bar). In order to avoid heat loss through conduction and convection, this is an essential step to ensuring that your curtain is well sealed to the wall.
Assemble the curtain fabric so that the insulating layer is facing the outside of the home and the vapor barrier layer is facing the interior of the room after you’ve purchased and cut the fabric. Insulation can be placed on either side of the vapor barrier material if you have multiple layers of insulation. At a distance of 4 inches apart, sew a line of stitching through the fabric, and then finish off the edges by sewing them shut. Sew a weight bar pocket into the bottom of your curtain, if necessary, and then sew your weight bar in place. Your curtains are now ready to be installed in your home.
Hanging your Curtains
Side Draw
In terms of hardware and sewing, the side draw is the simplest option. A curtain rod and rings can be used to hang them, or a bought pulley system can be used instead. A wooden framed cap is needed to keep air from circulating behind the curtain in this design.
Roman Shades
When it comes to window treatments, Roman shades are widely regarded as the most stylish. Because of the following stages, they are more complex to assemble. For each quilting line, sew enough “O” rings to your shade such that each ring is 8 to 12 inches apart. On the other side, a curtain pulley and eye-screws (one for each vertical line of “O” rings) are screwed into the mounting board. When the curtain is pulled back, each individual string is attached to the curtain’s lowest “O” ring, fed up through the line of rings by eye-screws, and then down through a pulley. Allows for a simple pull of the curtain cords to raise the curtain. The curtain is held in place by wrapping the string around a curtain cleat attached to the wall. Staple guns or Velcro can be used to fasten Roman blinds to a 12-inch mounting board. Velcro can be removed for cleaning purposes.
Roll-up Curtains
Depending on how you go about it, rolling up curtains can be a breeze or a serious pain. Velcro or a staple gun can be used to attach the curtain to a 12 mounting board (Velcro allows removal for periodic cleaning). In order to mount this design, simply drill an eye hook through the mounting board into the wall and attach a curtain loop to it (at the top center). Once the curtains are rolled up and attached to the hooks, all that is required is for you to hand-tighten them. The other way is more visually appealing and easier to remove, but the installation process is a little more time-consuming. In order to secure the mounting board, begin by screwing 2-3 eye-screws into the top and 2-3 into the bottom. On one side of the board, attach a curtain pulley using screws. String each of the bottom eye-screws with a separate string. The curtain is attached to the mounting board by means of eye-screws at the top of the board. They’re then pushed through a curtain pulley to finish their journey. It’s critical to take all of your measurements while the curtain is drawn all the way back. It is now possible to raise the curtain by just pulling the threads. The curtain is held in place by wrapping the string around a curtain cleat attached to the wall.
You can dry clean, “wet” dry clean, hand wash, or utilize upholstery cleaners that spray-on and vacuum-off to clean your curtains.
Thermal curtains with magnets should never be dried cleaned because the backing adhesive dissolves in the process.
Sealing your Curtains
In order for your thermal curtain to be effective, it must be firmly attached to the wall in order to prevent air from moving around the window. A variety of methods can be used to seal the curtain to the wall, such as employing magnets, Velcro, sliding metal tracts, or little boards on hinges. A weight bar, Velcro, or magnets at the curtain’s base will keep it in place on the window sill.
The curtains must have magnets attached or stitched in. The wall must be equipped with corresponding magnets. They can be painted to blend in with the background to hide their presence. Although Velcro will ultimately need to be replaced, it has worked well for some and can be unnoticeable if the same color as the paint.
During CCAT, thermal curtains are sealed on the sides of the window frame with matching painted 12′′ boards that are approximately two-thirds as long as the curtain’s vertical length. Closed against the curtain, these planks are held in place using spring-loaded cabinet hinges. At CCAT, we’ve found that the last approach consistently produces good results.
There is a last stage for thermal curtains that are side-drawn. Convection currents must be stopped by placing a cap above your curtains. The most common material for this is wood, but it might also be constructed of plastic or metal.
Glossary
If you’re installing side-drawing curtains, you’ll need a cap, which is a frame (often wooden) that extends 12 inches past the front of them and crosses over the top of them. It prevents the formation of convection currents around your curtain..
In physics, conduction refers to the movement of heat through an object.
Air currents carry heat from one place to another via convection. Warm air is drawn into loops where it cools and falls, cooling and falling to bring in even more warmth.
It’s an aluminized polymer that reflects infrared heat while also blocking water vapor.
As a measure of how well a substance resists heat flow, R-value: an usual measurement of insulation is an opening in the wall about 6 inches wide, which is around 6 inches of fiberglass insulation
Insulating Curtains That Cut Heat Losses Through Windows by 50%
- Improved comfort by removing cold spots and drafts in rooms can reduce heat losses by up to 70%. Heating fuel consumption was reduced by a quarter in the first homes equipped with Kume curtains.
- To put it simply: They’re cheap. To make a Kume curtain, the cost of materials normally falls between US$ 1 and US$ 1.5 per square foot.
- To put it another way, they’re simple to put together. Assembling a Kume curtain doesn’t call for a lot of manual dexterity or time. An 8-foot-long curtain may be put together in about two hours, for example. The most difficult step of constructing the curtains is cutting the panels to the correct length and width. With polar fleece, you don’t even need to hem your fabric, and you may make the curtain without a single stitch using the panels.
Step 1: What Is a Kume Curtain?
There are four unique layers to this roll-up curtain.
When the curtain is closed, the front panel works as the initial layer of insulation and seals the window opening perimeter.
An air-tight barrier that keeps condensation from forming on the window’s cool glass and frame while it is humid inside.
In order to keep the fabric stretched out, wooden battens are used to hold the curtain in place against the window frame. Air pockets created by the battens limit heat loss through the curtain even further.
When the curtain is closed, the back panel acts as the final layer of insulation and aids in sealing the window opening’s perimeter.
The following factors contribute to the Kume curtain’s ability to reduce heat loss through windows:
- Nature’s best insulator, still air, may be found in plenty in the Kume curtain. The thick polar fleece used to manufacture the curtain, and the tiny spaces between the front and back panels generated by the battens, are both places where the battens trap air.
- When the Kume curtain is closed, it clings strongly to the window’s top, bottom, and sides. It prevents the cold air that develops against the lass from entering the room by creating a layer of insulating air between the glass and the curtain.
- On a cold winter’s day, a Kume curtain operates just like a warm down jacket does. Because of the down’s ability to trap air, and the jacket’s ability to fit snugly around your waist, neck, and wrists, your body heat is kept from escaping into the cold surroundings.
Step 2: Where and How Can You Use a Kume Curtain?
To utilize a Kume curtain, the frame of the window must be set back from the internal surface of the wall by at least 1.5 inches. To get the best results, the curtain ought to be able to tightly enclose the entire window opening (i.e., top, bottom, and sides).
Xem thêm : How To Cut Swag Curtain? What Type of Material Should I Use For Swag Curtains?
If the window is flat with the inside wall, the cold air that accumulates on the inside surface of the window might flow around the sides and bottom of the curtain and into the room, making a Kume curtain less effective.
Its diameter varies depending on the length of the curtain and the thickness of the cloth used when it is rolled up. In this example, a curtain composed of two layers of fleece that is 5 ft long will generate a roll with a diameter of around 5′′. While windows that open outward (sash or sliding) are unaffected by the rolled up curtain, those that open inward (windows that open inward) are. These windows will have to be kept shut until the Kume curtains are taken down in the spring if they are installed.
Step 3: Where and How Can You Use a Kume Curtain? (continued)
Kume curtains can be translucent or opaque, depending on the cloth chosen. When it’s cold outside and the sun isn’t shining, they’re most effective at keeping heat from escaping through windows. The curtains may also be employed during the day in unoccupied areas where daylighting is unnecessary and windows do not give any meaningful solar heat gains, such as in basements.
As illustrated in the images above, they can be used as the primary curtain on a window, or they can be used in conjunction with a more ornamental curtain.
Step 4: Standard Components and Materials
A window with a width and height of “W” and “H” requires the following:
Panel on the front
- The width is W + 0.75′′ and the height is H + 0.75′′.
- To keep the air from escaping, you should use a thick and flexible fabric like polar fleece or something similar.
- A fabric can be utilized for the front panel of the Kume curtain if it is used as the principal curtain in the room (a cotton print for example).
- As with all drapes, you should consider utilizing flame retardant fabrics before constructing the panels.
Moisture-proofing
- Width is 0.75′′, and height is 0.75′′
- Polyethylene, approximately 4 mils (0.004′′) thick, is the material of choice. Black polyethylene sheets are another option, but bear in mind that even if you select light-colored fabric for the front and rear panels, your curtain will be completely opaque (blackout).
The upper battens
- One inch by one and a half inch
- Longitude = W – 0.75 in.
- Pine or, ideally, hardwood is the best material.
At this point, the lower battens have been removed.
- According to the measurements, the section is approximately half an inch by half an inch.
- Longitude = W – 0.75 in.
- Pine or, ideally, hardwood is the best material.
- Battens should not be more than 20 inches apart, so the number of lower battens required depends on the curtain’s height.
The back panel
- The width is W + 0.75′′ and the height is H + 0.75′′.
- Polar fleece or another thick, flexible fabric is the ideal choice for this project.
There are six fasteners in total (not shown)
- Staples are recommended for the back panel, while thumb tacks or upholstery tacks are recommended for the front panel, which is visible from the room. To avoid rust and staining the cloth, use stainless steel staples and rust resistant tacks instead.
Notes:
A) The panels on the front and back are a little larger than the opening for the windows. They are required to completely enclose the window when closed, hence this is why they are so large.
B) Our intention to keep the cost of these curtains low and the construction process simple led our selection of materials. So we used polar fleece for the curtain panels (which is cheap, warm, and easy to get) and polyethylene film as the vapor barrier because of these factors. However, a Kume curtain can be constructed from a variety of materials. As an example, we used a dark blue fleece back panel, a clear polyethylene vapor barrier, and a dark blue fleece front panel to make the curtain shown in the final step of these instructables. In addition to keeping the cold out, this curtain was completely opaque and functioned well as a blackout curtain.
- In order to fit snugly against the sides and bottom of the window opening, the fabric for the front and rear panels should be relatively thick, closely woven, and flexible.
- Consider the size of the roll you will have while raising the curtain if you decide to use a very thick material for the front or back pannels or for the moisture barrier.
- Behind the front panel of the curtain, there should be a moisture barrier. If you don’t have a good vapor barrier, there will be a lot of condensation on your glass (or almost none).
- A thin, flexible, and non-breathable material or cloth should be used as the moisture barrier. Even if you pick light-colored materials for the front and back panels, an opaque lining will turn your curtain into a blackout curtain.
- To keep the cold air that develops against the glass from leaking into the room, the curtain should fit snugly into the window aperture and seal the entire opening.
Step 5: In This Example We’ll Assemble a Curtain for a Window Opening That Is 24″ Wide and 48″ Tall
The following items will be required to make this curtain:
- The front panel is 24.75′′ x 48.75′′. (in this example it is made of thick white cotton canvas)
- A sheet of translucent polyethylene with a thickness of 0.004 inches (23.25 inches by 48 inches) is used.
- A pine top batten with a 0.5′′ x 1′′ cm cross section and a 23.25′′ length
- Three pine bottom battens, each measuring 23.25 inches in length and having a cross section of 0.5 inches by 0.75 inches.
- A rear panel measuring 24.75″ x 48.75″ (in this example it is made of yellow polar fleece)
- To secure the front panel and plastic sheet to the battens, use thumb tacks. There are many reasons why we use thumb tacks instead of screws.
- Back panel fastening staples on battens
Step 6: Trace the Position of the Battens on the Plastic Sheet.
As a precaution, make sure
- The plastic sheet’s top edge is aligned with the upper batten’s top edge.
- Using the plastic sheet as a guide, line the bottom edge of the lower batten with that of the lower batten.
- Other battens are evenly dispersed over the plastic sheet’s height.
Step 7: Slip the Battens Under the Plastic Sheet and Use the Marks Traced on the Plastic Sheet to Align Them Properly.
To line the battens’ ends with the plastic sheet’s sides, the length of the battens must be equal to the sheet’s width.
Step 8: Lay the Front Panel Over the Plastic Sheet.
This means that when the front panel is in place, the plastic sheet is a little longer and wider.
The top of the front panel should be aligned with the top batten.
In order to keep the bottom of the front panel in line with the lower batten and base of the plastic sheet, it should extend by about 0.75 inches.
It’s recommended that the front panel extends about 0.75 inches past the plastic sheet sides and ends on each side.
Step 9: Use Tacks to Fasten the Front Panel and the Plastic Sheet to the Battens.
Each batten should have a tack about 0.5′′ from the end.
- The distance between the thumb tacks on the upper batten should be between 4′′ and 8′′.
- Lower battens can have the thumb tack spacing expanded to twice as wide as the upper battens’ spacing.
Step 10: Flip the Curtain Over.
Step 11: Place the Back Panel Over the Partially Assembled Curtain So That It Rests Directly on the Battens.
When installed, the back panel matches the dimensions of the front panel.
- It is important that the back panel’s top batten is perfectly aligned with it.
- B) The back panel’s bottom should reach 0.75 inches below the plastic sheet’s last batten and base;
- C) The rear panel should extend 0.75′′ past the batten and plastic sheet ends on each side.
Step 12: Use Staples to Fasten the Back Panel to the Battens.
Each batten should have a staple around 3/8′′ from the end. Using this method, the material will be able to cover the entire window opening.
Staple the fabric to the battens with a sufficient number of staples on either side of the battens.
That’s it!
Step 13: For Additional Information …
In order to learn how to properly hang and secure the rolled curtain, please visit www.kumeproject.com for detailed instructions. On this page, you’ll find a variety of ways to assemble the curtain.
Detailed instructions for putting up the curtains are available on this page in French, Spanish, and Italian.
Conclusion
Learn how to construct your own insulating curtains so that you can save money and manage the temperature in your home. When you follow the above instructions, it’s simple to create and install your own insulating curtains in your home.
Nguồn: https://iatsabbioneta.org
Danh mục: Curtains


