I’ll show you how to make swags and tail curtains in this post. There are a number of ways you may incorporate these curtains into your home’s decor, from adorning your windows and doors to using them as part of a theatrical set design.
Why not give curtains a go and see if you like them? If you follow my 5 step approach, it’s a breeze!
Bạn đang xem: How To Make Swags And Tail Curtains? Easy Step-by-step Guide
Steps on Making Swags and Tails Curtains
Two pieces of fabric that are about twice the length of your curtain should be cut out before you begin sewing. You’ll also require a few shorter pieces, each approximately a foot wide. Cut some swags and tails from your fabrics as a beginning step! As far as swags and tails are concerned, I recommend choosing either one or two different fabrics.
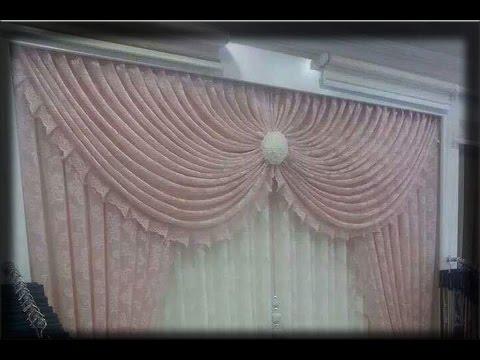
Swags can be measured and marked by holding them up against your window and spacing them evenly on either side of where you intend to install the curtain rod. Tie a piece of string around one end at this point so that it will serve as a guide for where to tie off the swags.
Start by wrapping one end around the other of each short fabric so that there is an equal quantity of fabric on both sides. At this stage, tie a knot to determine how far down this swag or tail should hang.
As you begin tying and knotting your swags and tails, keep in mind where you want them to hang. In order to ensure that all of the fabric dangling from the window frame is equal, you can experiment with how tight these knots are and how far down they should be on each side of the frame before tying off one end.
Continue knotting the short cloth pieces together with an equal number of knots, hanging them at varying lengths so that they may be seen from all directions in a room.
Strategies for hanging your swags and tails curtains
If you’d like a more conventional design, you can put a single rod on each side of the window (or one rod on each side).
Metal or wooden rods are used to hang the curtain rings from one end so that they can move in this direction.
It’s time to tie off one end of your curtains and cut any leftover cloth. Hang your swags and tail curtains, and admire them from both the inside and the outside of a window.
How to Wash Swags and Tails Curtains
Xem thêm : How To Make Knotted Curtains? Step-by-Step Tutorial
When placed near a window, elegant swags and tail curtains can soon become soiled. No need to keep buying new ones every year or so if you don’t want to! You can clean your swags and tail curtains on a regular basis to prevent them from becoming clogged with dust and filth.
Open a window or doorway to allow the curtains to air out for many hours.
Pour 14 teaspoon liquid dish soap into a cup of cold water, then add it to 12 gallon of warm water.
Pour the soapy fluid into a sink and submerge your swags and tail curtains completely.
After wringing your curtains, put them in the washing machine with several towels or other clothing to remove any remaining water.
Tip For Effective Cleaning of Swags and Tails Curtains
A terrific method to add drama and decor to your windows is with swags or tails curtains. There is no guarantee that they will remain in peak condition for years to come. Keeping your home clean is the simplest solution!
You’ll know exactly what to do to keep your curtains looking their best for years to come by following these five simple procedures.
Step One: Gather Your Supplies
Make sure you have everything you need for a quick and easy cleaning process before you begin. Use a vacuum cleaner with nozzle attachment, lint roller or tape measure to find the top of the curtain, water spray bottle and paper towels to clean up the mess you’ve created..
Step Two: Vacuum the Swags and Tails Curtains
Prior to any cleaning, vacuum all of the curtains so that any dirt or dust that has accumulated over time is loosened. Keep an eye on your curtains when vacuuming, since you don’t want any dust or filth to get lodged in them while you clean.
Step Three: Get Rid of All Dust, Dirt, and Pet Hair
Using lint rollers (or tape measures) to remove any remaining dirt or dust particles after vacuuming your curtain is a good next step. To remove pet hair from your curtains, you’ll want to use a lint roller, but be sure to use it carefully and not press too hard on the fabric so that it doesn’t tear.
Step Four: Spritz Them with Water
Xem thêm : How To Hem Curtains? Tips for Hemming Curtains
It’s time to spritz your curtains with water now that they’ve been cleaned of lint. Make sure you don’t get too much liquid on your curtain by spraying it with a bottle or just squirting it on with your hands.
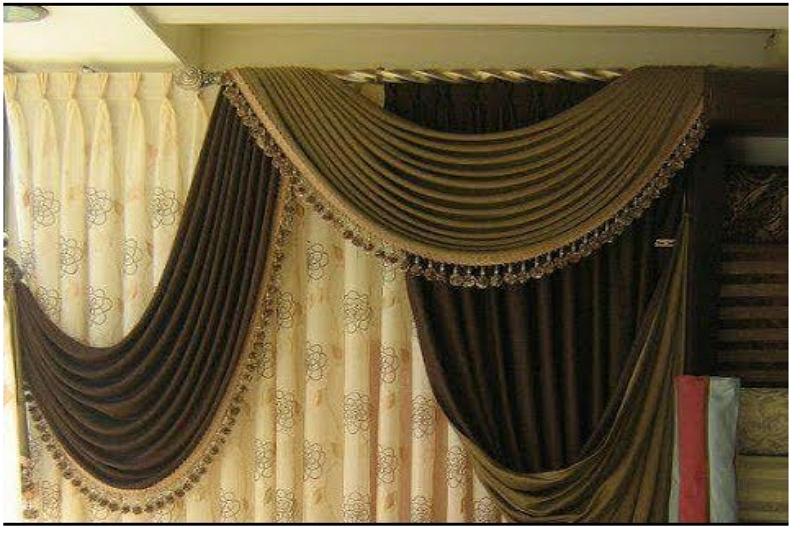
How to Make Drapery Swag and Tails
Drapery swags and tails in a traditional living or dining room are enhanced by graceful draping. It’s possible to achieve the same look without the use of commercial patterns or templates by using a single piece of draped fabric to make a rudimentary version of tailored swags and tails. It is common practice to suspend the swag fabric from a pelmet or cornice board hung above the window, which allows the main draperies to float freely while the swags remain fixed in their position.
Measure the width of your curtain track hardware and add 2 to 3 inches on each end for overhang. This will be the length of the pelmet board you create with one-by-four or one-by-six lumber. The board should be wide enough to extend 1 to 2 inches out from the wall beyond the curtain and track. Cut a piece of lumber to your length measurement, or have the supplier cut it for you. Sand off any rough edges at the cut ends using medium-coarse sandpaper. Attach the hook side of hook-and-loop fastener tape along one short edge, one long edge and the remaining short edge of the board, using a staple gun or hot glue.
For each end, add 2 to 3 inches to the curtain track hardware’s width. One-by-four or one-by-six lumber can be used to create a pelmet board this length. In order to accommodate the curtain and track, the board needs to be at least 1 to 2 inches in width and 2 inches deep. The supplier can either cut the lumber for you or you can cut it yourself. Use medium-coarse sandpaper to smooth out any rough edges on the cut ends. Attach the hook side of hook-and-loop fastener tape along one short edge, one long edge and the remaining short edge of the board, using a staple gun or hot glue.
You should provide 2 to 3 inches of overhang to either end of your curtain track hardware. Your one-by-four or one-by-six lumber pelmet board will be this length. An adequate board width is one that allows the curtain and track a 1-to-2-inch gap from the wall. Have the lumber provider cut it for you, or cut it yourself if that’s more convenient. Use a medium-coarse sandpaper to smooth down any rough edges on the cut ends. Using a staple gun or hot glue, attach the hook side of hook-and-loop fastener tape along one short edge, one long edge, and the remaining short edge of the board.
To use up the leftover fabric, cut a 4 1/2-inch by 12-inch rectangle out of it. Fold the rectangle in half along its long axis, with the wrong side out. Using a sewing machine, make a 1/4-inch seam along the long open end. To make a 2-inch-by-12-inch strap or swag holder, flip the material over so the right side is facing out and press it firmly. Continue making swag holders until you’ve made one more than you need. A three-swag window treatment calls for at least four swag holders.
Staple the swag holders to the underside of the pelmet board, spacing them them equally across the long edge of the board with the end holders positioned about 1/2 inch in from the board’s corners. Fastener tape on one side and loose fabric 2 inches from edge on other side of board with two staples in each corner of board.
Angle brackets should be used to mount the pelmet board so that it can be placed against a wall, fastener tape facing outward and swag holder straps protruding from its underside. In order to keep the board in place, use 1/2-inch wood screws to drive into the underside of the wood, up through the holes in the horizontal portion of the brackets.

Press the two pieces of the fastening tape together to secure the hemmed fabric to the pelmet board. Grab a swag holder strap and draw it up and over to the top of the pelmet board from behind the fabric. Put a pushpin in the strap to keep it in place for the time being. Repeat this process for each of the swag holders that you have. With more or less strain on the strap, you can alter the fullness and depth of the swag drape.
If necessary, refold the swag and repin the straps to achieve the desired look. The swag valance’s fabric ends will form butterfly-like tails at the sides. Using a staple gun, hold the straps in place on the board and remove the push pins after you are satisfied with the result.
Nguồn: https://iatsabbioneta.org
Danh mục: Curtains


