In order to earn a tiny commission at no additional cost to you, I have included affiliate links in this post. My complete disclaimer can be found here.
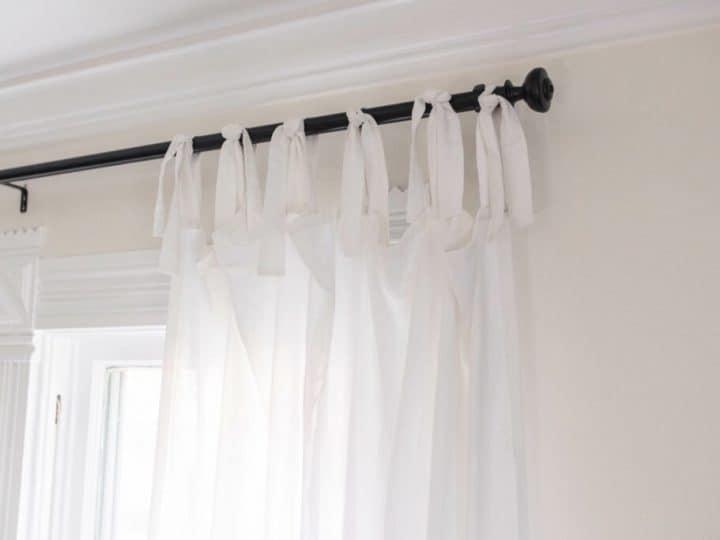
Tie-top curtains are a fun and easy way for you to decorate your home. They are ideal for creating a Pottery Barn-inspired design without the Pottery Barn expense.
Bạn đang xem: How To Make Knotted Curtains? Step-by-Step Tutorial
If you’ve never sewn before, don’t worry: this guide is for beginners.
If you’re completely new to sewing, I’ve put together a comprehensive, free sewing course that will teach you everything you need to know. Isn’t it great that it is free?
As you may know, I’m a big fan of manufacturing stuff in my own home. My home is filled with linen, ties, and ruffles, which I love because of their ethereal drape and movement.
I’ve even worn them myself, as in this gorgeous Shirred Dress Tutorial with ties and ruffles that I recently shared!
For our new living room, I wanted to merge my interests in art and fashion into the design. We’ve recently made a few additions to our living area, so I’ll show you everything soon.
Since our new farmhouse has really high ceilings, I was hoping to acquire some tie-top curtains but was unable to do so due to a lack of internet options.
As a result, I made these curtains from scratch, and I adore how they bring a lovely draped linen touch to the room. They look stunning when displayed in this manner on the windows.
Tips for making Top Tie Curtains
- Your cloth should be treated as if you want to use it. You should wash and dry your curtains before stitching them, for example. As for me, I prefer to hand wash my linen on cold and air dry it before sewing.
- Double-check all of your dimensions.
- Use the first panel that you cut as a guide for the following one. ‘
Supplies You Will Need:
For curtains that are 104 to 112 inches long, you’ll need 7 yards of linen.
Main panels are 116 inches wide (Cut 2)
Stitching apparatus
Xem thêm : How To Make Rod Pocket Curtains? Step-By-Step Guide
Using thread that matches the color of your fabric
Iron
Pins
Scissors for sewing
How To Make Curtains – Tie Top Curtains Step-By-Step
Cut out the ties:
Cut 24 3.5-inch by 17-inch pieces. Make sure you cut the ties along the width of the fabric when doing so. Because we’re utilizing the entire 52-inch width of the fabric, you don’t want to trim one of the long sides. From the bottom, not a corner or a seam.
Cut out the main panel:
- Please take a tape measure and mark the height of your window casings, then measure from that point downwards. I prefer to make the windows appear larger by enclosing them with a frame.
- Make sure you measure your desired length, then deduct 3 inches to account for the ties’ extra length and add 6 inches to either end. My measurements were 112 inches long, plus 6 inches for the bottom hem (3′′ X 2′′) and 1 inch for the top hem (1/2′′ X 2′′) And 3 inches for the ties, so I cut 116 inches of length by 52 inches of width (the width of the linen).
- So I made two 116-inch-long panels. Take your measuring tape and run it down each panel until it reaches 116 (or whatever length you need). Then, make a small notch in the cloth. Make a small notch on the other side, fold it in half, and check to see whether the notches match. After that, make a cut to join the two notches together.
- To generate the second panel, you can use the first panel that was sliced and checked for errors.
Sew the ties:
- After folding the tie in half lengthwise, right sides together, you will sew along the long edge of the tie, leaving both ends exposed. At the beginning and finish of the project, make sure to do a backward and forward stitch.
- In order to hide the rough edges, use a safety pin to turn it out. Make sure the seam is pushed over on the side by pressing it flat with an iron.
- Each tie should be topstitched throughout the whole circumference, with the exception of one raw bottom edge (it will just be tucked into the curtain panel). Simply put, a top stitch is a stitch that goes around the perimeter of an item to improve its aesthetics while also adding strength to it.
- With each tie, repeat this.
Sew The Main Piece:
- Fold the long sides in half and then press. Another half inch of folding and pressing results in a neat edge with no raw edges. On both long sides, do this.
- Fold the bottom edge over 3 inches and press to create a lovely, large hem for the bottom. In case the curtains need to be relocated or washed incorrectly and shrink and I need to make the curtains a little longer, I like to do this. A roomy hem allows you to move about comfortably.
- To conceal the raw edge, fold the bottom 3 inches over. Press.
- Press the top edge inward by approximately half an inch. Press another half-inch into the fold.
Sew The Ties:
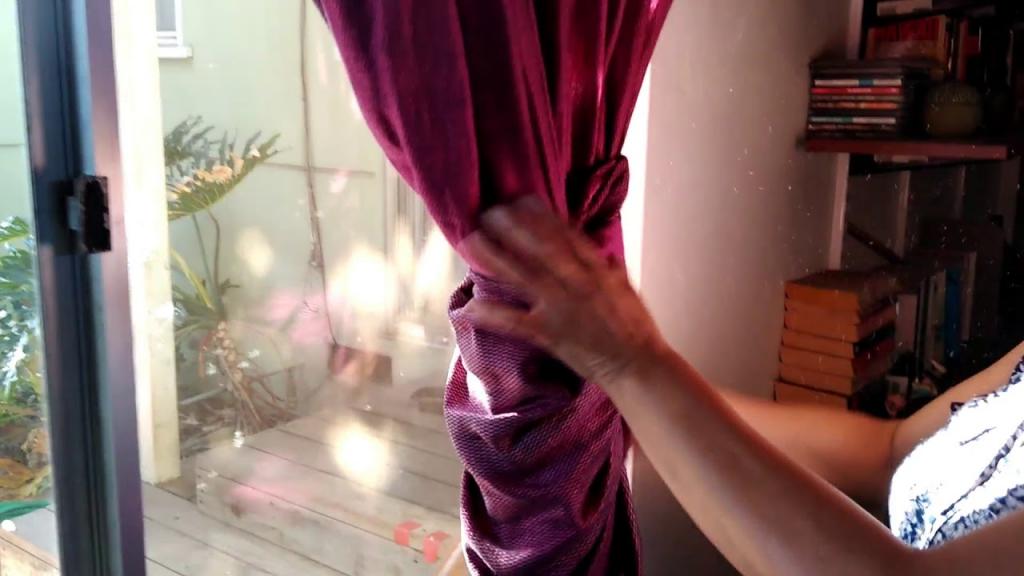
- Before hemming, place two ties underneath the top fold. To ensure that the ties are fairly spaced, we must first determine that there will be six sets of ties in total. Set up two sets of ties, one at each end, starting with the one closest to you.
- The remaining four inner knots should be spaced equally. The inner edge of the first tie was measured and divided by 5 to arrive at this result. My ties were spaced about 10 inches apart because my fabric was 52 inches wide. As long as they are somewhat evenly spaced, you don’t have to be too perfect.
- Make a fold and pin the uncooked end of the ties.
- My video on how to make a hem may be found here if you’re just starting out in the sewing field.
- The ties should be pulled towards the top of the curtain panel after the hem has been sewn around it and the ties sewn in.
- Additionally, you may use an iron-on serge to finish off all of the raw edges on each tie before sewing them in place on the top hem. There is no need for tucking them into the seams before stitching them on the other side.
- Hang and admire your curtains once you’ve finished sewing all the way around.
Steps Making knotted Curtains
Step 1: Measure and cut two pieces of cloth to fit the width and height of the opening to be covered. As well as a needle and thread, you’ll also need some color-coordinated ribbon for the knots.
After folding one piece in half, fold it in half lengthwise, then fold it in half widthwise so that there are four layers on both sides.
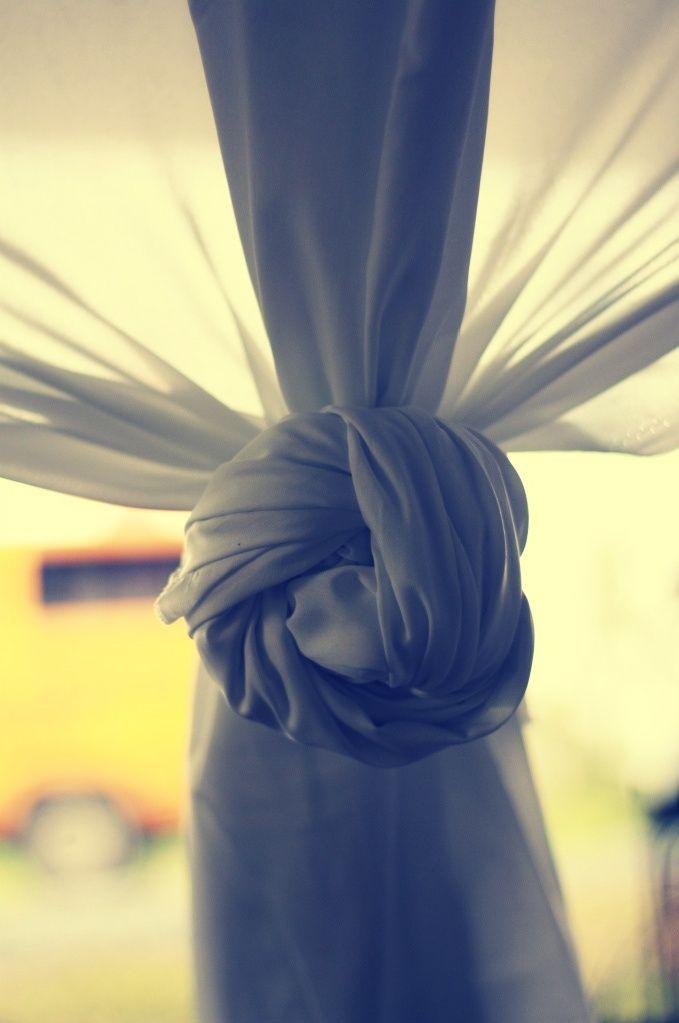
Step 3: With a long piece of string, tie an overhand knot at the top of one side (similar to how you tie shoelaces). In order to create a loop, pass the opposite end of the thread through the opening on one side of the needle.
Make a new overhand knot by pushing it through another hole on the same side and tying it off (similar to step three). Pull the two loops together with a little tug. Continue until you have made all desired knots. Tie knots at the bottom of each side and cut off excess string.
FAQS
Benefits of Knitted Curtains
Tie a second overhand knot and push it through the same hole on the other side (similar to step three). Tighten both loops by pulling them together. Continue tying knots until you’ve tied all of the ones you want. Each side should have two knots at the bottom and the surplus thread cut off.
Knotted curtains are a quick and easy way to freshen up a room.
If you don’t want to spend a fortune on new curtains, you can make your own.
How to Care for knotted curtains?
To prevent mold and mildew from forming on your knotted curtains, you should remove them from the wall when you’re done using them.
Xem thêm : How To Measure Up Curtains? Step-By-Step Guide
If the curtains are made of cotton, you can wash and dry them on a delicate cycle in the washing machine. Dry your knitted curtains using a towel if you prefer to wash and dry them by hand. Do not bleach or allow any chemicals to come into contact with your curtains!
How to Wash Knotted Curtains?
Use a delicate cycle and wash your curtains in cold water. To prevent fabric shrinkage or stretching, lay them flat to dry. Also, avoid using bleach during this process.
Should I Iron my Knotted Curtains?
It is not required to iron these curtains, but if you do, use a pressing cloth and the lowest heat setting.
What type of Detergent is best for cleaning knotted Curtains?
A mild soap like Woolite, dishwashing liquid, or Dreft is the finest choice for a detergent. Knotted curtains should not be treated with fabric softener since it can loosen the knots and make them more frizzy over time.
How Often Should I Wash Knotted Curtains?
Cold water and a light soap like Woolite or dishwashing liquid are the best ways to clean them if you do decide to do so.
What type of Shower Curtain liner should I buy for my Knotted Curtains?
Because it will not stick to the knots, a Velcro-attached shower curtain liner would be ideal.
Another option is to use a shower curtain liner made of vinyl, which is less susceptible to stains from dirt and water, and has a longer lifespan.
Knotted Curtains should be washed once every four months, but if they appear dusty or stinky, or if you want a deeper clean, you can wash them more frequently.
How much do knotted curtains cost?
About $40 will buy you a rod and ring set for your knotted curtains.
A yard of silk cloth can set you back about $80 if you’re looking for something more exquisite.
If you have a smaller window, you’re more likely to purchase knotted curtains this way because it’s cheaper.
Where to buy knotted curtain material?
Knotted curtain material is available from a wide range of merchants. Walmart, Lowe’s, and Home Depot are just a few examples.
An online shop called Knotted Curtains provides materials for people who want to make their own curtains using this method. Everything you need, including rod kits, material, and installation instructions, may be found at this location.
Nguồn: https://iatsabbioneta.org
Danh mục: Curtains


