Then, don’t worry, since we’ll be there for you. Learn more about this topic by reading to the end.
Curtains are frequently used to keep out the light and noise in a room.
Bạn đang xem: How To Add Blackout Lining To Curtains? Complete Step-by-Step Guide
Additionally, it shields you from prying eyes from the outside world.
Adding a liner to your current curtains, on the other hand, would greatly improve their coverage.
If you’ve already made a basis for your curtains, you should be able to add a second layer without too much trouble.
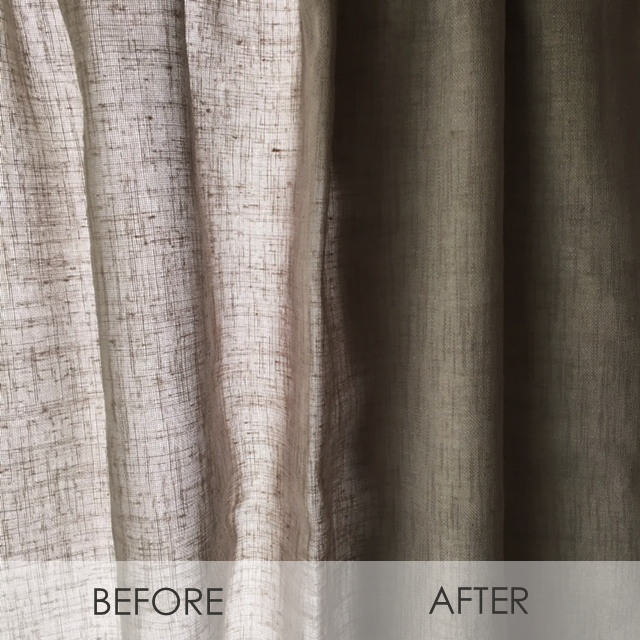
The color of a blackout curtain isn’t limited to white.
This can be used as a lining on the inside of the garment.
Keep the design and color of your curtains intact by placing it near the back of the drapes.
Steps To Add Blackout Lining To Existing Curtains
Even from the name, blackout curtains or lining make any curtain thicker and completely darken out the room.
Its purpose is to offer your rooms with even more effective and pleasurable covering.
This is a must-have if you’re a night owl.
As long as you have a guide to follow, adding another layer or liner to your curtains isn’t that difficult.
With all the necessary materials in place, you’ll be well on your way.
However, be calm and unconcerned.
We’ll be there to lend a hand.
To add blackout lining to existing curtains, here are the steps:
Step #1. Remove the curtain on the rod
The first step is to remove your curtains from the rod and thoroughly clean the rod before reinstalling them.
The lining of a soiled curtain cannot be sewn on, so make sure you clean it first.
Once you’ve removed all the dust, simply wash it along with the lining to soften it.
Step #2. Get the measurements
To make sure your curtain will fit, get a measuring tape that is at least ten feet long.
Make sure your measurements are accurate by using an old curtain as a guide.
In order to avoid problems with sewing, make sure you have exactly the right amount on each side.
Step #3. Cut the blackout fabric needed
Cutting out the fabric would be the next step, but first you need to take dimensions.
Curtains can be marked using a tailor’s chalk or any other item that is visible and easy to clean.
On each side, add at least 12 inch of excess fabric.
You’ll need it later on while making a curtain.
After you’ve marked the fabric, it’s time to cut it.
Step #4. Start assembling both fabrics and pin
Xem thêm : How To Make Prairie Curtains? Easy Step-by-step Guide
The fabric lining will be placed on top of the top curtain after it has been laid flat on the floor.
Your old curtain should face the floor at all times.
The following layer will be sewn on from the inside out, with the needle in the back.
Always pin with the 12 excess fabric tucked inside one of the sides before you begin stitching.
Afterwards, you can reverse both drapes and pin the other two sides, leaving one side unpinned as a way to reverse the process.
Step #5. Sew all the three
If everything is lined and looks okay, you can then begin sewing the three sides together.
Check to see if the curtains are made exactly how you want them.
So that it looks beautiful, the stitching must be clean and accurate.
Then stitch the remaining open end.
Flip it over after sewing 34 of the way through.
Once you’re satisfied with how it looks, sew the remaining 14 of the last side.
Step #6. Hang it again on your curtain rod
After that, you can assess whether or not the procedure was successful in helping you learn how to do it better in the future.
When you’re done hanging the curtain, tighten the rod once more to ensure it doesn’t fall down the rod.
The space should be darker and quieter while maintaining the same shape, appearance, and color.
Try to keep an eye on it for a while after you’ve installed it to see whether it works and if your curtain looks the same.
Because you added anything, the fabric will be a little stiffer, even if you detect only little changes.
Because it is soaked in fabric conditioners and powder, you can wash it to soften the cloth for a short time.
You can always go back and check for problems if you suspect you took a step incorrectly.
Make a note of this page in your browser’s history or snap a screenshot to be sure.
Learn how to clean this type of curtain by clicking.
That’s all I have to say on the subject.
Do you want to make your standard curtains blackout? With this simple lesson, you’ll learn how to line store-bought curtains in no time at all!
This method necessitates the use of sewing equipment, so know that going into it. The skill to operate a sewing machine and thread a needle is essential for this project, although there isn’t a lot of sewing involved.
Is it a terrifying thought to you? You’re right. The only thing I could ever get out of my sewing machine was a tangled mess of thread, no matter how many times I tried. I was the one scouring Pinterest for “no-sew curtains.” It was my iron-on hem tape that kept me in tact at all times.
My life took an unexpected turn when I enrolled in a sewing class. As a student at this adult education facility for four weeks, I brought my sewing machine and learned how to make simple gifts for my mother, whom I gave as a Christmas gift.
I can now sew as a result. Somewhat. A straight line stitch is all you really need for most home DIY projects, and I’m not the best person to employ as your personal tailor, but I can do it.
This story has two lessons for us:
- It’s not a difficult task. If I, a complete sewer noob, could do it, I’m confident that you can, too.
- Take a sewing class if you’re looking for “no-sew curtains” on Pinterest. It will give you a basic understanding of the language. They’re usually available once a month at most craft stores. Sewing and photography lessons are available in many school districts/cities/counties’ adult education programs for those who desire something a little different.
Xem thêm : How To Hang Tab Curtains? Step by Step Instructions
It’s worth noting that this blog has affiliate links. I may get paid if you buy something after clicking on my link (at no additional cost to you.)
Materials
- The Ikea Lenda curtains were purchased from the local home improvement store. Some Ikea curtains come in 118-inch lengths, which means they can be hemmed to fit any window.
- The Roc-Ion Blackout Lining from JoAnn’s was perfect for this project. Because I’m single and paranoid about strangers peering into my home late at night, I prefer blackout lining for all of my drapes. Despite this, JoAnn’s also offers a wide variety of alternative drapery linings.
- It’s easier to hide squiggly stitches if the thread is the same color as the drapes, so I do my best to choose thread that matches.
Get Organized!
Use our FREE Project Planning Worksheet to get a handle on your project. We’ll send you the worksheet by email if you sign up for our mailing list!
How to Line Store-Bought Curtains
Step 1: Lay Out Curtain
Lay your curtain out on the ground in a large area. Place the curtain’s blackout lining on top.
The bottom of my windows don’t quite reach the floor, therefore my fabric has to be shortened. I’ll be able to save money on blackout lining this way!
Step 2: Pin Fabric in Place
The blackout lining should be pinned at the very top of the curtain. Whenever possible, I strive to align my lining and pins in such a way that the new seam will be as similar to the curtain’s original stitching as possible.
Curtain tabs were too bulky for me, so I folded them over and stitched them to the blackout lining at the same time. Don’t do that! Pin the fabric the old-fashioned way!
Step 3: Sew!
Attach the blackout lining by sewing a single line across its entire length at its highest point.
There you have it. There you go.
But, Wait…
You might ask why you haven’t stitched the other three sides. Because it appears to be a difficult task. The best I could do was make an effort. However, because it’s tough to align the fabric evenly, my lousy job didn’t turn out very well. I’m sorry, but I didn’t snap a picture, but believe me when I tell it didn’t look good.
In addition, blackout lining has a high degree of rigidity. It gives the drapes a sturdier look. The curtain you bought will retain its original, flowing form if you merely stitch it in at the top. Only the light is blocked by the blackout lining, and it does not alter the appearance of the curtain.
It’s finally safe to sew in the top of the blackout lining. What’s the use of doing extra effort if it’s not necessary? The curtain also looks beautiful this way. Here’s a look:
HOW TO ADD BLACKOUT LINING TO EXISTING CURTAINS
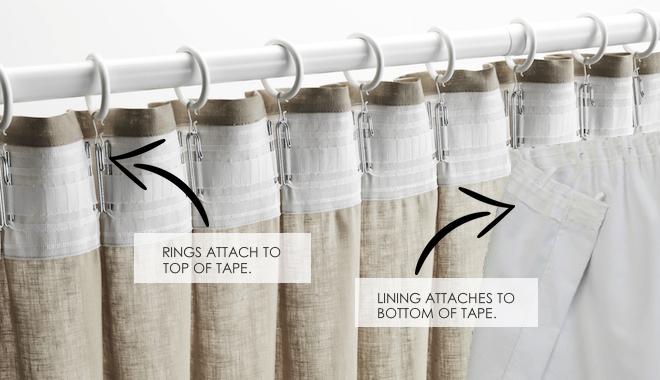
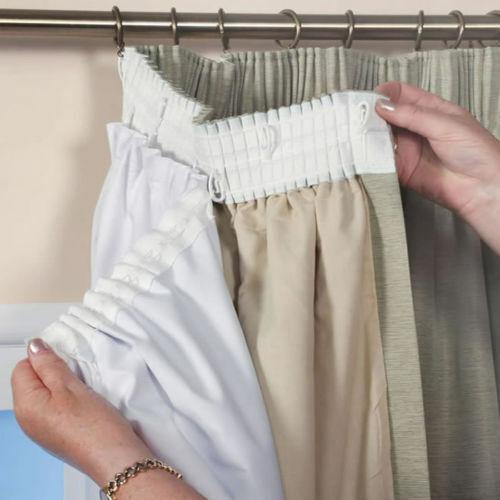
With our ready-made blackout curtain linings, you can easily change any pair of regular curtains into blackout curtains.
You’ll be able to obtain a better night’s sleep or more privacy thanks to the absence of sunshine, street lights, and annoying car lights.
When it comes to adding blackout linings to curtains, it’s a simple process that can be performed in less than half an hour, with no special skills required.
Can You Attach Blackout Linings To Curtains Without Sewing?
Blackout curtain linings may be attached to a set of curtains with no stitching required, and are ideal for use with both eyelet and tape headings.
All you have to do is follow a step-by-step illustrated fitting guide that is included in the package to attach the linings to your curtain panels.
It doesn’t get any easier than this!
What You Need
When it comes to making your curtains blackout, there are a few items you’ll need:
- A tiny ladder for putting up and taking down your drapes
- a big, clear, level surface, such as a table or a floor
- With the accompanying curtain rings and hooks, you may hang your pre-made blackout curtain linings.
- If the fabric has any wrinkles from being folded and inserted into a plastic bag, you may wish to softly iron them out.
Want A New Set Of Blackout Curtains Instead?
Our blackout curtains come in a variety of styles and sizes, so you may transform the look and feel of your space.
Take a look at our blackout fabric if you’re proficient with a sewing machine and want something a little more personalized.
It doesn’t matter what you choose; all of our products are created with our unique and exclusive 100% and 95% blackout material that is machine washable, easy to care for, and splash-proof; and its high-tech triple weave technology ensures the fabric is sturdy and long-lasting.
FAQs
Does this only work with blackout fabric, or can I use something else?
Drop cloths are a fantastic substitute for blackout curtains if you don’t need them. The fact that blackout cloth is so heavy helps explain why this technique works so well with it.
As a result, drop cloths would be an excellent solution. I’m not sure how well this strategy would work with sheets..
Do I actually need to line my curtains?
No. How light shines into a room affects the appearance you’re going for, and how you want it to seem.
Final Thoughts
They’re fantastic, in my opinion! With the burlap on top and the wainscoting below, I believe they’re a fantastic fit!
Check out the curtain rods I made myself!
If you found this helpful, save it to Pinterest so you can locate it when you need to line your curtains!
Store-Bought Curtain Lining: The Simple Solution!
Nguồn: https://iatsabbioneta.org
Danh mục: Curtains


