Want the classic appeal of pinch-pleated drapes but without the hassle? Pinch pleating ready-made curtains is simple; this guide will show you how. How to make curtain rings from binder rings and paper clips is another topic I cover. These rings are almost free, and you won’t believe how much more useful they are.
- How To Store Curtains? Everything You Need to Know
- How To Hang Curtains With Hooks On A Pole? Step-by-Step Tutorial
- How To Make Macrame Curtains? Complete Step-by-Step Guide
- How To Choose The Right Curtains For Your Yellow Walls? Comprehensive Guide
- How To Make Curtains From Sheets? Special Tips and Tricks
If you fit the following descriptions, this do-it-yourself guide is for you:
Bạn đang xem: How To Make Pleated Curtains? How To Cheat At Pinch Pleated Curtains?
- A messy curtain treatment is not something you find appealing.
- You’re in love with pinch pleated curtains, but you just can’t justify the high cost.
- You, like me, have very basic sewing skills.
- It’s important that your curtains can be taken down quickly and easily so that you can wash them.
In case you need to know something immediately or are just plain nosy: That is the pleater tape and pleater hooks I use. For the purposes of this guide, the following are the most useful types: The Use of Short Neck Pleater Hooks and Pinch-Tape for Pleating
How To Pinch Pleat Ready-Made Curtains?
A room outfitted with pleated curtains immediately exudes an air of refined sophistication. They include a level of classic elegance that will never go out of style. Imagine if Reese Witherspoon and Miss Mustard Seed had a baby.
Not only are they not the cheapest option when it comes to window treatments, but they are also not the easiest curtains to sew, which can be a deal breaker for those of us who love the look but not the price. Luckily, I figured out how to give you the best of both worlds by using ready-made curtains from Target and modifying them with a pinch pleat that only requires a little bit of sewing. (When I say “sewing,” I use the term loosely. I’m confident in your ability to complete this if you’re capable of sewing at least a straight line.
How Do Pinch Pleat Curtains Work?
Curtains benefit from pleats so that they can move in and out of the window without the bottom getting too full and blocking the view. Simply put, curtain rods prevent your drapes from flopping around and lend them an inherently neater and more put-together appearance.
Hemming, marking, pressing, pinning, folding, pinning again, and hemming are the steps involved in creating classic pinch pleats. That’s because it is as complicated as it sounds. This article, How to Make Pleated Curtains, goes into detail about the conventional method of sewing pinch pleated curtains.
Popular Types Of Pleated Curtains
Your personal taste can help narrow down the options for pleated curtains. It’s also worth noting that, in a strict sense, every curtain has pleats.
- Curtains with a flat drapery pleat are your standard, everyday curtains. It’s possible that you’ll hear “Flat Panel Curtains” instead.
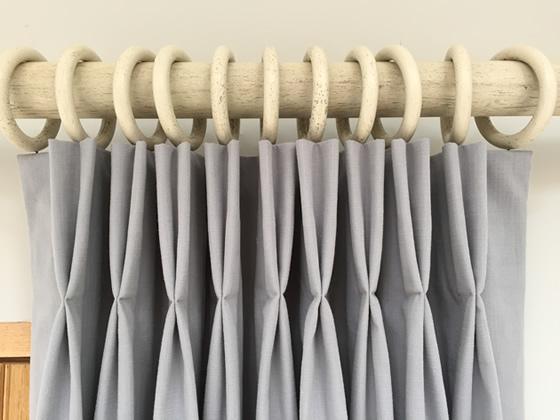
- The most common type of curtain pleat is the French Drapery Pleat (or Pinch Pleat), which is what we’ll be making today. It consists of 2 or 3 folds and then comes together 3 to 5 inches from the top of the curtains.
- Grommet Pleat – These are the most common types of curtains, and the rod slides through metal grommets.
- Rod pocket curtains have a rod pocket sewn into the top, and the fabric gathers on either side of the rod. Unfortunately, they aren’t always stable, are difficult to open and close, and can only expand as far as the top gathering will allow.
At the conclusion of this post, I detail the process by which you can change your rod pocket curtains into pinch pleats.
This article on Drapery Pleat Styles can help you learn more about the various curtain designs available.
Diy Pinch Pleat Curtains: Supplies Needed:
This is the best pleater tape out of the many available. Taped Pleats for Drapes
Again, there are many options when it comes to pleater hooks, but this particular style is the most effective. Hooks for a Short-Sided Pleat in the Neck
Rings for a Binder, Two Inches Wide
Clips for papers that are two inches long
Oil-Rubbed Bronze from Rustoleum’s Metallics line is my go-to when I’m in the market for spray paint.
The Curtain-Matching Thread You’ve Been Looking For
Curtains that you can buy in a store – (for examples of my own), click the links below.
Looking for Curtain Rods for under $10? In case you’re looking for Restoration Hardware-inspired curtain rods, you should read the post I made. I also detail some of my preferred low-cost brackets and easy-to-make finials.
Steps To Add A Pinch Pleat To Store-Bought Curtains
Step 1: Prep Your Curtain Hardware
Stop! Take a “before” picture of everything first. Post the “before” and “after” pictures here when you’re done so I can see the transformation! ❤️
In order to have time for the spray paint to dry while we work on the curtains, now is a good time to spray paint your binder rings and paper clips.
Your curtain rings and clips can be easily made to match your rod by spray painting them in a well-ventilated area. Here’s a post I wrote about making curtain rods that are inspired by those sold at Restoration Hardware for less than ten dollars.
The spray paint needs to dry for at least two days.
EXPLAINING MY CHOICE OF PAPER CLIPS AND BINDER RINGS AS CURTAIN HARDWARE
- These will only set you back pennies, while a new set of curtain rings will run you around $15.00.
- CURTAINS THAT CAN BE DISMANTLED INSTANTLY – SO YOU CAN WASH THEM You don’t have to unbolt the curtain rod from the wall or take off the brackets to take the curtains down. Simply take off the rings from the binder and they will collapse. DIY Bay Window Curtain Rods on a Budget shows you how to make your own, which is especially useful when working with bay window rods.
- EASILY ADJUSTABLE – The fact that you can use binder rings and paper clips as hardware for a curtain rod means that you have a second option when it comes to the height at which you can hook your curtains. Paper clips are convenient because they have two loops that can be used to attach to the pleater hooks.
“So tell me again, Karin,” she said. Have you ever bought curtains from the store only to find that one side is significantly longer than the other? Okay, here’s how to attach the paper clips to the upper loop: simply hook the long end through it. That saves you the trouble of re-mounting your brackets and replacing your curtains.
Have your curtain fabrics ever shrunk after a wash? Instead of buying new curtains or rehanging the brackets, you can simply move the curtains to the lower loop.
Have you ever discovered that after installing new flooring throughout your home, the length of your curtains was no longer appropriate? As a result, you won’t have to re-hem your curtains if you decide to switch out the loop they’re hooked on to.
After a flood a few years ago, which I detailed in my blog post “From Beauty to Chaos,” we had to replace the flooring throughout the entire house. When we replaced the carpet with vinyl plank flooring throughout the entire house, we found that all of our curtains were suddenly too short. Since it would have been a hassle to re-hem all 28 panels or reposition the brackets, I simply hung them on the lower level until it was time to put them back up again. Seriously, that was incredible! Who knew that some simple office supplies, like binder rings and paper clips, could be so helpful?!
Step 2: Buy Curtains Or Use Your Existing Curtains And Add A Pinch Pleat
PRINCH PLETTING CURTAINS FROM THE STORE
One of two options exists for achieving this. To ensure you get the right-sized curtains, measure the ceiling where the curtains will hang, then add an extra inch or two for the rings and clips. View this post for advice on how to determine the optimal curtain height: DIY Rods for Drapes
CONVERSATIONS ON PINCH PLETTING YOUR ALREADY EXISTING CURTAINS
Now that we have to consider the height of the paper clips and rings, you may need to raise your brackets if you use rod pocket curtains. Curtains that were not washed before being hung may shrink slightly, which can be used to your advantage by washing them now.
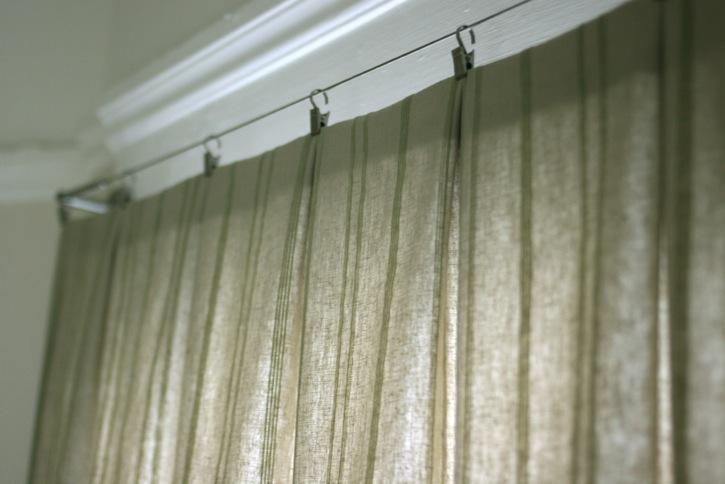
In this step, you’ll want to double-check that your pleater tape is properly aligned against the curtain’s back.
Place it so that the top is 1/4 inch from the top and the closest pockets on both ends are 1/2 inch from the edge. Take off the excess tape.
Verify that the tape’s tiny holes, which the pleater hooks fit into, are facing down. Ask me how I know this is crucial.
Step 3: How To Pinch Pleat Curtains With Tape
Xem thêm : How To Add Blackout Lining To Existing Curtains? Complete Step-by-Step Guide
You can hem your pleater tape between the top and bottom gold seams, but I find it most convenient to hem it right on the top gold seam. When hemming, make sure the openings to the pockets at the bottom are not covered. Choose a thread color that coordinates with your drapes.
Step 4: How To Attach Pinch Pleat Curtain Hooks
You can now determine where to attach the hooks to your homemade pinch pleat curtains after you have finished sewing the pleater tape onto the curtain panels.
To locate the center of your curtain, fold it in half along its length. Put your hook in the middle there.
Pleater Hook Tip: Instead of trying to insert the hooks one at a time, it is easier to place all four ends of the hooks in the mouths of the little pockets and then push the hook up.
You will find four end hooks in your hook package. Place one of these in the first pocket on each end.
Evenly Distributing Pleater Hooks – While perfecting this may take some practice, I was able to create two empty pockets between each pleat. There should have been four pockets, but the calculations were off and ended up with one on each end. OKAY, THAT’S FINE. If you hang them scrunched at uniform widths, no one will be able to tell.
Step 5: How To Hang Pinch Pleat Curtains
Having ensured that the pleater hooks are evenly spaced, the curtains can finally be hung. If the distance between your hooks isn’t ideal, just remove some and move them around. And that’s precisely why this approach is so appealing!
To organize your materials, fasten the binder clips and paper clips to the rod.
Just hook the curtains up and you’re done!!!
Remember to snap a photo!
Now that you’ve finished, please show me the finished product! Share your “before and after” pictures here!
Making A Pinch Pleat Curtain Look Even Better With Drapery Weights
Since freshly washed or newly hung curtains can look a little unkempt, I weighed them down with curtain weights to give them a more polished appearance.
In fact, I didn’t even bother to sew them. Basically, I just hot-glued one to the back of each curtain panel. What do you mean, “lazy easy”?!
The curtain weights that I used are as follows: Curtained-In Defeaters
More Posts Related Diy Pinch Pleat Curtains:
- Make Your Own Rods and Finials for Curtains
- The Easiest DIY Bay Window Rods
- Tutorial: Pinch Pleated Curtains
- Sherwin-Williams Silver Strand in the Master Bedroom
- Furniture Gel Staining: No Stripping Required!
Final Thoughts On Pinch Pleated Curtains And Diy Curtain Hardware
Because I am so pleased with the look of my pinch-pleated curtains, I have applied the same method to nearly all of the drapes in our home. The fact that it calls for such rudimentary sewing that even a novice like me can do it makes it appealing to me. The binder rings and paper clips used to create the simple, do-it-yourself rings were the icing on the cake, making this project not only inexpensive but also straightforward. Get out a measuring tape, and get ready to make your own pinch pleated curtains!
And so, today I’ll demonstrate how simple it is to make your own pinch pleat curtains. Since I was only going for a decorative effect, I didn’t bother lining my curtains and only used a small amount of fabric. OMG!!!
They add a touch of beauty to the space while also serving their intended purpose.
On the other hand, you may already have curtains and simply wish to give them a pinch pleat. And you can use this guide as well.
What you’ll pick up on is this:
- Pinch pleat tape and hooks, where to buy them, and my recommendations
- stitching on pleater tape
- the correct way to attach the pinch pleat clips
- And now, the hanging instructions
Let’s go!
Header Link to Contents
Things You’ll Need
- Curtain Fabric or Curtains
- Stretch Tape
- Hooks with Four Points
- Needles and Thread Sewing Machine
- Pole for Drapes
- Curtain Rods and Rings for Drapes
- Iron
- Push-pins, Wonder Clips, or other fasteners
- a pair of scissors specifically designed for cutting fabric
DIY Pinch Pleat Curtains – Step By Step
One of the first things you should do is clean and dry your fabric. This is crucial because fabric shrinkage will alter the drapery’s overall look and feel.
Iron, iron, iron after you’ve washed and dried your fabric. This will make it much simpler to cut the fabric and ensure that your curtains will sew up neatly. (Wrinkles can also make you look older than you are.)
I think we’re set to go at this point.
It’s a secret, but if you’re using ready-made curtains, you can skip right to the third step. You got lucky.
Step 1: Measure And Cut Your Fabric
Buying 4 yards of fabric for each window was the simplest and cheapest option. Each curtain will have 2 yards of fabric. Adding more yards to your order will be necessary if you want your curtains to be wider.
The curtains in my home serve no functional purpose. Since they are useless, they don’t need to move all the way across the window.
Once we hang these curtains, we probably won’t touch them again. Okay, we might clean them or vacuum them once in a while.
I sewed window coverings for my daughter’s bedroom that are just long enough to reach the floor.
Her bedroom is the pinkest in the country, and I wanted to decorate it with this cute floral (pink!) fabric I found. Fabric.com’s Art Gallery collection.
They are extremely thin cotton, but they are soft and delicate, and they make lovely curtains.
I sewed floor-to-ceiling curtains for my son’s bedroom. This windowpane fabric, available in both ivory and gray, is by one of my favorite fabric designers, Premier Prints. The walls of his bedroom are painted a muted gray (Sherwin Williams’ French Gray).
I simply folded the fabric in half horizontally (vertically for my son’s curtains) and cut at the fold to ensure perfectly straight edges.
Step 2: Sew A Hem On Your Curtains
No need to get abstract or mathematical. Add a simple hem to the edges of your curtains. Before I started sewing, I ironed the hem down.
The sole remaining unsewn area is the base. This is something I do after the curtains are up so that I can get a good look at the final cut.
Step 3: Sew On Pleater Tape
Let’s start with a brief introduction to pleater tape, also called pinch pleat tape.
Xem thêm : How To Make Rod Pocket Curtains? Step-By-Step Guide
Your pleater tape will be characterized by a series of evenly spaced vertical lines. These vertical lines will have small openings (channels) at their bases on one side.
When attaching the pleater tape, this side should be facing you.
Pin the pinch pleat tape in place once you’ve aligned the top of the curtain on the back. Trim the tail end of the pinch pleat tape.
Things to Remember Before Starting to Sew:
- You’ve got your pleater tape facing the wrong way, so the curtains’ unsightly hems will be on display.
- In this case, the holes (channels) of the pinch pleats are on the outside.
- Since you’ll be inserting the pinch pleat clip hooks in the opposite direction (upward), the channels for the pleats are located at the bottom of the tape.
- Pleat hook channels should not be stitched over. That will prevent you from putting them in.
Sew the pleater tape directly to your curtain after checking for proper alignment. I sew around the perimeter, along the top and bottom (careful not to go over the channels! ), and along both sides.
Despite what this photo may suggest, I did not actually sew over the channels.
Step 4: Insert Your Pinch Pleat Hooks
Yay! Here’s where all the good stuff occurs. I’ll show you the steps I took to make that beautiful pinch pleat.
If you look closely, you’ll see that your four-pronged pinch pleat hooks have…..
4 prongs.
Additionally, a slender hook.
The tinier hook can be attached to a drapery ring for convenient storage.
One pinch pleat channel will receive a prong.
How To Get The Beautiful Pinch Pleat Look
To get that chic three-pleat appearance, we’ll insert our prongs into every other pinch pleat.
To make them function, you must exert a certain amount of pressure on the fabric.
At first, I found this challenging, but eventually I became proficient. Even if things seem difficult at the moment, you shouldn’t give up.
It is also possible to pinch the curtain into the desired position and then align the holes in the back to make them more closely fit.
One of these days I really should get a manicure.
Another option is to gently separate your prongs before inserting them to increase your leverage, and then to re-squeeze them afterward.
Please see the accompanying video I made to illustrate this point.
How Far Apart To Space Your Pleats
Now that we’ve got one hook in place, how about we figure out where to begin the next pleat?
Although I cannot claim expertise in this area, I believe that it boils down to individual preference and the amount of fabric at your disposal. The recommended distance between each pleat varies, but it’s typically between 3 and 6 inches.
My advice is to examine the curtain to find the ideal location for the pleats. The more folds you can cram in there, the better, in my opinion.
This is where the pinch pleat really shines. If you want them to be uniformly spaced, you should use the same distance between the holes in the pinch pleats for each pleat.
You can also choose to wing it. Put a hook in each end, the center, and anywhere else that looks good.
You may need to adjust the pleats slightly after inserting the pinch pleat hooks to achieve the desired effect.
Pinch pleat tape and pleat hooks do the heavy lifting for you.
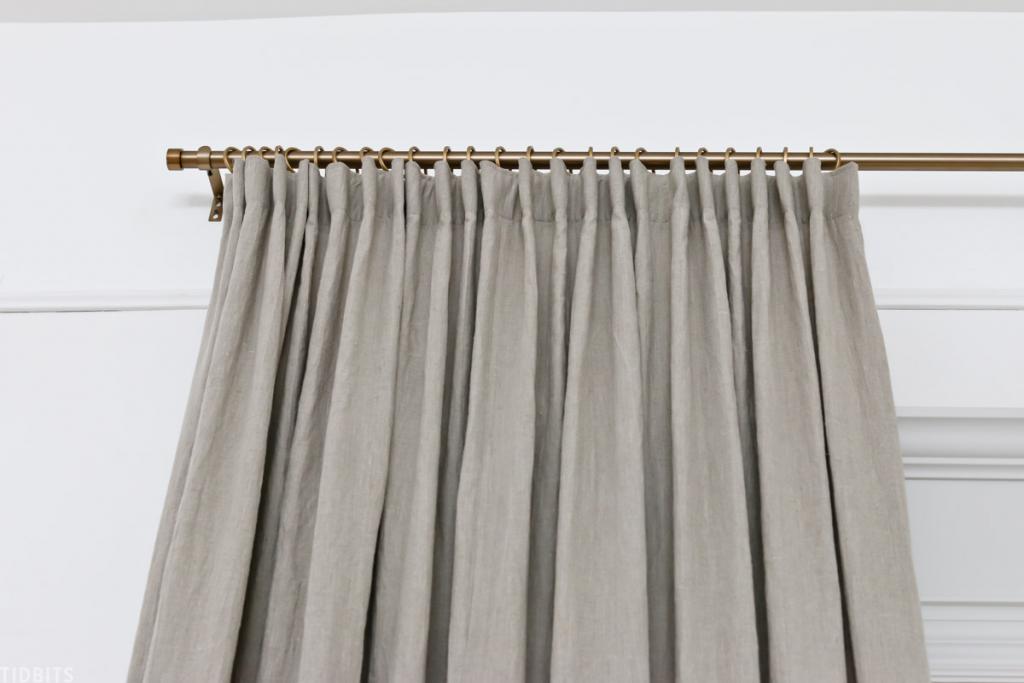
Step 5: Hang Your Beautiful New Pinch Pleat Curtains!
Woohoo! Finally, we have arrived!
We can finally hang them up now. I used this rod and drapery rings, which I hung on the rod first. After that, I used separate rings to hang the pinch pleat curtains.
The rings were the easiest to hang up first. It was too much for me to take on at once, and as I hung the rings kept falling off their hooks.
When the curtains were up, I hemmed the bottom by cutting off any excess material.
How To Add A Pinch Pleat To Curtains – FAQs:
Can You Wash Diy Pinch Pleat Curtains?
Yes, most certainly! The homemade alternative to pinch pleated curtains is much simpler to clean. The binder rings also facilitate removing the curtains for washing.
Can You Convert Rod Pocket Curtains To Pinch Pleated Curtains?
Yes, I did that with the rod pocket curtains I bought at Target. I finished the pleater tape on the inside back of the curtains as usual, oblivious to the pockets at the top. After sewing on the pleater tape, you can use a seam ripper to remove the excess hem at the top that resulted from the rod pockets if you don’t like it. Given how inconspicuous they are, I decided to leave mine alone.
How To Convert Pinch Pleat Curtains To Rod Pocket?
Pleater tape can be easily removed with a seam ripper, and a hem can be added about 2 inches from the top of the curtain to serve as a rod pocket if you change your mind.
How do I determine the right measurement for pinch pleated drapes?
In most cases, you can assume that each curtain will cover half its actual width once pleated, though this will vary depending on the spacing of your pleater hooks. Thus, remember that, especially when looking for practical curtain options. We have wood blinds, so the curtains in our house are purely for aesthetic purposes. After pleating, however, you will likely believe that each panel is only half as wide as it actually is.
Nguồn: https://iatsabbioneta.org
Danh mục: Curtains


