No need to sacrifice light for seclusion with macrame on a window or door! In order to add visual interest and even some privacy, this DIY macrame curtain is a terrific option.
Panels, planters, and much more can be made using the macrame technique, which is a sort of knotting craft. The curtain has a tiny portion of knots at the top, and the ropes dangle down to form the rest of the design. With its semi-opaque appearance and easy accessibility, this hook is ideal for placing on closet doors and other such places. Even a large curtain could be used to partition a room.
Bạn đang xem: How To Make Macrame Curtains? Complete Step-by-Step Guide
Learn how to macrame without getting yourself in knots by making this curtain.
What You’ll Need
Equipment / Tools
- Scissors
Materials
- 6mm cotton macrame rope, 50-150 yards long
- 1-inch wooden dowel or a smooth branch
Choosing Supplies
Macrame Rope
There are numerous designs and thicknesses of macrame rope, and while all will work, the results will vary.
This twisted cotton is a breeze to work with and extremely pliable. Untying your knots and retying them can sometimes cause the ends to tear a little. Fortunately, you can always trim the ends when you’re done.
You’ll need 6mm rope to match the gauge of this macrame curtain. Your curtain will be a different size if you use a different rope thickness, and you may run out sooner rather than later.
Hanging Rod
We picked a smooth, mostly straight branch that was big enough to span a window or a typical door in order to give this a more natural sense. To hang it without brackets, you can either use a wooden dowel rod or a stout tension rod.
Add a few inches of rope to each cut of rope if the branch or hanging rod is greater than 1 inch in diameter.
Cutting the Rope
You’ll need to do a little arithmetic to figure out how many curtains you’ll need based on your needs. But do not be alarmed! There’s already a lot of the math done for you. Both the curtain’s width and length are critical considerations while making one.
Panels measuring twelve inches in width are used to construct this pattern. Adjust the spacing as necessary to achieve the desired size.
To make a 30-inch-long window curtain, use these measurements. Make careful to follow the additional instructions for changing the length.
For a single 12-inch-wide panel, the formula is as follows:
- Cut two 108-inch strips.
- A 92-inch-long piece
- Sixty-eight inches
If you need more than one panel, simply repeat these steps for each one.
Altering the Length
Trimming the extra rope at the end of the project is the easiest way to achieve a shorter curtain. You can also subtract the difference by measuring and subtracting. To get the total length of each rope, multiply that number by two and subtract the result.
To get a longer curtain, subtract 30 from the total length requested. Add the result of doubling the result to each of the above-mentioned cutting lengths. Subtracting 30 inches from an 80-inch curtain results in 50. Each cut of rope should be doubled in length.
Attach the Ropes to the Rod
Using lark’s head knots, secure each piece of rope to the hanging rod by folding each one in half. Pull the ends through the loop and tighten it when you’ve brought the center over the rod.
Start with the two longest ropes and center them on the pole when constructing a curtain with an odd number of panels. Add two medium-length ropes to each side, followed by three short ropes on each side.
Start with a short rope in the middle of the rod and move to the right or left as follows: three short, two medium, two long, two medium, three short. If your curtain has an odd number of panels, start with a short rope in the middle of the rod.
The length of the ropes should be about twelve inches.
Add one section of rope at a time to prevent the ropes and panel portions from being jumbled. In addition, working with the rod hanging from your shoulders rather than reclining on the ground is beneficial.
Tying Square Knots
Once you’ve mastered the knotting technique for this curtain, it’s a snap to recall the pattern.
The first four sections of rope should be separated first. Make a loop with your left rope, then bring it over the middle two filler lines and under your right rope.
Right after that, bring your right cord under and through the first two ropes. In this case, the left loop is being crossed by the right rope.
Tighten the ropes until they are approximately an inch below the knots on the lark’s head. The first half of the square knot has been completed.
Bring the left rope over the right rope and beneath the two middle ropes to finish the knot.
In order to complete the maneuver, loop the right rope around and under the left rope, crossing it over the center ropes this time.
Right under two and over one, left under 2 and under 1, left 2 and 1 and over 1, right 2 and 1 and… right under 2 and over 1.
Repeat With the Following Groups of Ropes
Form a left-facing square knot with the next set of four strands by repeating the previous step.
This should be done with each of the four sets of ropes on the panel’s surface. The height of each knot should be the same throughout.
Start the Next Row of Knots
Set aside two ropes and work with four others. Both the first and second ties will be used in this project. In order to begin the second row, tie a square knot just below the first.
Knot the ropes across the row in groups of four at a time. There are two more ropes at the finish.
Add More Rows of Knots
Xem thêm : How To Hang Grommet Curtains Without A Rod? Easy Step-by-step Guide
Knot a new row with two ropes set aside at the beginning and end of the row. This will result in a triangle of square knots with the left side facing out. Each row should have an equal amount of space between the items.
Tie the Last Row of Knots
Work diagonally from left to center and then right to center for the final row of knots. Tie the left-facing square knot so there is a gap of three to four inches between the first and second square knots.
Add Panels for Width
Repeat the instructions above for the rest of the curtain panels.
Trim the Rope Ends
Trim the ends of the rope so that they are level with the curtain. It’s up to you whether you want to untwist the ends or leave them as is.
Hang Your Macrame Curtain
Use more rope or brackets to hang your curtain. With branches, it can be tough to keep things level, but that’s part of the appeal. In addition, the knots and panels can be spaced differently.
The curtain isn’t your cup of tea? This design can also be used as a wall hanging, or you can add another wall hanging pattern to make a curtain.
Where can I buy macrame curtains?
Make your own macrame curtains if you don’t want to pay for store-bought. Macrame curtains can be purchased instead of crafting your own DIY macrame curtains for a variety of reasons.
It’s possible that you’re not into DIY, don’t have the time, or just like the look of macrame curtains but don’t want to go through the trouble of making them yourself. Regardless, I’ve got this!
Pre-made macrame curtains have been carefully selected (and handcrafted) for you below!
- His Macrame Macrame Curtains
- The “Nomad” Macrame Door Curtain.
- Geometric macrame curtain made by hand
- A door curtain made of macrame leaves and vines.
- Panel curtains made of macrame fabric
- Window Treatments with M acrame Leaf
Best macrame curtain patterns and tutorials
Here is a selection of online tutorials for making macrame curtains in various formats, including articles, PDFs, and videos. Another option is to use a pattern, and there are plenty of those to choose from as well.
Vintage Macrame Pattern for Curtain Panels by The Patternist
Infatuated with the 1970s macrame style? The Patternist’s design is perfect for you. For privacy and light, this macrame curtain pattern is an excellent choice.
Heavy 2-ply jute rope was utilized in the presentation photo. Jute rope can be purchased at any craft store or substituted for any other macrame string with a few tweaks.
There are two sizes available for this pattern. 5031 inches is the size of the rectangular pattern, while 54125 inches is the size of the pattern with the adorable arch cutout.
This is a reproduction of an old pattern, and it includes all the information you need to build your own version, including material conversions and more. The digital edition of this pattern, which is suitable for intermediate to advanced macrame craftsmen, costs only a few dollars.
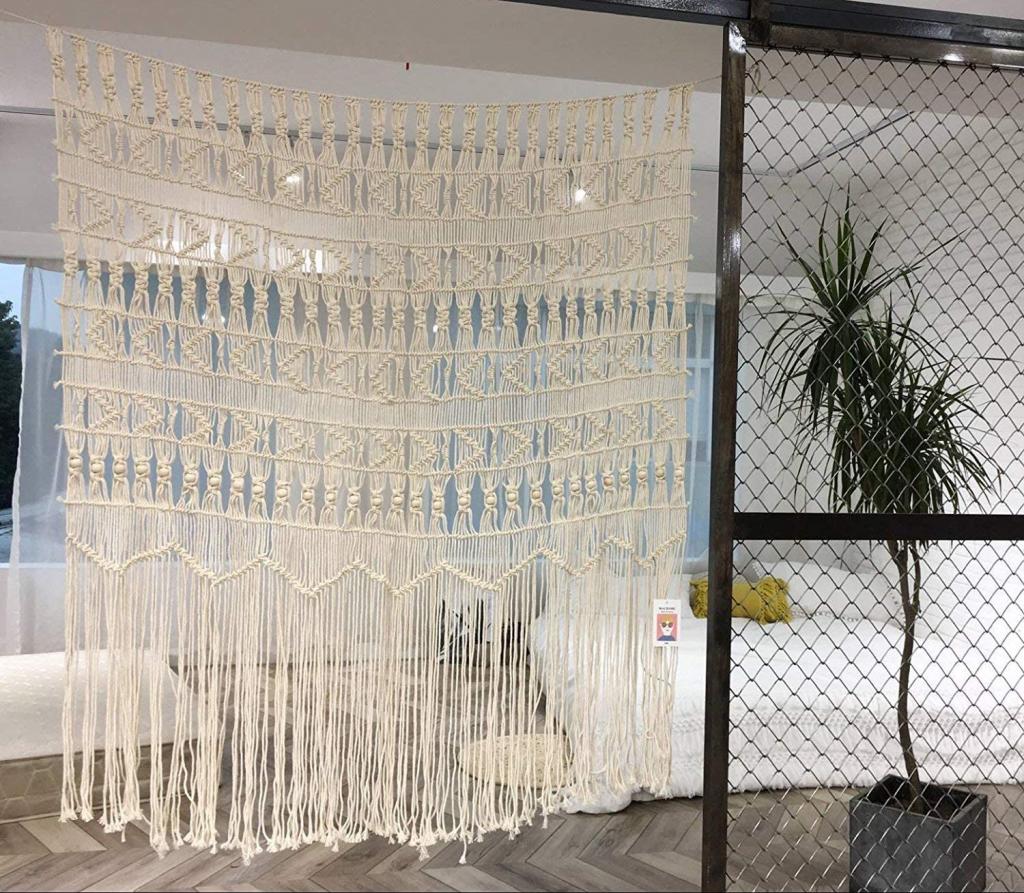
Macrame Pattern Curtain by The Cute Pattern Shop
This macrame curtain pattern is not for those who are easily scared. It’s not for the inexperienced.
For those experienced with macrame knots and patterns, this is an easy pattern to follow. Although the instructions aren’t as extensive as the ones above, this is still a good option.
This purchase includes a variety of patterns, including room dividers and drapes. The gigantic macrame curtain shown above, however, is the true star of the show.
However, the measurements of this curtain are not stated in the product description, which means that it is large enough to cover two double-glazed windows. It’s very private, but it’s going to cost a lot of money and time to build.
DIY Macrame Curtains by The Spruce Crafts
The Spruce Crafts has a detailed and easy-to-follow tutorial on how to make macrame curtains. It’s a great curtain for beginners because it just requires one type of knotting for the entire length.
For those who like a more understated look, this macrame curtain design is for you!
As a bonus, this can be made in any length or width you like. For a huge window or archway, simply construct as many panels as desired. Smaller windows and doorways can also be accommodated with simple changes.
I love that this technique can be completed in about three hours! It’s not a really impressive project, but it’s a good one for beginners.
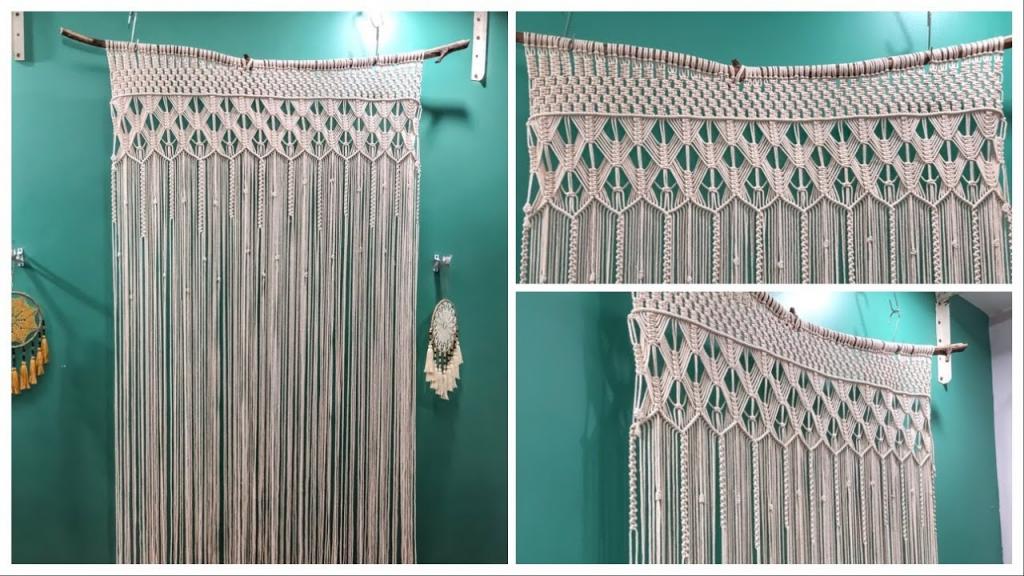
DIY Macrame Curtain Tutorial by Him Macrame
His YouTube channel, Him Macrame, features an impressive collection of macrame tutorials. Before beginning, it is recommended that you have a basic understanding of macrame knots.
It will be a piece of cake for you if you already know the Larks Head Knot, Spiral Stitch and Square Knots.
The final product has an 80cm x 220cm size. Beads can be readily added to change this into beaded macrame drapes if desired.
Being on YouTube means it’s always free and a great resource for crafters who are more visual in their approach.
Inner Sanctum Curtain by The Star Shop
Another vintage-inspired macrame curtain pattern is available here. This macrame curtain’s lovely archway is ideal for an entryway. With a healthy amount of classic macrame style, it’s lovely and beautiful.
Make it bohemian-looking by matching it with bamboo or wood curtains on your windows.
It is possible to change the width and length of this pattern to fit any conventional doorway. It’s possible to turn this into a large window panel as well.
This curtain pattern is based on a 1970s-era macrame pattern book and comes with a step-by-step instruction to teach you how to build it.
DIY Beaded Arch Door by Craftflaire
Using this Craftflaire template, you’ll be able to make a stunning beaded doorway curtain. It’s a stunning piece of art!
When compared to the other patterns on this list, this one costs more because it’s an original design that wasn’t borrowed from a book. The step-by-step directions, which include images and advice, take up 14 pages.
For a doorway with a width of 30″ to 36″ and a length of 80″, this macrame pattern is ideal. These curtains are also available from the vendor on her store!
Xem thêm : How To Fix Curtains That Are Too Long? Troubleshooting and Repair Guide
This curtain is perfect for beginners because it just requires two macrame knots! It’s also simple to customize for your own tastes.
Make Your Own Macrame Curtain by A Beautiful Mess
Free macrame curtain tutorial for beginners: this one. At the top, a simple knot is tied, allowing the rope to dangle freely.
The length and width of this DIY curtain may also be easily altered by adding or removing strands from the rod. Alternatively, you can trim the length to fit any doorway that you have.
In a doorway, rather than a window, this design is most effective. As a bonus, it’s relatively light, which helps keep manufacturing costs down while sacrificing some privacy.
XL Macrame Pattern ‘Journey’ by Berry and Clove
It’s technically a wall hanging, but it can easily be utilized as a valance for the window and combined with a set of blinds if you want. The look is really feminine and layered.
The knots on this curtain may look complex, but they aren’t nearly as difficult as they appear. In fact, a diagram showing how to tie the four macrame knots in this pattern is included in the purchase price. It’s marketed as an easy-to-learn game, and the user reviews support that claim.
To help you along the way, the pattern includes both a list of materials and a step-by-step tutorial with images.
This curtain has a width of 46″ and a length of 92″ if it is doubled for an extra-wide window. As a result, it serves only as an ornament and offers little in the way of protection from prying eyes.
Macrame Curtain 70s Macrame Pattern by Knitting Nostalgia
The materials list for this pattern differs from the others in that it calls for dishcloth or knitting cotton rather than standard macrame cord. Macrame cord, on the other hand, will work just as well.
This macrame style is reminiscent of 1970s home design, as are many others. To suit a 39×37-inch window, it uses two top and bottom rods, but it’s adaptable to any size.
This pattern is more suitable for experienced or intermediate macrame weavers because it does not make use of a standard macrame cord. This curtain is simple to build if you already know how to tie the fundamental macrame knots.
However, it’s a bargain.
Elegant Macrame Curtain Tutorial by Him Macrame
Him Macrame has created yet another stunning instruction for making a macrame curtain. If you’re looking for ideas for macrame curtains, this YouTube channel has a number of good ones.
With a width of around 43 inches, this curtain is ideal for windows and doorways.
Because it is broken down into such manageable steps, this macrame curtain tutorial is ideal for those just learning the craft. Although fundamental knots like alternating half hitch knots and square knots are a good starting point, knowledge of these knots is not required.
The top of the curtain has a basic diamond design in bohemian style. You can change the color of the cords or add beads to any of these curtains, or any other on this list, to make them your own.
Another thing to consider is that this YouTuber has an Etsy store where they sell a wide range of pre-made macrame drapes. It is highly recommended that you look into them in the event that you require a quick curtain for a wedding background.

DIY Macrame Beaded Curtains (With a Built-in Planter) by HGTV Handmade
It would be an understatement to suggest that this tutorial is for beginners. This beaded macrame curtain may be made by anyone, even if they have no prior experience with macrame.
HGTV Handmade’s Andrew and Dennis go down each process to make it simple to follow along. There are only two knots you need to know to complete this project: the Lark’s Head and the Square Knot.
Simple and elegant, with an extra bonus of practicality, this curtain is sure to please. There’s even a plant hanger built right in!
This macrame curtain is made on a tension rod so that it can be moved around to anywhere you want it.
This curtain can be be made in any length or width you desire. Choosing the right size rod and using an equal number of ropes crosswise is all that’s required.
What materials will I need to make a macrame curtain?
If you want to build your own macrame curtains, you may either start with a kit or buy the components separately as you go. You’ll need a lot of macrame cord for this.
Having trouble deciding on a cord or knowing where to look? For more information on selecting the best macrame cord, read our comprehensive guide!.
You’ll need a curtain rod in addition to the macrame cord. An old-fashioned curtain rod, or perhaps even an old-fashioned wooden dowel, is all that is needed to hang the drapes. Only choose a curtain panel that is big enough to cover your window.
Wooden rods or sticks are preferred for a more natural boho vibe. Smooth hardwood dowels are the best option for a more contemporary design.
Masking tape and scissors are also required. Your string will stay neat and tidy as you tie it thanks to the masking tape!
In the lessons that follow, we’ll indicate any additional supplies needed.
These tutorials and patterns for macrame curtains can be customized to meet your unique taste by changing the colors or adding beads.
The length of any of these curtains can be adjusted by multiplying the measurement from the curtain rod to the desired end point by two.
Final Words
I hope that after reading this post, you now have a better understanding of how to properly measure curtains.
May the foregoing writings help you on your journey.
You’ve done an amazing job up to this point. Thank you so much for your time and effort!
Nguồn: https://iatsabbioneta.org
Danh mục: Curtains


