Creating a fabric-covered cornice box for your windows is a simple DIY project. Check out our entire tutorial on how we created and covered our daughters room window valance in fabric. This is a simple project that can be done using a variety of tools and materials, as well as some clever methods!
DIY CORNICE BOARD
Jump to…
Bạn đang xem: How To Make Cornice Board Curtains? Step-by-Step Tutorial
As a long-time reader, you may have seen my Window Valance Box in our nursery a few years back. As far as I’m concerned, it’s still one of my favorite DIY window coverings to date. It’s hard to overstate the importance of decent window treatments! However, they don’t have to be pricey at all. A basic MDF board, batting and 2 yards of fabric were all that was needed to create this (and we even had extra left over to make a throw pillow!).
Here’s a look at the rest of the DIY bunk room the girls made!
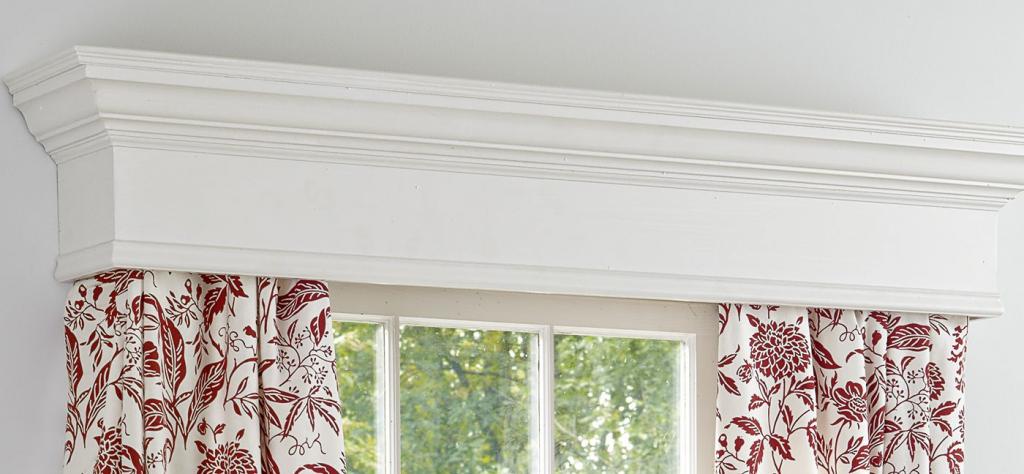
In the girls’ shared room, we hung this cornice box. We wanted a gorgeous window treatment that wouldn’t obstruct the built-in bookcases in our daughters’ bunk room (ages 7 and 3). The simple addition of a scalloped cornice board completes the look of the area.
HOW TO DESIGN A SCALLOPED CORNICE BOARD
There are a few basic design principles I follow when determining the appropriate size for a cornice:
1. THE CORNICE BOARD SHOULD BE MOUNTED 1″ BELOW THE CEILING:
Since we have 8 ft. ceilings in our home, I try to create height everywhere I can. ‘ The top of the cornice should be exactly 1″ below the ceiling for me. Using this technique helps to elongate the ceilings and make them appear higher than they are. If the box is any higher, it will be difficult to manoeuvre.
2. THE CORNICE BOX SHOULD HIDE ANY UNSIGHTLY BLINDS
It’s important that the cornice is just high enough to cover the window frame and any other window treatments (such as shades or blinds) that you’d like to protect. We had to raise our faux-wood blinds above the window so that they would be hidden by the cornice box.
When looking out the window from a standing position, they should be barely visible.
3. DON’T COVER UP TOO MUCH WINDOW–REMEMBER YOU WANT TO LET THE LIGHT IN!
It’s a delicate balancing act to keep the cornice from covering more of the window than is absolutely necessary while also keeping the blinds hidden beneath it. The size of the scallops depends on the size and scale of the window and the room in which they’re going to be placed.
We opted on three scallops with a 24″ radius and 3″ of reveal between the scallops for this window..
4. CORNICE BOARD WIDTH ACCOUNTS FOR WINDOW TRIM AND CURTAIN RODS
As a last consideration, make sure the cornice is wide enough to clear the window casing trim and deep enough to accommodate the blinds or curtains below. Ours measured 72 inches broad by 20 inches high by 5 inches deep.
PROTOTYPE A CORNICE BOARD
It may sound like a cliche, but we virtually always prototype anything new we’re going to build—especially if there’s a design feature that we’re not quite sure about or if it’s something that will be expensive or time consuming to change after we’ve built it.
Prototypes help us in two ways: first, they help us see how the design piece will look in real life without having to spend a lot of time and effort on it in the beginning. This is a great time to make changes if we don’t like it. In fact, if we do make adjustments now, it implies we could have avoided wasting time, money, and aggravation if we had just gone through with the plan as is.
In the second step, they ensure that the design is compatible with the planned space. Our prototype scalloped cornice had a window casing sketched out so we could ensure that l-brackets used to attach the cornice to wall would not interfere with the casing’s height.
To figure out the dimensions of the scallops on this do-it-yourself cornice board, we first made a paper replica. We went back and forth on this one a few times before we were satisfied with the scallops.
In the next step, we built a cardboard mock-up of the cornice that we could hold in position to get a sense of how it would fit in the room. The fact that we liked the way it felt gave us the confidence to move forward with the project of making it from wood.
HOW TO BUILD A CORNICE BOARD WITH SCALLOPS
*This post contains affiliate links at no additional cost to you. Please check my disclosure policy for more information.
MATERIALS
- We used 2 yards of this fabric in our project.
- We used 2 yards of batting for this project.
- 3/8′′ T-50 Staples
- 12″ thick MDF
- L-Brackets
- drywall screws with a 1-1/4-inch head
- drywall screws with a 2″ diameter
- Glue for wood
TOOLS
- Saw, Circular
- a sawhorse
- Jigsaw
- Drill/driver
- A stud finder is what you need.
- The 120 grit paper used for sanding
- Staples
We used 12″ MDF to build this cornice. Actually, it could be made from a variety of materials, including leftovers (which we used to make our nursery valance box).
HOW TO BUILD A WOODEN CORNICE BOX:
Prepare the wood by cutting it into rectangles.
For a nominal cost, you may be able to have someone at your local home center cut the pieces to your specifications. If you don’t have a table saw, this is an excellent alternative. For those who don’t have a large enough vehicle to transport a whole 4×8 sheet of wood, this is a viable choice.
For our cornice we didn’t actually have one piece of ½” MDF big enough for the whole front face, so we used two smaller pieces joined together. To join the pieces we glued and nailed two backer-pieces to the backside of the front face. We used two pieces so they wouldn’t get in the way of the cross-brace that would need to be attached later. Although I wouldn’t recommend doing it this way because it made the build more difficult, it demonstrates that you can often get by with what you already have.
We couldn’t find a piece of 12″ MDF large enough to cover the entire front face of our cornice, so we put two smaller pieces together. It was necessary to attach the components by gluing and nailing backer-pieces to its rear. Because the cross-brace would need to be attached later, we utilized two pieces instead of one. Using this method was more involved than I’d like, but I think it only goes to show how resourceful you can be when working with the materials you already have on hand.

The arcs were drawn using a compass. Use a scrap of wood with two holes drilled in it, one at each end of the circle’s radius, as an alternative. A piece of twine or a tape measure would work just as well.
Using a jigsaw, cut the scallops.
Our jigsaw was set up to cut the scallops, so we followed the curve as closely as possible when cutting. Here’s a pro tip: if you press down too hard while using the jigsaw to cut the curve, the blade will flex to one side and result in an uneven cut. We used 120 grit sandpaper to sand down the edges of the curves once they had been cut, as they will be covered by batting and fabric.
Put the cross-brace and the sides together.
Wood glue, 18-gauge brad nails, and 1-1/4-inch drywall screws were some of the materials we employed. At a height of 5 inches below the cornice, we nailed our cross-brace into place and trimmed the sides flush with the top and bottom. After the glue had dried, we sanded the edges and corners with 120 grit sandpaper to remove any sharp edges that could pierce the batting or fabric.
HOW TO COVER CORNICE BOARD WITH FABRIC
In order to cover the cornice board, cut a piece of batting that is at least 2-3 inches larger on each side.
Our goal was to have enough of extra batting on hand for stapling to the cornice’s reverse so that it would be larger than the surface it would cover.
When you’re finished, make a small slit at each corner of the scalloped batting, but don’t cut all the way through.
Staple the batting to the back of the cornice board after folding it over. For each additional scallop, follow the previous step’s instructions.
Stapling batting to the top edge after it has been folded and stapled.
Xem thêm : How To Calculate Yardage For Curtains? Step by step guide
A consistent tension was maintained during this process in order for it to lay flat on the front face.
Make a cornice board from scratch by folding, trimming, and stapling.
Staples were then used to secure the corners after we cut a slit into them and folded the batting over itself. We simply cut away any overhanging batting that was too thick to staple together. Only the exposed front and edges of the cornice are to be smoothed; the rest of the cornice is hidden!
Trim any excess batting close to the staples. Your DIY cornice board will look more professional if the edges are round enough.
The final step is to sew the fabric onto the surface.
When we tried to use a single piece of fabric to cover the cornice, the pattern was orientated such that the birds would have been looking in the wrong direction. To make up for this, we decided to sew the fabric together to form a piece long enough to cover the entire cornice, with the pattern facing the correct way.
Additionally, the seams had to be properly aligned with the design so that they wouldn’t be obvious. Making two seams instead of one (which would have been symmetrical, but in hindsight, this step was probably unneeded, although it looks amazing and no one has ever detected seams) made things much more difficult for us. In the end, you’ll have a stunning DIY Cornice Board!
Assemble cornice with staples and fabric:
It was just like the previous process with the batting, except that we initially stapled a few staples on each scallop’s edge to keep it in place while we worked on it. Again, we cut slits into the corners, making sure not to cut too deeply or the slit would be visible from the bottom..
Trim the surplus fabric and prepare the cornice for wall installation.
HOW TO MOUNT CORNICE BOX TO WALL
Make sure to use L-brackets to attach the cornice to the wall for a secure fit.
L-brackets can be attached to windows with a header above them since there is solid wood all across the window opening. Use a stud finder to make sure (or locate studs to screw your brackets into).
Our L-brackets were fastened to the wall using 2-inch deck screws. It was critical that the brackets’ tops be level and at the same distance from the ceiling, so we double-checked our measurements. The brackets were positioned so that the finished cornice would be roughly 1″ lower than the ceiling.
Cornice was attached by placing it on the L-brackets and screwing a couple of screws into the cross-braces.
AND THE FINAL RESULT…
We couldn’t be more pleased with the results of our DIY cornice board! I love how it hides the girls’ (required) yet unappealing imitation wood shutters while tying in their scallop theme! Because the curtains are out of reach, the cornice design is ideal for a child’s room.
FAQS ON WINDOW CORNICES & DIY CURTAINS
WHAT’S THE DIFFERENCE BETWEEN A WINDOW VALANCE AND A CORNICE BOX?
Window valances are composed of fabric, whereas cornice boxes are constructed of wood. It varies from time to time whether or not they are covered in fabric. Most people don’t know the distinction and use them interchangeably, despite the fact that there is one. There is no loose fabric underneath a fabric-covered cornice box (unlike a window valance.)
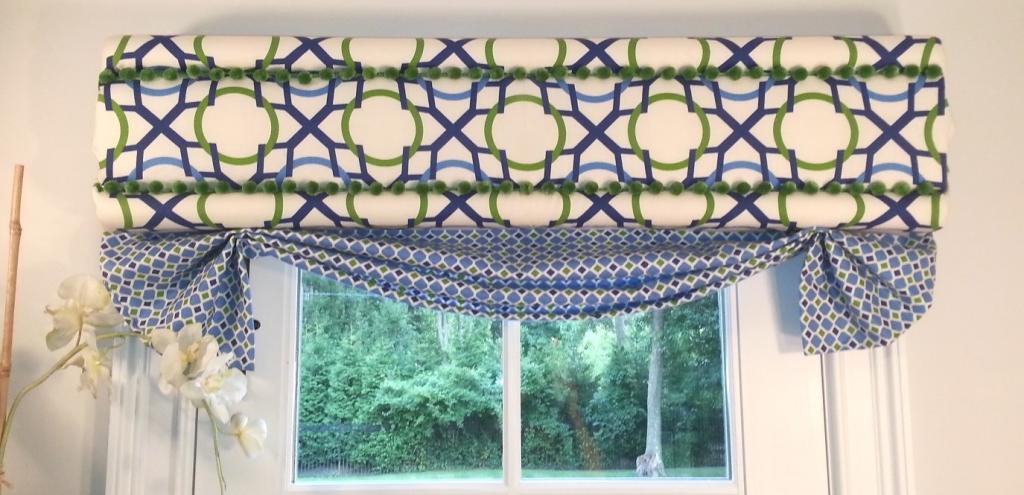
WHAT IS A WINDOW VALANCE?
To put it simply, it’s the highest element of a window treatment, which is typically used to cover blinds. Because it’s composed of cloth, it can either be paired with matching curtains or left bare. In the UK, it is known as a pelmet box.
WHAT IS A CORNICE BOX OR A WINDOW CORNICE BOARD?
It is common practice to use a cornice box or cornice board to enclose the top of a window. Hardware for window treatments is often buried beneath the surface (like blinds).
Steps To Make Cornice Board Curtains
To have a home, one must have curtains. They protect you from the sun’s rays and come in a variety of styles.
They can be used for a variety of purposes, including as blocking the entry of dust into your rooms or simply for aesthetic purposes.
With cornice boards, we can help you make your curtains seem even nicer.
Cornice board curtains are straightforward to make if you follow the instructions I’ve provided.
Whether or not you choose to follow these procedures is entirely up to you; they are only guidelines.
So, how do you go about making cornice board curtains?
Step #1. Hang the curtains
It all begins with you putting the curtains up in a convenient location to get a fast measurement and prepare for the following step.
It is important to hang the curtains correctly in order to avoid any problems.
Incorrect installation can lead to difficulties..
Step #2. Measuring and marking the frame
All you need is a simple measuring device for this stage.
The ideal method is to utilize a framing square or a tape measure.
Get the window’s internal width and add four inches to the window’s diameter to get the average diameter.
After that, you’ll need to cut two 1/8-inch sections to the length you want.
Make sure to double-check your measurements before attaching the cornice board to the curtains, as this could alter the final look.
Step #3. Cutting the frame
When building cornice boards, wood is the most important material.
Making these will be easier if you have one on hand.
Xem thêm : How To Hang Curtains Over Horizontal Blinds? A Must Read!
This step is critical since you will subsequently outline from the wood.
Simply draw a straight line through the points you marked on the 1x8s with a square.
Cutting the wood with a circular saw thereafter might be beneficial.
This is the only tool that can be used in this situation without causing complications or even harm.
Step #4. Put glue on the front and top
Glue down to the 1 by 8 that you’ve measured previously and prevent smearing it all over the place.
What’s the point of asking? That other piece would not be held appropriately for later if it were to be used in its place.
Screw the two 18-inch sections together while holding one in place and the other in opposition to the glue bead you’ve placed.
Step #5. Measuring, cutting, and gluing the end cap
Make a mark where a 1/8-inch piece of wood joins the frame at either end.
Then draw a line over the mark using a pencil and a square.
Use a circular saw to smooth and fine-tune the line so that it may be fitted into your cornice box with greater precision.
Glue the internal edge of the cornice box to the box’s end once you’ve completed the previous stages.
On the other side, do the same thing.
When screwing the end cap into place, use wood screws that match the color and texture of the wood.
Step #6. Wrap wood with batting
There are two things you’ll need for this phase. The spray adhesive for fabrics and the batting itself are the first.
This requires a fabric spray adhesive, which has a high level of stickiness and is simple to apply.
Adhesive should be applied to the frame you built earlier.
The batting should not slip off throughout the procedure if all pieces are sprayed on.
The best option is to use batting to cover the entire box.
For the best adhesion and no wrinkles, smooth the batting before applying it to the wood.
After completing these processes, make sure there are no problems by stapling each batting side to its internal corner.
Step #7. Wrapping and securing the fabric
Apply the adhesive to the batting once more using the spray bottle you used before.
Wrap the cloth around the inside corner of the cornice and staple it in place.
In order to ensure that the front side of the cloth does not have any creases, you should pull the fabric tightly.
Visually, it might be a disaster.
In the end, the cornice’s edge will be flush with the wall, so any excess staple fabric will not be seen.
Step #8. Attach brackets and secure
Determine exactly where the window cornice will be.
Finally, level and label the apertures in the upper right of the window frame before attaching a heavy-duty bracket to the frame.
As for the second bracket, level the one you’ve just put and note its location with a pencil.
Stick to it after that.
The next step is to install the cornice and drapes above it after the brackets are in place.
Retain it by screwing in wood screws once more.
Do you want to know how to hang heavy curtains? Then, go to this link.
Then again, that’s all I can say.
Conclusion
Creating a cornice board for your curtains just become a whole lot easier thanks to this tutorial.
The subject of how to construct cornice board curtains has now been answered.
You should be able to make a cornice board for your home, apartment, etc. with less difficulty the next time around, I hope.
Nguồn: https://iatsabbioneta.org
Danh mục: Curtains


