Campervan and RV owners will need to manufacture their own drapes or window coverings to keep the light out and enhance their privacy. Here, we’ll show you how to make your own campervan curtains on a budget by comparing several types of window coverings and providing a step-by-step tutorial.
When it comes to van building, window coverings are often disregarded.
Bạn đang xem: How To Make Campervan Curtains? Comprehensive Guide
The most crucial features of a window treatment are:
- privacy
- obstructing light
If you’re getting ready in your campervan and you don’t have curtains or window covers, you’ll probably be mooning the entire planet. In the woods, it’s not a big deal, but in the city, it’s not so fantastic!
Campervan drapes, in addition to providing much-needed seclusion, also block out light, whether it’s the full moon or street lights in a Walmart parking lot. No matter where the light comes from, you’re not going to get a decent night’s sleep if it’s shining in…
The question of what kind of window coverings are ideal for your campervan now arises…
Everyone’s van has a separate set of windows. Some folks (myself included) have a passenger vehicle with a plethora of uncovered windows. Another option is to buy a cargo van without windows and then add windows later on your own accord (we’ve all been there!).
Maybe you only have one window… Or perhaps there are 6.
When it comes to protecting your campervan’s windows, there is no such thing as too many options available.
For the record, we’ve taken two (very!) different tacks to this. Each method will be explained in further detail, but here is a quick overview:
DIY Campervan Curtains
- allow for some personal space
- protect your eyes from glare
- temperatures are not regulated by them (unlike insulated covers)
- cheaper
- easier to put together
- DIY is a resounding yes
Insulated Window Covers
- Magnetic, with a tight-sealing cap, these ensure your privacy at all times
- Darken the room.
- to assist with the insulation of your vehicle (this is critical and will be discussed in greater detail later)
- a higher price tag
- making it more difficult and taking longer
- DIY is a resounding yes
Which is better: Curtains or Insulated Window Covers?
The two solutions are equally viable, but for quite different motives.
You will get more benefits (insulation, total blackout and complete privacy) by using insulated window coverings than you will by using ordinary curtains.
In any case, making your own drapes is far easier and less expensive. The savings aren’t enormous, but if saving time and money is your primary priority, then I believe you’ve found the right solution.
You may already have an idea of which solution is best for you after reading through the basic bullet points above.
If you’re still not sure, we’ll go into further detail below to help you understand the pros and cons of each choice. This is where we’ll go over how to make each and how long it will take.
DIY Campervan Curtains
Having limited funds, we decided to keep things basic for our first campervan project. Using sheets obtained from a thrift store and a borrowed sewing machine, we constructed inexpensive curtains for our home.
While they helped us keep our van build costs down, they only served one purpose: to provide us with some seclusion. In addition, when I say “some privacy,” I mean only a small amount of it.
Our shadows could be seen through the curtains at night because they were thin and had some gaps in them. Due to their lightweight, it follows that they couldn’t effectively screen off the sun’s rays.
They didn’t even bother to adjust the temperature in our vehicle. I had no idea until I saw a fellow van lifer with these adorable-looking insulated window coverings on Instagram…
Insulated Campervan Window Covers
The magnetic window covers that suddenly snapped in place convinced me to buy them.
When we started building our second campervan, I informed Ben, “We are absolutely getting these.” Then I noticed the cost.
This is a pricey investment for anyone who has done any homework into purchasing insulated vehicle window coverings.
The most expensive quotation came from a small family-run firm that utilizes ethically sourced fabrics and has adorable designs, while the cheapest quote came from a company that manufactures bare-bones covers with function over appearances. We got quotes from all four of these businesses (the cheapest of the bunch). Then there were two more in the middle of everything.
$627 was the average price for the four companies.
Right on, that’s exactly what I meant…
According to our research, the lowest quotation we found was $460 for four window treatments.
It’s understandable if you’re squirming at the price of this, which includes seclusion, a blackout curtain, and temperature control. Both ours and yours were.
A variety of alternative choices exist.
Make Curtains Instead
We have a simple DIY curtain tutorial for those on a shoestring budget. Just know that covering your windows with an insulated magnetic cover is going to be far superior. You can always “upgrade” this later on.
Make your own Insulated Window Covers and Save $$$!
The other option is to say, “Yes, I need insulated window coverings right now but don’t want to spend hundreds of dollars,” if you are reading this and nodding your head in agreement. Let me share some excellent news with you.
Creating my own window treatments took a significant amount of time in the form of extensive study, charting, and design. I experimented with a wide variety of materials.
And I struck it rich.
I came up with a way to produce these infamously pricey window treatments on my own… and I’m going to show you exactly how I do it!
These window coverings have made such a difference, I can’t tell you how much I appreciate them. These insulated window covers have completely changed my perspective on my DIY curtains. There is no going back for me!
Psst! I have no prior knowledge of sewering. My guarantee to you is that you can construct these window coverings just as well as I did.
To put it simply, Insulated Window Covers are a game changer.
a) Temperature Control
These insulated blankets kept our van cool during the hot summer months. You could feel the cover’s heat on the glass as we yanked it back.
Additionally, we’ve been able to stay warm and dry in our van during the Oregon winter thanks to our magnetic window covers.
b) Privacy
It’s been a while since I’ve mentioned that our curtains had a small gap at the bottom. There were a few unpleasant moments when we were separated and saw individuals peering through the cracks in our separation. Why, exactly?
As a result, there is no “gappage” with these magnetic window covers. There’s no way someone could get a peep inside.
c) Blackout status
Xem thêm : How To Make Curtains For Pop Up Camper? 5 Helpful Tips
I would probably use a heavier and darker cloth if we were to create our own campervan curtains again. It looked great, but it didn’t offer anything in terms of light blocking.
A humiliating story: We quickly discovered that even when the curtains were shut, our shadows could be seen from the outside. Ben came to this conclusion after watching my shadow undress as he walked back to our van after using the restroom. Yikes!
On the other hand, our magnetic covers are completely blacked out. When we went outside to look at the sky in the middle of the night, you couldn’t see a speck of light emanating from our vehicle. All power is out. When you’re camping in a city, it can be helpful to not be able to see that anyone is inside the van.
As a bonus, we’re never awakened by spotlights or a full moon when sleeping here.
It can be difficult to get out of bed in the morning because it’s so dark inside! Why would you need an alarm for that?
d) Simplicity
These puppies are a cinch to install thanks to the window cover’s magnetic border.
Snap bracelets, popular in the late ’90s, were notoriously difficult to put on and take off. (Or am I aging myself?!) There is a pleasant click as these window covers snap into place, and that is how they feel.
Snap bracelets, which were popular in the late ’90s, are still making a comeback. There is a possibility that my age is increasing, or I am aging myself. These window coverings have a similar feel to them; they click into place with a gratifying thunk.
How to make Insulated Van Window Covers
I’m so excited about these window covers that I’ve put together a guide so that others can experience the game-changing magic for themselves!
What you’ll get is:
- what I used so you can get started as soon as possible
- Take the guesswork out of the process by following my step-by-step instructions
- videos in which I lead you through each step as we work together to complete a task
To learn how to make insulated window coverings, simply click here.
The time has come for us to go to work on our projects!
Any other concerns?
Will I need a sewing machine for this project?
A sewing machine is really necessary. Consider asking a friend or family member if they have a computer you may use. Request to borrow a machine from a member of your local FB group (Buy Nothing Groups are an excellent source for this!).
Why not invest in a sewing machine of your own? In order to complete this project (and others like it in the future! ), I invested in a low-cost Singer Start sewing machine, and it worked flawlessly.
How much will the materials cost?
According to how many window coverings you manufacture and the type of material, your overall cost will vary. Every penny I spent on this job was accounted for, and it totaled $86.42 for four distinct window treatments.
In comparison, you’d have to shell out more than $22 per cover to have them manufactured by a professional.
In total, you’ll be paying around $100 on the materials and the guide, saving you hundreds of dollars! As a result, you’ll get a far superior outcome than if you’d only used curtains.
I’m confident in my abilities. Remember that I’ve had both?
How much money will I save by making them myself?
To save hundreds of dollars, make your own window coverings instead of purchasing them. Insulated window coverings are not cheap to buy pre-made!
By making our own we saved $540.58 compared to bids from four separate providers! (It’s true!)
We care about your wallet, too. Using the instructions in this video, you’ll be able to create gorgeous window treatments on your first try.
I have never sewed before in my life. Can I still follow this tutorial?
ABSOLUTELY! My window curtains turned out beautifully despite the fact that I hadn’t stitched anything since Home Economics in eighth grade. It’s possible for you to make these, too.
Can I still use this tutorial if my windows are different sizes than yours?
Definitely! Here, you’ll learn how to build custom window coverings for your specific windows (no matter the dimensions).
DON’T MISS OUT ON MY TUTORIAL!
Don’t want to DIY?
No matter how much effort you put into making these window coverings, buying them is not a terrible option. They do make a difference, and your purchase will help some fantastic (small) businesses in the process.
Compare your options to get the best fit for your van:
- Xplr Outfitters is the cheapest place to get pre-made vehicle window covers that we’ve found.
- Overland Gear Guy: Van accessories for sale, including window covers.
- With a variety of patterns to choose from, CocoVan has more “personality” than the other two alternatives.
- For our readers, we offer a special coupon code that will save you 10% off your whole order at Moohah.com: WANDERINGSOLES
Simple DIY Campervan Curtain Tutorial
Are you sure you want to use a curtain?
You can do that, and it’s perfectly fine! Making your own curtains for your campervan is a lot more cost-effective and time-saving than purchasing insulated window coverings, as we previously stated.
Sharing the details of our DIY campervan curtains, as well as some things we’d do differently if we had to do it all over again.
In retrospect, don’t you think?
Let’s do this!…
Materials needed:
- The amount you receive is determined by the number of windows in your car. Measurement of the windows will be covered in the second step.
- Choose the ones with a plastic coating! The cost is a little higher, but it’s so much easier to put the curtains up this way. It would have been nice to have a coating on all of ours. Another factor to consider is the number of curtains you plan on making.
- Bolts and Nuts (4 per window)
- Thread
- The pins
- Pencil
- Disposable tape measure
- Scissors
- Sewing isn’t your thing? A good place to start is to ask around in your local Facebook group (Buy Nothing groups are a wonderful place to start) and see if you can borrow one from someone else.
- Drill
- Velcro (optional)
- Twine or rope can be used in the same way (optional)
1. Plan where you want curtains
Curtains aren’t just for windows; they’re also needed in a number of other places, such as closets and bathrooms.
- A wide curtain, hung between the driver’s and passenger’s seats, blocks all light from the front of the vehicle (as well as wandering eyes!).
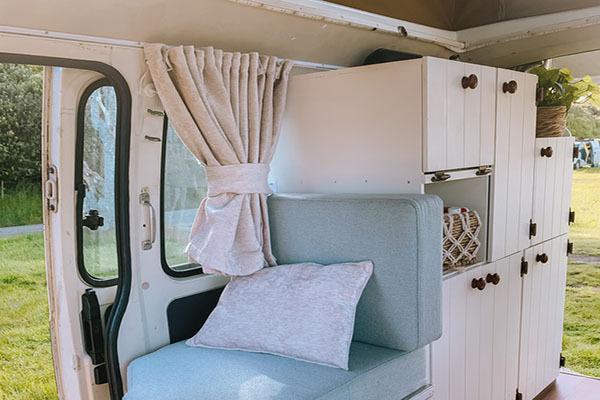
- For our simple campervan kitchen, we created a curtain to hold our pots and pans, a garbage bucket, and water tanks under the counter. (As illustrated in the accompanying photograph)
If you’re looking to add a dash of bright color to your home while hiding the ugly, this is the perfect solution. What a fantastically low-cost and resourceful way to store things in a campervan!
2. Take measurements
Because each window’s dimensions can vary slightly, it’s important to take precise measurements of each one. Each measurement should be noted. For each window, add 2 inches to its vertical height and 2 inches to its horizontal length. Make sure each component is bigger than the space you’re filling with it!
Don’t forget to construct a huge curtain to block out light from your car’s largest glass, the main windshield! During the day, we left this curtain open, but at night, we closed it to keep the light out and provide some seclusion.
3. Get your materials
Everything you need is right there in the list you just saw. A few pointers on two of the most crucial materials are included in this section.
Material, first and foremost
To save money, we purchased two sets of bedding from Goodwill for a total of $3. A single design would have been plenty, but I was concerned about how much I might “misjudge.”
To save money, I bought sheets instead of fabric from the craft store. Moreover, the ones we found at Goodwill were in excellent condition as well. You can even make do with any that you already have laying around your house!
Xem thêm : How To Choose Curtains?
To make it better: While using sheets will save you money, a heavier fabric will help block out light and provide you greater privacy. However, as we’ve already discussed, the thin material of the white sheets didn’t do a great job of blocking out light or providing complete seclusion. If anything, a darker colored sheet would have worked better for us.
b) Wire for pictures
This will give you an idea of the amount of picture wire that will be needed.
To cover the entire width of the opening, you’ll need two pieces. You’ll need an extra 2 inches to secure it to the screw, thus double the real measurement.
Also, in case you’re wondering, yes, picture wire is required to run the length of the window. The curtains will fall inward and leave an unsightly gap if there isn’t a second line of wire. At first, I didn’t think it was required.
Picture wire: where can I find it? In craft stores, Walmart/Target, or for less money here, you can find picture wire for your project.
4.1 Cut curtains according to window measurements
For more information, see Step 1.
Remember to increase the window’s vertical height by two inches and its horizontal length by two inches.
4.2 Fold and pin
Make sure the fabric you’re working with is lying flat on the surface. In order to cover the window, it should be laid down horizontally in front of you.
Mark two points on the tape measure with a pencil and a ruler:
- It is recommended that the first mark be placed around half an inch from its crest.
- Using a ruler, measure 1 inch from the top of the board.
Using a 1/2-inch ruler, indicate where you want the fold to be on the fabric. To keep the fold in place, put safety pins along the length of the fabric. Because your cloth was trimmed two inches taller than the window, these folds are already taken into account.)
5. Sew a “tunnel”
Create a “tunnel” for the wire by sewing a straight line at the 1-inch point and then threading the wire through it.
The wire will be strung through the “tunnel,” so make sure it is not too tight. You won’t be able to move the curtain if it’s too tight. I had to start over because I made a mistake with my initial try.
6. Repeat Step #6 on the bottom edge of the fabric
This piece of fabric should now have a “tunnel” at the top and bottom.
7. Cut each piece in half (vertically)
Rather than one curtain for each window, we will be making two. When you’re ready to close them, just pull them to the middle and they’ll stay open.
Make a vertical slit in the centre of the fabric now that the bottom and top “tunnels” are done.
8. Clean up the edges
However, the vertical edge is still unfinished. Your horizontal edges should now be nicer. The vertical edge should be folded over and sewn on both sides.
Creating a “tunnel” is unnecessary because no wire will be hung through this vertical edge.
Close the tunnels at the top and bottom of the cloth by folding this edge over and hemming it. Be at ease; this will be dealt with in Step #11.
To make two curtains for each window, repeat this process on the other side of the fabric.
9. Repeat the process for all windows
All curtains should be sewn at this point.
10. Secure picture wire to each window
Each of the four corners of each window should be screwed in only halfway with a drill.
Wrap the picture wire securely around the screw on the top left and secure it. The screw must now be drilled all the way through to ensure that it is securely holding the wire in place.
11. Thread the curtains
After cutting a small hole on the fabric’s outer edge, insert a piece of wire into it.
When the fabric has been folded, thread the wire curtain through the “tunnel” you’ve constructed.
Make sure to do this on the bottom as well. The second part of the curtain is now ready to be hung.
12. Drill it into place
Pull the wire tightly along the length of the window frame.
Use the drill to tighten the screws until the wire is secure after wrapping it around the second screw.
13. Final (optional) touches
Velcro can be used to close any holes between the drapes. To keep the curtains in place when they’re not in use, you can also use twine or rope as ties.
You now have privacy curtains that not only block out light, but also give a dash of elegance to your new house.
Any other concerns?
We’ll do our best to respond…
How much do DIY campervan curtains cost?
We spent a total of $26 on all of our curtains, including the thrift store sheets, thread, picture wire, screws, and velcro.
If you buy your fabric from a craft store, the cost will be more.
Keep in mind that our four distinct window coverings cost only $86.42 (or just under $22 each). A lot less expensive than creating a set of window treatments (especially if you choose to go with a heavier fabric). Because of this, it may be worthwhile to spend a little more and get an insulated cover instead.
How long will it take to make DIY campervan curtains?
Your level of sewing proficiency will have an impact on how long it takes you to complete this step. To my embarrassment, I had to watch a video lesson to learn how to use the sewing machine, so my progress was slow at first.
In my own words, I worked on this project for three days and put in about two hours per day. This project took me a total of six hours to complete.
With some sewing know-how, I’m sure you could make some curtains in no time flat. Putting them in your van will take another 30 minutes or so.
Building on a budget?
We’re with you. Our first campervan costs us less than $3,000 to build. Everything within the vehicle was included in the purchase price!
In order to help people who want to get into vanlife but don’t have the time or money to build their own, we’ve put together some resources:
- A Simple Bed Frame for a Campervan
- Campervan Kitchens on a Budget
- Construction of a Low-Cost Transport Vehicle
We sincerely hope that these resources prove beneficial to you as you embark on your vanlife adventure!
Nguồn: https://iatsabbioneta.org
Danh mục: Curtains


