Make a pillow pet in two easy steps and impress your kids. Even though making a pillow pet is a bit trickier than making your typical rectangular square pillow, don’t be afraid of the different pieces you’ll need. In constructing this multifunctional pillow, you may be astonished at how far your patience and imagination will carry you!
The best part of constructing your own pillow pet is that you have complete control over the finished product. You can use this instruction as a template to make a variety of animals for your children. Furthermore, you have complete control over the pillow’s construction, including the type of material used.
Bạn đang xem: How To Make A Pillow Pet? Step-By-Step Guide
How Do You Make A Pillow Pet?
Step #1. Preparation
The first step in making a pillow pet is to gather all the materials you’ll need. In addition, you can choose from a variety of fabrics for the pillow pet, depending on the design. In addition, it will be easy to cut the pieces needed for the construction.
You can use this project’s measurements as a guide, but you can always tweak them to suit your needs. It’s possible to get some inspiration for your child’s room design from pillow pets, which are widely available. When preparing the materials, it’s also a good idea to have an idea of what kind of animal you want to make.
Body
Using an existing pillow as the body of the project is a huge benefit. Cut a 26 by 19-inch fabric piece for the front of the pillowcase if your pillow measures 25 by 18 inches. For the back of the pillowcase, you can use the same dimensions, but add an additional 12 inches.
Each piece of the back cloth should be cut vertically and folded a half-inch along one side twice before sewing the raw edge contained Two fabric pieces of equal length should be cut and then pinned together before stitching so you can insert the stuffing. After that, leave a half-inch for the seam.
Feet
As a starting point, cut four pieces of 5-by-5 fabric before cutting each one diagonally, leaving you with eight triangles total. To make sewing the pillowcases a little bit easier, pin these triangles to the corners of the cloth pieces you just cut. In this case, the top and lower corners of the triangle on the side opposite to the one you just sewn should be on both back pieces, as there are two.
Velcro straps can also be used if you want to make the pillow pet appear more upright.
Head and face
Depending on the design, the process for preparing the head and face of your pillow pet may differ. Cut two circular pieces of fabric for the head, one piece of fabric for the muzzle, and two pieces of cloth from two different types of fabrics from which to make the ears. You may then stitch the parts together and stuff the head with your preferred filling before sewing it all together.
Assembly
The final and most straightforward step is to put the pieces together. Place the straps on the pillowcase and lay it so that the top of the pillowcase is facing up. In order to attach the velcros, pin the straps in the middle of the long sides. Then put the tail at one end.
Overlay a back piece with the final edge towards the center, and the top portion facing down. The legs should be aligned before pinning it in place. Place the second back piece on top, with the overlapping edge facing down.
Turn the case right side out and sew everything together with a half-inch seam allowance. Finally, insert the cushion into the case after attaching the head to the other end.
Types Of Pillowcase
Pillowcases come in a variety of designs and materials. Pillow pets can be made by sewing a cover for a rectangle pillow, as previously mentioned. Some typical sorts of pillowcases would also be useful to know.
Bag Style
To make life easier, the bag design pillowcase is the most common. As the name suggests, it resembles a bag. In order to replace the cushion, it features an open end that does not close. Because the ends stretch and enclose the pillow, it will remain safe.
Housewife
It is the housewife’s pillowcase that is the most frequent. A pillowcase for a housewife can have any number of closures, such as an envelope flap, button, or zipper. Your pillow appears more tailored because of this additional security.
Mock Oxford and Oxford
Similar-fitting pillowcases include those labeled “Mock Oxford” and “Oxford.” These cases, on the other hand, have back flaps that open like envelopes, and they’re bordered. You can tell the difference between the two because Mock Oxford covers do not have mitered corners, whereas Oxford covers have.
Materials List
- Furry knit, one yard
- A third of a yard of fleece (face & feet)
- The eyes of a doll (optional, you could use fleece)
- crocheted 2-inch poms (nose)
- Hand needle and embroidery floss (mouth)
- Poly-fill
- Cover with a pillow
Pieces to Cut:
Measuring #1): Pillow width + 1 in x Pillow length + 1 in.
Both sides: Measurement #1 + 12 inches, divided into two equal halves (vertically).
Cut two tracings of the dinner plate from the head.
Muffler: Draw a circle around the bowl or saucer and cut off a 1 inch piece (fleece)
8-inch straps, chopped in half.
The feet are 5 x 5, sliced into 4, and then cut diagonally for 8 triangles (fleece)
In this case, the tail measures 4 x 7 and is divided into two pieces.
Ears: 3 in. at the base, 7 in. long, cut 2 from pattern and 2 from fleece.
One-inch Velcro: Five inches of Velcro

How To:
Let’s start with the material. This time around, I’ve opted for a fuzzy knit pattern. You should go with one that has a little bit of give to it. The brand name for this style is Minky, if you’re shopping for it in a store.
Face:
Xem thêm : How To Make An Outdoor Pillow? Special Tips and Tricks
We’ll begin by looking at the face. I traced a large dinner plate for the head, and cut two of them out. Once the muzzle was traced onto felt, I proceeded to fashion it.
Glue the muzzle to one of the head pieces, about an inch from the bottom edge. Use a zig-zag stitch to sew the piece in place. Zig-zag stitching helps to stretch the fabric somewhat more.)
Give your pillow companion a little love. This time, I’m using doll eyes, but you could also sew or button your own.
Once you’ve drawn a mouth, continue. I’m attaching it with a backstitch and red embroidery floss. However, if you like, you might cut a piece of fleece and sew it onto the hat.
For the nose, attach a 2-inch craft pom to a piece of yarn. Because it’s going to be tugged on, make sure to sew it on securely.
Ears:
The ears are the next stop on our tour. For my ears, I used a combination of my printed fabric and fleece to cut out four raindrop shapes. If you prefer a different shape, you can do so… Make triangle or circular ears and you’ll have an adorable cat or bear.
You’ll need to stitch the right sides of the print and fleece together and leave an opening in the ear so that you can turn.
Avoid snipping your stitches by nicking the seams. Turn to the right.
Head:
Pin the ear’s base to the head. The ears should be facing inward. Ensure the print is facing up.
A second head circle is then placed over the first one, face down. Pin to the wall. Leave a 3-inch opening at the bottom of the circular for turning.
Polyfill should be stuffed into the right side of the garment. Close the hole by hand sewing it shut with a blind stitch.
Pillowcase Front:
Add one inch to the dimensions of your cushion after you’ve measured it. This will be the first measurement. Using these dimensions, cut one print piece out. According to my pillow’s measurements, it is 25″ long and 18″ wide. My fabric is 26 by 19 inches, therefore I’m cutting it that way. (Since the fabric I’m using stretches, I won’t be adding any more to the height of the pillow.) Cut a few of inches more fabric if your cushion is really fluffy.)
Pillowcase Back:
Add an additional 12 inches to the length of Measurement #1. (For example, the length and width of my rug were each 25 inches.) Slice it in half vertically now. (She hands me two 25 x 15-inch pieces.)
Using a half-inch fold, enclose the raw edge of one long edge. Pin to the wall. This should be done on the opposite back piece.
The long folded edge of each back piece should be sewn to secure it.
Velcro Straps:
The straps will be made next. As a result, the Pillow Pal appears to be standing when both straps are cinched together. Cut two 4 by 8-inch pieces of print fabric.
Using a pin, make a half-fold. Leave the bottom unstitched and sew a 1/2 inch seam all the way around. Turn to the right.
Attach a piece of Velcro to each strap by sewing a strip into place.
Tail:
Give your pet a new tail to wear. About 7 inches long, this puppy’s tail. Right-sides-together, pin and sew, but leave the bottom open for twisting. Sew a 1/2-inch seam allowance at the bottom of each piece after stuffing and turning it right side out.
Feet:
The feet are next. Make four 5×5 inch squares. Create eight triangles by cutting these in half diagonally. Each corner of the top piece should be pinned with one triangle. It is now time to pin the remaining triangles to the upper and lower back pieces, one on either side of the final edge.
To keep the triangles in place, use a zig-zag stitch to sew them together on the diagonal.
Assembling Pillowcase:
Put the pieces of the puzzle together, and you’re done. The top of the pillowcase should be placed face-up.
Staple the straps to the middle of each long length, one on each side. Make sure the Velcro on one strap is facing up and the Velcro on the other strap is facing down. Glue the tail to one of the shorter sides. Ensure that the tail is pointed towards you.
One back piece should be placed face down on top of it with the final edge pointing toward the center. The corners of the triangles should be aligned. Pin to the wall.
Place the final piece of the back face-down on top and align the corners of the triangles. There is a noticeable overlap between this piece and the other back panel. There will be no need to add Velcro or tie closures as a result of this.
Make a half-inch seam all the way around. Turn to the right. The head should be sewn to the end opposite the tail. It is now time to put in your sleeping pillow.
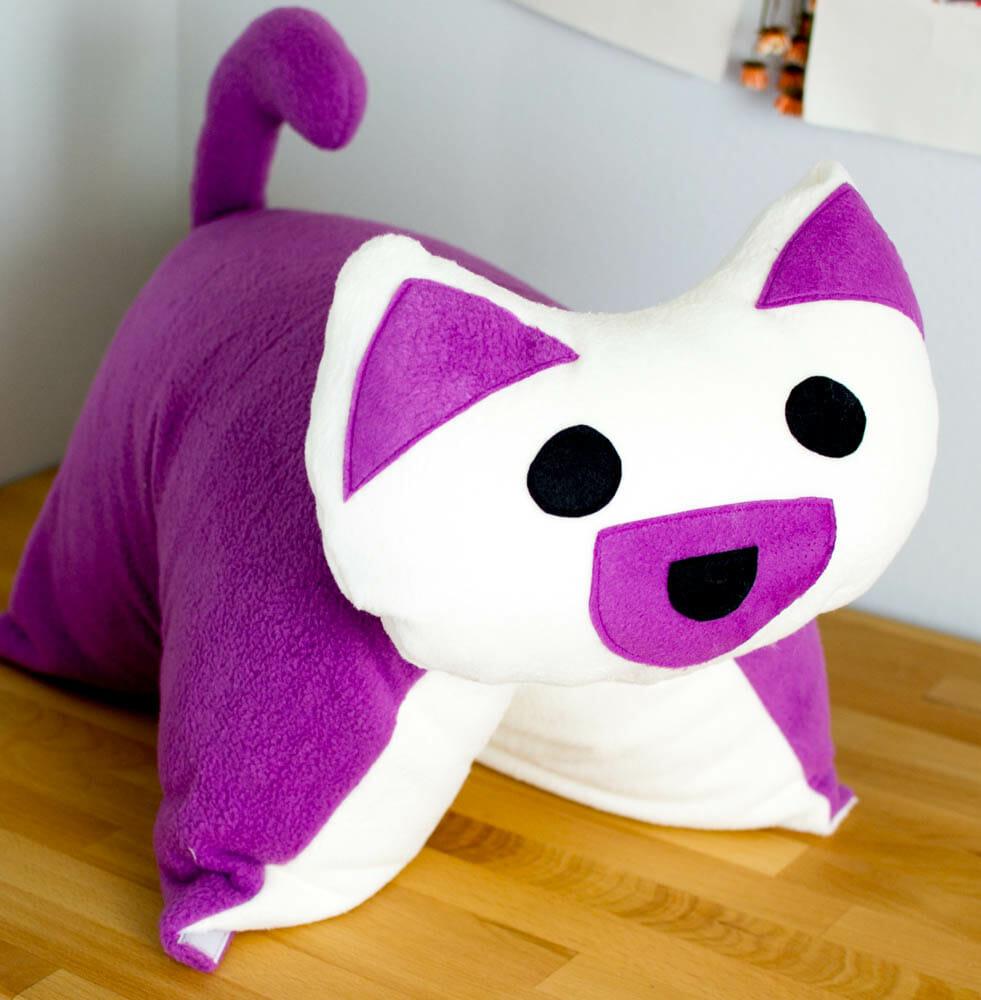
DIY Puppy Pillow ‘Pet’ Sewing Tutorial
You’ll need the following:
- 3/4 yd. of purple fuzzy material (or color of your choice)
- 3/4 yard of white or cream fluffy material
- felt bits in various shades of black
- embroidery with black thread
- 19-inch hook and loop tape (velcro)
- a 1 or 1 1/4-inch-diameter button
- Fusible web that is easy to iron on and remove
- fiberfill made of polyester
- in addition to the obvious requirement of a single, standard-sized bed pillow
CLICK TO DOWNLOAD THE DIY PUPPY PILLOW PATTERN TEMPLATES
Before moving on, you’ll need to tape together the head and appliqué features template.
Cutting
Xem thêm : How To Make A King Size Pillow Sham? Easy Step-by-step Guide
How to make a shawl out of white or cream fleece?
- A single 20″ x 29″ rectangle
- a pair from the design for the head
It was cut from a purple fleece.
- A single 20″ x 30″ rectangle
- The tail pattern piece has two halves.
- a 2-by-6-inch section
- Use the HeatnBond light to fuse the ears and muzzle to one of the head pieces after tracing them onto purple fleece.
HeatnBond Lite can be used to fuse the black felt eyes and nose to the head as shown.
Applique
Use a matching thread to sew close to the edge of the pieces of fused fleece and felt.
Sewing the Head and Tail
Using a 1/4″ seam allowance, sew the two head pieces together. For turning, leave a three-inch gap.
Stuff the head with polyester fiberfill and close the opening by hand sewing it closed.
Right sides together, sew the tail pieces together, leaving the straight edge exposed.
Gently pack the tail, making sure to turn the tail right-side-out. Top of tail should be flattened, with the seams at the top and bottom centered. A quarter-inch in from the edge, sew across the top.
A 1/4″ seam allowance is needed to sew the two 6″ long strips of fleece together. Make a fleece tube by flipping it right side out (use a safety pin or turning tool if you need to).
Sewing the Pillow Cover
1. Fold the cream fleece rectangle in half, wrong sides together, and stitch the two halves together. Closely sew it in place.
2. On the right side of the cream fleece rectangle, pin one side of the hook and loop tape against the hemmed edge. All the way around, sew it in place.
3. On the right side of the cream rectangle, fold the fleece tube in half and pin the ends firmly together. Hook and loop tape will produce a loop on the short edge of the fleece tube. 1/4″ from the edge, sew the ends of the fabric together.
4. Place the tail in the middle of one of the long sides. Close to the edge, sew it in.
Place the purple fleece rectangle on your work surface with the right side facing up. Cover it with the cream fleece, laying it face-down on top. Don’t worry about the purple rectangle being longer. Make a straight line from one short edge of the purple rectangle to the short edge with the loop sewn on it.
A 1/2″ seam allowance should be used on all seams, including the loop-sandwiched short edge. Turn the pillow cover right side out by snipping the edges.
7: Turn both sides in 1/2″ and fold the long edge 1″ to the wrong side of purple fleece that protrudes. Sew the edging down (just like on the cream colored fleece).
In order to fold and attach it to the cream piece, pin and sew the remaining hook and loop tape strip along this hemmed edge, but this time from the wrong side.
If necessary, insert the pillow inside the cover to ensure a proper fit. The button should be sewn in the middle of the purple hemmed edge. In order for the button to be properly connected, catch the tape twice in your stitching as you go.
In the opposite direction from where you sewn the tail, attach the pillow’s head.
I followed these steps to accomplish it:
Make a 3″ slit in the purple fleece and thread it through it. Then, sew 3″ down from the top of the head through the back. About an inch of stitching will hold the pillow and head together. Knot the thread to secure it in place.
Start at the top of the head and work your way down to about 3″ lower. In the same manner as described before, sew the head to the purple-and-cream-colored fleece seam.
It’s a good idea to carefully unpick the stitches holding the head of the cushion to the cover when you need to wash it. Once the pillow cover is clean, you can sew it back on.
For washing, it is not essential to remove the head. I’m afraid the puppy’s head will go lumpy in the wash, which is something I’m not a fan of happening to stuffed animals. Hand-sewing is something I enjoy doing, therefore the precaution isn’t a problem for me.
Sew black french knot whiskers to the muzzle of the pillow ‘pet’ puppies to give him a “tougher” appearance. Isn’t he more intimidating now?
I’m delighted that you came upon my free sewing pattern. I wish you all the best with your upcoming projects!
Conclusion
When the Pillow Pet was invented, it became one of the most popular innovations. A pillow pet can be made from scratch, but did you know that you can do it yourself? You may make a fluffy and comfortable animal pillowcase for your existing pillow.
The body, feet, head, and face should all be made first. For each item, you can play with a variety of materials and fill it with what you choose. Finally, assemble the sections and, if desired, use velcro straps.
Nguồn: https://iatsabbioneta.org
Danh mục: Pillow


