Creating a pillow from a needlepoint piece that has been completed and blocked is a great way to exhibit your work. For small projects like a pillow cover, you may do it yourself for a fraction of the cost by hiring a specialist who specializes in textile finishing techniques. It’s possible to turn your needlepoint pillow top into a beautiful piece of home decor if you know how to use a sewing machine and a few additional supplies.
About Backing Fabric
When making a needlepoint pillow back, the most critical decision to make is what sort of cloth to use. The material should compliment the needlepoint stitching and be durable enough to resist the normal wear and tear that a decorative pillow receives on a regular basis.
Bạn đang xem: How To Make A Needlepoint Pillow? Easy Step-by-step Guide
Corduroy and cotton velveteen, both medium-weight, strongly woven textiles, are great choices for backing material. When stitching needlepoint on a single-thread canvas with wool yarn, lightweight fabrics are too thin to sustain the needlework. Because of their tendency to tear, certain textiles should be avoided in these situations. Heavyweight upholstery fabrics, on the other hand, are difficult to sew and turn because of their stiffness.
To make a needlepoint pillow, you first need to choose a fabric.
Notes
Choose a pillow form that is one size larger than the finished pillow in order to adequately fill the cushion with fiberfill, if you choose.
What You’ll Need
Equipment / Tools
- There is a sewing machine in the room
- Sewing needles with a good point
- needle and thread
- Pinned to the wall
Materials
- The needlework is finished and blocked.
- Backing material for a pillow
- Muslin for the inner lining is light and breathable.
- The use of decorative cording or other embellishment
- Polyester fiberfill or a pillow shape for stuffing
- High-strength thread for stitching
Instructions
Backing Fabric and Inner Lining
Sew across the edge of the needlepoint canvas to keep it from unraveling as you work with the muslin lining and fabric backing.
- Sew around the blocked needlework using a sewing machine and working as close as possible to the stitches without touching the needlepoint.
To prepare the pillow front, use scissors to trim the excess canvas to within a half-inch of the worked design on all four outside edges. Your seam allowance is half an inch.
- Right-side needlepoint piece should be pinned to right-side backer fabric, using needlepoint piece as a pattern. To match the front of the pillow, make a back that is the same width as the front.
- Afterward, remove the pins from the needlepoint and put it away. To cut out the inner lining, pin a piece of backing fabric to the muslin and trace around it.
Baste across the entire piece within one canvas thread of the stitched regions after pining the inner lining to the wrong side.
Add Edging: Decorative Trim or Cording
Pin the ornamental trim or cording around the needlepoint’s final edges with the right side facing.
- Closely adhere the cording to the needlepoint stitches on the pillow front, overlapping the ends of the cording. Turn the garment over to check for any missing stitches and to ensure that the ornamental trim is attached to the garment’s body.
In order to stitch through a variety of cloth thicknesses, set the sewing machine for heavy-duty sewing and adjust the presser foot or feed dogs as necessary. To keep the trim in place, add another row of stitching or go back over the previous row.
Sew the Pillow
Front and back of the cushion, right sides together, should look like this.
- Using a running stitch, begin stitching one inch from the corner closest to you along the bottom edge of the fabric. Place the machine needle in the “down” position, pivot the cloth, and sew in the ditch along the next edge when you reach the next corner.
Stitch one inch from the final corner till you return to the bottom edge. Now that the pillow’s bottom edge is exposed, you can stuff it with a pillow form or fill it with stuffing.
- Do not cut through the machine stitching line; instead, clip the corners to within 1/4 inch of the stitching line.
Reduces bulk and eliminates rounding for a more professional-looking finish by cutting the corners.
Final Assembly
Simply flip the pillowcase over and gently press the corners outwards.
- Fill your needlepoint pillow cover with a pillow form or fiberfill. If necessary, you can add some extra pillow filler or fiberfill to fill up any voids.
- In order to eliminate the appearance of any raw edges, fold the needlepoint front and fabric backing inwards. To finish your pillow, hand slip-stitch the openings together.
Place the cushion on display after it has been fluffed up.
Finishing a Needlepoint Pillow
When it comes to sewing a finished needlepoint canvas into a pillow, it’s just as simple as making any other simple cushion, and it’s also a lot quicker than stitching the canvas! It’s also a terrific method to keep the canvas out and visible on a daily basis.
There’s nothing like a good needlepoint project to put a smile on your face! At this page you will find a magnificent collection of needlepoint canvases by Charley Harper, a talented painter and illustrator. Please click here to see how to needlepoint in a step-by-step guide. We highly recommend the TNNA How to Needlepoint Booklet if you need or want more detailed instructions on how to needlepoint.
Enjoy Your Stitches! –Molly
MATERIALS
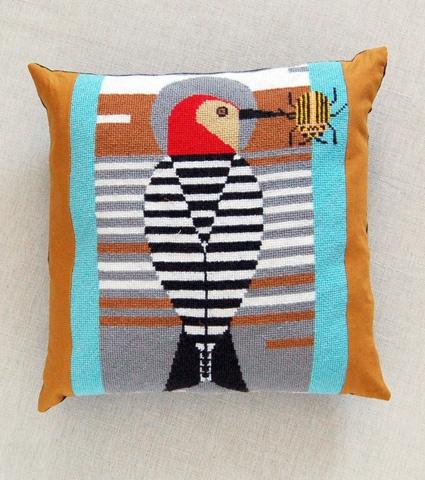
Using the same techniques, I fashioned a pillow out of my completed Charley Harper Baffling Belly needlepoint canvas (you can find all of our Charley Harper needlepoint canvases at this link).
Needed materials for a 14-inch square pillow:
- One completed “Baffling Belly” project is now complete. The Charley Harper needlepoint canvas is available here.
- 1/4 yard of Yarrow Kona Cotton
- Half a yard of Espresso Kona Cotton.
- A 14-inch bamboo pillow form
A walking foot is also required for your machine.
SEWING THE TOP
- Using an ironing board, pin down your needlepoint canvas tautly, then lightly mist it with water. Allow it to air dry for a few hours. After it dries, it will seem a lot more polished and refined.
- Trim the blocked canvas to a depth of about half an inch from the work’s perimeter.
- Cut two 3-inch by 14-inch strips from the Ochre cloth.
- Make sure the proper sides of the strips are pinned to each long length of the canvas.
- Use a 1/2-inch seam allowance while sewing the strips to your needlepoint canvas with a walking foot on your machine. It’s important to measure your needlepoint stitching seam allowance rather than your trimmed canvas.
- Strips should be pressed flat after being re-folded from the seam.
SEWING ON THE BACK
- Place the Espresso fabric, right sides together, on top of the sewed top and cut a 14-inch square from it. As you can see in the image above, the top and rear pieces may not be exactly aligned. To remedy this, trim the lengthy Ochre sides to meet at the back. It’s better to have a little canvas overhang than to accidently cut into the needlepoint work if you trim the top or bottom of the canvas.
- Attach the back with a few pins.
- As a guide, sew the front and back together with a 1/2-inch seam allowance, leaving a 10-inch gap along one of the sides (not a side that has any canvas on it).
- Poke the corners of the work and flip it over to the right side. A 13-inch square pillow case is what you’ll get. It’s a little smaller than the pillow shape so that it will fill out when you insert the cushion.
- Insert the pillow form through the opening in the case.
- Close the opening with a slip stitch after ironing the fabric 1/2 inch towards the inside of the pillow on both sides of the 10-inch gap (you can find our slip stitch tutorial at this link).
Steps To Make A Pillow Box?
Xem thêm : Bamboo Pillow How To Use
What is the process of making this object? The procedure is straightforward, and I’m sure you’d like to know how to accomplish it?
You can follow these seven simple steps to construct a pillow box.
Continue reading!
Step #1. Gather the materials
You’ll be needing a bone folder, scissors, PVA glue, cardstock or cardboard (color on your preference), ruler, and the decorations you want to put on it.
There are a few things you’ll need: a bone folder, scissors, PVA glue, cardstock or cardboard (color depends on your desire), a ruler, and the decorations you’d like to add.
Step #2. Choosing and printing a layout
You’ll need a bone folder, scissors, PVA glue, cardstock or cardboard (color depends on your desire), a ruler, and the embellishments you wish to put on it.
For a shaded design, you could just go with grayscale.
For example, you might print on colored cardboard with enhancing paper and use a combination of white and a dark color and white as an ink.
To keep the weight of your package low, we recommend printing on cardstock.
You can, however, print the pattern on PC paper and transfer it onto thicker cardboard if you desire a more sturdy box.
Step #3. Snip out your layout of the box
Make individual cuts along the black lines on your design. Make clean and precise cuts as much as possible.
If you cut the layout right, the box will fit better and stay grounded.
Use a ruler or something with a precise edge to trace and a particular blade to make your cutting experience more efficient.
Also, be sure to use a cutting mat or cardboard that is thick enough to prevent the blade from cutting through the table when assembling the case.
Step #4. Folding and scoring lines
Each of the four crease lines was scored, and the straight lines they overlapped were also scored.
Rather than cutting through the cardboard, mark it with an empty ballpoint pen.
Use a straight edge if you’re working with cardstock or banner board that’s on the light or medium side.
A half-cut can be made with any sharp blade and scissors, even if you don’t have a special art knife.
It depends on the design or the template you’re utilizing for your case.
Step #5. Design it on top (optional)
Cut a piece of decorative paper that is one-fourth of an inch and a half inches larger than the crate template.
Glue it in place once you’ve located it. Overlap the additional paper that has overestimated the glue, or trim it if you choose.
When applying ornamental paper to cardstock, it is essential to use a strong glue.
Paste sticks and pastes designated for children’s use will not provide an adequate bond.
Xem thêm : How To Make A Lavender Eye Pillow? Step-by-Step Tutorial
Stick to the instructions on the splash glue bottle for a long-lasting bond. Using two-sided sheet blocks is advantageous.
However, it is more expensive compared to other options.
This step is optional, as well.
Step #6. Fold it and stick it together
Make a slit in the middle of the crate and attach the tab with adhesive on the opposite side.
It’s imperative that you double-check to make sure the glue tab isn’t stuck to the box.
It’s best to wait until the paste has dried completely before moving on to the next step.
It’s the simplest and most straightforward step there is.
Step#7. Shaping the box and closing the ends
The top and bottom of the box will bow out as a result of this careful compression. The container’s two folds should be pushed inward at the container’s two corners.
To “energise” the wrinkle on the bent overlay lines, you may need to apply pressure with your fingernails.
The casing can be customized in any way you see fit.
The cushion box can be improved simply by adding a tiered band of colorful paper.
Paper cutouts purchased online were used to create the clusters seen on these containers.
How do you this?
Craftsmanship is often associated with the creation of a piece of art, and this is accurate.
It is possible to make a pillow box without any prior experience. Surely you can!
Using recycled materials for this project is a method for you to save money and time. As a result, making a pillow box doesn’t necessitate any special skills.
You don’t need to do anything more than read a few articles like this one to get started!
Conclusion
You can give these pillow boxes to someone as a token of your affection and hard work. You can put your gifts in this case.
And, of course! How do you make a pillow box? That’s what we found out. I wish you the best of luck in completing yours.
You need to be patient and passionate in order to succeed.
These items can also be sold on the internet. If you like, you may even shop for your decor online.
You can buy the tie online if you’re running low and need to make a bunch of them.
Have fun creating!
Nguồn: https://iatsabbioneta.org
Danh mục: Pillow


