Learn how to build a pillow out of an old sweater for a unique and personal touch to your living space. Any area can benefit from the rustic beauty that can be found in this thrifted creation.
Last year, my favorite sweater was this cream cable knit sweater from Thred Up, originally from Gap, which you might recall because I wore it a lot in my videos. When I went to put it back on after the baby was born, I was overjoyed to see it had a gaping hole in the front.
Bạn đang xem: How To Make A Pillow Out Of A Sweater? Easy Step-by-step Guide
A moth or other pest must have taken a bite out of it while it was in storage. Instead of writing it off as a total failure, I decided to turn my beloved sweater into a few home decor accents.
Next week, I’ll show you how to make a pillow and a few Christmas ornaments out of this gorgeous sweater. Now that I can’t wear it anymore, I can still admire it.
If you have a sweater that you can’t wear, or if you find a beautiful sweater in a thrift store, this is a great way to repurpose it.
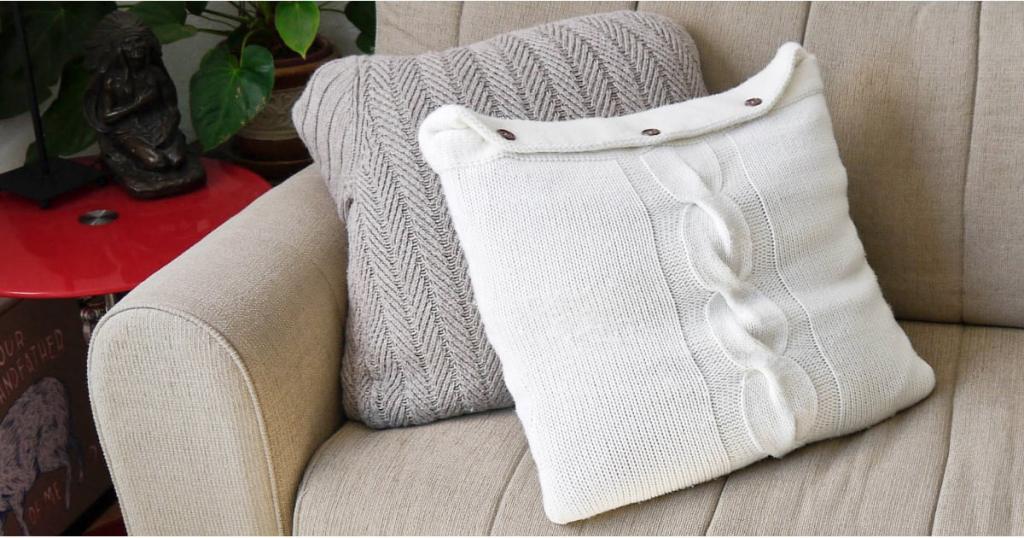
Although I miss being able to wear my favorite sweater, I can’t deny that this new pillow adds a pleasant, cozy feel and texture to my living area. In addition to being beautiful, this garment is ideal for the fall and winter months.
Tips For Making A Pillow From A Sweater
- It’s possible to utilize an old beloved sweater (maybe one with sentimental meaning), or you can go to the thrift store and pick a beautiful and inexpensive one.
- If you’ve never sewn before, my simple sewing series can teach you the fundamentals.
- You can either create or buy pillow inserts. High-quality feathers, on the other hand, keep their shape better than cheaper ones.
- To save money on this project, take a look at the supplies you already own.
In order to earn a tiny commission at no additional cost to you, I have included affiliate links in this post. My complete disclaimer can be found here.
Materials And Tools you will need:
A sewing machine.
Serger (optional)
Sweater
Grain sacks, drop cloths, or duck fabric are all examples of heavy-weight fabrics.
Piping
I used some leftover blue flannel for the piping.
Feather inserts work nicely for me because they keep their shape.
Find more sewing projects:
- How to Make Ticking Stripe Curtains at Home
- Tutorial for Sewing a Summer Summer Dress with a Bow in the Back for Girls
- Slipcover a Wingback Chair: A Sewing Tutorial
- Duvet Cover Making Instructions
- Ticking Stripe Pillows and a DIY Grain Sack
How To Make A Pillow From A Sweater
Cut Out The Pieces
- Add one inch to each side of the pillow’s dimensions for seam allowance when cutting the sweater. I trimmed the sweater 19 inches by 19 inches since I intended to make an 18-inch by 18-inch pillow.
- The sweater piece should be the same size as your heavy-weight fabric piece.
- Right-side-out, align all sides, and place sweater piece on top of the heavy-weighted fabric. Because you don’t want to see through the gaps in the knit, it’s a good idea to back the pillow cover.
Make And Sew On Piping
- It’s pretty easy to put together a hose. Normally, you’d make a bias-cut strip of fabric for this, but I didn’t have enough blue flannel and it worked just fine without it. You can find my tutorial here. then tuck the cording in between the fabric strips.
- Sew as tightly as possible to the piping by using a zipper foot.
- Put the front of the sweater piece down on the ground. Place the piping on top of the sweater piece, aligning the raw fabric edges of the piping with the edge of the sweater.
- Pin the piping around the sweater piece to the garment.
- Make sure the corners are neat by snipping the fabric around the piping and laying it flat. Around the corners, continue to pin down the piping.
- It’s not obvious when you sew the piping on and turn it right side out, but when you come to the finish, just overlap the two pieces.
- Use the zipper foot to sew the piping to the pillow cover front as closely as possible to the piping. Before connecting the front and back pieces, sew the piping in place to ensure that it doesn’t shift.
Finish Creating The Pillow From A Sweater
- To make the backs, cut the décor fabric into two 13-inch-by-19-inch rectangles. This is for the rear, so that they may fit together snugly. –
- Place the two pieces of décor fabric over the sweater, right side towards the sweater piece, overlapping the two pieces. Hem the long edges of both pieces where they meet in the back of the pillows. Ideally. I didn’t bother with this step because I cut my cloth on the completed edge provided by the maker.
- Right sides together, pin the fabric around the piping. An inch or two of it should extend over the edge.
Use a zipper foot to get as near as possible to the piping when sewing the pillow cover together on the machine. Because you can’t actually see what you’re sewing, this can be a little difficult. I tried to sew as close to the piping as possible by feeling the piping with my hands as I sewed. Make sure the corners are rounded so the finished product looks its best.
- Trim the excess fabric off the edges, leaving about a 1/2 inch.
- Finish the edges on the inside so there are no raw edges by serging around the edges. If you don’t have a serger you could just sew around the edges using a zigzag stitch.
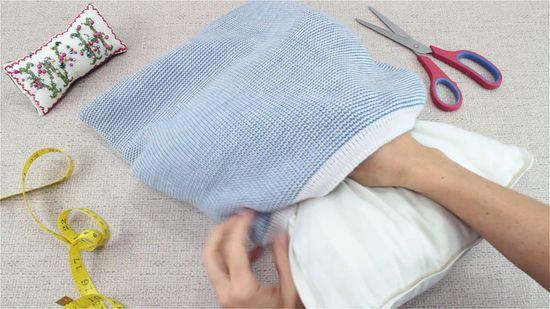
Add A Pillow Insert
Turn the pillow cover right side out, and put a pillow insert inside. I like to use nice feather pillow inserts, because they are nice and cozy and keep their shape nicer than polyester fiber fill pillow inserts.
There you have it: a beautiful pillow, made from a thrifted sweater, to add some farmhouse charm this winter for very little money. Since I used mostly leftover materials, this project was basically free.
Xem thêm : Boppy Pillow For Nursing
If there were no pillows in the world, how would you survive? We owe a lot to the squishy materials that have made our lives so much more pleasant.
Possessing more makes us happier. However, not everyone has the time or inclination to spend on more pillows because of other “more important” priorities.
You’ll do anything to get your hands on a new cushion if you’re a fan. Let’s do this if that’s what came to mind.
Yes. It’s all about your sweater!
To make a pillow from a sweater, follow these simple instructions:
Step #1. Choosing your style
I’m not going to lecture you on what I think is right or wrong in this piece. I will, however, provide you with a few pointers and suggestions in order to stimulate your creative juices.
This activity is all about you, therefore you’ll be able to choose the best design for your needs. So you’ll have complete control on the color and style of the sweater.
Just make sure that the color you chose for the pillow goes well with the decor of the room. You also need to take into account the shape of the item.
When deciding on a shape, don’t just go with what looks well on you; consider whether or not you have the sewing skills to make it happen.
During this tutorial, we’ll go over the many varieties of pillows to assist you select which one to build.
The list is long, but I’ll limit myself to three so you don’t have to — trust me, I know how it feels.
Bed pillows
Our pillows are most commonly seen on our beds. Our beds will appear bare without them.
The most comfortable pillows are rectangular in shape, which is why you sleep soundly.
You can construct a pillow like this out of a sweater.
Cushion
In most homes, you’ll find these in your sofas or couches. In most cases, it is arranged first in squares, then circles.
These pillows provide a dash of color to your home’s decor.
Due to their tiny size, they’re much simpler to create than traditional down pillows. You’ll be able to try out more of your intended design as a result of this.
Just my own preference, but I think sweaters are most comfortable when nestled in a cushion.
Travel pillows
Traveling is a once-in-a-lifetime opportunity. Nevertheless, the lengthy journey often induces sleepiness.
These situations necessitate the use of travel pillows. As a neck-tucking pillow, its shape is very distinct from that of other pillows.
Xem thêm : How To Make A Boyfriend Pillow? Easy Step-by-step Guide
Its form is what sets it apart from the rest. However, there’s good news! Sweaters still work for this.
However, it will be a lot more tough than you imagine.
Step #2. What to insert
I’m assuming you’ve already determined what you’re going to stuff your cushion with before you start sewing.
Poly-fill, which is widely available, is the most frequent.
Your items will be much more easily accessible in an inner case, on the other hand. These are, in fact, more readily available in the market.
There’s a good possibility you’ll want to stash some cash away. A sweater can still be used as a fill if that’s the case for you!
Cut it into small pieces. If there are buttons or zippers, don’t include them.
Step #3. Time for you to sew
Need help with your sewing? Do not be concerned, sweetheart, for today’s task does not necessitate the expertise of a professional sewer.
Get your sewing kit ready and follow these simple instructions to get started stitching. Two square pillows will be shown to you so that you can make up your own mind.
Design #1: Plain And Simple
- Make a square out of the sweater of your choice. Make two equal portions.
- Make certain that the insert size is compatible with the size of the cover.
- Keep one side open when sewing the edges.
- It’s better to sew it by hand and learn about the fabric’s characteristics.
- Trim away any extra fabric from the sewed-in seams. Then, turn it over so the interior is facing out.
- Place your items here.
- The remaining gap should be closed using a needle and thread.
Design #2: Tied To The End
- Cut a rectangle out of the sweater of your choice. Add another
- Keep one shorter size open while sewing the rest of the edges.
- Cut the excess fabric from the sewn edges to keep it tidy.
- Turn it over and see what’s on the other side.
- Placing the insert in its proper place
- It’s a simple yet effective idea to knot the ends together at the top.
Take an Old Sweater and Turn it into a Sweater Pillow
Sweater fabric is naturally warm and cosy since it is naturally thick. There are a plethora of knitted, cuddly sweaters just begging to be turned into cushions for the next fall season. In addition, finding sweater material for pillows isn’t as difficult as you might think! Making pillow covers from thrifted sweaters is a great idea! There have been times when I’ve put a woolen sweater in the washer and come out with it completely shrunk. Everyone has, don’t you think? Why don’t they just throw them away? Donate them to a good cause!
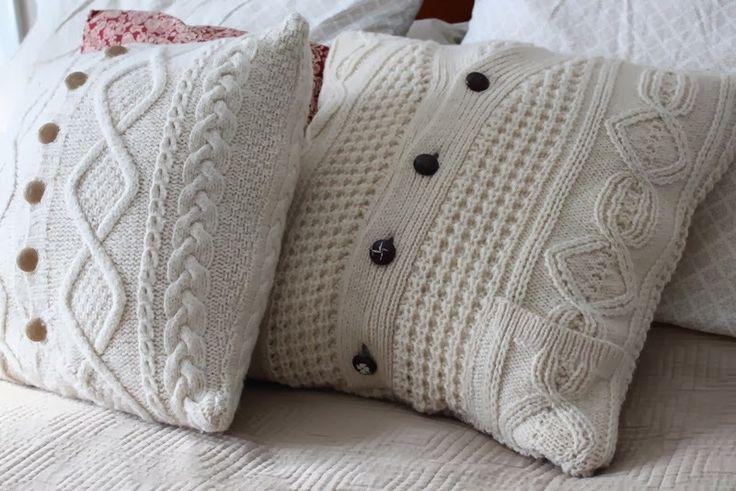
What Kind of Sweater Makes a Good Sweater Pillow
You can find some beautiful sweaters at your local Savers Thrift Store. Shrunk wool sweaters make excellent pillowcases. Going through the sweater collection at Savers was pure joy for me! All the colors of the rainbow are available in sweaters. Wouldn’t it be lovely to use all off-white pillows for the season? That’s the one I’m thinking of doing next. Sweaters come in a wide variety of designs and materials.
Pick a Sweater that Matches the Colors in Your Home
I’m a big fan of color in our home, so I scoured the internet for sweaters that would match our new carpeting. Pink and purple dominate. My sweaters are made from a variety of various fibers and textures. One is a tweed poncho that I found, the other two are made of wool, and the third is a cotton knit.
Pillow Covers are Easy to Store
Pillow coverings are a particular passion of mine, as regular readers of this blog will know. It’s a cinch! I also enjoy changing out my pillow covers to match the seasons and holidays. Much more convenient than having a slew of pillows strewn about the place. Remove the pillow covers and store them in a flat position like this :
How to Make Envelope Enclosure Pillow Covers
My sweater pillow covers are just like my regular pillow covers in every way. This project is a breeze thanks to an envelope rear enclosure. ZIPPERS ARE NOT INCLUDED. Straight stitches are all that’s needed. These pillow covers might be made by my children. This is ridiculously easy.
How to Make a Rectangular Envelope-Enclosure Pillow Cover
I wanted to use the fringe from the poncho’s outside for the long, rectangular pillow I fashioned from it. Because of this, I decided to use the fringed edge for one of the enclosure’s side panels. The front of this pillow features a zippered cage. The flaps on the pillow are usually placed in the rear of the cushion because they don’t have the same visual appeal as the front. The enclosure on the front of this pillow, on the other hand, serves to highlight the fringe. This may appear to be a lot, but it’s actually rather manageable. I use the back of the pillow as the front of this pillow, much like the other pillows.
Enjoy Your New Fall Sweater Pillows
As a result, I now have decorative pillows that match my cheerful and COLORFUL home decor and are both warm and comfy, just in time for the changing seasons.
Savers are the best. We make it a point to visit at least a few times per month. One of my favorite things about Savers is how quickly the merchandise changes. Month after month, thousands of objects arrive there. A plethora of adorable name-brand clothing, furnishings, household goods, and other personal items Shopping at the section of the supermarket where all of the things are packaged in bags is one of my favorite pastimes. Everywhere you look, there are hidden gems!
Final Words
I trust that after reading this post, you now know how to turn a sweater into a pillow. Please follow the directions given above to the letter.
It’s a pleasure for me that you’ve finished reading this piece of writing. We truly value the time and effort you have put in.
Nguồn: https://iatsabbioneta.org
Danh mục: Pillow


