With the help of this how-to on how to place an image on a pillowcase, creating photo pillows has never been easier. You can’t go wrong with it as a present.
In addition to giving your home a unique look, this clever concept also comes with a bonus. To keep these memories alive, print out those old images and save them in your album somewhere.
Bạn đang xem: How To Put A Picture On A Pillowcase? Comprehensive Guide
Why Are Pillowcases Necessary?
When it comes to decorating your bed with a pillowcase, there are a few things to keep in mind. The following are some of the most compelling arguments in favor of using pillowcases.
You’ll save laundry time
When it comes to protecting the cleanliness of your pillows, you can’t go wrong with a new set of pillowcases! Humans shed skin cells, dander, and filth on a daily basis, in case you didn’t know.
When you use a pillowcase, the down and feathers in your pillows will not accumulate as much lint and dust, as they would without one. As a result of these changes, your pillows will last longer and you’ll be able to go longer between washings.
It blocks out dust mite allergens
Symptoms of asthma and allergies can be triggered by dust mite allergens found in bedding, carpets, and upholstered furniture. Because of this, it is important to use pillowcases made of tightly woven cloth to keep the pillow’s contents free of dust and dander. Dust mite allergens are adequately blocked by them.
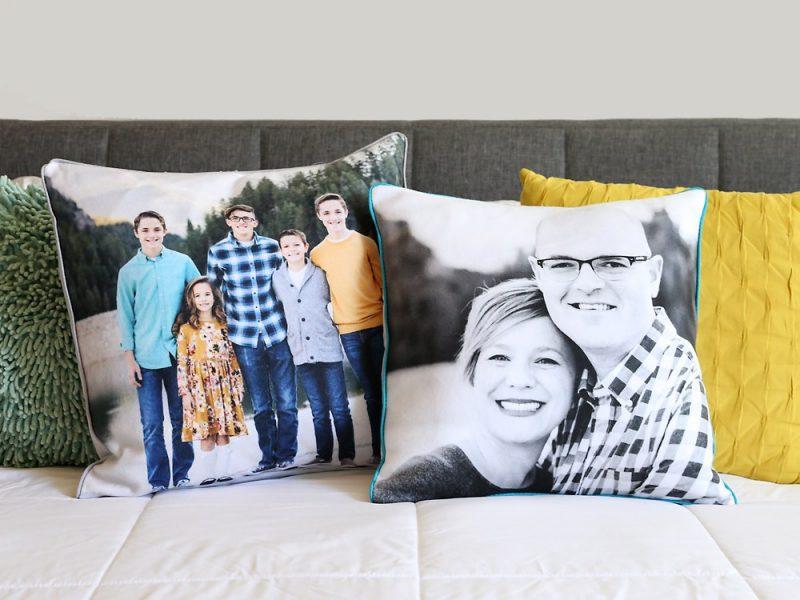
Your Personal Guide on How to Put a Picture On a Pillowcase
You can personalize your pillows’ designs and layouts by undertaking this DIY project. As a present, these are ideal, and they can be used for any occasion. Take a look at these step-by-step instructions to learn how to do it.
Step 1: Decide the fabric for your pillowcase
Before you begin the photo processing, you must decide on the printing substance. Your pillow cover should be washed on a regular basis. Because of this, the fabric for your pillowcase must be of the highest quality.
There are a few things to keep in mind while selecting a cloth for your project. Cotton and polyester are the most commonly used materials because of their long-term durability. In addition, they are more comfortable and easier to clean.
Step 2: Prepare your photo
For your pillow design, you can use a single photo that has been printed. Another option is to use a photo-editing tool to blend multiple images into a single image. A single photo might alternatively be tiled across the glass. If you’re photographing people, make sure their faces are in the center of the image.
It doesn’t matter what kind of photo pattern you use; what matters is that you use high-resolution images. The colors and tints can be tweaked in advance using Photoshop or another picture program.
In addition, keep in mind that a higher-resolution photo will look better on your photo pillow. at least 150 dots per inch is the recommended minimum resolution (dots per inch). It would be better if you could get to 300 dpi, though.
Step 3: Print the photo
Check to see if the printed photo’s dimensions match up with the pillow cover’s. For example, if you want a cushion that is 18″ x 18″ and you want to print a photo of that size, you should do so.
Printing your photo on a piece of cloth is preferable. You may not get the greatest results if you plan on using your home printer to print the document.
For starters, the size of your photo will be constrained, and then there’s the issue with the ink. When it comes to ink for home printers, if it gets wet, it will bleed. It is preferable to engage the services of a professional printer.
Step 4: Finalize your photo
Make sure the colors really stick to your photo after it has been custom printed. After the first wash, this is a major issue. So, as soon as you’re done printing, iron the fabric to fix the ink.
Your pillow cover is almost ready, and you just need to cut out the photographs. Your cushion insert must be of equal size to your individual photo. Otherwise, your pillow may not have the appropriate design.
Step 5: Finalizing how to put a picture on a pillowcase
Xem thêm : How To Use My Brest Friend Pillow? Comprehensive Guide
Use a plain cotton cloth for your backing. Allergy sufferers love it because it’s affordable and easy to use. Two back pieces are needed. Front and back pieces should measure 18″ tall x 11″ wide for a total of 18″ tall x 11″ broad for the front piece.
Your back pieces should have their long edges hemmed. Fold 14 of an inch under, then press again after 34 of an inch has been folded. Make a clean finish by sewing a straight line. Right-side-up orientation is best for the cushion cover. Stack the back pieces on top of each other, with the right side down.
Place pins around the pillow cover’s circumference to secure it. There must be an overlap in the middle of the sewed edges. Using a 14″ seam allowance, sew around the cover’s perimeter. Insert a cushion into the opening in the centre of the cover and then flip it over.
There are a multitude of uses for pillows, the most common of which is as part of a bed’s covering.
Wall picture frames and pillows have become increasingly popular in both the bedroom and the living room in recent years.
There are two types of ornamental pillows: pillow shams and cushions.
Your room’s overall design is enhanced by their presence, making them stand out.
If you frequently use your pillows, a protective cover is necessary to avoid having to wash them every other day.
Pillow covers and pillowcases are useful because they keep pillows clean and free of contaminants that could shorten their useful life.
There should be no shrinkage, washability, and durability in the fabric choice so that the garments can be used for a long period.
How to decorate your pillow cases
Bedding, such as pillowcases, can be easily interchanged to keep the room looking fresh.
This is a more cost-effective approach to change the room’s theme and color without having to buy new pillows to match the new look. Size, shape, and color options abound with commercially produced pillowcases.
When it comes to decorating your home with pillows, you have a wide variety of options to choose from.
However, despite the abundance of prints to choose from, there are some images that simply cannot be found in the normal locations.
Photos of your favorite vacation spots, family gatherings, or even a picture of your beloved pet are all examples of things that deserve to be preserved for future generations.
In other cases, you’d like to give a buddy a printout of their favorite photo in a unique format.
Printed images still look fantastic, even as the world moves toward digital and away from paper. Some memories leave a lasting impression on your mind and soul.
To bring your photo memories back to life every time you enter the space, there are a variety of options.
Using a personalized pillowcase is a great way to keep these memories close to your heart. These monogrammed pillows are a great way to make your living area stand out from the crowd. It is possible to accomplish this on your own.
Adding photo on a pillow – DIY
Choose the pillowcase fabric
Xem thêm : Bamboo Pillow How To Use
Making photo pillows begins with selecting the fabric that will be used for printing your pillow.
You need to choose a fabric that can be washed frequently without becoming unkempt because the pillow cover will need to be changed frequently.
Bedding and other home decor items should be chosen with the same care as clothing. It’s well-known that polyester and cotton fabrics are long-lasting materials.
The fact that they may be washed as well as made more comfortable to use is an added bonus. You can also change the room’s color scheme by changing the fabric’s color.
So as you cut out your fabric, make sure to leave enough room for sewing along the edges so that you may make a pillowcase.
Choose and edit the photographs
You’ll also need to decide on the photo or photos you wish to use for your pillowcases. It’s up to you how the photo is shown; you can choose from a variety of options.
Using picture editing software, you may put together a collage of various images. You can also tile a single photo in the photo pane. To get the best results from your printing project, use only high-quality photographs.
Make your shot gorgeous with the use of an application such as Photoshop, which has a wide range of colors and hues available. Keep the resolution as high as feasible when you crop and enlarge the images.
It is advised that the resolution be at least 150 dpi (dots per inch), but a resolution of roughly 300 dpi would be preferable.
As an example, if you want a pillow that measures 18 inches by 18 inches, make sure that the photographs you upload have the appropriate measurements.
To avoid looking out of place when printing photos with people’s faces, make sure the images are centered. Save the images in a.jpg file after you are satisfied with their quality.
Printing and stitching of the pillowcases
It’s possible to print the photographs onto your cloth using a printer at home if you want. This, however, restricts the size of photographs that may be printed, which is a problem. Mastering the process of printing your images on fabric can be time consuming as well.
Sending them to a commercial printer with instructions on what you want printed and how you want it done is an alternative that is more convenient.
This is a good chance to print multiple copies of the same photo in various sizes for different pillows. There are a variety of online design tools that allow you to place these orders and then wait for your package to arrive.
The ink can be set into the fabric by ironing it after it has been delivered. To prevent the color from fading when it is washed, you should do this.
Cut out the separate pieces for your pillow covers from your images. The next step is to sew the pillow cover out of the fabric.
If you laid up the images carefully, they will fit perfectly and the back cover may be added to complete the pillow. If you’d like, you may also use it to dress up your pouf.
Keep an eye out for the edges as you stitch the pillowcases so that you don’t lose any of the photos. Pillows can be made even more beautiful by adding pompoms to the edges.
Conclusion
It’s a great task to learn how to paste an image on a pillowcase to create a personalized photo pillow for your house. You may now preserve cherished memories close to you as you sleep thanks to this DIY technique.
Nguồn: https://iatsabbioneta.org
Danh mục: Pillow


