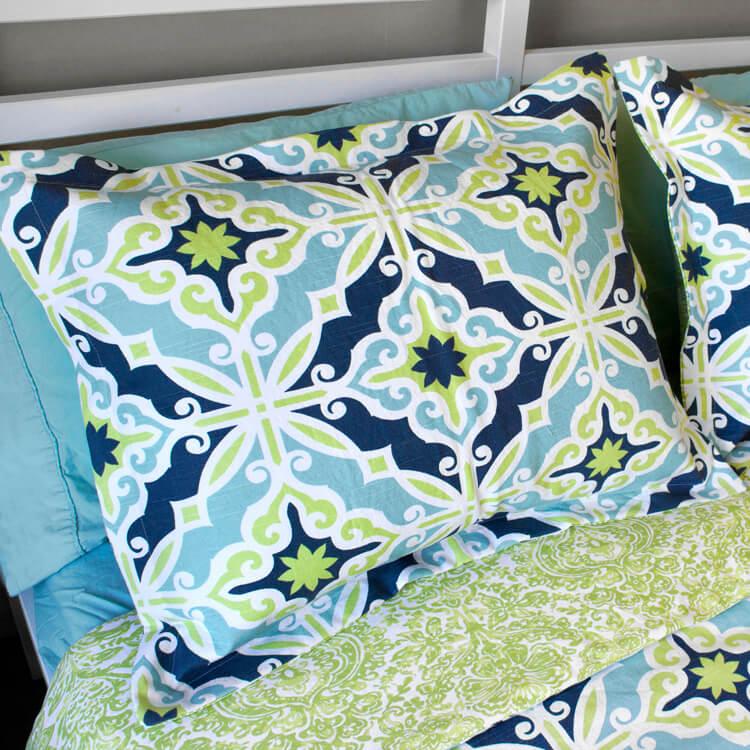
Since this easy flanged pillow sham creation didn’t make it into the Lookbook for the spring fabric collection, I’m sharing it with you now. a pillow sham’s flap of fabric is referred to as having a flanged edge. Whether they’re composed of plain fabric or a bright design like this, cotton flanged pillow shams look great once they’ve been washed and pressed with a hot iron.
I prefer to cover the simple pillow cases with cotton pillow shams while making mattresses. When you’re not using them to prop yourself up against, flanged shams like these can be used to conceal your pillowcases at night. With prewashed cotton fabric, matching thread, a measuring tape (and some pins), you can easily sew your own.
Bạn đang xem: How To Make Pillow Shams With Flange? A Step-by Step Learning Guide
I use the same technique as I did for these envelope pillows, but allowed for extra fabric around the edges to create the flanged border. To make a normal pillow sham with a flanged edge, follow these simple instructions:
A bolt of 44″-wide cotton fabric is needed for each pillow sham, so cut three pieces of fabric to the size shown in the picture below.
Each envelope’s back border is formed by sewing the rough side of a 28″ piece of cloth to pieces B and C.
With the pattern facing up and the 28″ length of their stitched edges overlapping by 4 inches, align the pieces B and C. Make sure that the pattern side is facing down when you put piece A on top of it. A repeating pattern such as a stripe, geometric shape, or floral pattern can be aligned such that the patterns match or the pattern fulfills your expectations. Piece A (the front) is laid on top of piece B (the back) and folded down to make the envelope.
Using a seam allowance of 12″ from the edge of the cloth, stitch all three pieces together. In order to avoid bulky excess fabric that will show when the sham is flipped right side out, trim the excess fabric at the seam edges inside and around the corners of the sham.
To reveal the design and the huge envelope cover, turn the sham right side out. A 3 12″ border is required on all sides of a normal pillow, so double-check that your measures are accurate. The pillow sham should be 33″ x 27″ if the pillow from is 26″ x 20″ at this point.
If your pillow form is a different size, be sure to account for the 3 12″ margin on all sides when taking your dimensions. In order to ensure that the fabric is flat and that there is no pouf between the flange and the edge seam, press all the edges with a hot iron before sewing.
In order to make a conventional pillow form, measure 3 12″ around the edge and pin the pins.
Sew the flange along the 3 12″ border marked by the pins, with the design facing out.
You can display your sham on your bed by turning it inside out and pressing it with an iron again if there are any wrinkles.
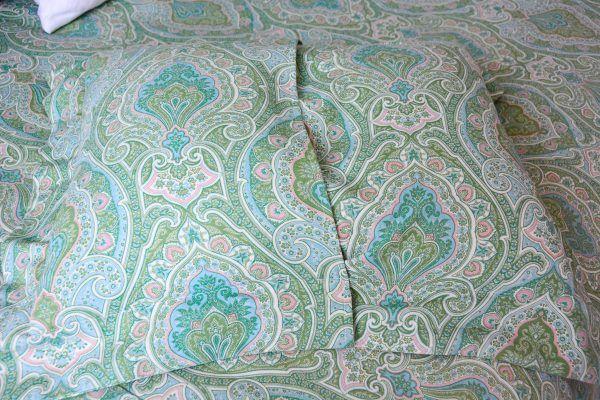
You can use any fabric you like to make this! The yellow fabric is from my shop, the floral pillow is from HomeGoods, and the other items are from other places. if you make any for yourself, please send me a picture, I’d love to see them!
How to Make Flanged Pillow Shams
I’m going to make an envelope-backed flanged pillow sham. The excess cloth that surrounds the edges is referred to as the flange. Use quilting weight cotton, sheeting, or décor fabric to make the project.
Your pillow sham can be personalized in any way you choose. Do you want to construct a duvet cover that matches your bedding? To learn how to make one, see How to Make a Duvet (Comforter) Cover.
The printable PDF instructions are available here. Subscribe to our newsletter to get the PDF.
The instructions can be downloaded by signing up.
Xem thêm : How To Measure A Throw Pillow? Easy Step-by-step Guide
To receive the instructions, please sign up for our mailing list. Enter your email address again if you’ve already signed up.
To get OFS promotional emails after signing up, you must agree to receive them. For further information, read our Terms & Conditions or Privacy Statement.
MATERIALS
- Fabric for home decor
- Form of a pillow.
- Fusible Fleece by Pellon
- Thread
- Scissors
- A fabric marker
- Pins
- Ruler
- Iron
INSTRUCTIONS
Step 1: Pre-wash the fabric
Prior to washing the sham covers, always pre-wash the fabric. Dry cleaning is required for most décor textiles, although you may be able to use a washing machine for cotton fabrics. When you wash it, the cloth may shrink. For further information, see Can I Machine Wash Décor Fabric?
Step 2: Measure & cut the fabric
I’m using a 20 x 26-inch down pillow, which is the normal size for down pillows.
You have complete freedom in terms of size and fill. King pillows are 20 x 36 inches, and euro shams are 26 x 26 inches in length.
Flanges for this pillow can be as tiny as 1 12 inches or as large as 3 inches.
For a fuller look, we recommend creating pillow covers a few inches smaller than the cushion itself. One inch will be cut off of this pillow cover’s dimensions.
From the front fabric, I’m going to cut a 29 × 23-inch piece. That’s the pillow size plus the flange size, which is two times the pillow size.
If you were sewing the pillow together normally, you would add an inch for seam allowance. However, I’m taking an inch away from the pillow to give it a fuller appearance.
[1′′ or 2′′ cushion size + (flange size times 2) + 1′′ seam allowance]
In both directions, cut a fusible fleece that is one inch smaller. To avoid the appearance of floppy corners, this step is optional. For bigger flanges, this is especially significant.
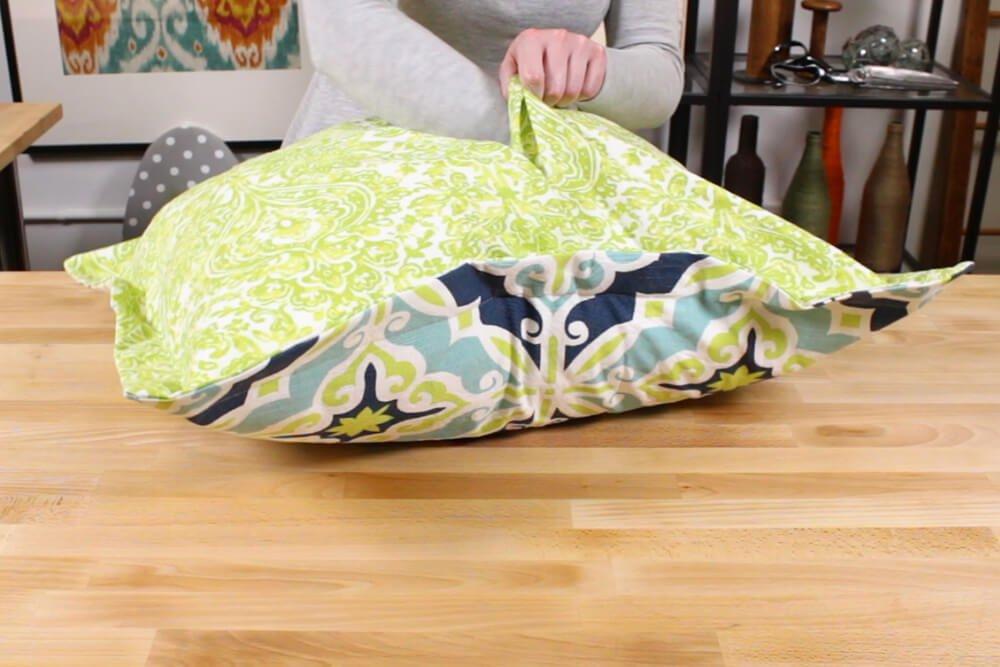
To produce an envelope-like opening, the rear will have two parts that overlap. A matching fabric is being used for the back.
The back fabric should be cut at the same height as the front cloth, but 8 inches longer than the front piece. In terms of dimensions, that’s 35 by 23 inches.
Then cut along the line you drew, resulting in two pieces that are the same size.
Use an iron to adhere the fusible fleece to the backside of the front fabric.
Iron the fusible fleece to the back of the front piece, then center it on the back and iron it in place.
Step 3: Sew together
Fold the end of each back piece 12″ over and iron. Fold an additional 12″ and iron. Make sure you’re doing this on the two ends that will be overlapping each other.
Xem thêm : How To Make A Pillow Out Of A Sweater? Easy Step-by-step Guide
The inside folds of these edges should be sewn in place as closely as possible.
Line up the back parts so that they face down when the front piece is facing up.
Using a pin, secure the position. Using a half-inch seam allowance, sew around the entire piece. Begin and conclude with a backstitch.
Trim the corners. Poke the corners of the sham cover from the inside out. Flatten the edges with an iron.
Step 4: Sew the flange
Place a piece of tape 1 12″ from the needle on your sewing machine. You can use the measurement of your flange instead if it is different.
Begin stitching 1 12″ in from the taped edge of the fabric. Using backstitching, sew around the entire piece.
Stop 1 12″ from the edge, raise the foot, and turn the fabric when you reach the corners.
After inserting the pillow, the sham is finished.
Making Pillow Shams With Flange
Be sure to learn how to avoid stitching mistakes before beginning the process of making your pillow shams with a flange.
#1. Familiarize your needs
There are a lot of things that my grandmother sews including gowns, pillow cases, uniforms, and more. I’m astounded that she’s so familiar with every cloth type and the proper application for each one.
The color of your thread, on the other hand, should match the color of your cloth when making a sham.
#2. Watch videos and research more
Taking the time to look into things could make your life a lot simpler. Take notes as you see. Possessing a deep reservoir of information is usually a plus. Pay attention!
#3. Be responsible and avoid accidents
When stitching, make sure you’re paying attention. If it’s too difficult to lift the needle up, you can use a thimble to help.
Let’s Wrap Up!
Has your mind been made up on starting work?
Pillow shams with flange should be familiar territory by now.
In order to make your pillows more comfy and stylish, use flanged pillow shams.
Keep working hard and remembering everything we’ve taught you. Don’t lose hope and try not to stress out. You’re capable of it.
It’s time to be creative!
Nguồn: https://iatsabbioneta.org
Danh mục: Pillow


