This post has been in the works for YEARS. WHY? Because Faux chenille blanket is TIME CONSUMING! So years of making these blankets just so I can show you all the ins and outs and hold your hand…BECAUSE–even if they are time-consuming…these blankets are the most amazing things!!!
- How To Knit A Blanket With Squares? Comprehensive Guide
- How To Make A Puff Blanket? Complete Step-by-Step Guide
- How Long Does It Take To Crochet A Blanket? All You Need To Know
- How To Make A Double Sided Minky Blanket? Easy Step-by-step Guide
- How To Cast Off A Loom Blanket? Everything You Need To Know
I popped on a facebook live and showed you live in action…but I will break it all down for you below!I’m going to go into depth of how to sew this chenille (and troubleshoot problems) down below. But let me give you the basics so this fabric portion makes sense.
Bạn đang xem: How To Make A Chenille Blanket? Easy Step-by-step Guide
What is a faux chenille blanket?
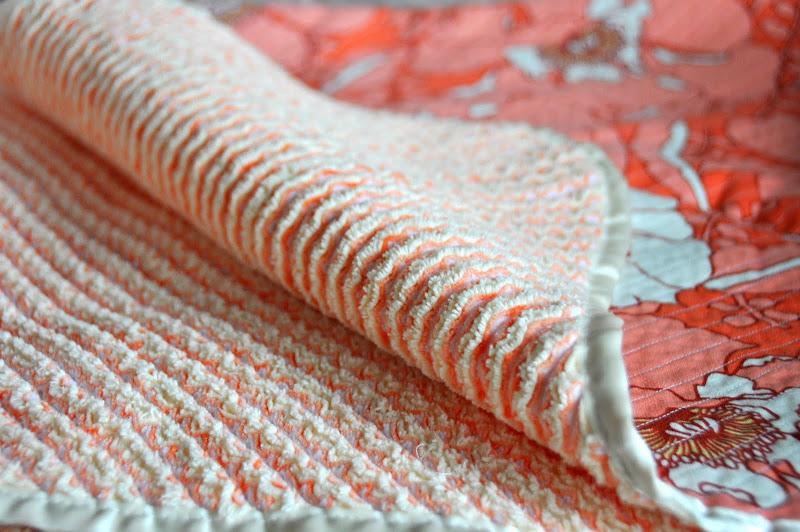
Faux Chenille is layers of fabric (4-5) sandwiched together. Sewed together into strips and then the strips cut apart and washed and frayed up to reveal the chenille texture. It’s a beast of a blanket to sew. BUT…when you wash it! oh! It will be all worth it!
supplies to make a blanket:
- 4-5 yards flannel fabric
- binding
- sewing machine
- lots of thread
- scissors or chenille cutter.
What kind of fabric to buy
Okay first up! You need LAYERS of fabric. I have made blankets cutting through 3 layers and cutting through 4 layers. I literally can’t tell you what I recommend. I will tell you this…Flannel is important. I have made a few with just cotton. They work… but nowhere near how pretty and soft the flannel is! See the comparison below. So if you are using flannel…3 layers should be plenty. If you are using regular cotton. I would get 4 layers for your backing!
So 3-4 layers of backing–plus the front layer. This front layer will get stitching through it…but you won’t cut through it so it can have a cute pattern!
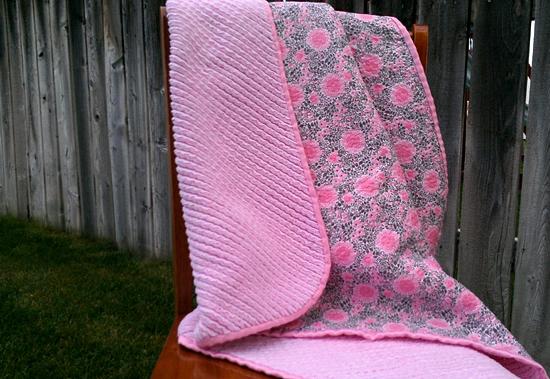
Another thing to note is this…sometimes you can see the back of the front layer of fabric! The polka dot fabric is my top layer. But you can see that the back is a dull gray/blue. I didn’t want that–so I added a blue backing. So this blanket has 5 layers. a front. a back to the front and 3 layers of fabric to cut through.
(see how the blue pops through! That’s the backing fabric layer I put on!)
Which brings me too:
What color should I do on my blanket
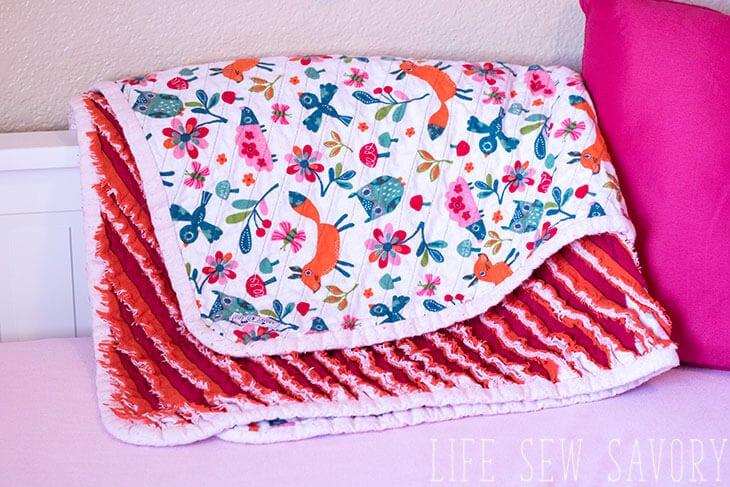
I’ve tried all sorts of fabrics! They all give such a different look! The picture above I just used one color! I loved how pretty it looked! I’ve done totally fun colors (below) I usually just pick out my front fabric first…and match the layers to it!
I’ve also done a couple ombre ones–They are pretty!
The pink layers are subtle…but as you wash the blanket they will become more noticeable!
It really doesn’t matter if the fabric backing has a print on it. You wouldn’t really be able to see this after a couple more washes! So just get a nice solid color that has the color on both sides)
I did get a nice polka dot and the stripes lined up perfectly and it was a great guide!! (it was purely accidental…but a happy accident!)
(I usually buy a yard of each fabric!) Perfect baby blanket size!
How to layer the fabric:
Okay! You bought your fabric (hopefully on sale!) Unless you are doing all one color–how you lay out your fabric is going to change the look of your chenille. These two have the same fabrics: the one on the left has the lightest blue at the bottom and the one on the left has the darkest color on the bottom
Also–if you want to add a decal or initial on the front–that needs to be sewed on beforehand! You will have stitching through it!
Assembly of fabric blanket!
You lay out all the pieces. I lay out the top piece–right side down. Then all the other pieces will go right side up (if they have right sides! the solid colors should be solid on both sides! Now! An important thing to remember is THIS BLANKET HAS TO BE SEWN ON THE BIAS. To do this…after I had it all laid out, I fold over the side and get a nice angle.
I pin along that crease and that is where I start sewing!
Let me show you my sister’s blanket when she sewed not on the bias
It doesn’t fray up. It strings up. So many strings! So sew on the bias!
Sweing the faux chenille blanket !
Now is the time to grab a good netflix series and get comfortable. This sewing portion can be tedious! You are going to sew and sew and sew. One stitch right next to each other.
How far apart to sew the blanket
The spacing between the stitches isn’t an exact science. I usually just line it up with the edge of the sewing machine foot. But too close and you will have the hardest time getting the scissors between the lines to cut.
and too wide and it won’t fray up quite as good. I shoot for about 3/4 of inches wide.
Another thing to keep in mind is that it’s a lot of fabric..and with all the layers it’s heavy. It can pull when it’s all hanging off the side. I usually fold it up and pin it. Just a little tip to help keep it in place.
cutting to make the faux chenille
Okay. After all the sewing is done…time to cut. You are going to cut it right between the stitches. If you cut it too close to the stitching it won’t have the nice frayed up edges on both sides! Just right down the center.
Now. You can cut these blankets with scissors. and I did for MANY blankets.
My husband kept telling me…there has to be a better way than scissors. (it was a little time consuming)
Then my husband found this ofla chenille cutter. Guys. I’m cheap. But this is worth its weight in GOld! Seriously. go buy this now. I’ll wait.
You just hook the yellow edge in between the stitches and it just glides!!! So much easier!!!
Xem thêm : How To Personalize A Fleece Blanket? Easy Step-by-step Guide
For your viewing pleasure:
Adding binding to the blanket
After all the cutting is done-It’s time to add the binding around the blanket. (you might need to trim the edges of the blankets to make it all even and nice)
(you can go HERE to check out how I make my bindings. This one is for an apron but same concept! Cut strips. Iron into a binding and sew on.
You will want to make sure to add the binding before you wash it. After you wash and dry it, the chenille will pop up and the binding is hard to sew on with the bulk!
After you sew on the binding…it’s FINALLLLY time to wash and dry it. This is when the magic happens! It’s seriously so amazing to see how it fluffs up!
Troubleshooting
- wrinkles. Sewing all those lines–sometimes there tend to be gathers of fabric! Don’t fret! Once you cut between the stitches you can trim any long pieces of fabric and you will never notice.
- Crooked stitching. The only place where you will see crooked stitches is on the front…and there isn’t anything you can really do besides let it bother you (unless you want to unpick it and sew it again) But don’t let it bother you. When there are 100 stitches across a blanket, they all tend to blend in and you can make out the crooked mess ups!
Faux Chenille experiments!
One blanket I did had stripes…I just couldn’t commit to doing a whole thing so I just did 8 inches of stitching and 8 inches just normal. It was cute!
If you are nervous about committing to a whole blanket…I did a baby spit up rag! Lots less time consuming but still cute! You could do a pillow cover as well!
Okay. Time for show and tell. Lots of blankets (and some are old…that’s why the pictures are not the greatest!)
How to Make a Faux Chenille Baby Blanket
First of all, there are lots of different tutorials already out there for these awesome blankets, when I first made mine I used this great tutorial: http://www.danamadeit.com/2008/07/tutorial-faux-chenille-blanket.html I just thought I would throw my two-cense out there about some of the things I have learned after making several of them.
Supplies:
– 1 ¼ yards for your back fabric, you’ll want this to be a print (cotton works best for this)
– 1 ¼ yards each of 3 or 4 fabrics for the chenille part (flannel works best for this) if it has a pattern just know that you really won’t be able to see it after it’s all cut up and washed.
– ¼ yard fabric for binding. This can be any fabric (cotton, flannel, satin, etc) I personally love using satin, it take more patience to work with but the end result is SO worth it.
– Faux chenille cutter, (or bias tape) you can get these at JoAnn’s. They are not absolutely necessary, you can use regular scissors but it cuts the cutting process from 2-3 hours down to about 45 minutes. If you are going to make more than one of these blankets then I highly suggest you get one (with a 50% off coupon they are only about $7)
– Quilting Foot, again not necessary, but a quilting foot helps keep your fabric from shifting more than a regular foot.
– Quilting pins (curved safety pins), regular safety pins will work too, the curved ones are just easier to use.
– Sewing basics: machine, matching thread, scissors (gingher are my favorite,) ruler, fabric marking pen/pencil or chalk, etc.
Step 1:
Pre-wash all your fabrics. There are many different reasons why this is important, here are a few:
– Flannel shrinks and because you have 3 or 4 layers of it (if you choose to use flannel) they will all shrink differently and you don’t want that happening after it is all sewn together because it could cause some weird bunching or pulling.
– Flannel creates a lot of lint and after you sew the blanket and cut it up it creates even more than normal, by pre-washing it you will save some wear on your washer and dryer by splitting up the amount of lint that will come off in two loads instead of one.
– Just in case the dyes in your fabric bleed, that will happen in the pre-wash instead of after and the colors won’t get all over each other.
After your fabrics are all washed either remove them immediately from the dryer and start the next step of putting the blanket together so they don’t get wrinkled or iron them before you start to get all your wrinkles out.
Lay out your back fabric, the fabric with a print on it, on a solid surface face down, I use my kitchen floor. Then lay your flannels down one at a time on top of the back fabric. As you lay each layer down smooth them out. I like to put my brightest/boldest color on the bottom because it will stand out the most after it is done and if it’s the top layer it might be a little too bold.
It’s okay if your fabrics aren’t squared off or if one layer is longer than another, you will fix this all at the end. Just try to center them on top of each other, like I did in the picture below. Smooth it out the best you can. I usually smooth it all out then flip the whole thing over, smooth that side, then flip it all back over again just to make sure there are no big wrinkles in it.
Step 2:
Next you will want to pin the layers together. Pin on the side you are going to sew on. I pinned mine on the back fabric (my print) but for picture purposes I am showing you the back because the pins were impossible to see on the other side.
Your pinning doesn’t have to be perfect, you will remove the pins as you go, but put enough in to help hold it together while you are moving it. I usually use about a dozen pins. It will probably get some wrinkles in it at this point and that’s ok.
Now you are going to draw your line. You only need to draw one line, you will sew right over the top of it then use the width of your sewing foot as a guide to make the rest of the lines. Use a piece of string and run it from one corner to the other diagonally. If you have someone that can hold the string straight and taught for you, great, otherwise just put some books on one end so it stays still.
Step 3:
If you have an acrylic ruler or yardstick you will need it for this, if not a book would work, but you need a straight edge to lay down just to the side of your yarn and then draw a line with your fabric marking pen/pencil or chalk (just make sure it will wash off!).
Step 4:
After your line is drawn, roll both sides up to the line.
Step 5:
Prep your machine before you sew. Because will be sewing 4-5 layers of fabric together and the majority of those are flannel, you want to make sure and take care of your machine. I always start with a new needle and oil my machine before I start. About half way through I clean it out all the lint and oil it again, then do this again when I am finished. Here’s what mine looks like half way through.
Xem thêm : How To Get Silly Putty Out Of Blanket? Complete Step-by-Step Guide
You will also want to fill 2 or 3 bobbins if you have extra ones because these take a lot of thread. By having extra bobbins already wound you will be able to just quickly change one out and keep going.
It might not look like much but there is a ton of lint all over the place.
Step 6:
Now for the fun/time consuming part, sewing! On average it takes me about 3-4 hours to sew all my lines. Don’t let this scare you. It’s not hard, it’s just tedious. I like to move my machine downstairs and move a table into my living room and sew while I watch a movie, it makes the time go by much faster. Another way to break it up if you don’t have 2 hours to sit in front of the tv and sew is to sew 10 lines one way and then flip it and sew 10 lines the other way then walk away. Come back later and do the same thing, before you know it, you’ll be done! Also, keep in mind your lines get shorter and shorter as you go because they are diagonal, so the first line you sew is the longest J
Sew your first line right over the top of the line you drew. Also, you do not need to backstitch at the beginning or ends of your lines.
The next line you sew will be to the right of your first one. Position your needle all the way to the right and use the side of your sewing foot as a guide to keep your lines straight. You want your lines to be about 3/8” apart.
The closer your lines are together, the better. After you wash it your fabric curls up and if the lines are sewn too far apart then there will be big gaps after it’s washed, and you don’t want that. In the picture above you can see how my foot is right next to the line I just sewed and the needle is positioned as far to the right as it will go.
Now just sew, sew, sew!
Once all your lines are sewn you are going to square it. You don’t square it until this point because as you will notice, the fabric shifts and stretches during the sewing process.
I don’t have any pictures of how I square mine, sorry, I just wasn’t thinking. The main thing you want to pay attention to is that you cut it so that all your layers end up the same. Because it shifts during sewing and to begin with your fabrics probably aren’t all the same size, your cotton fabric will probably be sticking out the most and then maybe layer 1 of flannel but then maybe layer 2 is shorter than layer 3 so you want to cut it so that all the layers are even. I hope that makes sense, sorry about not having pictures to help explain it better.
Here’s what mine looks like all squared:
It always amazes me that after sewing 100+ lines they don’t stand out more!
Step 7:
Now comes the other fun part, cutting! Again, don’t be scared, but this can take a really long time. I recommend a Faux Chenille Cutter, it will save your life. I made two blankets before I got a faux chenille cutter and they took me about 3-4 hours to cut, now, they take me about 45 minutes with the cutter. Seriously, they are a-ma-zing!
If you are using scissors, just start cutting. Start at one end and move to the next. Make sure you do not cut through the back layer! Only cut through the 3 or 4 layers of flannel. At the beginning of each row take an extra second to make sure you don’t cut through your back layer, this extra second might save you a lot of heartache.
If you are using a chenille cutter, I recommend making a snip or two with your scissors to start each line.
The reason being, after you square off your blanket your strings are left loose (there’s no backstitching to hold them in place) so if you go right at it with the chenille cutter it can pull some of your threads undone and you don’t want that.
Once you are done with the cutting you are SO close to being done!
Step 8:
This next step is personal preference. But I like to round my corners. If you prefer squared corners, that’s great and just leave it how it is. I like the rounded corners because I feel like it just makes the blankets look “softer” and since they are for babies, I like the “soft” look.
If you want to round your corners, get a plate and use that as your guide. Set it where you want your corners to be and use your rotary cutter to cut it, or trace the plate and use scissors.
Step 9:
Now for your binding! I won’t go into detail on exactly how to bind, but here are several good tutorials on binding:
I know there are tons more out there, I’m sure you can find one (or even a video) that helps you the most.
You want to attach your binding to the flannel side, or cut side, with your machine. This is important if you are going to hand bind the other side, I accidentally sewed it to the cotton side first and hand stitching it to the cut side was frustrating to say the least.
If you rounded your corners use LOTS of needles to hold it in place before you sew.
Depending on who you talk to, some will say sewing over needles is fine, others say it’s the worst thing you can do. I have made seven of these and every time I sew over all my pins and have never once broken a needle.
Again, I recommend hand sewing the binding because in my opinion it looks so much better, but do whatever works for you.
Here’s some pictures of the binding on both sides (machine stitched on the cut side, hand stitched on the top)
Step 10:
Now, wash it!! Wash it on a gentle cycle and then dry it. It comes out SO soft!! I always get so attached to mine and hate (but love at the same time too) giving them away because I want to keep them and snuggle in them. Make sure the recipient knows that the more you wash it the softer it gets. I had a friend who was scared to use theirs for fear of their baby spitting up on it and then having to wash it because she thought it would lose its softness. She was very relieved when I informed her the more she washed it the softer it got J
If you want to see some examples of other color schemes, here are my other ones.
These blankets are perfect for babies, or even for yourself to cuddle with while watching your favorite movie.
Conclusion
Wanting to have something is natural, but being able to make that thing is a rare experience.
A lot of people have been compromising to have their own comfy and fuzzy blanket, but their budget is slacked off.
For your convenience, here are the steps and the materials you’ll need on how to make a chenille blanket.
Nguồn: https://iatsabbioneta.org
Danh mục: Blanket


