Adding piping to a pillow is as easy as pie, and the results are stunning.
Using fabric to cover inexpensive cording, you will learn how to make piping in this article. Then, I’ll teach you how to finish the envelope cushion with piping.
Bạn đang xem: How To Add Cording To A Pillow? Step-By-Step Guide
How to Add Piping to Throw Pillows
Supplies:
- For two pillow fronts and bias strips, use one yard of fabric
- 1/2 yard of fabric (enough to cover the backs of two pillows)
- In fabric and craft stores, you may buy 4 yards of 1/2″ (9/32″) cording or welt cord.
- Scissors
- Cutting Mat and Rotary Cutter.
- Thread
- Marker that can be removed with water
- A Zipper Foot and a Sewing Machine
Step 1: Cut Out Pillow Front
The Pillow Front should be 1 inch longer and 1 inch wider than the size of the pillow form you are using.
I’m going to use a piece of fabric that is 13″ x 17″ to cover a pillow form that measures 12″ x 16″. Reduce each measurement by 1/2″ if you want your pillow form to fit more snugly.
The front of the pillow should be put aside for this purpose.
Step 2: Cut Out Pillow Back
Because this is an Envelope Pillow, you’ll need a Pillow Back that is a little wider.
The formula for making the envelope is as follows: Add 1 inch to the length and 5 inches to the breadth of your pillow form.
We’ll need a piece of fabric that is 13″ x 21″ because my pillow form is 12″ × 16″ and 16 + 5 = 21″ to make our pillow. Reduce each measurement by 1/2″ if you want your pillow form to fit more snugly.
For my Pillow Back, I’m using a polyester-polyester blend with a burlap weave. As a result, it frays and has difficulty keeping in place.
Before cutting out my fabric, I’m using an iron-on weave interfacing ‘available at Joann’s’ to decrease the effect of this.
To prevent them from coming undone, I additionally serged the outer borders. If you don’t have a serger, you can try zigzagging the edges instead or just omit this step.
Find the center of your Pillow Back and draw a pencil line at 10.5′′ from the side.
Once you’ve cut the Pillow Back in half, you’re ready to sew it. You will end up with two 13″ x 10.5″ pieces with serged edges.
Step 3: Finishing Edges of Pillow Back
To complete the ‘envelope’ of your Pillow Back, you must now finish the edges of the Pillow Front and Pillow Back.
It’s time to fold and press the long edge (the side that’s 13″).
Press after a second fold-under.
Using a 2.5mm stitch length, sew along the folded edge.
Replicate on the opposite side of the Pillow Back.
Set Pillow Back pieces aside.
Step 4: Determine Amount of Bias Strip Needed
Set aside the Pillow Back pieces.
My formula is as follows:
Next, figure out how many bias strips you’ll need for this project. Pillow dimensions should be increased by a factor of two.
For a pillow that measures 12 inches by 16 inches, I’ll be making piping. My formula is as follows:
Using the formula (2 x 12) plus (2 x 16) plus four, we get 60 inches of bias tape.
Two-inch bias strips, cut to 60-inch lengths, are what I need.
Step 5: Cutting Bias Strips
At least 60″ of 2″ wide bias strips will be cut after using the preceding calculations. I’ve already cut out two 13″ x 17″ Pillow Tops from my one-yard piece of fabric, and this is the remaining piece that has been pressed.
To make a crease, fold the bottom left corner up and over the top. You’ll know it’s your bias if it matches the top edge. Use a water-soluble marker to mark this edge after pressing it.
In order to have at least 60 inches of bias strips, you’ll need to extend the original marking by 2 inches and then repeat the process.
Despite the fact that there are other ways to cut continuous bias strips, this method is extremely time-efficient for little items like pillows. The Binding Buddy (affiliate) is a great tool for speeding up this process.
Using the cutting lines as a guide, cut out the strips. Bias tape for two pillows can be made this way. What a small amount of time and effort!
Each end of your strips will have a diagonal cut after they’ve been cut. Before you can attach them, you’ll need to square off the ends.
Step 6: Attaching the Bias Strips Together
Make a lengthy bias tape by attaching all of your squared-off bias strips together.
Pin your bias strips in place with the right sides facing each other. Draw a 45-degree angle with a water-soluble marker.
Stitch across this line, then press open the seams. A 1/4″ seam allowance should be left for trimming. Complete the process with the remaining bias strips.
Bias tape, such as the one you’ve just made, can be used to cover the cording.
Step 7: Making the Piping
Put a zipper foot on your sewing machine and move the needle to the left before you begin stitching.
Press one of the bias tape short ends 1″ under to make a neat fold. The folded end of the cording should be about an inch away from the cording you are inserting. Bias tape is pinned inside the cording.
Leave the folded end open as you begin sewing about 2 inches from the folded edge. Once you’ve attached the piping to the Pillow Front, you can insert the other end of the piping in this way.
Zipper foot should be placed as close to the piping as possible. It will be easier to go closer if you can modify the needle position.
Sew as closely as you can to the cording until it is completely enclosed in stitching.
Your Pillow Front is now complete with several yards of beautiful piping.
Step 8: Attaching the Piping to Pillow Front
Start pinning the piping to the Pillow Front at the point where the stitching begins, matching the raw edges. Unpin the 2″ section that hasn’t been sewed.
Continue pinning the pillow in a circular motion.
Make three clips into the seam allowance at the corner. Using this method, the pipe will be able to lay flat around the four corners.
As near as possible to the cording should be stitched with the zipper foot. Be extra cautious around curves.
Keep going until you come near to the beginning point of your pillow top stitching.
As you get near the starting point, line up the beginning and the end of cording. Slip the end of the piping into the folded opening at the beginning.
The cording should be aligned as you approach the starting position. Insert the piping’s folded tip into the opening at the beginning of the piping.
Step 9: Attaching Pillow Front and Pillow Back
Lay out the Pillow Front on a level surface with the right side facing up. Lay the left Pillow Back piece on top of the right Pillow Front, matching the left corners, with right sides together. Keep a close eye on the pipe and use a safety pin if necessary.
With a 1/2′′ seam allowance, backstitch at the openings of the pillow.
Xem thêm : How To Wash A Foam Pillow? Comprehensive Guide
Turn the pillow over and gently push it.
Adding piping to an envelope pillow is straightforward after you’ve mastered this method.
Please share this article on Facebook and Pinterest if you enjoyed it. It would be an incredible honor for me.
How to sew a pillow cover with piping, the easy way
Inside: A step-by-by-step guide to making a piping-trimmed pillow case! Even a complete novice can achieve this!!
For me, sewing my own home decor has been one of the best ways I’ve been able to add a lot of color, character, and pattern while saving money.
Pillows are right up there with fabric pattern mixing as one of my favorite things, so I figured it was about time I showed you how easy it is to sew a pillow cover with piping.
If you can stitch a straight line, you can accomplish this, I guarantee it. It’s as simple as that.
For your convenience, this post includes affiliate links. For a complete list of disclaimers, please visit this page.
Thanks to Fabric.com, I’ll be sharing an easy-to-make sewing project on the blog! ‘
Piping the edges of pillows is an easy way to bring out one of the colors in your fabric pattern or add a fun burst of contrasting color to your decor.
I used to make my piping in a separate phase until I became wise and discovered that adding piping is much easier (and faster). Not to add that if you follow my instructions, your finished pillow cover will never have an extra stitch line visible. I know, it’s really infuriating. You’re welcome, and thank you for your kind words.
Here’s what you’ll need to make a pillow cover with piping:
- Pillow cover fabric cut to your pillow form’s dimensions. To make a pillow cover, you’ll need a piece of fabric that measures 18 inches square. For a zippered pillow cover, the back piece is also 18 inches square; however, for an envelope pillow cover, the back portion is really divided into two halves.
- Your cushion should have enough cording to wrap around it.
- Bias tape in the desired color for your piping. Bias tape should be wide enough to wrap around your cording and still have a seam of about a half-inch wide.
- Use a matching color of thread.
- Your choice of pillow insert in the size you want
- (Optional) zipper
RELATED: Instructions for a zippered pillow cover or an envelope pillow cover.
Here’s a link to the flamingo fabric that my daughter adores:
How to sew a pillow cover with piping:
Step 1: Wrap your cording in bias tape. Be sure to leave about a 1/2 inch extra when aligning the bias tape’s borders so that it covers the cording completely.
Make sure the good side of your pillow cover is facing you when you begin this step.
Step 3: Place the raw edge of your bias tape along the raw edge of the fabric, starting in the middle on the bottom edge. All three of the raw edges should be completely aligned.
A rotary cutter and cutting mat were the best investments I’ve ever made when it came to making exactly straight, clear lines when cutting fabric.
Pin it in place about 2 inches from the end in order to complete Step 4.
On to the machine! You got this!
For this step, you’ll want to use your zipper foot to get as close to the cording as possible.
Next, attach your garment to your machine and lower the zipper foot immediately after the pin you just inserted. A piece of your piping should be left unstitched for now.)
Step 6: Begin stitching along the cording’s edge with a straight stitch. Inside the bias tape, you can see the bump caused by your cording. Sew straight down the middle of it.
A few inches from the corner, stop sewing and use your scissors to make roughly three or four little snips into the bias tape. Allows you to turn the corner without tripping over the wires.
Step 8: Work slowly and steadily until you are about half an inch from the end of the first side. At that point, lift your foot, turn the fabric, and align the piping on the second side of the cloth.
Lower your foot, then proceed down the other side of the path, as before.
These steps must be repeated for each corner.
Step 9: Sew until you are about 2-3 inches from where you started on the final side.
Line up the cording ends and cut them so that they butt up against each other. It is necessary to remove the bias tape for this step.
When you’ve finished sewing the bias tape around the cording, fold it over the cording as if you’re going to go on with the project.
Step 12: Fold over the raw edge of the bias tape’s beginning end just a little bit. After that, fold it over the corded portion of the piece. When you look closely, you may see the beginnings of your seam.
Pin it to the wall so that it doesn’t fall over and ruin the look.
Return to your sewing machine and begin stitching a few stitches ahead of where you left off, going all the way back to where you started!
All the way around your pillow cover’s font piece, you now have piping! Woo-hoo!
Okay. Now you need to make a decision. Are you going to go for it and make a zippered pillow cover? Or are you going to make an envelope pillow cover?
In any case, I’ve got you covered. Now that your front piece has piping, all you have to do is follow the instructions for either my zippered pillow cover lesson (which is so simple that beginners can do it!) or my envelope pillow cover tutorial.
But a few tips before you head over to those steps…
You should always lay the bias tape that is left over after cutting your corner snips flat before sewing on the back of your pillow cover, no matter what type you choose to construct. If you don’t, your finished creation will have protruding corners, which is a bad thing.
When putting on a zipper, make sure you don’t stitch through the piping as well as the zipper itself! Check that the piping hasn’t been crushed beneath the foot by lowering the foot and lifting the cloth. Stop and double-check everything.
You’ll also want to use your stitch ripper to undo the temporary zig-zag seam once you’ve attached your zipper, but make sure you only rip the zig-zag seam and not the seam that holds your piping onto your front piece. This was a lesson I had to learn the hard way.
It’s time to flip that baby over, insert your pillow insert, and have a look at your hard work!
After her first day of school, my daughter couldn’t wait to get back to her freshly made bed!
Elevate Your Homemade Pillows With Perfect Piping
The piping on a homemade throw pillow can make all the difference in whether it looks like a pro-made pillow or a home-made one.
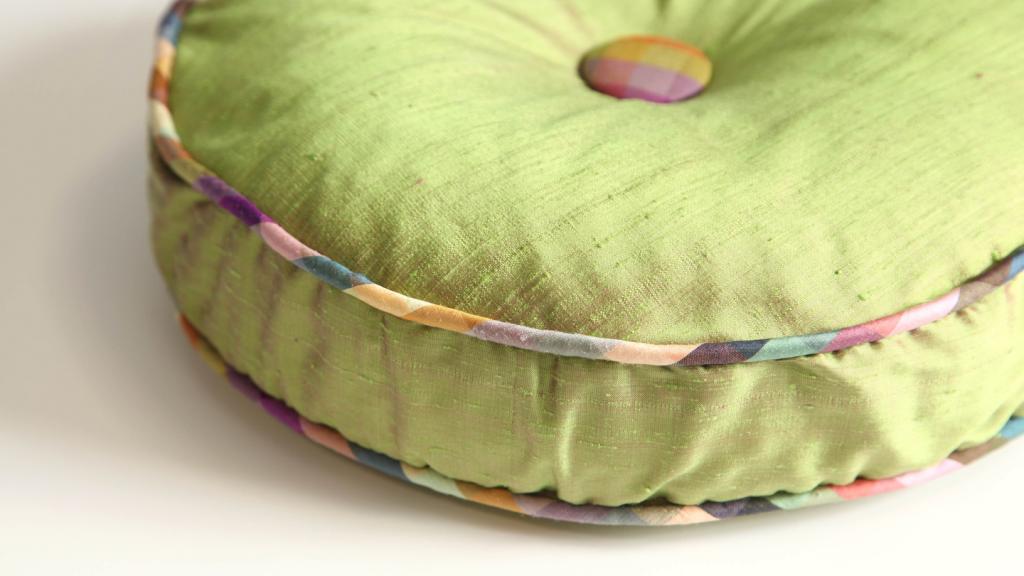
If you add an extra layer of fabric for additional definition to a seam, it was once known as “flat piping” and was simply called “piping” back then. The coiled trim you see in the image above was once referred to as “cording,” which refers to the piping into which cord has been placed. “Piping” and “flat piping” are two different terms for the rolled trim with cording, however of days they’re used interchangeably.
There’s nothing we can do about it if all that is enough to make you want to put your head down and forget we ever said anything. It’s simple to add piping to your pillow, and it’ll make your head rest look fantastic, so why not?
How to Sew Piping On a Pillow
Level: Easy
What You Need
- Your pillowcases are made of fabric.
- Piping
- Pins for sewing
- Scissors
- The foot has a zipper.
Instructions
1. Prepare Your Pillow Pieces
To begin sewing, you’ll need to cut your pillow pieces to the correct dimensions and attach an optional zipper to the back. To begin, sew the piping to one of the pillow cover pieces, aligning the stitching on the piping with the seam allowance on the pillow. Unpin the first few inches of the piping to give yourself some breathing room.
You can sew the piping to the pillow’s reverse side if you put the zipper in one of the pillow parts.
2. Make a Corner
Pinch each corner together, making a smooth but tight seal. Be careful not to cut any of the stitching that holds the piping together when making the slits in the seam allowance. Ensure that the corner is flat and smooth by making adequate slots.
When using piping, you will not have the option of achieving perfectly round corners at the end of the piece.
3. Pin the Piping in Place
Pin the pipe to the corner once the corner is cut. Piping that’s somewhat bunched up will soon be turned to the outside of the seam, so you don’t need to worry.
4. Leave the Extra Piping Unpinned
The piping will still be there when you’ve finished the cushion and returned to the beginning. Leave a few extra inches unpinned if you have them.
The pipe sections will overlap, so keep that in mind. In this case, the first pipe layer will extend up to the cloth and the second layer will diverge away from it. This overlap should be near the bottom of your cushion, if possible.
5. Sew the Piping onto the Pillow
Piping can be stitched onto the garment using conventional zipper feet and stitching on top of existing piping stitches. Close to the rounded portion is ideal. Check with your machine vendor to see if you can purchase an optional piping presser foot for your machine.
Start stitching at the point where the piping meets the ends of the seam. With the piping dangling off the cloth, begin sewing the piping to the pillow. The piping should have a little slope to it so that the cloth can easily slide over it.
6. Stitch Around the Corner
Xem thêm : How To Clean A Body Pillow? Comprehensive Guide
Snipe slowly around the corner, aligning yourself with the piping’s stitching as you do so. For a smooth, slightly rounded corner, keep the piping in place.. If you can, use shorter stitches to get more precise curves.
7. Overlap the Ends
Using the unpinned additional piping that you left at the conclusion of your stitching, overlay it on top of the first piping. You want to form a “V” at the intersection of the two ends.
8. Trim the Ends
Cut off the superfluous piping at the beginning and end so that they are aligned with the fabric’s edges.
9. Add the Second Fabric Layer
Right sides together, place the second layer of fabric on top of the first. All around the pillow, align the outer borders and pin them in place.
10. Open the Zipper
In order to sew into the pillow, you’ll need to unzip the second layer of fabric’s zipper a little bit. When sewing a zipper, be sure to pin the two layers together tightly so that they don’t come apart.
11. Stitch the Pieces Together
Still using your zipper foot, stitch the pillow pieces together on the seam allowance. This should keep you in line with the edge of the cord in the piping and the stitching on the piping. When you get to the overlap, sew right over it as if it were flat.
Using the zipper foot, sew the pillow pieces together along the seam allowance. Make sure you’re aligned with the edge of the piping cords and the stitching. Just stitch directly over it as if it were a level surface.
12. Trim the Corners
To make it easier to turn the garment right side out, cut the corners of the layers together.
13. Trim the Zipper
Trim the zipper tape at both ends if it has an excess piece on the top layer. Don’t use your fancy scissors if you need to trim any metal parts.
14. Turn It Out
To reverse the cushion, simply flip it over. Nice and tidy: The final result will look like this image.
Making A Pillowcase
For those who currently own a pillow and are looking for a replacement case with a cable, simply follow these instructions.
Measure
Measure the pillow’s dimensions and perimeter.
Using the measurements you’ve taken, cut the fabric you’d like to use.
Calculate the cord and piping length based on the measured perimeter.
Add a few extra inches to the cord’s overall length for overlapping purposes.
Pinning out
In order to make it easier for sewing, you’ll need to lay the fabric out on top of each other.
A zippered pillowcase can be made by sewing the zipper into the fabric’s bottom edge.
A non-zipper pillowcase requires three pieces of cut fabric, so plan accordingly.
It’s simple to make a zippered pillowcase by following these steps: However, you should leave the lower portion unlocked.
For a pillowcase without a zipper, overlap the two materials with one another. The first piece will serve as your front, and the other two pieces will act as your back.
The sides of the two pieces of fabric should be 3-4 inches apart. By doing this, the pillow will be unable to escape the pillowcase.
Sewing
You will now stitch the fabrics together after they have been pin-pinned.
You must have a basic understanding of sewing in order to do this.
You can either use a sewing machine or sew by hand to complete your project.
- Mechanized Stitching
The development of tools and technology has made life a lot simpler. Using a sewing machine to sew cushions.
Sewing machines can be divided into two categories. The manual and electric transmissions. You have the option of picking either one of them.
My personal sewing machine of choice is a Juki high-speed model. There’s a lot you can accomplish with this sewing machine.
For a neater appearance, sew the piping as close to the cord as possible before attaching the pillowcase.
- Using a needle and thread to sew
You should have a sewing kit ready while sewing by hand. You’ll need a pair of scissors, a pair of needles, and thread in the same color as your fabric.
Try basting the corded piping to the cloth first for a cleaner appearance. The pipework will be installed this way.
In order to sew the garment, use a backstitch. The better your results will be, the smaller the stitches you sew.
We’ll use the 4th side after you’ve sewed all three sides if you want a zipper for opening.
The bottom must be placed out when stitching the zipper on the fourth side. The zipper should be slightly open so that you may easily turn the garment later.
Those last touches
The pillowcase is ready to be turned inside out after sewing.
Turn your pillowcase inside out if you have a zipper.
Your pillowcase can be turned inside out without the use of a zipper if you leave a small gap between the two fabric layers on its backside.
After rotating, inspect your pillow for holes and loose threads.
Make sure you use scissors to snip the loose thread and not to tug on it.
Your work will be damaged if you pull on stray threads.
Also, check to see if anything needs to be repaired, such as an uneven cord or a stitch that doesn’t quite match up.
Conclusion
There are a number of methods to liven up your living space.
It’s also a good idea to use low-cost, hand-made accents.
It is possible to find a variety of pillows for sale on the internet.
Check them out and see which one appeals to you the most.
For those who’ve already completed this task and want to know how to make corded pillows, just follow the instructions in this page.
The time passes quickly.
In the process of constructing these pillows, you’ll learn new skills, have fun, and your pillows will look better than before.
If you’ve learned how to add cording to a pillow, now is the time.
Make sure you have all the supplies you’ll need before you start designing!
Nguồn: https://iatsabbioneta.org
Danh mục: Pillow


