Finally, I think I have it all figured out. When I initially started to focus on the wonder of Eco Printing, it seemed like I was attempting to crack a weird secret puzzle. For your convenience, I will now address the Iron Blanket, a frequent topic of inquiry.
Knowing how it all worked would be a valuable item, much like a secret recipe, therefore I can see why those who have this knowledge kept it to themselves. Finally, I feel like I have a handle on what is going on within and outside of those bundles, though I still wouldn’t call myself an expert.
Bạn đang xem: How To Make An Iron Blanket For Eco Dyeing? Step-by-Step Tutorial
What is the Iron Blanket?
Every once in a while, someone will ask me that exact thing. A carrier blanket is used to transport iron to the fabric being printed on. A carrier is a piece of cotton fabric or similar material (including paper towels) that absorbs the liquid solution you want to mix into your combination of color dyes and mordants; in this case, the iron component.
How to Use an Iron Blanket:
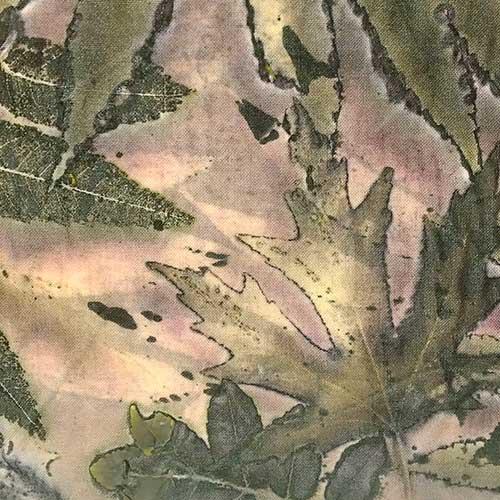
Above, leaves are being arranged on the pre-dyed (cochineal) silk before the iron blanket is positioned on top. To prevent prints from vanishing into thin air, a layer of paper or plastic will be placed either on top or underneath. Nonetheless, these are not hard-and-fast regulations; on the contrary, a little experimentation often yields surprising and delightful outcomes.
What does the Iron Blanket do?
Unrolling it after it has been processed by boiling, steaming, or my “alternative” processing is fascinating. Note how the leaves have sharp corners. Tannins are responsible for this, I believe, by binding to the iron in the metal ions. Since the right-hand fabric is not uniformly iron-rich, the iron and tannins “play” together to produce bolder prints near the fabric’s margins.
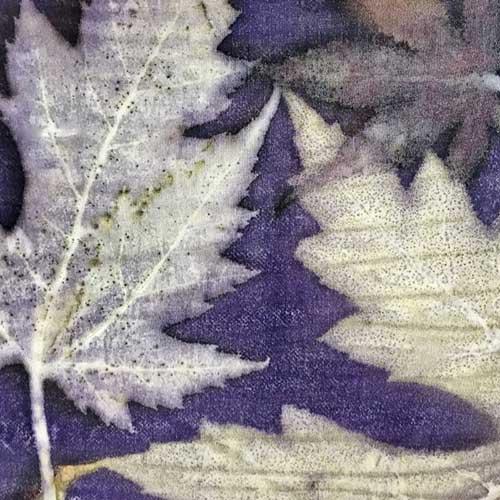
Both are typically covered in lovely designs, however their aesthetics couldn’t be more different. These prints are typically extremely dark and not as “outlined” as the “host” fabric since the iron is absorbed by the “Blanket” fabric. Because of this, you can print not one, but two items simultaneously.
When I find a really lovely set of vintage cotton bedsheets, I don’t throw them away; instead, I put them into retirement for use in other contexts. To have the tannin-rich leaves imprint on the fabric by doing this would be the same as dipping it in an iron solution.
Notice the difference?
The photos above all feature the identical leaves, except the ones in the center were printed with Iron Blankets. Since some are drawn really clearly, I ratcheted up my focus. The iron solution was dipped directly onto the leaves (no “covering”) to produce the outer samples.
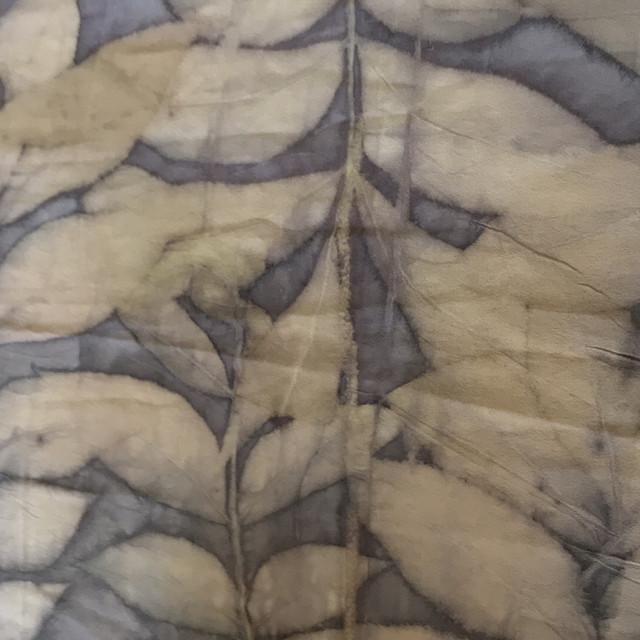
Beautiful accents on this Iron Blanket were produced when the dye color printed back from the main cloth. They can have a lot of nuance because of their versatility.
So many…
I printed a lot of them and ended up with a huge collection of different colors. In light of this realization, I decided to incorporate them into a quilt. I get that ironing (particularly repeated ironing) can damage cloth, but how long are we talking about here—50 years, 100 years?
Make something with the Iron Blankets!
Xem thêm : How To Get Slime Out Of A Blanket? Step-By-Step Guide
Having a wide range of patterns to choose from that all work well together was a breeze. Incorporating prints from nature, this Art Quilt is truly one-of-a-kind.
Eco Printed Journal Covers are upcycled using leather and additional iron blankets. It is possible for the prints on the blankets to become darker with each subsequent washing.
I hope this article has shed some light on Eco Printing and cleared up any questions you may have had about it. In this ever developing creative form, I welcome any and all feedback.
Steps In Making An Iron Blanket For Eco Dyeing
Making the iron blanket
The first thing you should do is measure the item you plan to dye to ensure that the fabric you plan to use as an iron blanket is the same size. A large bucket or basin should then be filled with warm water.
Ferrous sulfate is readily available and inexpensive at most garden centers. Put one teaspoon into the basin/bucket for every gallon of water.
If you don’t have any fresh iron, you can also prepare the solution by mixing water with rusty scrap metals like old nails. Vinegar can improve the outcome.
To begin, let the fabric soak for 10 minutes in the iron solution. If you want the solution to spread out evenly, you’ll need to soak it well. As a result, your dye prints will come out looking more professional and free from unwanted black spots on the iron blanket.
After some time has passed, squeeze the liquid out. You can now use your iron blanket.
Using the iron blanket
First, if you’re unfamiliar with eco-dyeing or just need a refresher, here’s what you’ll need to do to give your garment the look you want. Be sure to pre-dye your garment before making your iron blanket if you want the eco-print to have the vibrant colors you desire. In order to get just the leaf designs you want, you can get started with the iron blanket right away.
As a second step, arrange the leaves anyway you like on your clothing. In order to create a sandwich, you can add the iron blanket on top after you’re satisfied.
A barrier on top of the sandwiched materials can prevent bleed-through. There are a number of options for the barrier material.
Third, bind everything together with some string or rope by wrapping it around a dowel.
Xem thêm : How Many Skeins Of Yarn To Crochet A Twin Blanket? A Must Read!
Fourth, you can now steam or boil the wrapped textiles to improve the dying process. Spend the next 90 minutes doing this.
Untie and spread out on a clean surface #5 when it’s done. Just wait for it to dry, and you’ll be good to go! Your very own eco-friendly print is now in your possession.
What Are The Best Leaves For Eco Printing?
You’ll be thrilled to learn that nature provides an abundance of attractive leaves that may be used in eco-dyeing.
Fruit trees
Cherry, plum, apple, and peach trees, to name a few, have leaves that make for lovely prints on cloth. Leaves from berry plants including strawberries, blackberries, chokeberries, serviceberries, and Saskatoon berries are all attractive accents.
Leaves
Leaves of other nut trees, such as chestnut, beech, walnut, and butternut, should not be forgotten either. You might even try something completely out of the ordinary and make use of carrot leaves! Leaves from common trees, shrubs, and bushes, such as birch, eucalyptus, maple, oak, sumac, willow, alder, and others, make for beautiful prints that are hard to go wrong with.
Flowers or herbs
Flowers and colorful herbs are other options for adding visual interest to your project. Dandelions, irises, lilacs, tulips, violets, marigolds, catmints, and many other colorful flowers and herbs fit this category.
Your eco-dyeing project will benefit greatly from the addition of the leaves and blossoms from the plants mentioned above. For every project that calls for the use of leaves, it’s important to select leaves with the appropriate amount of tannins.
In a nutshell, tannins will help the dye (often in tones of yellow to brown) penetrate the fabric more deeply, resulting in more vibrant and distinct designs. Collecting the leaves and plants you’ll use in your eco print is a rewarding part of bringing your design to life.
Knowing the procedure from start to finish will make creating your iron blanket both easier and more enjoyable.
Conclusion
It’s true that eco-dyeing as a whole is a time-consuming process. However, the end product will be so impressive that it will be well worth the effort.
After reading this, you should have a good idea of what you’ll need besides leaves to build an iron blanket for eco-dyeing. Having patience is vital for this project, as it is with any decorative endeavor. Always take your time and don’t rush things if you want beautiful outcomes.
Nguồn: https://iatsabbioneta.org
Danh mục: Blanket


