Tools used
Clear Acrylic Ruler, 6″ x 24″
Large (24″ x 36″) Self-Healing Cutting Mat
Bạn đang xem: How To Make A Meditation Pillow? Comprehensive Guide
First off, you’ll need to cut the fabric. Fabric for a homemade meditation cushion can be cut to size with a Fiskars® 60mm Stick Rotary and a Fiskars® Acrylic Ruler. When I made this, I wanted a big square on which to sit cross-legged, so I cut two pieces of fabric 28 inches by 28 inches. You can make it bigger or smaller, depending on your needs. And because I wanted to be able to take these cushions outside to my meditation garden, I made sure to use an indoor-outdoor fabric.
Second, sew the pieces together. Join the two squares of fabric with the right sides facing each other. Sew a 1/2-inch seam allowance after pinning the raw edges of the two layers of fabric together. The pillow should be inserted through a gap left in one side.
The third procedure entails snipping the edges. Trim the corners with the Fiskars® Original Orange-handled ScissorsTM, being careful not to cut through the stitches. When the wrong sides of the fabric are showing, it’s time to flip the pillow cover inside out and insert the pillow.
The fourth step is to close the opening by sewing. Close the pillow by pinning the open end and stitching it shut with tiny stitches.
The fifth step is to stuff the cushion. Insert a button into the middle of each side to complete your cushion. Place a button on each end of the cushion by inserting a doll needle through the center of one side and coming out the other. Tighten the thread until the buttons are completely encased in the stuffing of the cushion.
Stage 6: Chill Out! You can take your cushion indoors or outdoors, depending on your mood. To keep your cushion in good condition for as long as possible, bring it back inside whenever you can.
Patterns
You can find many different tutorials online to follow if you want to make a more conventional pattern. The procedure will be essentially the same, with the exception that you will not be adding an embellishment in the form of a button to the center and that your final product will be circular rather than square.
How to Make Your Own Meditation Pillow
Meditation cushions are the best. Raising your thighs above your knees will help you sit up straighter and for longer periods of time.
Are the pillows at your neighborhood gym’s studio some of your favorites? Need one for your house but don’t want to spend the average of $80? If so, read on!
It’s not hard to sew your own pillow, and then you can pick out the perfect fabric, dimensions, and filling. Inspiring as this post was, we decided to give it a try.
Fabric is the first thing you’ll need. Fabrics made of thick cotton work well for this purpose, and the addition of pretty colors and patterns can’t hurt either.
Slice into three parts:
Xem thêm : Ideas on how to Decorate a Bed Room With a Reclinereding Wall
One fabric strip, 59 inches in length and 6 to 9 inches in width (depending on the desired finished height of the cushion).
A pair of 11- to 13-inch-diameter fabric circles. The fabric’s circles were originally drawn using a plate as a guide.
In order to make your pleats, you must first draw them on the “wrong” side of the fabric. Draw three marks, the first one being 6.5 inches in from the left edge. Distance of 75 inches between them. Make three more marks at the three-inch mark. As before, keep a distance of 75 inches between you and your partner. Continue down the entire length of your fabric.
Pleats should be folded so that the first and third marks meet.
Flatten the pleats as much as you can by pinning and ironing.
Your pleats will be finished once you sew along the length of the fabric from top to bottom.
Secure the side by pinning it to the upper and lower circles. A little overlap is fine; that’s how we’ll squeeze the filling in. Complete a top and bottom hem.
Afterwards, turn it right-side-out, stuff it (we used buckwheat hulls), and then close the remaining opening by sewing. A zipper, by the way, can be added later if desired.
Have fun with your new individualized meditation cushion.
What’s a Zafu?
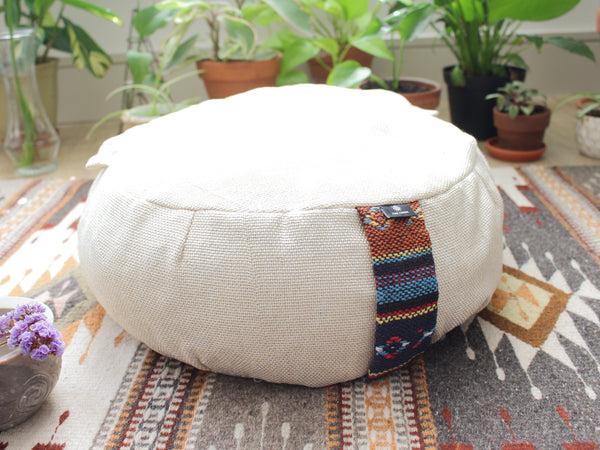
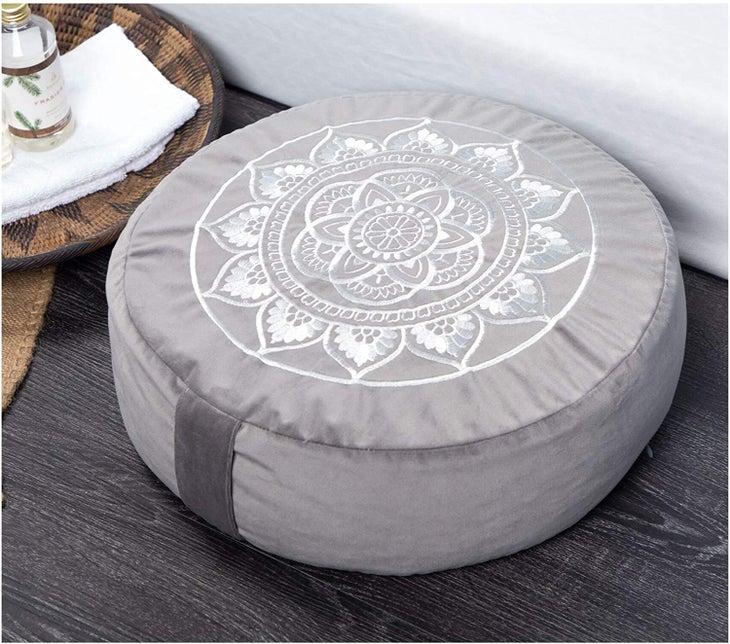
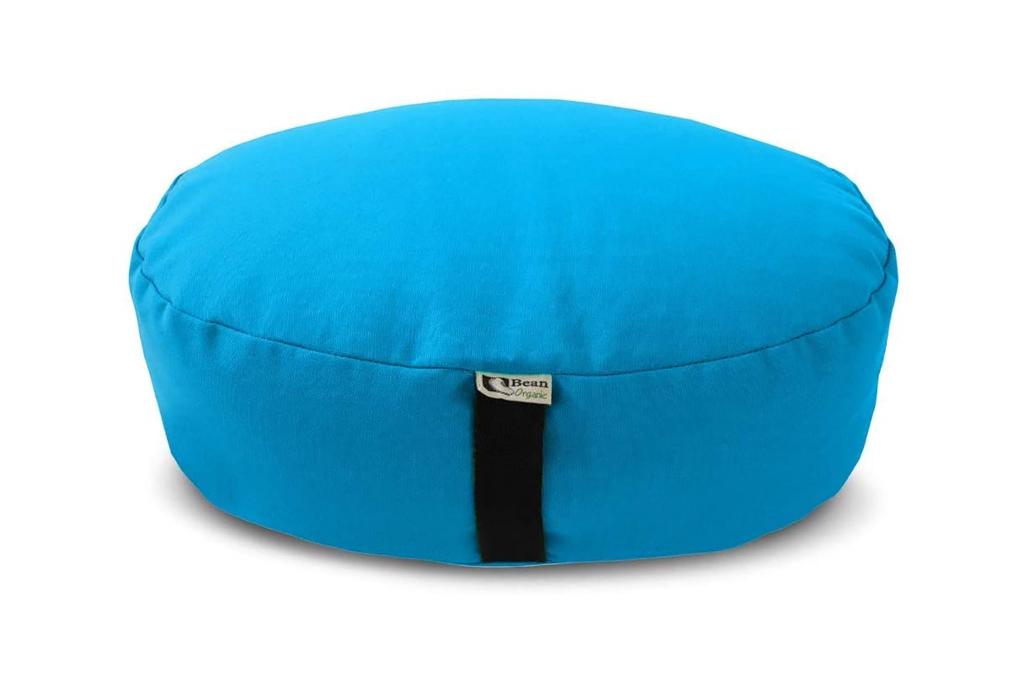
A zafu is a firm, high cushion used in seated meditation and some forms of yoga. The correct term is zafu, but you may also refer to it as a meditation pillow, meditation seat, or meditation cushion. The plural form is zafus.
How to Make Your Own Zafu Meditation pillow
How to Make Zafus: A Free Sewing Tutorial!
Materials Needed to make your own Zafu Meditation Pillow
Fabric
Fabric made from organic cotton is the best option. The approximate amount of material required is:
You will need one piece of fabric that is 59 inches in length and anywhere from 6 inches to 9 inches in width (depending on the height of your cushion).
Two fabric circles, 11 to 13 inches in diameter (the exact range depends on the desired circumference of the finished cushion). One Tip for Complete Beginners: Fabric is usually sold on the bolt with both folds in the same direction. So, the apparent width of 30 inches is actually 60 inches. Hurray!
The Best Filling for Zafu Meditation Pillows
Kapok fiber (or buckwheat hulls, if you prefer a firmer seat) is what you’ll need to stuff your pillow. Get your kapok by clicking the orange image below now!
USE this special Carolina Morning promo code, 0012310. If you do, we’ll give you a discount of 5 percent on your initial purchase. What’s more, they provide us with a small reward for our trouble. A win-win situation for both of us. We appreciate you taking advantage of our Carolina Morning coupon. To what extent do you require Kapok?
Free Step-by-step Tutorial to make your own Zafu Meditation Pillow
Initiate process by making a pleat along fabric length. My recommendation is to use pleats spaced at 3 inches, or 3/4 of an inch. Here’s how it’ll play out across the width of your fabric, if you’re curious:
FABRIC DIMENSIONS FOR PLEAT 1: 6.50 (3.75 x 0.75) = 8.75
PLETCHES 2-10: (3 (3 x 0.75))= 9 x 5.25′′ = 47.25′′ for each of the 9 pleats.
Closing overlap for PLEAT 11 = roughly 3 inches
Add two quarter-inch seam allowances, bringing the total to 59 inches (the width of your fabric).
How To Pleat
a) On the left side of the length, start by marking a stretch of 6.5 inches and a 0.25-inch seam allowance.
Xem thêm : How To Measure For A Slipcover? Complete Step-by-Step Guide
Make three marks, 3/4 inches apart, to outline the first pleat, and then fold and secure it with pins.
A total of three 0.75 inches of fabric were used to create the foldover.
Pleat again as described above, beginning 3 inches after the first.
Keep going until you’ve exhausted your fabric’s width. The final pleat marking should be spaced about three inches in from the right edge, allowing for a quarter-inch seam. (Of course, if you want your pleats to be thinner, you can always make more of them.)
Then, b) press the pleats and secure them with pins. All of the folds should go to the left, and the ironing should be done so that the left side shows. Each time you see a set of pleat markings, fold the third toward the first, as shown, and secure with pins.
AFTER YOU HAVE COMPLETED THE FIRST STEP, TAKE the right edge of the pleated strip cloth and PIN it to the left end of the strip so that you have a nice, evenly pleated tube. Right?
STEP 3: Place the rounded tube on top of the two layers of fabric. Place four marks of equal distance on each circle of fabric inside the tube.
Put the marked pin on both pieces of fabric, but first separate the two ‘circle’ pieces.
Flip the tube inside out if it is pleated. Attach one circle to the top and one to the bottom of the pleated tube using pins at each of the four corners, as shown in the image.
If you have a round object, you can use it to trace a circle onto the fabric, which you can then use to cut out (with a quarter-inch seam allowance added to all of the cut edges). You could also leave the excess fabric for the time being and trim it later. There won’t be any learning curve issues this way…
Following this, pin the upper and lower pleats into the circles. Join the spheres to the fabric strip by stitching them together.
STEP 5: Flip inside out and fill with kapok or buckwheat hulls (via the zafu’s side opening). For the best results, lots of stuffing should be used. Over time, kapok will shrink in size, and buckwheat hulls will decompose:
Make sure it can be easily refilled by sewing a zipper into the opening.
* Our design is based on an old, now out-of-print book by the Zen Center of Los Angeles called “To Forget the Self: An Illustrated Guide to Zen Meditation” by John Daishin Buksbazen.
Namaste!
How to Make a Zafu Meditation Pillow – NEXT STEPS
Can you tell me how much buckwheat hulls or kapok I’ll need to make this zafu?
Finding Kapok or Buckwheat Hulls to make your own zafus or purchasing pre-made zafus, zabutons, and futons for your Zen meditation practice.
Why choose kapok instead of cotton?
Eco-friendly Cushions, Pillows and Beds
Caroline Morning also sells pre-made zafu pillows for meditating. No matter how much you buy from Carolina Morning, whether it’s $6, $60, or $600, you’ll save 5% if you use our FineCraftGuild.com promo code of 0012310.
Nguồn: https://iatsabbioneta.org
Danh mục: Blog