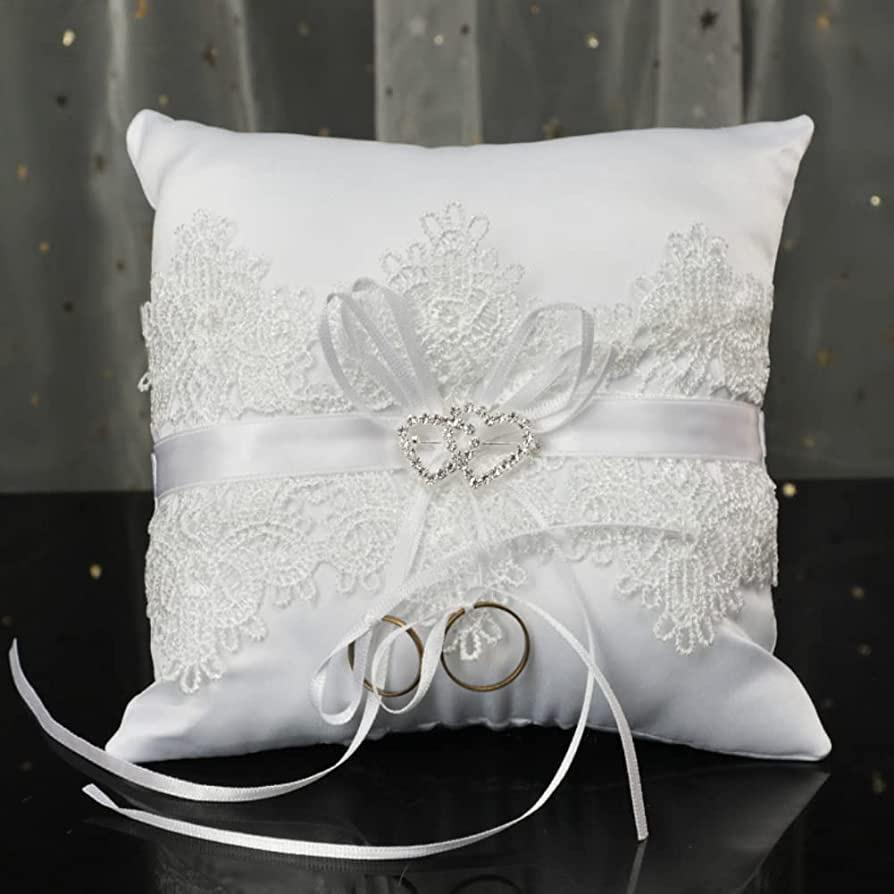
Interested in making a ring bearer pillow for your wedding? It’s quite simple to make one of these.
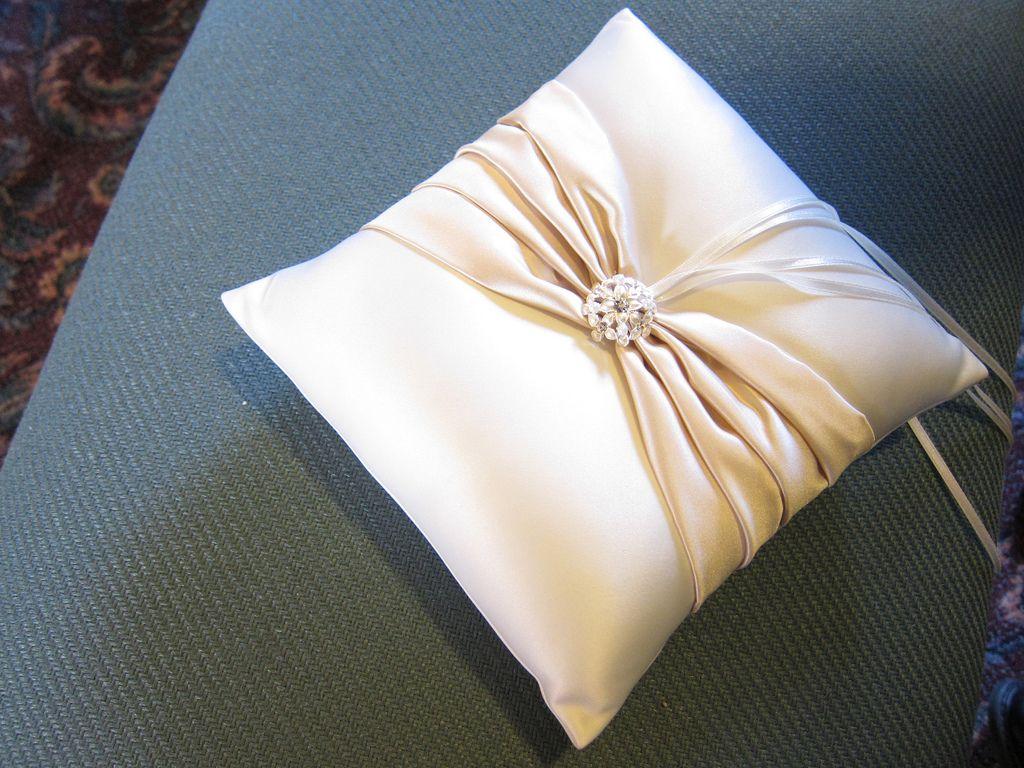
The most appropriate ring bearer pillow for any wedding is a basic yet elegant one.
Bạn đang xem: How To Make A Ring Bearer Pillow? Easy Step-by-step Guide
The wedding ring serves as a reminder of one’s vows to another. Small jewelry like that can bring out the unity between two people’s hearts in a big way.
It serves as a reminder of their commitment to each other.
You’re the one who’s going to be wearing it, so do you mind if it’s not honored before you get your hands on it?
Not at all!
Learn how to sew a ring bearer pillow in this post.
Steps In Making A Ring Bearer Pillow
A wedding ceremony isn’t complete without a wedding ring.
In order to properly commemorate the occasion, the couple’s left fourth fingers must first lay the ring on a “throne.”
In this section, we’ll learn how to make a ring bearer pillow that’s both simple and fun.
Step #1. Choose a design
To get married, you need a specific theme and motif. Surely, you don’t want to miss out on it.
So, while picking a design, it’s best to match the event’s topic and ethos.
Pillows for ring bearers come in a variety of styles and sizes.
Just my two cents: keep things simple, stupid.
Sewing beginners should start with a simple shape like a square.
It’s best to avoid any issues with size for the ring bearer by picking a pillow that’s appropriate for the occasion.
Step #2. Prepare what you need
The cost of manufacturing a ring bearer pillow is really minimal. You’ll be able to find whatever you need within a short distance of your home.
Alternatively, you might be surprised to learn that you don’t even have to leave your house.
Yes, you may already have what you need at home.
Needed materials include silk string and polyester fiberfill, sewing pins, thread, scissors, and a sewing machine to complete the project (optional).
Fabric
You’ll need to select just one type of cloth among the numerous available on the market for this project.
You should go with a simple design rather than one that features patterns.
Weddings are formal affairs, so dress appropriately!
A ring bearer pillow can be made from a variety of materials, including:
- Linen
- Silk
- Cotton
- Polyester
Ribbon
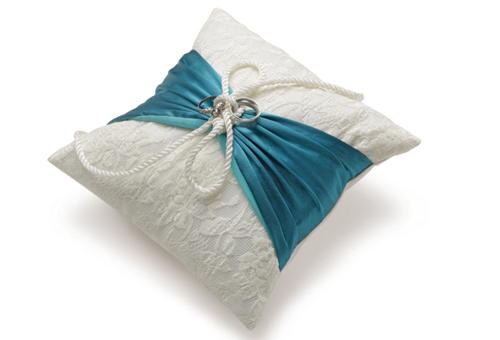
Make sure that the ribbon you choose for the pillowcase matches the fabric you used for the cover.
In order to contrast the shiny shine of a fabric, use a matte ribbon.
You should also ensure that the length of ribbon you intend to use is sufficient.
Ribbons of the same length and appearance, but with varied widths, will be used in this essay. A ratio of three to one is ideal.
Step #3. Cut fabric and ribbons
To make stitching easier, divide the fabric into two squares and sew them together.
For the length of the side, ten to twelve inches would be ideal.
You’ll need two ribbons for each piece of fabric that’s twice the length of your ribbons.
Step #4. Attach the ribbons
Stack the smaller ribbon over the larger one.
Xem thêm : How To Make A Meditation Pillow? Comprehensive Guide
Check to see if the side edge is in sync.
Attach the ribbon to the top of one of the pillowcases, along the side edge, and place it in the center.
Sew down the side edge of the ribbon, being sure to leave a large enough seam allowance.
Make sure to repeat this process for the other ribbon on the pillow.
Step #5. Sew the pillowcase
Using your hands, you can simply sew the two pieces of the pillowcase together.
All you have to do is learn how to sew from the ground up.
It would be ideal, however, if you had a sewing machine at your disposal.
Start with one piece of the pillowcase and work your way up.
Place pins to the pillow’s edges.
Ensure that you leave a sufficient hole in order to turn the garment over with the right side facing up.
Step #6. Stuff the pillow
After you’ve finished sewing, use the remaining opening to flip the pillow right side out.
You should iron any fabric that has been used that has wrinkling.
After stuffing your ring bearer pillow, it will look neater and more polished.
Fill the pillow with polyester fiberfill through the opening.
Don’t over-stuff your pillow for maximum fluffiness. Using your finger, check the pillow’s quality.
Pin the opening if you are satisfied with your stuffing. Polyfills can be a little messy to use.
Before sewing the opening, make sure to tuck everything in.
Step #7. Pin the silk string
In order to find the pillow’s center, look on the other side of the ribbon attachment point. Pin the silk strand to that spot.
Use thread and a needle to keep it in place.
Step #8. Make a ribbon bow
Creating a ribbon bow is an art form in and of itself, with countless variations. That’s something you can do on your own, in your own unique way.
Make a nice ribbon bow with these simple instructions.
The ribbon must first be folded in half from both ends.
The ribbon’s ends must now face the opposite direction. Make sure the ribbons go the full length of the pillow.
Start wrapping the ribbon lengthwise around the other from a transverse position.
As you do this, slowly and gently pull the ribbon with your hands rotating in each direction. You have to keep doing this until it returns to its original place.
Keeping the first loop in the center will help you generate the second. Once the loop is formed, you must gently pull one side of the ribbon upwards. It can be held in place by pinning it in place.
There should be a similarity between the second loop and the previous one. Do the same things you’ve done before.
Use a needle and thread to sew a few little stitches through the loops to keep them secure.
Create the ribbon center to finish off the ribbon bow. Ribbon with a smaller width should be cut at least 4 inches in length. This should be wrapped around the bow’s center.
The end of the ribbon should be folded a few centimeters toward the interior before being pounded into place.
To finish, sew a hem.
With this wrapped ribbon, you’ll be able to make a bow with a firm, tight core.
Step #9. Attach the bow
Using the needle and thread is not yet complete. This will be used to secure the pillow’s bow in the center. The back of the pillow should be sewn directly to it.
Xem thêm : How To Store A Tent? A Few Tips to Remember
Do this a few times to give your pillow a tufted appearance. Make sure to tie off the needle and thread at the end of the project. ‘
Finally, trim the ends of the ribbons so that they form a W at the end.
Preparation to Sew a Custom Ring Bearer Pillow
Stabilizer and stabilizer must be cut from the satin fabric and ribbon before any other trimming is done. The pillow’s body requires two separate pieces of fabric. Cut an 11-inch square for the top and a 10-inch square for the bottom. The top piece has to be cut larger than the bottom because of the pintuck take-up.
Cut a 30″ length of ribbon for the top-tying ribbon. Because I wanted the ribbons to droop over the pillow’s edges, I made mine a little longer. And cut a 10-inch length of ribbon for the pillow’s ribbon handle.
Cut an 11″ square for the stabilizer, or 11″ x the width of the roll.
Mark the middles of the top and bottom pillow pieces with a ruler and a FriXion pen (or other marker of choice). The top ribbon and the button cover will be tacked on with the help of these points. Only on the top piece, mark 1 14-inch stitching lines on both sides. The first rows of pintucks will begin and stop at these positions.
Setting Up Your Sewing Machine to Sew a Custom Ring Bearer Pillow
To begin sewing, the machine needs to be set up correctly first. Insert the twin needle after attaching Foot #46C to the machine. Change the size of the twin needle you’re using to achieve a wider or narrower pintuck. To get the finest results with the satin cloth, I used an embroidery-type twin needle.
It is possible to adjust the machine’s safety features to guarantee that stitching is done in a secure manner. Always use the 9.0 mm stitch plate if you’re sewing with a twin needle. Open the Stitch Plate Security/Needle Security menu on the left-hand side of the screen once this is installed on the machine. This menu should have the stitch plate set to the 9.0 mm plate by default, but the twin needle size should be selected according to which one is currently being utilized. The indicator on the screen will now be yellow, indicating that the security feature has been adjusted to reflect what is being sewed with, once this adjustment is made.
Threading the machine for twin needles is a necessary step before sewing can begin. The Tutorials menu has a video of this. To pause the video, all you have to do is touch the screen.
If you’re using a twin needle, be sure to separate the threads before attaching them to the tension disk. Once you have the first thread guide fully re-threaded, go to the second one. Once you’ve arrived at the tension disk, attach one thread to the left side and one to the right side of the disk. The thread separation can be seen in the video above.
Make sure that each needle eye is manually threaded as you typically would when threading the machine The needle threader that came with your machine can be used if necessary. The easiest way to get more thread is to wound it onto a bobbin if you don’t have access to another spool.
Lastly, increase the stitch length to 2.75 stitches per inch A test sew is always a good idea to ensure that the settings are accurate. Try increasing the tension on the pintucks if you don’t like how they look on the satin.
You’re now all set to start sewing! The twin needle should be aligned with the marked beginning point on one side. Begin sewing on the fabric as soon as possible. The Slide-on Table of the machine can be used to ensure that the pintucks are sewn in a straight line.
Cut the threads once you’ve reached the conclusion of the project. Return the piece to the beginning of the stitching at the top. Stitch a new pintuck at an angle that is somewhat less than half an inch from where you started, depending on which side you started stitching on. For aligning the following row, the #46C foot is a great choice. To begin, simply place the first pintuck into the presser foot’s outer groove. Pintucks should be equally spaced, so that the initial pintuck should fit snugly into the groove.
To make a total of sixteen rows of pintucks, stitch four rows vertically and sixteen rows horizontally. Keep the stitches going in one direction, starting and terminating on opposite sides of your item.
Take a piece of stabilizer cut to the correct size and layer it on the back of the pillow top. Use 505 Temporary Adhesive spray to fix it, being careful to only apply it to the stabilizer.
A single needle can be used instead of a twin needle for more ornamental stitches. I used a Microtex needle and found it to be effective. It penetrates the fabric cleanly and without snagging. Change the needle type in the Needle Selection menu after removing one spool of thread. Keep the stitch plate with a width of 9.0 mm on the machine.
When using the B 480, go to the Decorative Stitches menu, and then pick Stitch #305. This stitch length is perfect for me, but you should always do a test sew before stitching on the pillow top to be sure it works for you as well.
The ornamental stitching will be placed in the middle rows formed by the two middle pintucks on either side. All four pintuck sets will receive the ornamental stitching. This presser foot’s second purpose is to arrange the pintucks so that the ornamental stitching is in the middle. Make sure the pintucks on the stabilized pillow top are aligned with the grooves on the bottom of the presser foot. Begin stitching once the alignment is correct. Take your time crossing over the horizontal pintucks on both sides. When you get to the middle of the pintucks, do the same.
Assembly of the Ring Bearer Pillows
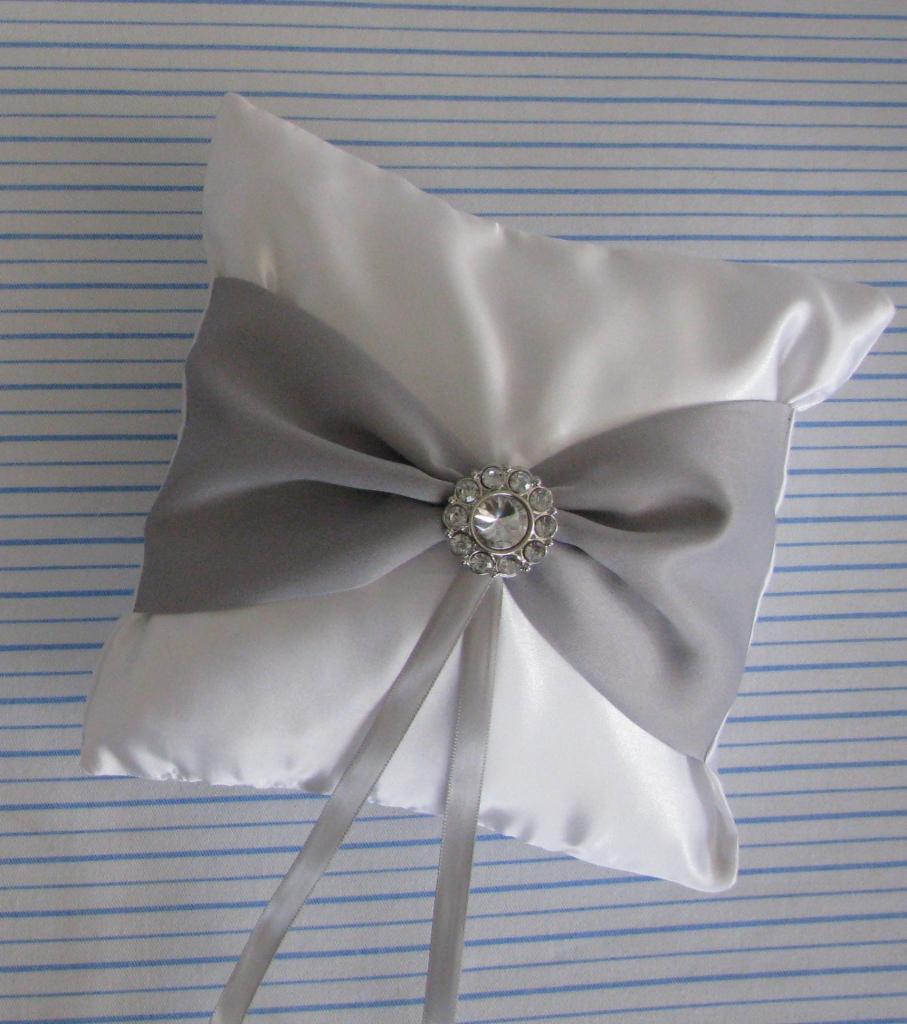
The ornamental stitching on the pillow is now complete, and it’s time to put it together. The first step is to remove the back stabilizer with care. Afterwards, square up the pillow’s top. On each side, trim the edges to 1″ from the first pintuck. The pillow’s top should now be a 10″ square to match the pillow’s bottom, as seen in the illustration.
Make sure the cushion’s pillow top is facing up. Make sure the pin head is on the outside of the 10″ piece of ribbon that will be used as the handle. To avoid snagging, use satin pins instead of regular ones.
Ribbon is in place and the pillow bottom piece is laid right side up. Pin to the wall. To make it easier to turn the pillow right side out, leave a 4-inch opening at the top of the pillow case. Ideally, this opening should be situated between two sets of pintucks on a side that does not have the ribbon handle. My opening was indicated with two sets of double pins in the image below.
Use #34C Clear Sole Reverse Pattern Foot on the machine. This presser foot gives you a better view of the pillow’s corners while pivoting. On the screen, select Straight Stitch #1.
Start stitching along the specified opening, with a 12″ seam allowance. Backstitch to secure the stitch. Pillow stitching is completed by sewing around it and pivoting at each corner.
In order to turn over the cushion, trim the corners while it is still facing the incorrect way. After that, turn the pillow over and remove the stuffing. Use a point turner to have the corners completely pushed out. Poly-fil can be used to gently stuff the pillow.
As soon as you are satisfied with the amount of stuffing in your cushion, hand sew or whipstitch the opening shut. If you want, you can begin by pressing all of the rough edges toward the center of the piece. Stitch Witchery helped me keep the stuffing in place as I hand sewn the bag.
All that’s left to do is attach the final embellishments, including the ribbon and buttons. At the sewing machine, the ribbon can be attached. You may find it in the Buttonhole Stitch menu at #60, the Button Sew-on Stitch. The stitch width should be increased to 5.0 mm. Align the presser foot with the designated center by placing the pillow underneath it. Then, using a ribbon handle on the back, remove it so that it doesn’t get caught in the stitches. Press the Start/Stop button on the front of the machine to sew the ribbon in place when it has been brought in and centered on the mark.
All that is left is to hand-stitch the pillow’s center covered button in place, and you are done! Most sewing and craft stores have kits to make your own button coverings. The satin cloth I had on hand was perfect for covering mine. Use the marked center points on the top and bottom of the pillow as guidelines while you sew through both layers of the cushion.
All that’s left is to sit back and watch the cushion make its way down the aisle at a very unique wedding.
Final Words
By the time you’ve finished reading, I hope you’ve figured out how to build a ring bearer pillow for your own wedding.
For a low-key but still magnificent wedding, keep in mind the suggestions listed above.
It’s an honor for me that you’ve made it this far. Please know that I much appreciate all that you have done for me.
Nguồn: https://iatsabbioneta.org
Danh mục: Blog