Although I’ve always been a fan of the art of knitting and crochet, I never took the time to learn how. When I was pregnant with my first child and on maternity leave, I was utterly and completely uninterested. Using the only stitch I could master, I made him a baby blanket. I had to figure out how to accomplish this on my own because blogging wasn’t around yet. When I noticed this super-soft loop yarn at the craft store, I was intrigued and decided to learn how to make a loop yarn blanket.. What’s the best part? All you need is a pair of scissors and some yarn. It’s a piece of cake! For more information on how to make a loop yarn baby blanket, visit my original tutorial (which has been updated with new photos and a video).
Loop yarn is available in a wide variety of colors, and each one is luxuriously soft and fluffy. They even provide some bright, fun colors for kids to experiment with. My ten-year-old daughter could enjoy making scarves for her classmates as a Christmas gift.
Bạn đang xem: How To Make A Loop Yarn Blanket? Step-by-Step Tutorial
There may be affiliate links in this post, which means that if you click on a link and purchase something I’ve recommended, I may receive a commission.
To make a loop yarn blanket, all you’ll need is:
- 7 skeins of 18-yard loop yarn are needed to produce a 50-by-60-inch throw. (Because loop yarn is expensive, wait till it’s on sale or use a coupon to save money.)
- scissors
The use of a crochet hook at the conclusion of the project is helpful, but it is not required. It just so happened that I had one on hand at the time of writing (you know, from that baby blanket I made.)
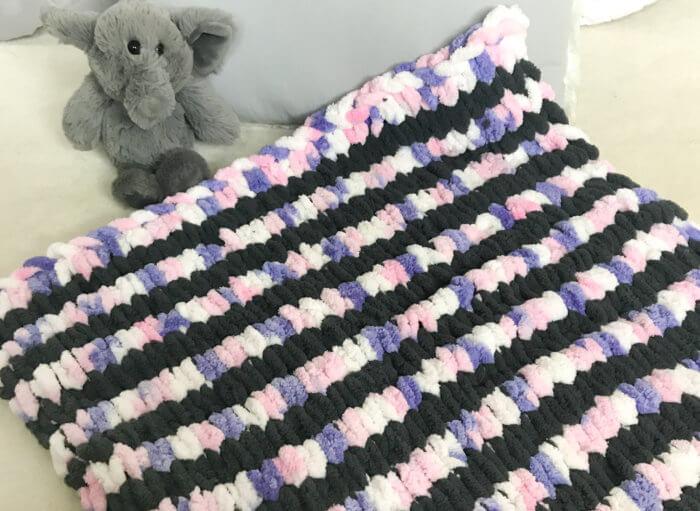
This blanket was made using four skeins of cream and three skeins of the pink/gray/cream variegated hue. I went from cream to pink and back to cream. The pink variegated skeins had a little yellow in them, which I didn’t realize, so that’s a turnoff for me. My sister says it looks like a cat peed on parts of the blanket, which is true. The cream color may not be to your liking, therefore you may want to look for another color skein. Aside from that, I’m a big fan of the final result.
I used a combination of knit and purl stitches to create a border for my blanket. If you’re a beginner and don’t understand what you’re doing, simply knit the entire thing. It’s a breeze to do!
I decided that a video tutorial would be the best method to teach you, so here it is. The video will not play if you have an ad blocker turned on. You can also see it on my YouTube channel, which you can find here.
What Are Loop Yarns?
Loop yarns are designed for persons who are either just starting out in the world of knitting, or those who want to make a single object with a smaller amount of knitting.
Loop yarns are pre-sewn thick and soft yarns that are ideal for beginning crocheters. Premade loops with fixed spacing and tension are already included.
You won’t have to use knitting needles as often, which will save your hands from fatigue.
Steps On How To Make A Loop Yarn Blanket
Hand weaving a loop yarn blanket is an option.
You can follow these instructions to complete this project.
Step #1. Buy the yarn of your color choice
Seven skeins of the loop yarn would be needed to make a 50-by-60-inch throw blanket.
Some loop yarns are more user-friendly than others, despite the fact that most loop yarns on the market are soft.
Step #2. Prep the loop yarn prior to knitting
Some knitters prefer to wash and dry their yarn before beginning their projects.
However, when dealing with loop yarns, you must cover the skeins before washing them.
Pillowcases or other fabrics can be used to protect the yarn from becoming loose and unraveled.
Step #3. Allot loops for the dimension of the blanket
For a 50′′ by 60′′ blanket, 70 loops of the yarn are needed to cover the width.
On a level surface, place these loops, as well as the end of your yarn, in this position.
Cut the threads holding the loop up once you’ve marked the end of the loops with a clip or pin.
Step #4. Begin hand-knitting the loops into a blanket
This will be your first row after you’ve completed your initial 70 loops.
Xem thêm : How Does An Electric Blanket Work? Everything To Know!
Place the remaining skein of yarn from the marker at the top of the first row to complete the second row.
Then, one by one, draw the next row’s loops into the previous row’s loop, creating a knit stitch.
You can do this by pulling the 71st and 72nd and 73rd loops through 70th and 70th loops, respectively, and so on.
To ensure that you don’t miss a single loop, start at the bottom and work your way up.
For the third row, add the remaining yarn skein to the previous row and work as before.
The second row has a winding or zigzag pattern.
This is the blanket’s standard, with each subsequent row going in the opposite way of the one before it.
It’s as simple as that: For row three, the loop number 141 travels via loop number 140, and so on; for row four, it’s loop number 42.
If you continue winding your blanket in the same direction, you won’t have to keep track of how many loops you’ve made.
Knitting should be done on a flat surface so that the loops can be easily tracked from the bottom to the top, and the full loop should always be pulled when knitting.
The similar procedure is followed for the next three rows.
To construct a 60-inch scarf, you will need to make a certain amount of rows.
More loops from top to bottom are needed to cover this length than the width.
For a border, you can use a curl stitch that is identical to the knit-stitch except that it is worked from top to bottom instead of beginning and ending.
A different color yarn can be added by adding two loops to your last row and removing their threads before cutting off the extra yarn.
In the same way, snip the threads of the first two loops and begin knitting from the third loop with the new color.
All your tails (loops with removed threads) should be on the same side of your blanket when you’re ready to sew them all together.
To secure the final row, knit-stitch from the first loop toward the tail of the last row.
It’s best if you start with one loop and work your way up from bottom to top.
Finish the row by weaving the tail back through the row and tying the final loop.
Before cutting the excess yarn, make sure the tail is threaded through at least four loops.
Xem thêm : How Much Wool For Arm Knitted Blanket? Best Answers To FAQs!
For any of your other loose ends and tails, you may do the same.
What Can You Make With Loop Yarn?
Loop yarn can be used for everything from blankets to caps to pillows, and it’s versatile enough to be used in a variety of ways. Some of the best loop yarn patterns for beginners and intermediate knitters may be found in the list below, including Big Twist loopty-loop and Loop It.
1. Chunky Throw Blanket
A blanket is an excellent introductory project for those who are just beginning to work with loop yarn. It’s an easy project to learn to knit because of the vast blanket’s surface area and the simplicity of the design. When it comes to knitting, you can still utilize this blanket pattern to learn new skills, such as changing colors and binding off.
Recognize the Typical
2. Square Pillow
To make this loop yarn pillow, you’ll first need two square panels, which you’ll then sew together using needle and thread to form the pillow. The elevated accent rows in the image above are the result of knitting and purling two different stitches together. A needle and thread, two skeins of loop yarn, and a pillow insert are all you’ll need for this craft.
3. Cozy Cardigan
Loop yarn and scissors are all you’ll need to make this soft and cuddly cardigan. Even though this is a more difficult project, it should not intimidate those who are just getting started. To put it another way, it’s like knitting together a series of simple panels.
4. Winter Hat
This bulky winter hat may be made with just one skein of loop yarn. You’ll begin by making the bottom edge of the hat’s brim a border first. After that, keep knitting the loops around the circle, getting smaller and smaller, until you’ve reached the zenith of the project. You may then use the remaining yarn to make a pom pom to finish the look.
5. Criss-Cross Scarf
This criss-cross scarf is a nice alternative to typical loop yarn scarf patterns. An unique item can be created by using loop yarn, especially if it is multi-colored.
Prefer to Knit With Needles?
Learn the basics of knitting by making a simple scarf.
6. Crochet Basket
It is possible to make a knit basket out of loop yarn patterns in addition to clothing and accessories. Toys, blankets, and excess yarn can all be stored in this large basket. If you’re using loop yarn, keep in mind that it won’t be able to hold the shape of the basket on its own. To give the basket more structure, you’ll also need something stiffer, like a sheet of plastic canvas.
7. Mermaid Tail Blanket
Want to make a loop yarn project with your children? Attempt to make this mermaid tail blanket. This isn’t a regular blanket, but rather a tail for kids to stow their legs inside. They’ll enjoy it. It’s a beginner-friendly pattern, despite the fact that it appears more complicated than the average throw blanket.
8. Round Pillow
From a square cushion, this intermediate project is a step up in design complexity. To make a loop yarn pattern for a pillow or blanket, you first need to make two flat circles and then bind them together and stuff them with an insert.
9. Loop Yarn Pumpkins
You’ll need fiberfill (or another material to stuff the pumpkins so they keep their shape), sticks (for the stems), and hot glue for this fall-themed activity. You’ll get a lot of use out of a single skein of loop yarn, since it’s enough to make numerous pumpkins.
10. Backpack
It’s an excellent project for intermediate sewers. Loop yarn can be used to make the backpack’s main compartment, but the straps demand more sophisticated crochet abilities.
11. Cable Knit Scarf
This is one of the most aesthetically appealing loop yarn scarf patterns that you’ll come across. This pattern will show you how to create a criss-cross, braid-like look using stitches other than knit and purl.
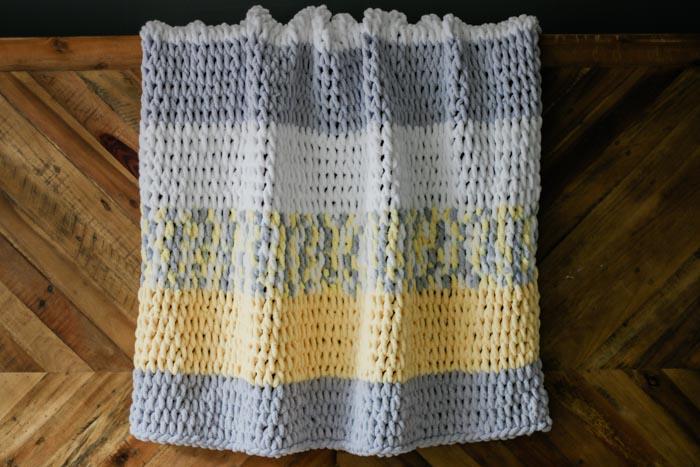
12. Baby Blanket
Baby blankets made of soft, squishy loop yarn are a great choice. Each of the four corners of this throw blanket is adorned with adorable pom poms, making it smaller than a conventional throw blanket. Purled and knitted rows are used in this pattern to create intriguing texture.
13. Wreath
Want to make something with loop yarn but don’t know how to knit? You’re going to love this. Rather than interlocking any of the loops, this wreath merely exhibits the texture of loop yarn. Loop yarn, a hot glue gun, and a styrofoam wreath form are all that is required. Wrap the loop yarn around the wreath and glue it in place before adding your finishing touches, such as the flowers seen above.
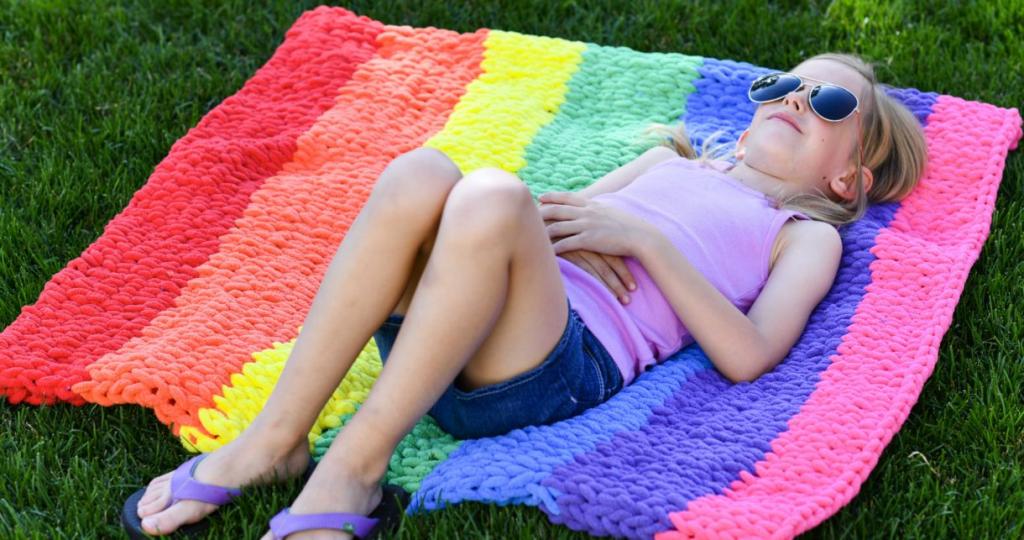
14. Rainbow Blanket
This colorful blanket is an excellent illustration of how to use many colors of loop yarn in a single project. In either a classic rainbow or a more subdued color palette, it’s easy to switch colors and create an attractive striped pattern.
15. Chunky Cowl Scarf
This infinity scarf from Loopity Loop features a leather trim, making it one of the pattern’s most distinctive features. Because the leather piece hides the spot where two ends connect to make a circle, it is an added bonus.
Loop yarn is a terrific alternative for all crafters, whether you want to someday break into traditional knitting or simply attempt a new pastime. And with these loop yarn patterns, you can create practically anything.
Conclusion
To put our newly acquired knowledge into practice, you may now build your own loop yarn blanket.
In order to get started, you can start with basic projects and work your way up to more complex ones.
Nguồn: https://iatsabbioneta.org
Danh mục: Blanket


