Furniture like a rocker chair can be quite costly. Make sure to take excellent care of the item so you can get the most out of its lifespan. You may prolong the life of your rocker recliner by repairing the swivel of the wood base. We’ll show you how to do it yourself even if you’ve never done it before in this post!
- How To Adjust Lazy Boy Recliner Pitch Too Low In Front? Comprehensive Guide
- 4 Steps on Locking Swivel Mechanism on Recliner. Why Does my Recliner not Stay Reclined?
- How To Rebuild A Broken Recliner? Comprehensive Guide
- How To Adapt A Recliner For Right Arm Surgery? Comprehensive Guide
- How To Adjust An Apex Collection Swivel Recliner? Step-By-Step Guide
Steps on Repairing a Rocker Recliner with a Wood Base Swivel:
Step 1: Remove the swivel by removing the screws on either side. Using a power drill and screwdriver set will make the job much faster and less difficult.
Bạn đang xem: How to Repairing a Rocker Recliner with a Wood Base Swivel?
In order to remove any residual wood or fabric, lift up on one side of the chair seat and pull outwards with your hands.
Step 3: Use an old toothbrush dipped in water and vinegar to remove any loose particles (or ammonia). Before moving on to the following step, make sure the area is completely dry with a rag.
Apply glue liberally around the area where there is no longer a connection point between the wood base swivel and the under/behind furniture leg – this will ensure that it is secure when tightened back together!!
Using a popsicle stick, apply glue to the surface and smooth it out.
Screws in pre-drilled holes are used to secure the dowel material in place once it has been bonded together on both sides.
Step 7: Tighten screws using a power drill or a hand screwdriver if necessary. Screws should be long enough to go through all of the layers of wood.
How to Repair Swivel Rocking Chairs
Metal rubbing against metal is the most common cause of swivel rocking chair failure. In the event of misuse or old age, this causes the part to wear out more quickly. You can only mend your swivel rocking chair permanently if you replace the worn parts. A broken swivel rocking chair can only be fixed by replacing the entire chair when the worn pieces are either unavailable or too expensive to repair. To help you fix some of the most typical issues with swivel rocking chairs, here are some ideas.
Step 1: Determine the Problem
You should check if there are any gas mechanisms in place to see whether the seat moves up and down when not in use, if you can lower it by leaning back, if the lever doesn’t work, and if it is locked in one position. The only part that can be replaced by the do-it-yourselfer is the adjustable height cylinder. It may be difficult to determine whether or not the cylinder has been compromised. Look for unusual noises emanating from the cylinder or a lack of movement in the chair when you test it with the gas lever.
If you’re experiencing the same issues as above but don’t have any gas mechanisms, check out the manual mechanisms. The rocker base, direct drive, and hand levers are all included. You may notice squeaks in the machinery if a post, bell or thrust washer is worn out. To replace these washers, various manual mechanisms must be disassembled, and there are no instructions provided on how to reassemble them. Take on this challenge only if you have the ability to put things together by simply glancing at them.
Make careful to inspect the swivel’s races, springs, or ball bearings, which could be the source of the problem. Check all wooden joints for missing or loose screws, damaged dowels, or loose or missing pieces of wood.
Step 2: Replace Faulty Gas Cylinder
Place the rocking chair on the floor, swivelled around. A clip and washer can be removed from the base by loosening them. To remove the gas cylinder, first loosen it with a pipe wrench by alternating back and forth between the wrench and the pipe. Replacing the old cylinder
Step 3: Replace Faulty Manual Mechanisms
To get to the washers, remove the base and casters with the adjustable wrench. Use the suitable replacement for any worn washers. Assemble the chair again. For example, broken plastic or metal springs as well as ball bearings cannot be restored.
Step 4: Repair Damaged Wood
Secure any slack joints with an appropriate-sized clamp after applying wood glue. Before using or testing the rocker, allow it to cure completely for 24 to 48 hours. New dowel pins and wood glue should be used to tighten any loosened or broken ones. Replace or tighten any loose screws.
How do you keep chairs from moving?
Wedging tape between the two legs of each chair at their meeting point under and perpendicular to the seat can be used to stabilize chairs on carpeted floors.
Chairs without wheels should have cardboard pieces placed under each leg where they connect at the top, whereas chairs with casters just require rubber bands wrapped firmly around any metal hardware that sticks up through holes drilled into the foot. Small pieces of cardboard. A how-to manual for the particular chair in question is the finest source of information.
How do you keep bar stools from hitting counters?
Turn the stools so that their backs are away from the counter to keep them from slamming into it. With just one stool, move to the other side of the island or stove and place it in front of a large, stable object like a television stand or media console.
How do I Keep my Recliner From Spinning?
Xem thêm : How To Assemble A Coffee Gilder Recliner Console? Complete Guide
Wedging tape between the legs of a recliner can be used to keep it in place on carpeted floors by placing it under and perpendicular to the seat.
Chairs without wheels should have cardboard pieces placed under each leg where they connect at the top, whereas chairs with casters just require rubber bands wrapped firmly around any metal hardware that sticks up through holes drilled into the foot. Small pieces of cardboard. A how-to manual for the particular chair in question is the finest source of information.
How do you remove a swivel base from a recliner?
To prevent the chair from tipping back, first turn it upright and place a heavy object on top of it. Find a wrench that will fit on one end of the swivel base, and then unscrew it like you would any other bolt.
Use a utility knife (or something similar) to carefully cut through dried adhesive if it is keeping items together so that they can be removed separately.
Using warm water mixed with soap and home cleaning goods, such as Mr Clean Magic Eraser Extra Power Foam Bathroom Rags for Scrubbing Dishes & Glassware – Kitchen Cleaning Supplies, thoroughly clean old oil and filth from all surfaces. Using dishcloths in the kitchen is a great way to keep your glasses sparkling clean.
After that, wash the swivel base with the same warm water and soap solution. A towel or air-drying for at least 12 hours is recommended before putting it back together.
How to Remove a Recliner Chair Mechanism?
When transporting a recliner, it may be necessary to remove the back and reinstall it. Even though numerous manufacturers have their own recommendations, the underlying fundamentals remain the same. You must first determine whether the recliner will fit in the new place by measuring its dimensions. Remove the locking tab from your chair if it has one by using a screwdriver. Remove the back panel to reveal the bolts if your chair has a bolted-on back.
- The recliner chair should be moved to an open area. To remove the chair’s back, simply roll it onto its front. As a result of the recliner’s utilization of Velcro snaps or strips.
- If you ever decide to replace them, be sure to affix them firmly to the frame’s bottom. Loop-and-hook tape removers can be found at this point.
- You’ll notice the recline mechanism when you remove the leather/fabric from the chair.
- The metal tabs are now in plain sight. Thumb screws can be found near the bottom of the recliner, so pay attention to that area.
- Turn the screws anti-clockwise with a flat/standard slotted screwdriver.
- Avoid injuring the threads by not forcing them. The screws must, of course, be installed in a secure spot.
Once you’ve pressed and held down the metal locking tabs on the recliner’s base, pull upward on the recliner’s bottom in an upward motion. The mechanism can be unlocked with the help of this metal locking. After then, use your hands to pull it straight up. Move the brackets side by side if they are sticking or if you are having trouble removing them.

How to Fix Recliner Chair Tension Springs?
Any mechanism in a recliner chair that utilizes a tension spring. Simply swap it out if it stops working. The tension spring can be replaced, but first identify a replacement. It’s important that the spring be of great quality and is strong enough to last a long time. If you are unable to locate the spring for your specific model of chair, be sure to speak with the manufacturer about ordering one. For further information, you may also speak with the product’s creator.
Turning over your recliner is the simplest approach to locate the problem. The frame under the seat will be on display in this manner. Aside from that, make certain the backrest is upright. Look for clips or tabs on both sides if the spring is still present. Remove the broken or old spring with a pair of pliers. It’ll make it easier to remove the tension spring from the frame with this tool. You must wear eye protection in order to avoid injury.
To pull the spring apart, place the screwdriver at both sides of the spring. Alternatively, you can use nickel to separate the springs. A washer will also give good results. After that, attach the spring to the frame. Be sure to use a pair of pliers to pull the spring. Now, get rid of the nickel between the coils. But before you perform the task, ensure you’ve attached the spring firmly on both ends. For a solid grip, you need a good pair of pliers.
Placing a screwdriver on either side of the spring will allow you to separate it from its casing. Nickel can also be used to separate the springs. A washing machine will also do the trick. Attach the spring to the frame following that. For best results, pull the spring using a pair of pliers. Remove the nickel from in-between the coils now. But first, make sure you’ve attached the spring tightly on both ends before you start working. Pliers are a necessity for a secure grasp.
How to Fix a Recliner Pull Handle?
Tools are essential if you plan on disassembling and repairing your recliner handles. A standard hex key, screwdriver, handle replacement, and a single Torn bit are all you’ll need. In addition, check the manufacturer’s model number to make sure you acquire the correct handle. To be on the safe side, the manufacturer’s website can help you find a replacement kit. If the chair is still covered by the manufacturer’s warranty, you may be eligible for a free replacement. Replace the handle of your lazy boy recliner or any brand’s reclining pull handle by following these instructions.
Get The New Recliner Pull Handle HERE
Make sure the footrest is in an upright position before you begin. The chair should be flipped upside down only if the seat belt is securely fastened. If the recliner is very bulky, you may want to enlist the aid of a friend. Locate the chair’s anchoring mechanism or screw. Check the screw at the bottom of it on most models. Inside the chair, at the handle’s level, it can be found.
- Start removing the screws from the mechanism with the screw driver you just removed.
- Take your recliner chair’s old handle on a safari.
- Keep them in a secure location after unlocking them since you will need them again when you replace the handle with the new one.
- As soon as you’ve finished installing your new handle, go back and reinstall the screw where you removed it.
- Also, use a screw driver to tighten the screw.
- To avoid tearing the chair’s fabric, hold the handle firmly but gently.
- After you remove it, search for the ornamental area, which is normally located below the handle.
- You can use this method to get to the bottom of the chair’s cable.
- The cable-end, which is attached to the mechanism, should be examined closely.
- Finally, grasp the head rest and handle of your chair and raise it to its regular position from the bottom of the floor.
Before installing a new handle, you’ll need to install a new plate. Next, insert the new handle in the same way as the previous one. To put it another way, this is where you’ll put the mechanism clip back. Make sure that the handle doesn’t fall off by putting the screws back in the wooden component. Once you’ve finished, it’s time to put the handle through its paces. Pull the handle while sitting in the recliner chair. The legs can also be stretched to guarantee that the chair is as comfortable as the day it was purchased. Steps like these can save you a lot of money if you run into complications down the road.
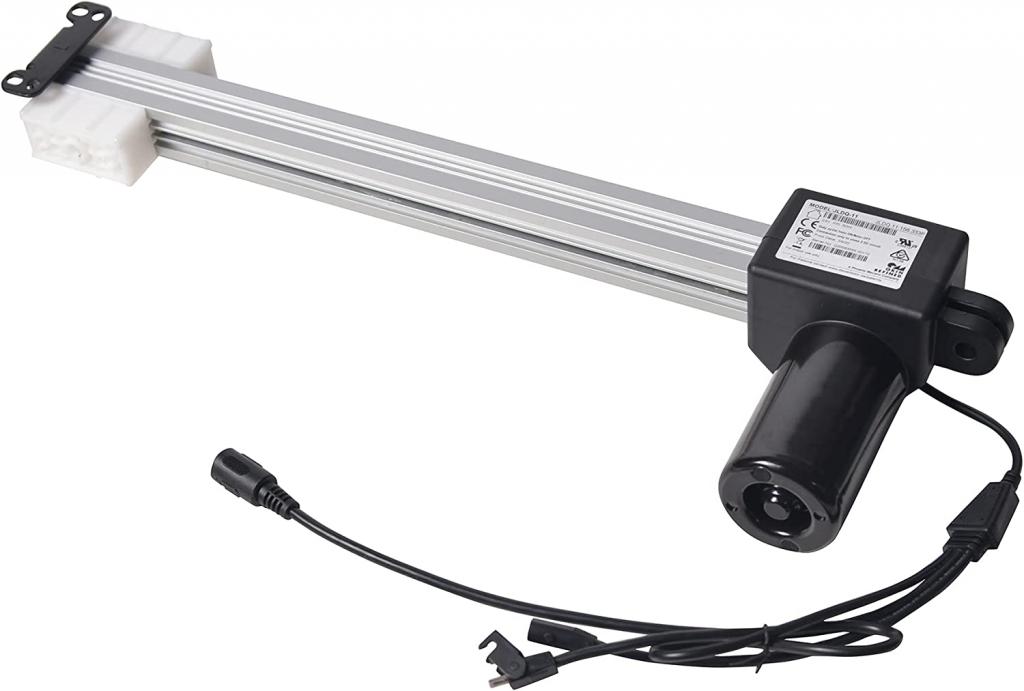
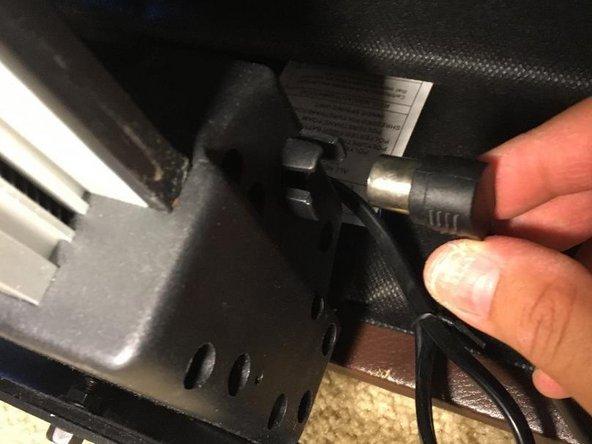
How to Fix Power Lift Recliner Motor?
With a simple press of a button, an electric power lift recliner can take comfort to a whole new level. Power lift recliner motor repairs are necessary if your chair does not function as expected.
- Recliner chair mechanisms can be damaged by simple power surges or overload.
- There’s a major electrical problem if the recliner suddenly stops in the middle of its movement.
In order to discover the disconnected part, you may need to disassemble and reassemble the unit.
If you’re mechanically inclined, on the other hand, you may be able to solve the problem on your own if you pay attention to the specifics. Check the base unit of your electric recliner for cables before you recline. Make a list of all the electrical components when performing the check. The power supply, activation button, massage motors, and raise motors are examples of these components. You’ll get a clearer idea of the entire group if you make a list. You don’t want to spend time and money repairing a lift motor just to discover that other parts are defective.
Xem thêm : How To Make A Slipcover For Your Recliner? Perfect Information For You
Using a marker, indicate the brackets where the motor is located on the underside. Reassembly will be a lot easier thanks to this method. The motor drive linkages’ nuts and bolts should be removed next, but they should be saved. Seconds after that, remove both Torx bolts (2) that were used to secure the motor to the bottom rail. Keep these two screws in a separate location because they are so small. Removing the rear rail is as simple as removing the Torx head screws that hold it in place. It is now possible to remove the motor.
Remove the four Torx head screws that hold the motor’s drive linkage to the drive linkage linkage. In addition, two of the screws have a huge washer on them. The first step is to reinstall the drive arms on each side of the system. Keep in mind that a washer is required on the two back screws. The motor can now be installed. In order to begin, make sure that your pigtail is tucked neatly behind your back. The two Torx screws can be used to fasten the motor to the rail. Remember the two short screws as you tighten the Torx screws on the front of the motor. To proceed, connect the remote’s hand wand to the chair’s motor.
Drive the arms into the drive tube to guarantee that your ottoman is closed. Keep the nuts in place with 5/16″ bolts. Use black ties to attach the power wire to the motor pigtail and keep it in place on the railing. Finally, connect the transformer to your recliner chair. To ensure the chair is working properly, run it through its whole cycle.
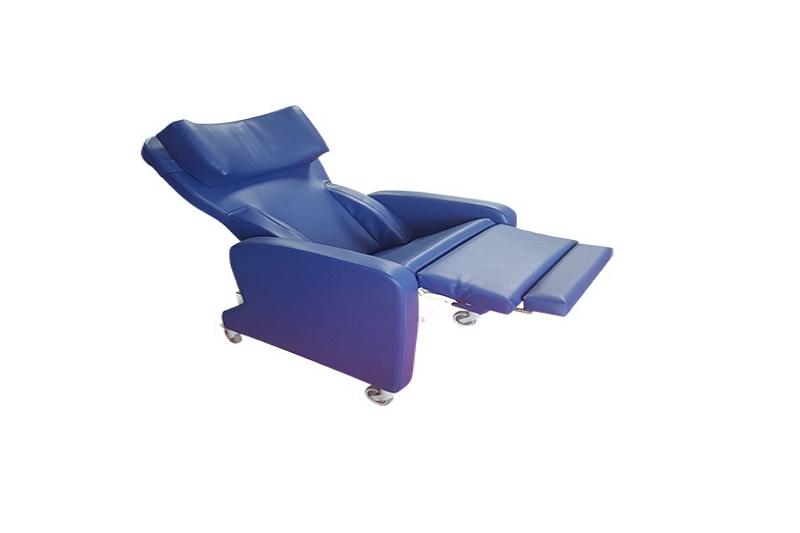
How to Fix the Swivel Plate Mechanism for Recliner Chair
The swivel base of a recliner might be damaged if it is moved around on the floor. It’s possible that the way the seat is used has an effect on the pattern of wear and tear. There are a few things you can do to make sure the swivel plate is in excellent working order. However, before you begin any repairs, determine the chair’s model number. Swivels are available in manual and automatic versions of recliners. Repairing each is a unique process.
You can consult the manufacturer’s instructions if you have any questions about which parts should be replaced. The swivel base can be removed by exposing the bottom of your recliner. Turning the chair on its side was the final step in this project. For the purpose of this exercise, you will be looking at the column’s base. Use a lubricant if you notice any rust.
The swivel and the base are held together by nuts in most models. To disassemble the system, you’ll need a wrench. A little lubricant will help if they’re too stiff. You should remove the nuts from the bolts before putting them back together. To separate the components, just pull the base away from the support. The swivel problem can be fixed by tightening a few nuts and bolts. Make sure the base can support the weight capacity stated by the manufacturer before purchasing a repair part. In addition, pay attention to the quantity of ball bearings in the device.
A swivel base can either be attached to an existing column or have its own column. Hammering the inner column may be necessary. It’s easier to remove now that this has been done. Before installing a new swivel, check the column’s internal components. The new swivel plate mechanism must line up with the holes in the base, just as it did during removal. Assemble the components and secure them using the included bolts and nuts. Tighten them up using a wrench. It’s time for testing when you’re done.
How to Fix a Recliner Footrest
It’s a typical problem with recliners’ footrests, but it’s easy to correct. Slamming the footrest of your recliner repeatedly has the potential to irreparably damage it. If a recliner footrest is stuck in one position, does not lock in place, or does not stay up, it will be ruined. You will need a screwdriver, bolts, lubricating oil, and screws to remedy the problem. As a result, here are the steps to fix or modify a power recliner footrest or any other type of power recliner footrest.
If the chair is stiff, it’s likely that there is no lubrication in the mechanism. It is also possible that the bolts and screws will come loose. The first step is to flip the recliner over. You should inspect the screws and bolts to see if they are rusty or not. Don’t be afraid to replace or tighten any that you notice. In addition, you can replace rusty screws with fresh ones. Lubricate the footrest bushings and joints after you’ve checked everything. Next, try raising and lowering your arm. Remove the remaining grease using a towel.
What if the footrest of the recliner chair has a difficulty with adjusting? Obviously, this means that the movable feature isn’t working either. Changing the position of the footrest is difficult, or it could remain stationary. The footrest is connected to the bushings by a spring-like component. Next, use a screwdriver to dismantle all of the spring-related components. Get the spring out and check to see whether everything is properly fastened.. Investigate the mechanism to ascertain how it functions. If the footrest recliner glides smoothly, you’ve solved the problem.
What is it that causes the footrest to become stuck? The footrest will become caught if the ratchets don’t operate. Depending on the severity of the issue, there are a variety of approaches to consider. Wrenches and screwdrivers will come in handy. To begin, flip the recliner over. Destroy anything in your path to the ratchet, including the nut and bolt. Determine if the bar is broken by taking it apart. Remove the screws holding the ratchet in place to replace it. Grab the new part and put it in if necessary. In order to make sure that everything is adjusted correctly, tighten everything down. Take a look to see if the footrest can be raised and lowered without difficulty.
How to Replace Cup Holder of a Recliner
There are several different types of cup holders for reclining chairs, ranging from simple plastic holders to more innovative touch LED cup holders. While you’re enjoying your favorite video game or movie, you can keep your drinks chilled in one of these units. There’s nothing wrong with the cup holder’s ‘click’ button if it makes a sound. Nevertheless, if you can’t hear the sound, you’ll need to replace your cupholders. You should contact the manufacturer to make sure you obtain the right size. Remove the element of uncertainty by taking measurements of the inner and outer diameters. Consider the cup and bottom heights, as well as the materials and colors used.
To begin, take off the safety label. The next step is to remove the four screws from the base. Carefully reverse the gradient with the assistance of others. After that, cut the cable ties holding the wires together with a hacksaw. Remove the two cords from the lounge and disconnect it from the wall. Place the cables towards the rear of the lounge after unzipping the dust cover. Pull the cup holder out of the top after that. Replace the old cup holder on the arm with the new one. You must remember to tuck the wires into the Velcro loop before putting them back in place. Cable ties should be used to connect the wires and keep them in place on the frame. They won’t become tangled if you use this combo.
Cut the extra cable ties after you’ve closed the dust cover zip. You can roll the seat back onto your feet with the help of a friend. Replace the four screws in the cup holder’s base. To avoid damaging the threads, do not overtighten the screws. Finally, swap out the plastic cup and the warning label. Make sure it doesn’t protrude from the wall.
How to Replace a Recliner Mechanism Release Trigger
Taking care of your recliner’s release mechanism is an easy DIY project. The first step is to flip it over so that the bottom is visible. Socket extension, wrench, and a screwdriver are all you’ll need. To begin, remove the trigger cable from the device. Keep track of which hole you drilled out when you’re making adjustments. It can be helpful to label it once you’re done so that you can readily locate it. Additionally, you can see the fill-up bolt and the coil spring that cause the trigger to be in tension, as well.
A little tension spring, a plastic bushing, and a bolt should be included in the assembly as a whole. Replace the nut if it gets rusted or wears out. Before you acquire a new cable, you must take into account the length, height, and breadth of the current cable. An 88cm cable with a 12.5cm outer spring length is the norm. If you’re measuring by hand, allow for a 0.5-1″ range of error. A 5mm barrel on the cable is required (S-shaped). You can contact the manufacturer if you are unsure of the size. It’s also important to note that aluminum alloy is used in most cables. Most chairs will accept a spring end with a diameter of 90 mm.
Removed trigger cable can be replaced by reinserting it into its hole. The next step is to screw in your nut. To make it easier to tighten the nut, a ratchet can be used to locate it inside the mechanism. Make sure the cable is plugged in as well. Re-adjust the recliner once you’ve finished your task. Take it for a spin to make sure it’s working properly. If your seat has a reclining mechanism, this method is ideal.
Conclusion
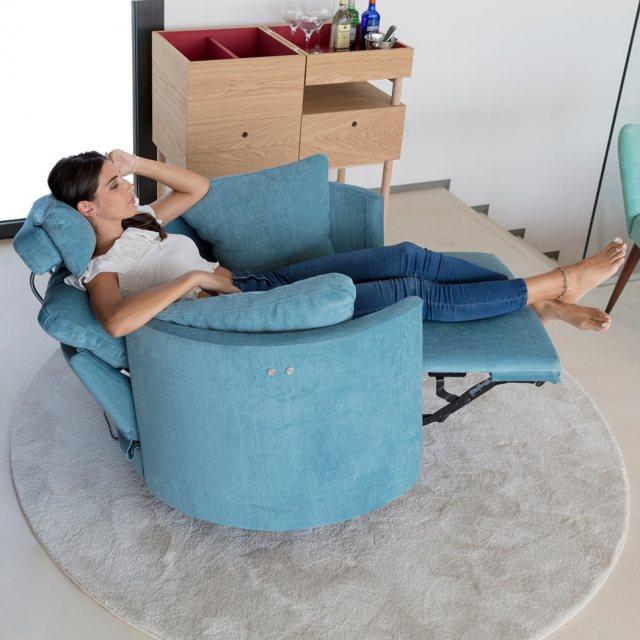
Recliners aren’t simply amusing pieces of furniture; they’re designed for comfort and relaxation. The repair of a recliner chair is simple as long as you are familiar with the chair’s features and eccentricities. The majority of recliner issues may be fixed even if you’ve never worked on one before. Start your hands on the necessary equipment and get to work. Recliner chair mechanism repair was made easier using the information provided in this article. Remember to tell your friends and family about this.
Nguồn: https://iatsabbioneta.org
Danh mục: Recliner