If the reclining lift on your couch keeps ticking when you try to close it, you should take it to the repair. Gears or springs may be the source of the clicking sound.
A recliner lift motor that makes a ticking sound when it’s closed will be explained in this blog post.
Bạn đang xem: How to Fix Ticking on a Recliner? Easy Step-by-step Guide
Causes of Ticking on a Recliner
Due to worn-out equipment that needs to be replaced, this occurs.
If a broken spring isn’t discovered and repaired in time, it can cause the motor to thump when the door is closed.
It’s possible that dust or other material has built up on the gears, causing the recliner lift motor to make a ticking sound as it closes.
If the recliner lift is ticking when it tries to close, a loose wire may be to blame. This can happen if an animal chews or climbs on it.
When recliners have been used for a long time, the gears may have worn down, causing the engine to run but not as smoothly.
It’s possible that a recliner lift that has been open for a long period of time will produce a ticking sound when it is shut down. This occurs because if the reclining mechanism is left in one place for an extended amount of time, it may wear out due to age or heavy use.
In addition, a recliner lift motor may thump when closing if the gears are dirty and need to be wiped off with WD40 or some oil.
#8. If a recliner lift has been tampered with, it may make ticking noises when closing because of parts that have been fitted incorrectly and need to be changed.
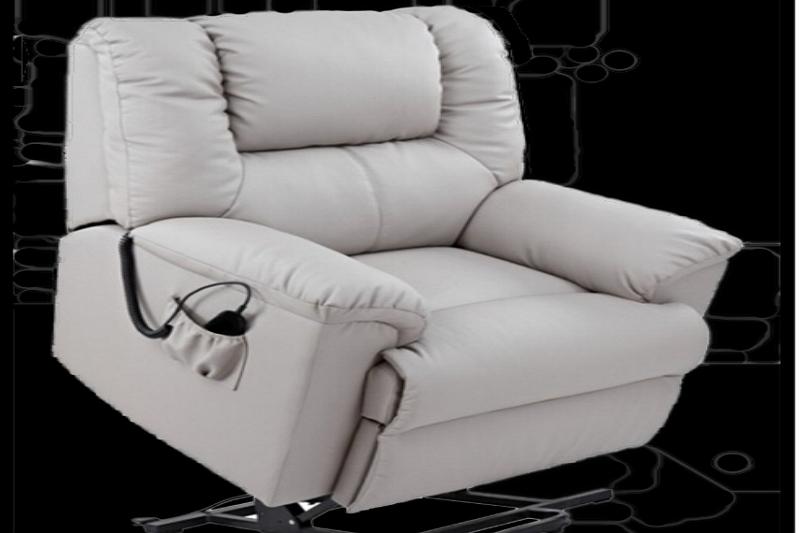
It’s possible that the recliner lift motor is ticking due of low power, which could mean the batteries need to be replaced before it can function normally again.
#10. If there is dirt or debris on the gears of the recliner lift switch, it may make this noise and needs to be cleaned off with WD40 or oil.
The recliner will not close properly if too much weight is placed on one side of it, and it may make a ticking sound when it tries to recline back to its upright position since this type of problem may necessitate altering or replacing parts.
For example, a hard object like an end table can cause the recliner to make this sound. Other objects in the way may need to be moved or adjusted so that it closes more smoothly and without generating ticking noises.
Steps on How to Fix Ticking on a Recliner
The lift mechanism’s internal gears can generate a ticking noise while the chair is reclined.
This problem may be solved by following the following steps:
Tip #1: Make sure there is no dirt or debris surrounding these gears and then attempt shutting again. If it doesn’t come loose, you may need to use WD-40 or oil to remove some of the dust.
Make sure the cable isn’t too tight or loose and then try reclining again to see if it helps. A new set of gears may be required if there is still a ticking noise (or at least remove them).
Tip 3: Check to see if anything is blocking your recliner from making a ticking noise.
The reclining mechanism should be in position, so check it out and see if that helps.
The lift motor assembly in your recliner may need to be replaced if it continues to tick when closed after you’ve tried the instructions above (or just replacing the gears inside).
How to Avoid Ticking on Recliner Lift Motors:
#1: Clean the gears in the recliner and try it again.
#2. Check to see if your recliner is being ticked as it closes because of a minor object blocking its path.
Adjust your cables to make sure they are not too loose or too tight, then re-seal the splices. You may need to replace the lift motor component if the ticking continues.
Try removing any hair or lint from the gear case and see if that helps with the ticking sound.
Xem thêm : How To Lock A Recliner So It Wont Swivel? A Few Tips to Remember
A new recliner from Walmart’s Furniture department is an option if all else fails.
How Much Does it Cost to Hire a Professional Recliner Repairer?
Repairing a recliner costs, on average, $150. However, this can differ depending on the model and make of your chair. A new set of gears for an electric lift motor is more expensive than changing the timing belt in a gas-powered one, as well as when you need to employ someone to install them. Having a high-end recliner chair comes with additional costs.
How Much Does a Recliner Lubricant Cost?
A recliner lubricant will set you back about $25. This does not include the cost of your reclining chair’s motor or the cost of installation.
What are Some Other Ways to Prevent Noise?
In order to prevent noise while operating your chair, make sure that all of the pulley and idlers are aligned properly before shutting it down.
Maintaining the cleanliness of your recliner’s motor can lower noise levels and improve the overall performance of the device.
Troubleshooting an Easy Chair Recliner
Even though electric motors are used in certain modern recliners for this purpose, vintage easy chairs still rely on simple mechanisms to do the same thing. Even though these mechanisms have a proven track record of dependability, issues might develop due to incorrect use, poor maintenance, or simply wear and tear on the mechanism itself. Some simple troubleshooting solutions are almost universally applicable, regardless of the brand or type of the reclining chair.
Maintenance and Prevention
The best way to troubleshoot any type of chair is with regular maintenance and care. Sit gently and cautiously in your recliner and don’t use the reclining mechanism too often. Be aware of the weight restrictions on your recliner, which are usually specified in the product’s manual. To prolong the life of the chair’s moving parts, use cooking spray to lubricate the underside of the chair and the mechanism.
Placement
Even though every recliner is different, you must leave a five-to-twelve-inch gap between the chair’s headrest and the wall in order to prevent the chair from leaning backward. Allow at least 24 inches of clearance in front of the recliner’s leg rest to avoid any issues with its operation.
Mechanism
Recliner mechanisms might become misaligned and generate a peculiar metallic popping sound. The chair should be flipped over gently to check for symptoms of misalignment such as worn paint, rub marks, or metal dust. Identify the mechanism. Use a hammer and prybar to gently bend the mechanism plate so that it does not rub against the mechanism when you recline the chair. When transferring your chair for repairs or adjustments, always lift it by its base.
Tension
The ability to alter the tension on your recliner may prove useful if you find that your chair is either too easy to recline or too difficult to recline. Look for wingnuts that may be twisted on either side of the recliner’s structure underneath the chair. Adjust the chair’s tension by tightening or loosening the wingnuts in 1/4-inch turns.
Getting More Help
Contact the manufacturer of your recliner if simple preventative and troubleshooting measures fail. For troubleshooting information and replacement parts, check any tags or labels attached to the furniture or visit the manufacturer’s official website. Depending on the policies of the manufacturer and the warranty of your recliner, you may be able to acquire free repairs, replacement components, or a new chair. Check the fine print of your chair’s warranty to see if the store or manufacturer should be contacted. The warranty must include the manufacturer’s contact details as mandated by law.
How to Fix Recliner Chair Mechanism- The Details Guide
To repair your recliner chair mechanism on your own, you should have a thorough understanding of the process. Now it’s time to get your hands dirty and start fixing things. The mechanism of a recliner might become worn out over time. An tired mechanism should be replaced even if it appears to be in perfect condition. To begin the process of repairing the reclining chair, you must first pinpoint the source of the problem. You can learn more about repairing the mechanism of your recliner chair by reading the entire article. You may also repair the mechanism of a lazy boy reclining chair by following these instructions.
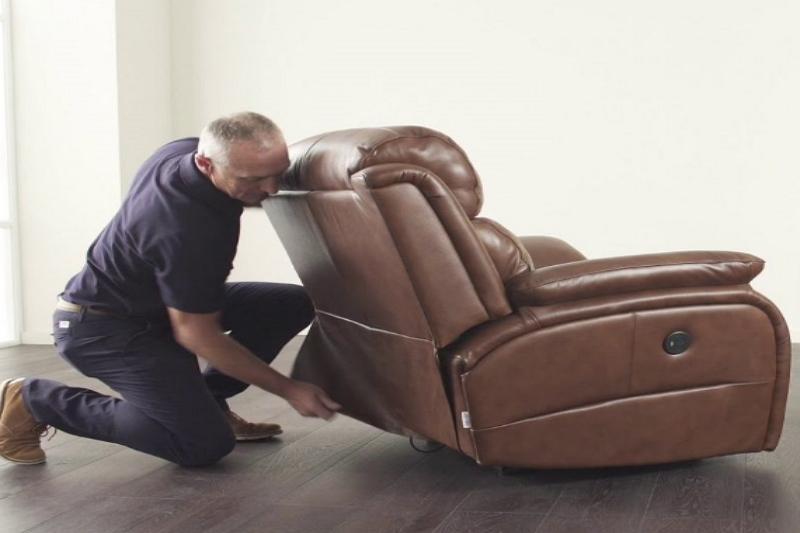
How to Remove a Recliner Chair Mechanism?
The back of a recliner may need to be removed and reinstalled if you’re relocating it from one area to another. There are many ways to do this, but the fundamentals stay the same. To begin, determine if the recliner will fit in the new place by measuring its dimensions. Use a screwdriver to remove any locking tabs from your chair. Removing the panel from the back of chairs with bolted-on seats will reveal the bolts that secure the seats in place.
- Place the recliner chair in a more accessible location… To make it easier to remove the chair’s back, roll the chair onto its front. As a result of the recliner’s utilization of Velcro snaps or strips.
- Replace the bottom frame by attaching it firmly to the bottom of the frame. Loop-and-hook tape removers can be found at this point.
- You’ll notice the recline mechanism when you remove the leather/fabric from the chair.
- Metal tabs can be found by searching for them. Thumb screws can be found near the bottom of the recliner, so pay attention to that area.
- Turn the screws in an anticlockwise orientation using a flat/standard slotted screwdriver.
- Avoid injuring the threads by not squeezing them too hard. The screws must, of course, be installed in a secure spot.
Hold and press the tab on the chair’s metal locking tabs, and then pull the bottom of the recliner upward. The mechanism can be unlocked with the help of this metal locking. After then, use your hands to pull it straight up. Move the brackets side by side if there is any friction or difficulty removing the side of the brackets.
How to Re-install a Recliner Chair Mechanism
The method of reinstalling the recliner’s back is simple. The brackets should be positioned at a modest angle to each other. At first, this back may frustrate you, but with practice, you will get more adept at dealing with this problem. It’s a lot of work, especially when one pair of brackets slides over the other. You can now recline the chair back to its original position after ensuring it is properly aligned. Adjust the levers, add screws, and fix tabs to complete the procedure. As a result of this procedure, the back will be securely fastened.
How to Fix Recliner Chair Tension Springs?
Any recliner chair working mechanism with a tension spring. Simply replace it if it ceases to function. But before you think about replacing the tension spring, find a new one. Make sure the spring high quality and it’s strong enough, so it lasts long. If you can’t locate the spring for your particular chair type, be sure to get in touch with the manufacturer. You can also get in touch with the manufacturer for further guidance.
Any system that uses a tension spring to recline a chair. Simply swap it out if it stops working. However, before you go out and buy a new tension spring, look for a used one. To ensure that the spring lasts as long as possible, make sure it is robust and of great quality. Do not hesitate to get in touch with the chair’s manufacturer if you are unable to locate a spring for your specific model. Additional help can be obtained by contacting the manufacturer directly.
Set the recliner back to its upright position after installing the new spring. Tilting the brackets back is the quickest and easiest approach to check the spring tension. Try a different set if the first ones aren’t providing sufficient resistance. You can, however, enjoy the spring resistance if you’re used to it. There is no need to call a professional if you follow the advice in this article. Before you begin, make sure you know whatever type of recliner system you have. A gliding recliner, for example, has a restricted range of motion. To replace the tension springs, you may need the help of a professional.
How to Fix a Recliner Pull Handle?
The appropriate tools are essential if you plan to disassemble and repair your recliner handles. A standard hex key, screwdriver, new handle, and a single Torn bit are all you’ll need. Apart from that, look at the manufacturer’s model number to be sure you get the right handle. When in doubt, consult the manufacturer’s website for more information on purchasing the replacement kit. It’s worth mentioning that if the chair is still under warranty, you may get a replacement for free. Replace the handle of your lazy boy recliner or any brand’s reclining pull handle by following these instructions.
Get The New Recliner Pull Handle HERE
To disassemble and repair recliner handles, you’ll need the proper tools. In addition to the Torn bit, you’ll also require a standard hex key, screwdriver, and new handle. Aside from that, make sure you get the correct handle by consulting the model number provided by the manufacturer. It’s also possible to look for the replacement kit on the manufacturer’s website. If the chair is still under warranty, you may be eligible for a free replacement. For replacement handles for lazy boy recliners and other brands, please follow these instructions.
- Safarat your old reclining chair handle.
- You’ll need them again after installing the new handle, so store the keys safely once you’ve unlocked them.
- Screw in your new handle and reinstall it where you removed it. Afterward, you’re done!
- Using a screwdriver, tighten the screw.
- To avoid tearing the chair’s fabric, hold the handle firmly but gently.
- Look for the decorative area below the handle once you’ve removed it.
- You can use this method to get to the bottom of the chair’s cable.
- The cable-end, which is attached to the mechanism, should be examined closely.
- Turn your chair back to its usual position by holding on to the head rest and handle.
Installing a new decorative plate is the first step in replacing the new handle. Next, insert the new handle in the same manner as the previous one. It’s here where you’ll affix the clipback mechanism. Make sure that the handle doesn’t fall off by putting the screws back in the wooden component. It’s time to try out the handle now that you’ve completed it. Pull the handle while sitting in the recliner chair. Stretching the legs can also help keep the chair feeling like new. You can save a lot of money in the future if you follow the methods outlined in this article.
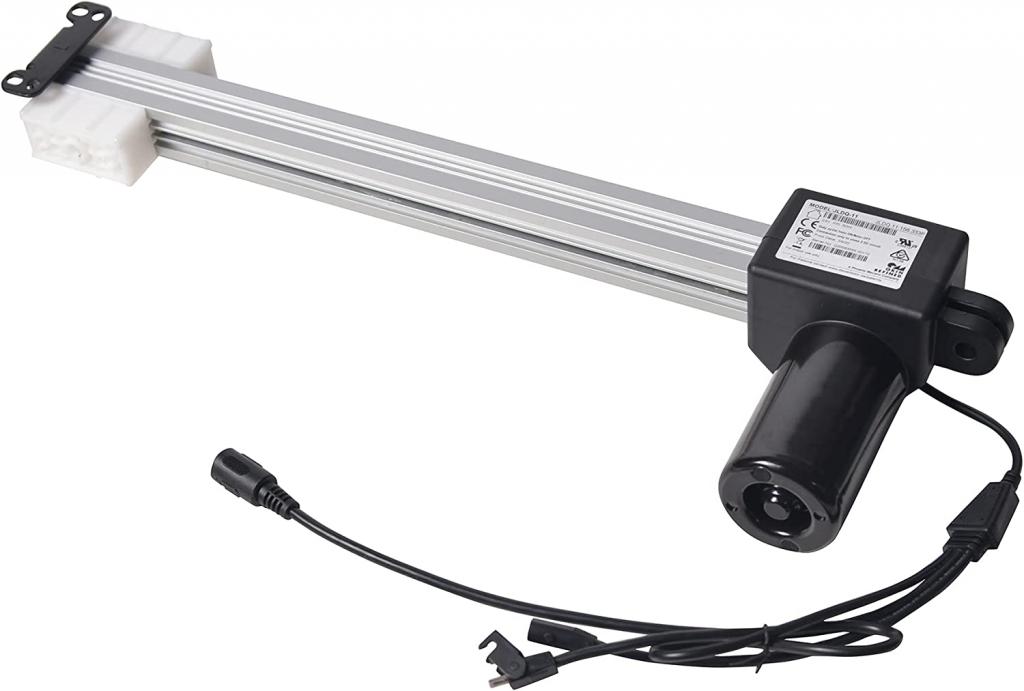
How to Fix Power Lift Recliner Motor?
Simply pressing a button on an electric power lift recliner can elevate the level of comfort to a new level. Power lift recliner motor repairs are necessary if your chair does not perform as expected.
- Your recliner chair mechanism can be damaged by simple power surges or overloads.
- There’s a major electrical problem if the recliner suddenly stops in the middle of its movement.
Even if you can discover the missing component by disassembling the device, you may have to go farther.
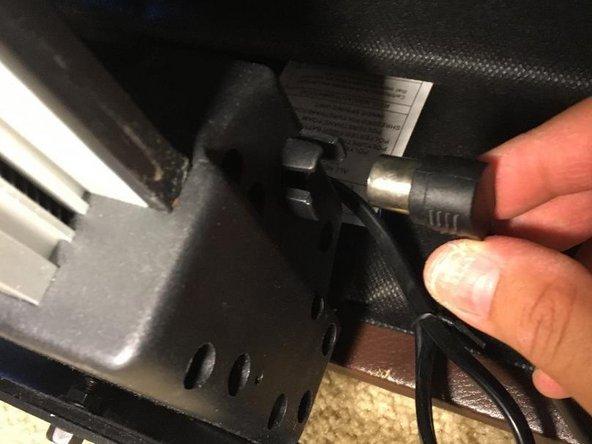
In contrast, if you’re mechanically inclined, you can solve the problem on your own if you pay attention to the finer points of construction. Make sure the cords in the base of your electric chair are not caught. Make a list of all the electrical components when performing the check. The power supply, activation button, massage motors, and lift motors are examples of these components. You’ll get a clearer view of the entire group if you make a list. You don’t want to spend time and money repairing a lift motor just to discover that other parts are defective.
Mark the brackets with a marker because the motor is on the bottom. Reassembly will be a lot easier thanks to this method. Next, remove the motor drive linkage nuts and bolts, but leave the bolts in place. After that, remove the Torx bolts (2) that hold the motor in place on the bottom rail, and then remove the motor itself. Keep these two screws in a separate location because they are so small. Remove the screws holding the rail in place with Torx heads once you’ve finished. The motor can now be taken out.
Xem thêm : How To Convert Your Rocker Recliner Into A Regular Recliner? Complete Step-by-Step Guide
The driving links are secured to the motor by four Torx head screws. In addition, two of the four screws have a huge washer on them. Reinstall the drive arms on the right and left sides of the computer. Keep in mind that a washer is required on the two back screws. Now that the motor has been finished, it can be installed. Make sure that the pigtail is tucked below your chair’s backrest. The two Torx screws can be used to fasten the motor to the rail. Remember the two short screws as you tighten the front of the motor with Torx screws. Plugging in the hand wand to the chair motor is the next step.
Close the ottoman by aligning its arms with the driving tube. Keep the nuts in place with 5/16″ bolts. Use black ties to attach the power wire to the motor pigtail and keep it in place. Finally, connect your recliner chair to the transformer and relax. To ensure the chair is working properly, run it through its whole cycle.
How to Fix a Recliner Chair Back?
It’s possible that the back of your chair is broken if it leans to one side excessively. There is a chance the chair is old or has been misused. Uneven padding, a sagging frame, or an uneven floor might also result in a fractured back. The back mechanism of a recliner can be easily repaired if you have some basic knowledge and a few tools.
In order to lock the chair’s back in place, one of three mechanisms can be used: a lever, a tab, or both. The brackets were secured to the back using the locking lever. The backs of these people swung down. After that, you’ll need to secure them to the seat’s metal posts. The back of locking tabs/catches was secured. The bracket fasteners must be removed and then re-tightened. It’s better to use a screwdriver than your hands.
Recliner chairs with bolted-on backs indicate that the back is tucked under the panel. Before you begin, familiarize yourself with the specifics of the task at hand. Remove the bolts/screws with a flathead screwdriver on some models. It’s much easier to separate the back and the base this way. Tighten the bracket fasteners if the back is loose after sliding it on.
Turn the chair upright after removing the back. Side of the arms should be above slots in order to install back.. To check that the back is aligned with the brackets, carefully lift it. Lift the recliners to find the brackets for a three-leg high-leg chair. In addition, you must keep your back in contact with the rest of your body.
To see if you’ve reinstalled the back correctly, simply shift it to the side. This means that the brackets don’t fit correctly. Pushing the lever down with a slotted screwdriver is essential. When not handled with care, loose levers can lead to injuries. Additionally, each bracket must be locked separately. To receive assistance with a reclining chair back, speak with a retailer.
How to Fix the Swivel Plate Mechanism for Recliner Chair
The swivel base of a recliner may be damaged by the recliner’s movement on the surface. Depending on how the seat is utilized, you may observe a pattern of wear and tear. Keep an eye on the swivel plate; there are a few things you can try. However, before you begin any repairs, make sure to ascertain the chair’s model number. When it comes to recliners, there are manual and automatic models. Repairing each is a unique process.
You can consult the manufacturer’s instructions if you have any questions about which parts should be replaced. Reveal the underneath of your recliner to remove the swivel base. The task was completed by reversing the chair. The goal is to get a good look at the base of the column. If you see any rust, apply a lubricant to the area.
Nuts hold the swivel and the base together in most models. Using a wrench, dismantle the various parts. A little lubricant will help if they’re too stiff. The nuts and bolts should be separated. To separate the components, first pull the base away from the support with a pair of pliers. Swivel issues can sometimes be solved with a simple nut and bolt fix. If you’re looking for a repair part, a good rule of thumb is to be sure the base can support the maximum weight specified by the manufacturer. The quantity of ball bearings in the unit should also be taken into consideration.
A swivel base can be attached to an existing column or a separate column. Hammering the inner column may be necessary. It’s easier to remove now that this has been done. Before installing a new swivel, check the column’s internal components. The new swivel plate mechanism must be aligned to the holes in the base much like in the removal process. Lock the nuts on the bolts by inserting them into the holes. Tighten them up using a wrench. Upon completion, you’ll be ready for testing.
How to Replace Cup Holder of a Recliner
Some recliners have plastic cup holders, while others have touch LED cup holders. Drinks can stay cool while you watch your favorite movie or game on these coolers. There’s nothing wrong with the cup holder button if it produces a ‘click’ sound. However, if you can’t hear the sound, you have a defective cup holder. You should contact the manufacturer to make sure you obtain the right size. The inner and exterior diameters should be measured to eliminate any assumption. Consider the cup and bottom heights, the materials used, as well as the color, before making your selection.
Remove the warning label first. After that, remove the base’s four screws and preserve them in a secure place. Carefully reverse the inclination with the assistance of others. To remove the cable ties, cut them. Plug in the two cords that are connected to the lounge and disconnect them from the wall. Place the wires at the rear of the lounge after unzipping the dust cover. Pull the cup holder out from the top after that. Make sure that the new cup holder is attached to the arm. Remember to re-enter the wires through the Velcro loop. Cable ties can be used to hold the cables to the frame. They won’t get tangled because of this combination.
Close the dust cover’s zipper and then remove the excess cable ties. You can roll the seat back onto your feet with the help of a friend. The four screws at the bottom of the cup holder must be re-tightened now. To avoid damaging the threads, do not overtighten the screws. Finally, swap out the plastic cup and the warning label. Check to see that it doesn’t stick out in any way.
How to Replace a Recliner Mechanism Release Trigger
Taking care of your recliner’s release mechanism is an easy DIY project. To begin, turn it over so that the bottom of the device can be seen. Socket extension, wrench, and screwdriver are all you need for this task. To begin, remove the trigger cable from the device. Keep track of which adjustment hole you removed because there are several. It can be helpful to label it once you’re done so that you can readily locate it. You can also see the fill-up bolt and the coil spring that cause the trigger to be tense when it is pulled.
A little spring, a plastic bushing, and a bolt should be included with the component. Replace the nut if it ever wears out or becomes rusted. Consider the length, width, and height of your existing cable before purchasing a new one. With an outside spring length of 12.5 cm, a normal cable is 88 cm long. If you’re measuring by hand, allow for a 0.5-1″ range of error. There should be a 5mm barrel on the cable’s connector (S-shaped). Contact the manufacturer if you’re unsure of the item’s dimensions. It’s also important to note that aluminum alloy is used in most cables. Most chairs will accept a spring end with a diameter of 90 mm.
Put the cable back in the hole you withdrew it from to reinstall the trigger. The next step is to screw in your nut. The ratchet is the best tool for tightening the nut since you can find it easily. Also, don’t forget to reattach the cable. Re-adjust the recliner once you’ve finished your task. To make sure it’s working properly, run it through its paces. If your seat has a reclining mechanism, this method is ideal.
How to Fix a Recliner That Leans to One Side
Your chair leans to one side for a variety of reasons. Over time, the wooden frame may become brittle or the linkage mechanism may fail. The unevenness of the floor or the lack of padding can cause your chair to lean to one side. Fortunately, you don’t need any advanced knowledge to get your seat back in shape. To tighten the bolts, nuts, and screws, you just need a few tools.
Make sure the footrest is closed before you begin. In order to see what’s underneath the chair, you’ll need to lean it forward. You’ll discover a pair of thumbwheels on recliners with adjustable reclining tension. To adjust the tension, rotate the wing nuts/thumbwheels that are linked to the tension springs. Rotate it counter-clockwise to raise the tension. And if you wish to release it, turn it in the opposite direction of clockwise. It’s critical that you find a way to maintain an even amount of stress on both sides. You can loosen the mechanism with pliers.
The screws, springs, and cushioning may need to be updated from time to time as well.. Remove them by finding the site of attachment. Wood fillers can be used if the screws and wooden part have a loose connection. Matchsticks and toothpicks can also be used for this. A worn-out attachment spot is a possibility if the springs are mounted to metal.
The springs should be supple, but not brittle. Stretching at the same level is also important. For wood-mounted springs, ensure that the screw holes are not too large. Finally, double-check your work and replace the upholstery if necessary.
How to Fix a Recliner Footrest
You may quickly remedy an issue with the footrest of your recliner. Your recliner footrest might be irreparably damaged if you repeatedly slam it down. If the footrest on a chair is stuck in one position and won’t lock into place or doesn’t stay up, it will become damaged. You will need a screwdriver, bolts, lubricating oil, and screws to remedy the problem. So, to fix or adjust the footrest of a lazy boy power recliner or any other brand of recliner chair, follow the steps listed below.
Lubrication may not have been applied to the recliner. They could loosen as well, like the screws and nuts. The first step is to flip the recliner over. Check for corroded or loose screws and bolts. Don’t be afraid to replace or tighten any that you notice. In addition, fresh screws can be used to replace old ones that have rusted. Lubricate the footrest’s bushings/joints after checking that everything is in order. After that, try moving the arm up and down and side to side. To finish, dab the surface with a cloth to remove any remaining oil.
What if the footrest of the recliner chair has a difficulty with adjusting? It does imply that the movable feature isn’t functioning. Changing the position of the footrest is difficult, or it could remain stationary. Footrest bushings are connected by a spring-like component. Next, use a screwdriver to dismantle all of the spring-related components. Get the spring out and check to see whether everything is properly fastened. See how the system works. The footrest recliner problem has been solved if it moves smoothly.
What’s wrong with the footrest? Ratchets that don’t work will cause the footrest to get jammed up. Depending on the severity of the issue, there are a variety of approaches to consider. If you don’t already have these tools, you’ll need to buy them. The first step is to flip the recliner over. Dismantle everything that might get in the way of your ratchet. Take a look at the bar to make sure it’s not damaged. Remove the screws holding the ratchet in place to replace it. Grab the new part and put it in if necessary. Screw everything down to make sure it’s adjusted properly. Verify that the footrest may be raised and lowered freely.
Conclusion
Recliners aren’t only for decoration; they’re made to be relaxing and comfortable places to sit. Repairing a recliner chair can be a simple operation as long as you understand the chair’s unique qualities. The majority of recliner issues may be fixed even if you’ve never worked on one before. Take the necessary equipment and begin to work. If this post on reclining chair mechanism repair helped you, please let us know in the comments. Let your friends and family know about this, too.
Nguồn: https://iatsabbioneta.org
Danh mục: Recliner