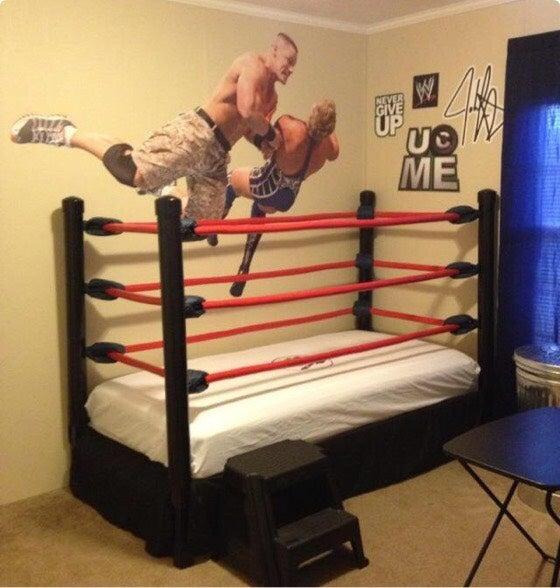
Wrestling ring beds are notoriously difficult to construct.
- Where Is The Fuse In A Window Air Conditioner? How to Remove Fuses?
- How Much Does It Cost To Run A Window Air Conditioner
- How To Cover Windows Without Curtains? Ultimate Guide
- How To Attach A Swivel Base To Your Lazy Boy Rocker Recliner? Complete Step-by-Step Guide
- Zero Breeze Air Conditioner Where To Buy? Helpful Information!
This is a simple task that should take no time at all.
Bạn đang xem: How To Make A Wrestling Ring Bed? Step-by-Step Tutorial
Get your kid’s old bed ready for the ultimate metamorphosis.
Wrestling is a favorite pastime for children—especially when the “fanboy” friend is actually their father.
Wait. Is “she” necessary? The fact that some girls also enjoy wrestling is perfectly acceptable! What a sweet idea!
Furthermore, the times when this child and his father watch their favorite wrestling show and clap for their favorite wrestler are unique.
It’s a great idea for your child to have a wrestling ring-themed bed.
To all the ladies and gentlemen who are interested in learning more about the responsibilities of this position, please continue reading.
Steps To Make A Wrestling Ring Bed For Kids
Hey, parents and caregivers!
Make a wrestling bed for your child with these easy-to-follow instructions.
You’ll be done in a matter of hours.
You may be concerned that your child will suffer an injury.
However, the wrestling ring bed that we’re going to build is absolutely safe because of this thought process.
However, it’s important to remember that this is strictly an exercise in aesthetics.
Despite the fact that your child may still be able to jump on their bed in the same way they used to.
A professional wrestler would not have done this before.
A wrestling ring bed can be made in several ways.
What are we waiting for?
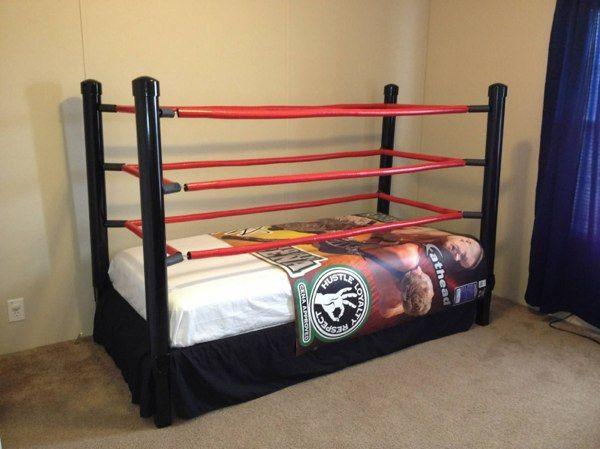
Step #1. Prepare your kid’s old bed frame
A wooden bed frame with posts at each corner would be excellent. I am not sure what kind of frame you have.
You must, of course, pick a location where you can complete the project.
Ideally, avoid doing it in your child’s room. Why?
Xem thêm : How To Lose Weight While On Bed Rest? Comprehensive Guide
Because the screws used in the building of this wrestling ring bed have pointed sharp edges, it could be problematic.
A headboard and footboard are common features of a child’s bed.
You’ll have to get rid of them.
Your child’s bed may not meet the criteria for the ideal bed that was previously outlined.
All four corners of the bed might be supported by four posts.
Step #2. Design the posts for the corners
The bed’s posts can be accommodated by PVC pipes with a diameter of the appropriate size.
Make four equal pieces out of this.
Additionally, you’ll need four PVC caps of the same diameter as your pipes.
The cups should be placed on one side of the pipes.
In order to mark and drill the pipes’ rope locations, they can now be inserted through corner posts.
We’ll make three of these here.
Drill these holes at the same distance down each pipe in the same way.
Make sure that the eyehooks you have are compatible with the diameter of the drill holes.
Finally, for this phase, use a black paint to paint the pipes.
However, you may want to try a different hue.
Just go with your gut.
Step #3. Make the bed frame sturdier
The thicker the plywood, the better, so measure and cut a piece that will fit into your bed’s frame.
The slats of the bed can be used to support it, or you can screw it in if you like.
Children may be tempted to jump on these beds because of their unique design, don’t you think?
As a result, do not skip this procedure in order to assure their safety.
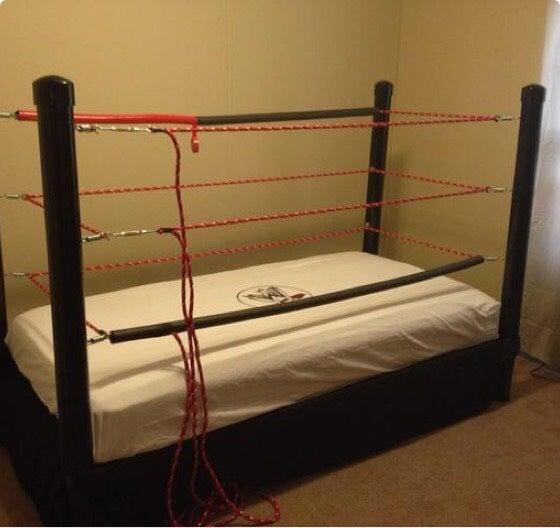
Step #4. Install the ropes
The eyehooks should be inserted into all of the drilled spots along the pipes.
Xem thêm : Do Bed Bug Stinks When You Kill Them
Make sure the threads are sunk in.
We can observe that there are three phases of “rings” or ropes surrounding the bed when we look at the design.
As a result, we’ll need three ropes, each of which should be long enough to allow for a full bed rotation.
Hook a large spring to three eyehooks on a corner pipe that are all aligned.
Attach a metal ring to each sides of the three ropes you cut.
This ring of metal can be hung from the springs.
Start with a single rope and work your way up.
It’s recommended that you start with the lower ring to get things done faster.
Get every corner pipe’s eyehooks to hook the first rope around the bed.
Hook the metal ring back to the eyehook where you started after it has completed a full cycle.
Repeat this for the middle and upper rings.
Step #5. Add coverings for protection
Cover all of the ropes and springs with pipelining insulation.
Use duct tape to secure these insulations in place.
The color of the tape should match the color of the posts.
The ideal rings for black poles are those with red accents.
Step #6. Finishing touches
You can now return the mattress to its original location after completing the ring-making process.
You’ll be able to choose the color and pattern of the bed linens and pillows.
That’s it!
The new wrestling ring bed is sure to delight your little one.
Final Words
I hope you’ve learnt how to build a wrestling ring bed for children at the end of this essay.
I appreciate you taking the time to read this far.
Thank you so much for your time and effort!
Nguồn: https://iatsabbioneta.org
Danh mục: Bed