Are you wondering how to level a shed on uneven ground? Here’s what you should know first:
How do you level a shed on an uneven surface? First and foremost, you should be aware of the following information:
Bạn đang xem: How To Level A Shed On Uneven Ground? Step-by-Step Tutorial
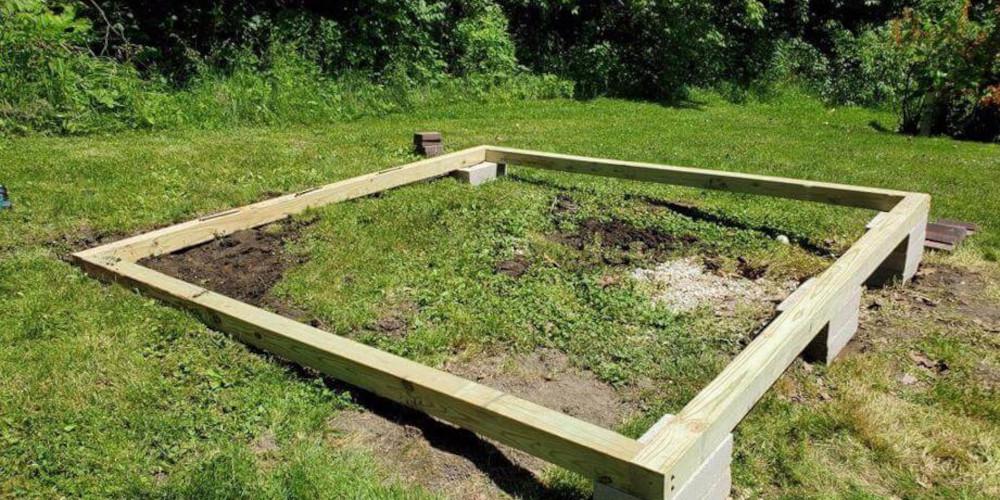
Ensure that the ground is level before building the shed, especially if it’s going to be situated on a slope or other unlevel terrain.
If much is accomplished, it depends on how uneven the surface is, what kind of soil it is, and the shed’s type and weight.
Planning For The Shed Base
You can put the shed in your garden once, so it’s crucial to make sure you got it right.
Putting the shed in your yard is an investment, and you only get one chance to get it correctly.
The easiest way to build shed bases is to use a base of blocks, ideally concrete, on uneven ground.
The quickest and most straightforward technique to construct a shed’s foundation is to place concrete blocks on an uneven piece of ground.
The main objective is to create a flat area on uneven ground where your garden shed can be placed.
Tools Needed For Building
Building a shed necessitates the following items:
- Spade
- Using a caliper
- Mallet with a rubber handle
- Level
- String
- Pebbles made of peas
- Planks of wood.
Steps On How To Level A Shed On Uneven Ground
Once you’ve decided where your shed will be located, the following step is to level the ground.
Step #1. Mark out and remove the surface from the area.
Drive stakes unevenness should be assessed on all four sides of the shed site.
Step #2. Level the ground
Take a spade and carefully dig through the top layer of dirt to get the area as level as possible, with the extra dirt going straight to your hand.
Step #3. Measure
Using a tape measure and four rows of three blocks, you can get a good idea of how much each block weighs.
Step #4. Make the foundation
Under each block, excavate to a depth of six inches and a width of two inches.
Make a flat surface by covering the area with pea gravel. An effective water delivery method, the pea gravel preserves its energy.
Step #5. Finishing touches
Measure the smoothness of the wooden planks by placing them along the block rows.
You can then add or remove blocks if there is a big height issue.
Finally!
Xem thêm : How To Get Rid Of Leaf Miners? Garden Guide
Before we wrap things off, do you know that there are several things to keep in mind when building a shed on uneven ground?
Factors To Consider In Building A Shed On Unlevel Ground
Keeping the entry as level as feasible is my recommendation for a shed door location. Deck solutions can be joined from the top or side, depending on your preference.
The shed’s perimeter can be accessed for repairs. This relates to the retaining wall’s solution.
In order to gain access to the shed, avoid placing it too close to the retaining wall.
So, what are the ground rules for this project?
To ensure that the proposals do not conflict with local zoning restrictions, this varies greatly from place to place.
Planning rules and some city governments limit shed height above ground level, which likewise applies to shed height above ground level.
Depending on how you view this, your decision may be influenced.
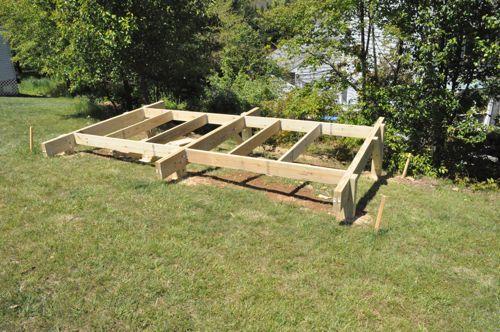
How To Build The Shed’s Foundation
There are many steps involved in the process of making it.
Let’s take a closer look at these!
Step #1. Creating the square
Using 2×6’s, build a square with the same dimensions as the home.
Step #2. Assembling the baseboard
Deck screws with washers can be used to assemble the baseboard.
Step #3. Test the square’s frame
Corner by corner, check the frame’s squareness. Change the box until the dimensions match.
Step #4. Lock the frame
Plywood can be used to secure the frame in place and keep it square.
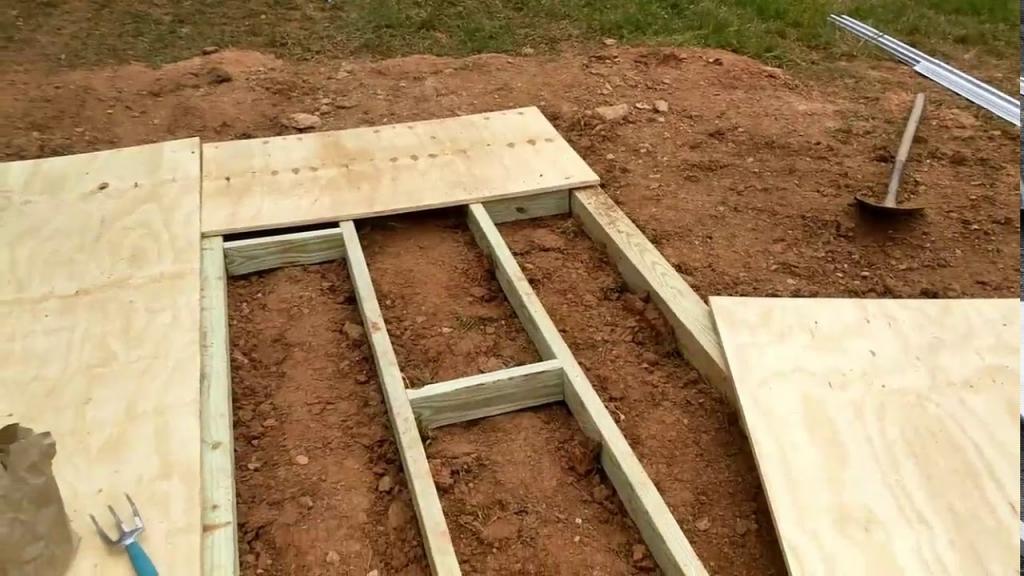
Step #5. Leave plywood opening
You can mark the sites by driving spikes into the ground through an aperture in the plywood.
Step #6. Set the corner post in the plywood gap
Connect the corner post to the aperture using clamps after it is in place.
Ensure the frame is level before tightening the clamp.
Step #7. Make sure that it’s level
Make a diagonal search around the frame to make sure it’s level.
Step #8. Add some pressure
Add pressure-treated 2-4’s next to the floor joists on the inside of the door.
Xem thêm : How To Get Your Toddler To Stay In Bed? Comprehensive Guide
These can hold the apron in place so that the concrete rocks and chunks remain under the shed.
Step #9. Finishing
Using pressure-treated plywood for the apron and painting it will help it last longer with the roofing cement on top of it.
How to Install a Shed on Uneven Ground
Step 1
Make a note of the shed’s unevenness. Set stakes in the ground at each of the shed’s four corners. Builder’s twine, leveled with a line level between stakes, should be used to connect them. To determine the slope, use a tape measure to measure the distance between the level line and the ground. This method works whether the site has a single slope or numerous slopes of varied degrees.
Step 2
It is possible to solve minor slope concerns by excavating a high area and bolstering dirt on a lower area. On one side, use single solid concrete blocks, while on the other side, use double stack (or even triple stack) blocks. A triple stack of solid blocks, each 4 inches thick, can alter the slope by 8 inches on either side. Long boards and levels are useful for leveling block apexes.
Step 3
For steeper slopes, use pier and beam construction. You can either use precast concrete piers or posthole diggers to dig holes, then fill them in with gravel and pour concrete footings that are the same height as the shed, all while making sure that the level of the gravel base is constantly changing. Build wooden piers or buy thick cardboard round forms to use as piers. To provide a stable foundation for a shed’s floor, place wood beams on top of these posts.
Step 4
If the region where the shed is located is prone to flooding, consider moving it. The foundation support should never be placed near an area where a shed might act as a dam and cause an accumulation of water behind it. Make sure the shed’s floor is elevated over any uneven ground, whether it is made of wood or metal. Upon completion of the foundation, either a kit shed or a wood shed built on site might be installed.
How to Install a Basement Support Post
Step 1
Make sure that an eight-foot adjustable metal post is exactly what you need by measuring the height of your aperture. Purchase as many posts as you require if this is the case. Most hardware stores should have them on hand.
Step 2
Determine where you want to place the post and then place it on a wooden block. Suppose you have a wooden beam that runs the entire length of your basement, for example. You want to place the post under the crack because it’s cracked but not sagging. Underneath the crack, place a 2 X 12 or 2 X 10 inch square piece of lumber cut to the proper size. Then, using the adjustable top, raise the post until it begins to move higher after placing it on top of the block.
Step 3
A wooden block placed between the post’s peak and either a beam or floor joists it supports should be cut to fit the space between the two. Make a square-shaped cut in a 2 X 6 or 2 X 8 and use that piece of wood as the block. If you decide to double your wood supply, you’ll need to cut two square blocks and stack them.
Step 4
Make the floor higher. You can raise the floor above you by turning the lever attached to the post in a clockwise direction. Do not raise the floor more than 1/8 of an inch per day, or you may need to build a makeshift beam to distribute the weight of multiple jacks over a wide area. Temporary beams can be made from 4 X 4 or 6 X 6 lumber, or you can nail together many 2 X 6’s. In order to prevent a temporary beam from sagging over time, you can attach multiple metal posts under an eight-foot-long temporary beam that spans seven floor joists spaced 16-inches apart. To do this, you’ll likely need three posts that are spaced evenly beneath the beam. Lift one at a time until you have the lift you want. You should only move forward by a quarter inch at a time.
Step 5
Make a cement pier beneath the area where you plan to install your jack. A dirt floor or concrete slab in decay necessitates this procedure. A typical poured slab floor is between 4 and 6 inches thick and can withstand minor lifting. A specialist should be consulted if your building demands more than this.
Conclusion
In my experience, building shed foundations on rocky terrain is most easily accomplished with a frame of bricks, preferably concrete.
It is possible to adjust the foundation to compensate for uneven ground on one foot by adding or removing blocks.
Leveling your shed requires you to deal with some heavyweight.
To mitigate the danger, you can always work with a partner or seek the advice of an expert.
Without a smooth surface, your shed will not function correctly and can split, resulting in the destruction of your belongings and even your wallet.
Despite the fact that the shed will be built on uneven ground, a flat shed foundation is an absolute necessity.
Thank you for taking the time to read this piece.
With any luck, you learned something new about leveling a shed on an uneven surface.
All the best!
Nguồn: https://iatsabbioneta.org
Danh mục: Guide