The phrase “swivel” conjures up images of an espresso machine, but what does it actually mean? The swivel on the scoop prevents spillage of your ground coffee. A swivel may be used with any type of espresso maker, and the instructions in this article will show you how.
Steps in Making Swivel For Espresso Scoop
Espresso has a well-known connotation, but what does it mean to “swivel”? Swivels make it easy to scoop ground coffee without worrying about it spilling all over the place. The swivel on any espresso maker will be explained in detail in this post.
Bạn đang xem: The Art of Making an Espresso: A Brief Guide to the Swivel
1. Grind your ingredients evenly and coarsely.
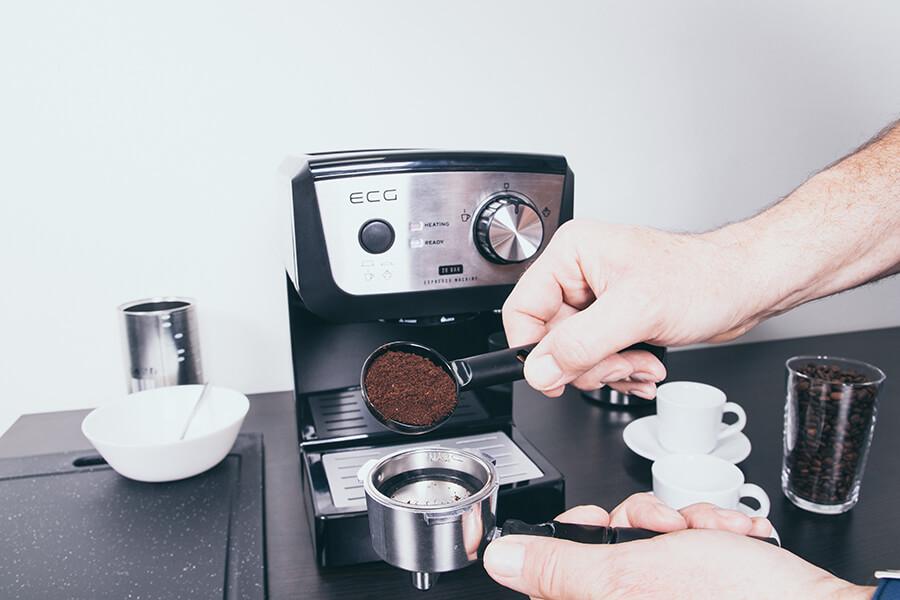
#2. Scoop: Using the scoop’s handle, scoop grind into the swivel’s base. If you want to avoid spilling anything, gently press it down and then release it when you’ve used up all of the contents.
Swivel Base #3. Espresso Machine Insertion. Insert it into your machine’s portafilter by raising its handle swivel base and lowering it back down..
Fill Portafilter: The amount of coffee required for the recipe you’re making should be placed in the portafilter (usually around 18g). Fill the portafilter to the brim using a scale and a level an inch or two below the required level on your left-hand scoop.
#6. Twist the Top Handle Counterclockwise: With one hand on top of the swivel base, twist the handle counterclockwise.
The machine should be set to fire a single shot. Afterwards, turn on your espresso machine and set it to brew a single shot of espresso.
The eighth step is to press the Start button: When everything has been completed, Make sure your espresso machine is running before you start pouring the shot into the portafilter by pressing on the start button.
What is Espresso Scoop?
Espresso is a concentrated coffee beverage with the same viscosity as “black coffee,” but with a much higher concentration. When we talk about espresso, we’re talking about both the drink and the way it’s made.
Dark roast coffee beans are ground exceedingly coarsely and infused with boiling water at a rate of one or two espresso shots per minute.
A clear, reddish color and a thick, frothy layer known as crema are hallmarks of the best espressos. Espresso’s body could vary in thickness, ranging from thin to thin and watery (called”scalding”) or the ideal consistency: dense however not too syrupy.
Benefits of Taking Espresso Scoop
A clear, reddish color and a thick, frothy layer known as crema are hallmarks of the best espressos. Espresso’s body can range from thin to thin and watery (known as “scalding”) to the ideal consistency: dense but not syrupy.
The best espressos have a reddish, clear color and what is known as crema. Espresso’s body can range from thin to thin and watery (known as “scalding”), to the perfect consistency: dense but not syrupy.
A clear, crimson color and a thick, frothy layer known as crema characterize the best espresso. Scalding is a term for an espresso’s body that ranges from thin and watery to viscous and syrupy, but not overly thick or heavy.
Espresso contains caffeine, which causes the adrenal glands to generate cortisol, which helps raise blood sugar levels.
adenosine receptors, which stimulate beta-adrenergic receptors as well as adrenaline releases in reaction to psychiatric problems, like depression or stress, can be blocked by caffeine, which can be found in coffee.
How to Protect Swivel
The swivel must be kept in a safe place to prevent what’s known as”the “sweet spot” from getting too hot or cold.
The “sweet spot” on the swivel needs to be protected from extreme heat or cold by storing it in a secure location.
It is imperative that the swivel be cleaned with hot soapy water and washed with brushes, and then rinsed thoroughly. Boiling it for 30 minutes in “water” will also do the trick.
If you want to avoid “bruising” your beans, don’t crush them before the process known as making.
How to Store Swivel
It’s a handy way to store “swivel” in a “coffee can” or a “cabinet,” depending on your point of view.
In order to keep the coffee beans fresh, they must be stored in an airtight container. The best way to store them is to keep them away from any sources of outside air.
9 Steps How to Make the Perfect Espresso
You have to work hard to make a good espresso. To make a great espresso, you’ll need good coffee, a great brewing method, and a clean, well-maintained espresso machine and grinder. You should also be familiar with the proper techniques for making an espresso. Here are some of my tips and tricks for making the perfect cup of espresso.
For several years now, I’ve been immersed in the world of espresso. First as a barista and a coffee enthusiast, then as a barista trainer and a roaster, I’ve learned a lot about coffee. With over tens of thousands espresso shots brewed and drunk, I feel confident in my knowledge of the subject matter. I’d like to share some of the things I’ve learned in this blog post. So, here are some of my best recommendations for you to use! If you’d rather learn how to make espresso by watching a video, check out this one!
1. CLEAN YOUR PORTAFILTER
You should clean and sanitize your portafilter before dosing your coffee into it. Your next cup of espresso may taste bitter and astringent if it contains moisture or residual grounds.
2. DOSE CORRECTLY
I think we’re in for a breeze here. A simple press of a button with your portafilter or your hand will do the job for you with on-demand grinders. It’s important to use a scale to confirm your dose before dispensing and tamping your coffee. You may rest assured that your extraction will be accurate this way because your dose will not be too much or too little. This.
3. DISTRIBUTE YOUR GROUNDS IN THE PORTAFILTER
The grounds will most likely be dispensed into the portafilter’s basket in the form of a mountain or a pyramid from your grinder. If you don’t spread the grounds before tamping, some portions of the basket will have more coffee while others will have less. Channeling may occur if the ground is unevenly distributed.
If you want to go really technical, you can employ distribution tools. You can improve the uniformity of your espressos and extractions by using distribution tools.
4. TAMP EVENLY AND CONSISTENTLY
In 2012, I had my first barista instruction, at which time I learned to tamp with a pressure of 20 kilos. How much pressure is 20 kilograms? I still don’t know after “a few” taps and several years. We must dispel this widely held notion.
Let’s tamp in a more contemporary fashion now. Tamping is a technique used to ensure that the coffee puck is perfectly level by removing any air pockets. Long and “hard” tamping results in a puck that is crushed (i.e. no longer descends). Make sure the puck is horizontally leveled to avoid channeling and extraction that is either over, under, or uneven.
5. RINSE YOUR GROUP HEAD
It’s a good idea to rinse the group head to get rid of any old coffee grounds before installing the portafilter. Cleaning your espresso machine has never been easier. It’s also a good idea to rinse your group head to ensure that it’s fully heated, so that you can extract more coffee.
6. INSERT THE PORTAFILTER AND START BREWING IMMEDIATELY
After rinsing, attach the portafilter to the group head and begin brewing right away! Your coffee’s surface may be burned if you do not brew it right away, resulting in bitterness in the cup.
7. BE AWARE OF THE YIELD & BREW TIME
Espresso is being brewed right now. Be cautious of your brew time if you are using a volumetric machine. Make a new espresso and/or examine your grind size and dose if the extraction time is too short (under-extraction) or too long (over-extraction). Espresso can be diluted (making it softer) and possibly over-extracted using a manual espresso machine if it runs too fast. Be cautious of your yield while using a manual espresso machine.
8. SERVE WITH A SMILE
Following these instructions and employing a suitable brewing method, you’ll likely end up with a delicious cup of espresso. We baristas are in the hospitality business, so treat your customers with respect and consideration. Describe the coffee you’re using and what kind of flavors they may expect from the espresso they’ll be consuming. Finally, and perhaps most importantly, ALWAYS WEAR A SMILE. You may brighten someone’s day by serving them a delicious espresso with a grin.
9. DISCARD THE PUCK, CLEAN THE BASKET AND RINSE THE GROUP HEAD.
Keep the area clean and orderly after serving. Rinse the group head and place the portafilter back into the group head after cleaning the basket of any old coffee and moisture. Making the next espresso is lot simpler, faster, and more pleasant when everything is in its proper location.
How To Dial In Your Espresso Grinder
Let us know if you have any questions or concerns about your new grinder after reading this helpful information. Grinder settings may be too fine, resulting in no grinds being produced. Do not be concerned, though – we’re here to assist! Be careful to read through these instructions and give us a call if you have any questions or concerns. Consider adding the Clive Grinder Dial-In Service to your order and we’ll take care of the shipping and handling for you.
A full bag of freshly roasted coffee will be required to learn how to dial in your grinder, but this post’s aim is to avoid waste and make the process easier. The more coffee you grind through your grinder, the more efficient it will be, so keep that in mind (this is called seasoning the burrs).
Step 1: Plug in the grinder, install the hopper, open the hopper throat
Step 2: Choosing your method of dose, eliminating the variable of quantity
Add the amount of beans needed for a single cup of coffee at a time, known as single dosing. While certain grinders are more suited to this task than others, it’s not impossible to try. A finer grind and longer grinding time are required for single dosing since there is no hopper weight to drive the beans through. If you’re a coffee drinker, you’ll appreciate that you can keep your beans fresh by keeping them in an airtight container (rather than letting them get stale in the hopper). If you’re having trouble getting a thick, even 25-second extraction with a single dose, you may want a heavier grinder.
Weigh-based dosing (option 2): Putting beans in the hopper and grinding by time or weight (or sight) is a bit easier than single dosing. Use a scale and a timer to ensure you’re grinding the correct amount of coffee and to time how long it takes to pull your shot. A timed grind is an option on many grinders, and we recommend that you start by selecting a grind time that provides you with the amount of coffee you desire in the portafilter. There should be a mound of ground somewhat over the basket’s level, but not so much that your machine is soiled by the excess dirt (hint, inspect the shower screen and brewing area regularly to see if your routine needs adjustment). We recommend using 18 grams of coffee in a double espresso basket for most spouted portafilters. We propose 20 grams for the triple baskets used in bottomless portafilters.
Step 3. Grinding for the first time
Try the factory setting on your grinder before making any changes. Listed below is a troubleshooting procedure you can use if no grounds are being produced. If you have a scale, put the empty portafilter on top of it and tare it. Grind manually until you get the desired amount of coffee, or set your grinder time to dispense the desired amount of coffee. If you have programming questions, consult your product’s handbook or contact our support team. Make sure your double or triple dose contains at least 18 or 20 grams of coffee. A small variation in dosage can have a significant impact on the grind setting (shot speed up or slow down), so using a scale is a good idea until you’re comfortable with your regimen.
Adjust the grind courser (while the grinder is running) if you activate the grinder and no grounds are being dispensed and a flood of coffee begins to gush out.
- The top collar with the number indications on Macap grinders must be rotated clockwise to alter course. “Grosso” appears to be rotating leftward, so look for it.
- For Profitec grinders, the top collar needs to rotate counter-clockwise (note the arrows that point right for course, left for fine).
- Setting the right-hand micro adjustment to 2 for Baratza Vario or Forte AP means that the left-hand micro adjustment decreases.
- For the Breville Smart Grinder, the grind indicator should shift to the left and the numbers increase when the setting is set to course.
- Breville Dose Control’s course setting indicates that the collar should turn clockwise as the numbers increase.
Step 4. Pulling your first shot
Make sure the coffee is uniformly distributed in the espresso basket, since an empty space will make it easier for the pressured water to punch a hole in (inspect the spent coffee puck for holes). Gently whisk the coffee up, down, left, and right with your finger. Apply medium pressure with a level tamper (not too light, not too heavy). For the most part, consistency is more crucial than the exact amount of power. To determine how long it takes for 1.5 ounces to be dispensed, start a stopwatch at the same moment you fire your shot. Starting when the pump is activated, the goal is to have a total shot time of 25-30 seconds. Your shot may taste sour and lack body if it hits 1.5oz within 25 seconds (under extracted). If this takes longer than 30 seconds, the flavor might become muddy and heavy, making it difficult to enjoy (over extracted).
Step 5. Dialing in your grind
The grind must be finer if your shot is less than 25 seconds long. After 30 seconds, the shot needs to be fine-tuned. Be patient and keep in mind that changes don’t take effect right away (there will still be some coffee remaining inside from your last shot, that needs to be pushed through). Because worm drive adjustment is so sluggish, even a half-rotation of the knob may appear insignificant (so at first you may want to start by making full rotations or more). The top collar can be manually rotated or micrometrically adjusted to make significant alterations rapidly. It doesn’t matter what type of grinder you have, you’ll only be able to change your grind if you keep playing with it. Scale and timer are your best friends when it comes to making adjustments to your camera settings. In order to keep the shots in this range, you should only need to make slight tweaks every now and then.
Why Train Baristas?
If you work in a place where coffee is a big part of the culture, then you must be dedicated to making and serving delicious coffee drinks. Traditional baristas know how to operate an espresso machine and how to make delicious coffee beverages. Professionalism is critical to your company’s success when it comes to providing client service. Baristas that are well-versed in the art of making great coffee will find themselves in high demand, especially during the morning rush.
Xem thêm : How To Get Your Toddler To Stay In Bed? Comprehensive Guide
Positive client feedback, increased sales and profitability, and an enormous tick for courteous customer service are all assured with barista training. Having a great cup of coffee will also inspire your clients to order a second. Baristas are the face of a coffee shop or restaurant, and their job is to make customers feel at ease. Your coffee-based business cannot function without them.
Are you interested in finding out more about Barista Training? To learn more, take a look at this post:
Understanding Coffee & Your Chosen Blend
The vast majority of coffee sold today has been blended in some fashion. Mixing coffee beans from different areas and altitudes creates a variety of flavors in a single cup. To put it another way, think of a coffee blend like a recipe; you combine diverse flavors to achieve an overall balance, while producing the complexity of flavor, adhering to client demand and providing an individualized brewing method in the workplace.
Coffee Origins/ The Two Types Of Coffee
I) Robusta
Originally from central and western Africa, Robusta coffee is cultivated in Brazil and Southeast Asia, as well. It was introduced by French colonists in the late 19th century. Currently, robusta produces one-third of the world’s coffee and has just eclipsed Brazil, India, and Indonesia as the world’s largest exporter. The “crema” in instant and espresso mixes is frequently made from the stronger of the two coffee kinds, Robusta, which has two times the caffeine of Arabica.
II) Arabica
In the Arabian Peninsula and the southern highlands of Ethiopia, coffee arabica is the original species of coffee. Known as the “mountain coffee” or “coffee bush of arabia,” it is thought to be the first coffee species to be cultivated and grew in southwest arabica for more than a millennium.
Blending
It is possible to create a coffee blend by combining beans from several countries. It is possible to combine beans from eight different countries to create a complicated blend. The distinct flavor profiles of the coffee will be shaped by the amount of each individual origin in the blend. There are many various types of coffees that may be made by combining different types of beans, such as a coffee that is 50 percent Colombian and 50 percent Indonesian.
If you’re looking for coffee beans that have been grown in different micro-climates and conditions, you’ll find that single-origin beans are the best option.
The blending of coffee is an essential aspect of the process of producing a cup of coffee. A variety of factors are at play, including the ability to meet price points and quantity requirements. It is also done in order to cater to the diverse tastes and expectations of customers, as well as to suit the market’s demand for custom-made coffee services. Coffee shops may choose to make their own in-house blend, which incorporates the features of an espresso and the principles of speciality coffee with a wide range of different flavor profiles.
How To Choose Components For Coffee Blends
If you’re thinking about putting together a one-of-a-kind coffee concoction, here are some of the ingredients we recommend.
1. A Sweet Base Note
Browning coffee beans, such as those from Brazil, Mexico, and Peru.
2. Mid-Palate Satisfaction
When you take your first drink of coffee, you’ll experience this moment. To avoid any negative encounters, use coffee beans from Costa Rica, Colombia, and Guatemala, which have notes of green apple and peach.
3. High Notes
Create a flowery and citrus coffee with a mild acidity. Coffee beans from Kenya or Ethiopia can be used to make this.
Roasting
The longer the coffee beans have been in the roaster, the darker they become. The color of the bean is typically a factor in this procedure. Roasts range from light to dark, with light roasts being a pale shade of brown, medium roasts being dark brown in color and heavy roasts being black in color. In addition to a black Italian roast and a black and greasy French roast, there are a number of additional sorts of roasts.
A. Light Roast
Once they’re out of the roaster, the beans’ color changes. Beans that are lightly roasted create minimal amounts of bitterness and sweetness in flavor. They are likely to taste like fruits, teas, and chocolate, and when powdered and used, they are incredibly aromatic. Their finely nuanced flavors may be found in many arabica coffees, which is why they are so popular.
B. Medium Roast
Espresso with a medium roast resembles a darker shade of brown and has flavors reminiscent of roasted almonds, vanilla and butter, among others. With milk or when brewed for focus on well-rounded flavors, this is a great choice. One of the most popular roasts in the coffee business because of its balance of flavors and reduction of intense acidity when ground.
C. Dark Roast
Dark bitter chocolate, liquorice, and spicy notes of black better or clove are often created using a dark roasted coffee bean. If you’re looking for a flavorful cup of coffee, dark roasts are the way to go. If roasted over a long period of time, they become smoky.
Packaging And Distribution
The transportation of coffee is a major aspect of the supply chain, spanning from local cafés to the world’s largest retail chains. Fair and honest interactions are essential for a supply chain that is both dependable and low-cost.
The packaging and distribution of coffee is extremely stringent. The foil packing of premium coffee beans is designed to prevent oxidation, which can lead to staleness. To remove any oxygen before sealing, crushed or whole beans are bagged. When
For a successful manufacturing operation, freshness of the ground or whole bean coffee is critical. Bulk and single-serve coffee are the two most common purchase options. Cans or foil type bags containing various weights of bulk coffee are the most common packaging alternatives. One cup of coffee is made from ground coffee that has been encapsulated in little filter paper, such as in coffee pods.
Understanding Your Coffee Grinder
The oils in roasted coffee beans are what give coffee its flavor, and grinding them helps to ensure that the oils are released evenly. It is possible to fine-tune your grinds by using a coffee grinder, which creates small amounts of even-sized pieces of coffee.
What Is Espresso
In Italy, espresso is a fast-brewed coffee drink created by combining extremely hot water and steam with pre-ground coffee. All coffee connoisseurs are invited to sample the rich flavor of espresso, which has evolved over time.
The Grinder
In an espresso bar, the grinder is the most crucial piece of equipment. There must be adequate flow resistance, little heating of the grounds during grinding and minimal generation of fines or insoluble protein molecules that can clog the bottom of a filter basket with compact layers.
A stepless grinder has no adjustment steps, while a stepped adjustment grinder does have some steps. Adjustment can be locked into position with the use of stepped grinders. In order to fine-tune your grind, you will spin either the bean hopper or an adjustment knob. An audible “click” will signal that your selection has been successfully made. You’ll be able to fine-tune your grind to your heart’s content with a stepless adjustment grinder.
Espresso extraction requires the use of an espresso grinder and grinding to order. As a result of their longer cutting edges and lower rotation speeds, conical burr grinders are preferred because they can extract more flavor from the coffee. The fineness or coarseness of your grind will be affected by a variety of elements, including the relative humidity of the air and the grinder’s rotational direction. Making small modifications to your grind until you are sure that you have it just perfect is great practice.
The disk under the hopper must be adjusted and rotated clockwise in order to increase the coarseness of your coffee. Turning it counterclockwise will reduce its coarseness. When making the adjustment, make sure the motor is running and that there is no coffee in the path of the grinding blades. If your espresso machine is producing coffee that is too coarse, it is operating too quickly. The coffee is too fine if it is coming out too slowly. Grind a tiny bit of coffee to get the ideal fineness and coarseness for your brew.
The Hopper
The hopper is a plastic chamber in the form of a funnel. The coffee beans to be ground are stored in the hopper. A few pounds of coffee beans can be stored in the commercial coffee grinders seen in espresso shops. Coffee grinder hopper must be removed to clean grinder, grinding discs, and spout. This can be done with a screwdriver.
So that the beans fall into the grinding mechanism, a hopper’s base is attached to a collar. A gate at the bottom of the hopper will prevent beans from escaping. Before removing the hopper from the grinder, it is critical to close the gate, which you may accomplish while adjusting the collar. To avoid spilling beans, close the gate when you remove the hopper. To clean the hopper after closure each day, remove the hopper and store the unused beans in an airtight container. Allow the coffee grinder’s hopper to air dry for at least one night.
The Grinding Plates
Some burr grinders have “burrs” that are flat, while others have “burrs” that are conical. While grinding, one plate remains stationary and the other revolves around. To avoid clogging and give you more control over how coarse or fine your coffee is ground, these plates assist crush the beans into consistent size particles.
The quality of the espresso extraction can be greatly improved by adjusting the grind. Competitors are given 15 minutes to tweak their grinders and calibrate their espresso shots in professional barista contests.
A portafilter or a ground coffee container is what you’ll use with a non-dosing grinder to grind your beans into. With six similarly shaped parts to gather ground coffee from, dosing grinders are designed to accomplish the same. There is a funnel from which the ground coffee escapes the burrs and drops into these rotating parts. A handle is used to change the direction of rotation.
Dosing Ground Coffee
In order to produce one espresso, you need between 18 and 21 grams of dry ground coffee, which is known as a “dose.” It’s imperative that you fill your basket with the correct amount of coffee. Each time you click the lever, be sure you’re putting in the full dosage in your basket. Using 18g of coffee grounds and 25-30 seconds, you may prepare a 2 oz double espresso that will be ready in 25-30 seconds.
As long as you remain consistent, you can be flexible with your coffee dosing. To be sure you have the correct amount of coffee, weigh your beans both before and after they are ground. To enhance the flavor of milk-based beverages, you can increase the amount of coffee you use. A lower dose can be used for non-milk-based beverages because you won’t be competing with milk for flavor supremacy.
If your dosage comes in contact with the portafilter’s shower screen, your coffee will be over-extracted and have an excessive amount of space between the grinds. By adjusting the dosage, you can alter the flow rate, extraction temperature, and extraction yield.. Keeping things the same will make it much easier to modify variables.
View Grinders Range
Commercial grinders are critical to the coffee manufacturing process, and Liquidline understands that a great grinder is needed to bring out the full flavor and aroma of the coffee bean.
Understanding Your Espresso Machine
Even under heavy use, a good espresso machine should maintain constant temperatures and pressures for each shot. Espresso is made by squeezing hot water through finely ground coffee beans. Espresso machines come in three varieties based on the methods used to generate this pressure.
The Three Types Of Machine
1. Manual Espresso Machine
This sort of equipment necessitates the user to perform all of the steps necessary in preparing a cup of coffee. When producing cappuccinos and lattes, you will need to add water and coffee grinds to the machine, as well as manage the frother. There is a lot of control over the entire brewing process, including dosing, tamping, pulling the manual lever to pressurize the water, and the time between each of these actions.
2. Semi-Automatic Espresso Machine
In order to use the espresso machine in semi-automatic mode, you must first flip the switch to the on position. Turning the machine off after you’ve brewed a cup of joe is a must. You’ll still need to make sure the water reservoir is full and the grinder is stocked with enough coffee beans. It’s necessary to fill the group handle with coffee and then tamp it down before locking it into place with a semi-automatic machine. In order to begin the extraction process, place a clean espresso cup under the portafilter and activate your espresso machine’s switch on the front panel. The flow should be stopped by pressing the switch once you’ve filled up the cup.
3. Automatic Espresso Machine
This machine will produce great espresso coffee without having to participate in the process. The water system and the coffee grinder are both built into one equipment. You only have to press a button and the machine will do the rest. This internal container can be taken out at any time to remove the beans that have been ground and used during each procedure. One of the buttons on the super-automatic machine corresponds to the drink size. Espresso, doppios, ristrettos, and Americanos can all be made using the same button. Just insert the portafilter with ground coffee and press the button for the drink you desire once you have customized your machine.
Automatic Bean To Cup Coffee Machines
If you don’t want to get your hands dirty, this espresso machine will do the job for you. There is a built-in coffee grinder and a water filter included with these units. The machine will take care of everything for you if you just press a button. Beans that are ground and used during a process will be ejected and placed in an internal bin that can be taken out and the contents extracted. The super-automatic machine features a variety of buttons, one for each type of beverage. ‘ A single button can be used for espresso, a second for double espressos, a third for ristrettos, and a fourth for Americanos. It’s as simple as filling the portafilter with ground coffee and pressing the button for the beverage you like.
The Correct Working Machine
As there are several group heads on espresso machines, the extraction temperatures can be customized for each group independently of one another This is a common extraction method for specialty coffee blends that require a little more or less heat during the roasting process. The following is a step-by-step guide for making the perfect espresso shot.
- Before using the cup, warm it up and run hot water through it.
- Make sure the handle of your portafilter is clean and dry. Espresso will taste less flavorful if it is brewed with old coffee residue.
- Make sure you don’t over- or under-extract your shot by dosing your ground coffee into your portafilter and paying attention to the grind size.
- Use a little tap on a tamp mat to evenly spread the ground coffee in the portafilter handle.
- Next, take your tamper and push it down on the ground coffee with enough force to keep its shape.
- Using the tamper, sand the ground coffee to a smooth and even surface.
- The portafilter’s top, ears, and spouts should be thoroughly cleaned of any dry coffee residue.
- Remove any previous coffee grounds by rinsing the grouphead thoroughly before adding the portafilter.
- Begin brewing the espresso by inserting the handle of the portafilter into the grouphead.
- Remove the cup from the machine tray when the timer reaches 25 seconds, either automatically or manually.
The Operating Parts
1. Group Or Grouphead
When preparing to extract espresso, this is where you place the portafilter. Pressurized hot water is sprayed over a bed of freshly ground and tamped espresso via a diffusion plate.
2. Portafilter
To make coffee, you use a portafilter, which is a container for ground coffee that you place in the group.
3. Portafilter Basket
The portafilter’s filter screen, which is available in single and double sizes.
4. Group Gasket
Large rubber o-ring fitted into groove drilled into the group to seal the portafilter to it. A leaking portafilter is usually caused by this component.
5. Group Screen
Xem thêm : How To Apply Florel? Garden Guide
Every three months or so, it’s recommended that you replace the dispersion screen in your group.
6. Steam Wand
A steam pipe is a part of the milk-steaming machine. The steam valve and the steam valve knob or lever are used to activate it.
7. Steam Tip
The component of the steam wand that disperses the steam in a splayed pattern so that you can steam milk is called the spout.
8. Hot Water Tap
Dispensing hot water from the machine’s tank.
9. Group Dosing Keypad
The group head is activated by pressing one of these buttons, which can be found on many automated and super automatic espresso machines. Dispensing times and quantities are shown, as well as programming and continuous flow.
10. Group Dispense Switch
Over the top of the group, a simple on/off switch.
11. Power Switch
There is a power switch situated on the rear of most espresso machines that is marked with the digits 1-0-2.
12. Pressure Gauge
Indicating both boiler pressure and pump operating pressure, it is located on the front of the machine. This keeps tabs on the machine’s health and the temperature settings for your coffee brewing process.
13. Sight Glass
The boiler water level is usually indicated by a sight glass at the front of the machine, which is marked with maximum and minimum indications.
14. Top Of Machine
It is designed to keep ceramic cups or glasses heated before serving.
15. Drain Grate Or Trough
Drip pan and drain included. The area where water flows away.
Making & Perfecting The ‘Extraction Time’
A good cup of coffee can’t be made without first extracting the beans. A well extracted coffee balances countless variables to produce a cup of perfection. Despite the acidity, the flavor has a pleasant sweetness to it. Caffeine, acids, lipids and oils, and sugars and carbohydrates are among the water-soluble components found in coffee. Extraction time optimization is sometimes referred to by baristas as “dialing in” because it involves starting with a single recipe and tweaking the dose or grind setting in order to influence the taste.
What You Need
In order to prepare a good cup of coffee, you have to first extract the coffee grounds. A well-extracted cup of coffee is a delicate balancing act involving many variables. The acidity is well-balanced and pleasant, while the scent is sweet and inviting. Caffeine, acids, fats and carbs are among the water-soluble components found in coffee that can be dissolved in water. A common term among baristas is “dialing in,” in reference to the process of fine-tuning the extraction time by starting with a single recipe and adjusting the dose or grind setting to impact the flavor.
Preparation
This is the starting point for every barista: the amount of liquid in the cup. The higher the production, the more bitter and sour the coffee will taste. When you grind a dose, you get back around two times as much as you put in. For example, if you grind 20 grams of coffee, you’ll get 40 grams of coffee out of the process.
Brew ratio comes next. This is the ratio of ground coffee to water you’ll be brewing with. The flavor will be affected by the water. There is a fine line between using too much water and not enough water while brewing coffee. Typically for espresso, the ratio is 1:2, which is one gram of coffee for every 16 ounces of water. Pouring these ratios accurately necessitates accurate measurement of both the coffee and the brew water.
If you’d like to know how much extraction is taking place, you can use the refractometry to figure out the amount of total dissolved solids (tds). The more solids there are, the more the light’s orientation shifts. Determine your extraction percentage with tds to get an idea of how quickly the ground coffee is dissolved in water.
In the extraction process, grind size is an important consideration. Increasing the grind size necessitates greater use of the grinder’s power. Grinding the coffee finer in order to get the proper quantity of overall energy when using a lighter roast is necessary. Grind size can be measured with a coffee grinder using a simple flow rate method. You will get 2 grams of espresso each second if it takes 20 seconds to pull a 40 gram shot of espresso.
The Extraction Method
- To clean the portafilter basket, empty it into the knockbox, then wipe it down with a damp cloth.
- Fill your portafilter to 18 of an inch above the top of the basket, which is about 17–19 grams of coffee.
- The portafilter should be shaken slightly to spread the grinds evenly in the basket.
- When using a tamper, hold the handle in the palm of your hand with the tips of your thumb and index finger resting on the tamping surface’s top edge.
- Put the tamper in the basket and apply 30 pounds of pressure to the coffee. The same amount of pressure should be applied at all times.
- After tamping, clean the portafilter’s rim and wings to remove any remaining coffee grounds.
- Remove any remaining grounds or oils from the screen before re-inserting the portafilter back into the espresso machine’s group head with roughly 2oz of water.
- The portafilter should be inserted and tightened into the group with care. Pour your shot into a cup placed under the portafilter.
- Between 20 and 26 seconds, the shot should generate a dark brown stream with a thick, glossy appearance.
- The knockbox can be used to dispose of any unused espresso grounds after you have made your espresso shot.
Espresso Extraction Checklist
1. Dose
the 16 gram weight of the coffee grounds.
2. Extraction Time:
the amount of time the espresso is extracted including the pre-infusion time, i.e. 27 seconds.
3. Espresso Weight:
Espresso extraction time, including pre-infusion time, i.e. 27 seconds.
4. Grind Setting:
the grinder’s grind setting number.
5. Grinding Time:
how long the dosage will be ground for
The Rate Of Extraction
A) Extraction
This is the location where the coffee is at its most espresso-like. Beautiful brown with cream stripes, a strong aroma, and a rich, well-balanced flavor will be the hallmarks of this variety. Between 25 and 30 seconds is the perfect amount of time for the extraction process to be completed, without sacrificing flavor or quality. Coffee that has been well-extracted is delicious, smooth, and brimming with life.
B) Under-Extraction
Under-extracted coffee has a light crema, weak fragrance, flavor, and watery body, as well as an unpleasant flavor profile, all signs that it has been under-extracted. When you don’t extract enough flavor from the coffee grinds, you’ve got an under-extracted coffee. Sour, lacking in sweetness, and exceedingly salty to the taste, it turns out to be.
B) Over-Extraction
Crema with a dark black line around the edges and a probable white spot in the center will be present in the coffee. Burning flavors and scents will be present in this product. If the coffee is steeped for 40 to 50 seconds, the soluble flavors are extracted too much. Because polyphenols compounds contained in coffee are known to generate a dry sensation in your mouth, over-extraction can also lead to dryness in your coffee.
Working Practices
- Dose the basket with freshly ground coffee until the rim is level with the handle.
- In order to get the coffee to become flat, tamp it firmly and evenly.
- Clear the handle of any loose coffee grounds.
- The handle should be inserted into the hot grouphead and secured.
- Put a heated cup under the espresso machine’s spout.
- The shot extraction has begun. There should be a 3-6 second pause before the coffee is poured. After that, the first drops of crema will trickle down the spout.
- The espresso will be lighter in color as the majority of it flows out.
- A 25-second extraction time is expected. The final product should be a dark, rich crema.
- Using a hot water rinse, wash the basket.
The Art Of ‘Foaming’ & ‘Steaming’ Milk
With a decent espresso shot and steamed milk, the best coffee can be made. Your espresso machine’s high-pressure steam creates steamed milk, which is the final product. When steam is introduced into milk, it expands to generate a layer of milk bubbles known as microfoam. For espresso-based drinks, the outcome is a smooth, silky-textured coffee.
The Difference Between Foaming And Steaming
It’s no coincidence that milk and coffee go so well together, as the latter adds a layer of flavor depth to the former. When used in coffee, it brings out the inherent flowery and roasted flavors to their full potential.
To create frothed milk, heated milk is heated and shaken or mixed to create a frothy texture. Air is introduced into the milk during its rapid movement, causing it to be separated into two separate layers. There are two layers: one is milk, while the other is thick, frothy foam that sits on top of the coffee and creates a unique mouthfeel.
Pressurized steam is used to both heat the milk and enhance its texture in steamed milk. As the fluid breaks down the air bubbles that form, known as micro-foam helps create a velvety texture that combines foam and milk in one unit. For lattes, steaming milk is a common method.
Why Foam
Pressurized steam is used to both heat the milk and create its texture in steamed milk, which is different from the traditional method of heating milk by steaming. Micro-foam, the air bubbles that emerge when the fluid breaks down, helps create a velvety texture that mixes foam and milk in one unit as it breaks down. Lattes are generally made using milk that has been steamed.
How To Foam Milk
- Cold or refrigerated milk should be used to begin the foaming process. There is a tendency for non-fat and skimmed milk to foam extremely quickly. Full-fat milk, on the other hand, generates a delicious froth, but its fat content makes it heavier.
- The espresso machine’s steam wand can be used to heat up a tiny metal pitcher of fresh, cold milk.
- Milk should be frothed at a temperature between 140 and 155 degrees Fahrenheit.
- Adding air and stretching the milk are accomplished by placing the steam wand near the surface of the milk while foaming it.
- To make a vortex in the milk, place the steam wand on the side of the pitcher and place it just below the surface of the milk.
- To break up the bubbles, move the pitcher so that the steam wand is higher, lower, and closer to the edge. Make sure you don’t overheat the milk.
- Remove the wand from the pitcher and wipe it clean with a cloth once the milk has grown to nearly twice its initial volume.
- The milk will have a creamy, frothy texture that resembles melting ice cream. Pour some of the foamed milk into your espresso-based drink, but keep the rest in the pitcher for later use.
Why Steam
The procedure of steaming milk allows you to add as much or as little air as necessary to achieve the desired level of froth. Steaming milk yields a delicious espresso-based beverage. Steamed milk can also be used to create professional latte art.
How To Steam Milk
- About two-thirds of the way up the spout ‘v,’ place your milk jug in the sink and fill it until the milk’s surface touches the tip.
- Your espresso machine’s milk may now be stretched. To create a hissing sound, turn on the steam and place the steam wand below the surface of the milk. By allowing air into the milk, this results in the formation of micro-foam. The milk should be spun in a swirling motion for about 5 seconds while the nozzle is slightly under the surface of the milk.
- Submerge the steam wand nozzle into the milk once again and continue spinning the milk in a whirlpool motion for a few more seconds. A hissing sound should no longer be heard. A micro foaming agent is added to the milk during this process to make it shine.
- Take a damp, clean cloth and wipe down the steam wand after you’ve got the whirlpool just right, then switch off the steam.
- Once the milk is made give the jug a solid tap against a hard surface to disperse any bubbles then leave it to sit while you make your espresso shot. Before pouring swirl the milk around the jug to polish the milk so it has a shiny texture and is ready to serve.
- If there are any bubbles left in your milk, give it a good tap on a hard surface to disperse them before letting it sit while you prepare your espresso. Milk should be polished before it is poured so that it has a smooth texture and is ready to be served.
Producing Gourmet & Speciality Coffees
A barista’s job include creating various kinds of specialty coffee. These coffee and espresso recipes are extremely popular among coffee connoisseurs throughout the world. Traditional latte and cappuccino as well as macchiatos and mochas can all be made using espresso.
Espresso:
There are a plethora of espresso-based cocktails that can be made using an espresso as their foundation. Extract a double shot by placing a 70ml demitasse cup beneath the group head of your espresso machine.
- When your grinder’s doser is empty, insert the empty handle and pull until it is full.
- By gripping the handle and twisting it forcefully left-to-right, you can ensure a solid pack of coffee.
- Wipe the filter’s rim clean of any extra grinds.
- Espresso is best served in an espresso cup. Espressos should be brewed for 25 seconds and have a creamy, hazelnut-colored crema layer as a byproduct.
Cappuccino:
A medium-sized cup of steamed milk and foam is used to make a cappuccino, which is essentially an espresso shot.
- When your grinder’s doser is empty, insert the empty handle and pull until it is full.
- By gripping the handle and twisting it forcefully left-to-right, you can ensure a solid pack of coffee.
- Wipe the filter’s rim clean of any extra grinds.
- Prepare a double espresso shot in a 190ml cup and serve it immediately.
- As soon as you’ve used the steam wand to foam up your milk, carefully spoon some of the thicker milk on top into the cup, and then pour some of the hot, slightly grainy liquid underneath.
- Make sure the leftover milk froth is pushed into the cup by using a spoon. A thicker dome of foam will rise above the cup’s rim. Sprinkle with a little dusting of cinnamon or cocoa powder.
Caffe Latte:
Traditionally, an espresso shot is poured into a latte glass, which is then filled halfway with hot steamed milk.
- When your grinder’s doser is empty, insert the empty handle and pull until it is full.
- By gripping the handle and twisting it forcefully left-to-right, you can ensure a solid pack of coffee.
- Wipe the filter’s rim clean of any extra grinds.
- You can use a 200ml glass, or a 250ml cup. Pour two shots of espresso into a glass or cup and enjoy! Fill your milk jug to the very top of the spout with milk.
- The steam wand can be used to heat up your milk. Allow the thicker, slightly textured milk to run into the espresso and milk with the espresso as you pour it in.
- Pour the milk from the jug’s side to guarantee a consistent result.
Caffe Mocha:
Espresso, milk, and chocolate come together in a delectable concoction known as a mocha.
- When your grinder’s doser is empty, insert the empty handle and pull until it is full.
- By gripping the handle and twisting it forcefully left-to-right, you can ensure a solid pack of coffee.
- Wipe the filter’s rim clean of any extra grinds.
- Turn the machine on and place a carafe or shot glass under the spout. Make two shots of espresso.
- Add cocoa powder or chocolate syrup to the bottom of a mug and stir in the rest of the ingredients.
- Use the steam wand to froth the milk.
- In a mug, add the espresso and milk and mix.
- Add some of the milk froth on the top.
Ristretto:
To put it another way, this is the most concentrated form of espresso you’ll find.
- When your grinder’s doser is empty, insert the empty handle and pull until it is full.
- By gripping the handle and twisting it forcefully left-to-right, you can ensure a solid pack of coffee.
- Wipe the filter’s rim clean of any extra grinds.
- Use a 70ml demitasse cup and place under the group head. Extract one shot, restricting the pour and stopping the extraction at about ⅔ of the shot.
Flavoured Lattes:
The cup should be placed under the group’s head. Limit the pour and halt the extraction at around two-thirds of the shot.
- When your grinder’s doser is empty, insert the empty handle and pull until it is full.
- By gripping the handle and twisting it forcefully left-to-right, you can ensure a solid pack of coffee.
- Wipe the filter’s rim clean of any extra grinds.
- Put milk in a pitcher and heat up a cup of water in a separate bowl.
- In order to enhance the taste of your double espresso, add a single flavor syrup to the bottom of your cup.
- Latte art can be added to your steamed milk latte if desired.
Cleaning And Maintenance Of Your Machine
The barista’s skill and the machine’s capabilities both contribute to the taste of the coffee. Keeping your espresso machine clean and well-maintained is essential, especially in high-stress circumstances. This is a step-by-step approach to establishing a daily, weekly, and even hourly cleaning schedule that removes toxins from your home.
Essential oils in coffee beans are among the contaminants that adhere to and accumulate behind the espresso machine’s water screen. Additionally, they adhere to the brass surfaces of the portafilter spout and filter basket, resulting in buildup. It’s simple to get rid of them if you stick to a regular cleaning schedule. Your espresso machine will last longer and produce a better cup of coffee if you keep it clean.
Back Flushing
Backflushing your espresso machine should be done on a daily basis if you are running a busy coffee shop. Every 10 to 15 espresso shots, you should do a clean water backflush. Here are a few pointers for performing a successful backflush.
- Take out your brew baskets and insert the blind baskets. Insert the portafilter into the group and add 1 teaspoon of espresso machine cleaning to the blind basket (s).
- Repeat this process ten times for each group. Espresso machine cleanser will be flushed into the machine’s inner group.
- Take off the portafilters and run the group over the basket to rinse them until they are both free of espresso machine cleaner.
- 2 tablespoons of cleanser and 6 ounces of hot water from your coffee maker should go into a cleaning pitcher.
- Remove any coffee grind residue from the group head by rubbing it with a clean brush.
- Replace the espresso handle’s filter basket with a blank disk.
- Start the water flow by putting the handle in the group head.
- To clean the blank disk, turn off the water after 5 seconds and rinse it.
- When no more coffee grinds are visible, repeat the process.
Group Cleaning:
To remove any remaining coffee particles, run water through the machine with the portafilter in place and no ground coffee in it at least once a week. The portafilter should be rinsed and wiped clean after each use, and the steam wand should be purified using a damp cloth. After a flurry of drink orders, use a brush and hot water to scrub each group leader.
- Using the portafilter and the filter together, fill up the machine with water and turn it on.
- The filter basket holes can be cleaned with a small pin.
- Run a cleaning cycle of the machine with the portafilter and filter in order to thoroughly clean the filters and group.
- Remove baskets from portafilters at the end of each day and soak for at least one hour in cleaning solution. To avoid cracking and drying of the gaskets, leave portafilters in group heads overnight.
Decalcifying Your Machine
Keep an eye on the quality of the water you’re using. If your water has a lot of minerals, your steam tank may become calcified. Water flow is restricted over time by calcium and mineral deposits that build up inside the machine. This can be avoided by setting up frequent decalcification of the machine and following these basic procedures.
- Make sure your espresso machine has cooled down before you begin cleaning it.
- Clean the machine’s exterior by wiping it down with a moist cloth.
- Remove the brewhead by unscrewing the one screw and wiping it down with a moist cloth. Reattach it to the espresso machine once it has been cleaned.
- Remove your espresso machine’s water reservoir. Fill it up with warm water after you’ve emptied it totally of any liquid. Dissolve one package of decalcifying cleanser in the water by stirring vigorously.
- Turn on your machine and refill your water reservoir. A steam container should be placed directly below, however rather than using steam setting on the machine, use hot water.
- Wait for the decalcifying liquid to flow into the container after opening the steam valve. Discard the container’s contents once the process is complete.
- Before putting it back in the machine, make sure the water reservoir has been thoroughly cleaned and refilled with fresh, clean water. For complete removal of the decalcifying agent, re-use the decalcifying solution and re-run the machine with fresh water.
Steaming Wand:
Maintaining cleanliness in the shower and steam wand is essential to prevent cross-contamination.
- Every time you use the steam wand, dampen a cloth and wipe it down. If there is any remaining milk in the steam wand, return it to the drip tray, and turn the steam dial to the steam position.
- Ascertain that the steam dial is in the “standby” position before using the machine. If you’re using an automatic machine, turn it off and let it cool.
- The steam wand may need to be unblocked with a pin.
- With a spanner, you can remove the steam wand’s tip if it’s still clogged up. Before using a pin to remove the blockage, unscrew the tip and immerse it in hot water.
- Secure the steam wand’s tip by reinstalling it.
The Machine Surfaces
A coffee shop’s success depends on adhering to health and safety laws by keeping all machine surfaces clean and dry at all times. Do a thorough cleaning every day by immersing parts in warm water and cleaning solution and wiping down all machine surfaces after each use.
The Drip Tray:
Regular cleaning and emptying of the drip tray is recommended, especially when the drip tray is full. Replace your cleaning cloths every two to three hours to keep them fresh. Make certain to wash at a high temperature and with a detergent before putting them away.
- Remove the grid, compartments, and dispose of the grounds from the dry compartments into the bin..
- Use a non-abrasive washing product and warm, soapy water to clean the drip tray. Rinse and dry well before applying the final coat of paint.
- Pull remove the drip tray and clean the storage tray found behind the drip tray. Use a moist cloth to wipe down the tray.
Bean Hopper:
It’s important to maintain the cleanliness of your bean hopper on a regular basis so that it may be replaced with fresh coffee beans. The freshness of the coffee beans and the flavor of your coffee will be compromised if coffee oils accumulate over time.
- Unscrew the top of the hopper from the grinder and remove the beans.
- For overnight storage, place the remaining coffee beans in an airtight container.
- Before reinstalling the hopper on the grinder, thoroughly clean it with warm soapy water.
- Remove the upper burr and use a suction to remove coffee particles.
- If you’d like to keep your coffee fresh, you’ll need to remove it from its chamber by continuously lifting the dosing lever until all of it has been gone.
- Brush the grinding wheels and chamber internals using your grinder brush to keep them clean and dry.
- You can clean the grinder’s body with window cleaner and paper towels.
Nguồn: https://iatsabbioneta.org
Danh mục: Guide