Root rot is a typical concern for orchids. Overwatering or a fungal infection can cause root rot, but so can a lack of adequate drainage and aeration. Your orchid will need to be taken out of its potting media, where it will need to be re-rooted. If the rotting is due to a fungus, you’ll need to use a fungicide on your orchid.
To further understand orchid root rot, read on. Orchids can be saved by taking preventative measures against root rot. In addition, I’ll provide you with some advice on how to properly care for your orchids.
Bạn đang xem: What Is Orchid Root Rot? How To Fix Orchid Root Rot?
What Is Orchid Root Rot?
A plant’s roots rot and deteriorate due to a disease known as root rot. You can learn more about plant root rot by clicking on this link.

It’s more typical to see root rot in potted and indoor plants, such as orchids. An alternative to the common white coloration of rotted roots is a black or dark hue. Root rot is characterized by soft, mushy roots that are unable to absorb water.
Orchid root rot can only be detected when the plant is housed in a crystal-clear plastic container. This is due to the fact that the orchid roots are buried beneath the potting medium. Root rot often goes unnoticed until it has progressed to the point where it is a serious problem.
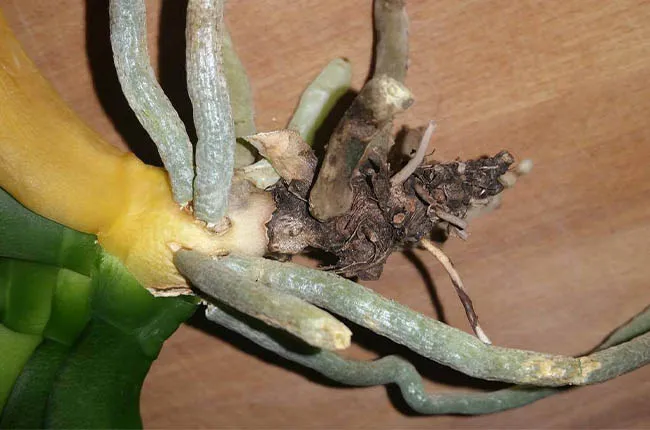
Signs of Root Rot in Orchids
orchid root rot symptoms include:
- The flower buds fall from the spike for no apparent cause.
- Instead of being robust and firm, leaves are floppy, soft, or limp.
- The plant has stopped flowering.
- Roots that have been exposed appear shriveled and brittle rather than white or green and firm.
- Roots are not white or green, but rather black or dark brown.
- It’s not a good idea to press the roots too hard because they will turn to mush.
Your orchid’s health can be saved if root rot is prevented or stopped. If left untreated, it might be fatal to your orchid. If you ignore these symptoms and don’t address the root rot, your plant will die.
Causes of Root Rot
In orchids, root rot is most commonly caused by prolonged exposure to water in the potting medium. If you don’t utilize an orchid pot with sufficient drainage, this can happen. If you have a tendency to overwater your orchid, this could also happen. The roots can decay if the potting medium is not allowed to air dry between waterings.
One more way that the roots of orchids might get rotted out is if their potting medium is packed too tightly around them. The roots can’t obtain enough oxygen if there isn’t enough room between the potting medium and the plants. The root system gets suffocated as a result.
As a result, water drains more slowly when the potting material is packed densely into the pot. Your roots are exposed to water for long periods of time because of this.
The fragile velamen coating of the orchid root is damaged by prolonged exposure to moisture and damp conditions. So, the root is unable to take in any water or nutrients. The root eventually withers away.
Root rot can be caused by a variety of diseases, including mold, spores, and fungi, in addition to excessive watering. In order to spread, many pathogens require a moist, humid environment. You’ll notice root rot on your orchid as soon as the fungus spreads and becomes established on the plant.
Xem thêm : How To Get Blue Roses? Comprehensive Guide
Damage to the orchid’s stem might allow fungus to infiltrate the plant. In the event of crown rot, this occurs. The fungus will eventually find its way down to the plant’s roots, resulting in the plant’s demise. Fungi can even penetrate the orchid through its roots in some cases.

How to Treat Orchid Root Rot
Checking the roots of an orchid for root rot will require you to remove it from its pot. Remove the orchid from its container with care. Remove any adhering or stuck-on growing medium from the roots.
Your orchid’s roots will next need to be carefully rinsed and cleaned with lukewarm water. Mushy tissue can be found in the roots of the plant. Using a pair of disinfected gardening shears or scissors, remove the dead roots one at a time.
Sterilize your scissors after each use to prevent the spread of infections. Any time you’re dealing with an infection caused by mold or germs, it’s critical that you do this as soon as possible.
In order to generate a 10% bleach sterilizing solution, you simply combine one part bleach with nine parts water. Spray this disinfectant mixture into a bottle. Every time you make a cut, lubricate your cutting tool. Make sure the equipment is completely dry before using it on your orchids.
You can now repot your orchid after removing the diseased roots. Potting medium and a new pot should be used. Do not use the same pot for another orchid until it has been fully cleaned. Spend at least an hour soaking it in your sterilizing solution. Before you place your orchid in it, let it air dry.
Treating Fungus
Precautionary measures include spraying your cut roots with a fungicide like Physan. This is a crucial step in preventing fungus from spreading to the healthy roots of the plant. In this article, I go into greater depth on how to treat your orchid plant’s fungal and mold infestations.
You may make your own fungicide by following some simple instructions. A natural fungicide called cinnamon can be applied to the cut ends of the roots. Ground cinnamon powder is typically found in the baking and spice aisles of your local supermarket. To avoid damaging the velamen, avoid getting pulverized cinnamon powder on the remainder of the orchid roots.
A commercial orchid fungicide can also be sprayed on the remaining roots. Purchase this from your neighborhood garden center.
How To Prevent Root Rot in Orchids
Using a free-draining orchid planter can help you stay on top of potential problems like root rot. There are specific containers used by orchid growers, each of which has a slit carved into the side of it. Air and water can flow through these perforations. Make sure to only water your orchid if the potting soil has completely dried out. The pot should never be left in water for long periods of time.
Your orchid’s environment is equally important. Orchids do best when kept in an open, airy space. By opening a window or putting on a fan in the room, you can ensure excellent air circulation.
Orchids can be placed outside in the sun if the weather is warm enough. Keep your plants in a well-ventilated spot in the garden. Take care to keep them out of direct sunlight and away from any animals.
Xem thêm : How To Transplant Bleeding Hearts? Helpful Information
The use of varying-sized potting material components should be avoided as well. The gaps between the larger particles will be filled by the smaller components. This lowers the volume and volume of air voids in the pot and between the plant’s roots. It’s important to loosely fill the pot with orchid potting medium and then cover the roots during repotting. Drainage and circulation must be allowed to occur freely.
Repotting your orchids on a regular basis is a wonderful preventive step as well. This occurs only once every one to two years for most orchid producers. Every two to three years, you can repot your terrestrial orchids.
Roots may be inspected more clearly when plants are replanted. With this product, you may also replace the potting material.
Components of organic potting media develop and decay over time. The disintegrating potting media creates a dense environment that resembles potting soil as this occurs. It’s a good idea to repot your plant to receive a new batch of potting soil for it.
How To Save Orchids With No Roots
In the case of severely rotted orchids, it is still possible to salvage the plants. The plant’s chances of establishing new roots are good as long as there are still some leaves on it.
It’s much nicer if the orchid still has aerial roots. When repotting, take care not to harm or remove any of these roots. During the time that the orchid is trying to establish new roots, these aerial roots will be critical to its survival.
You may save your orchid even if it has no roots by reading this post. Repotting an orchid to encourage root growth is something you can learn how to do. Check it out if you want to know how long it will take your orchid to regrow roots.
Is it possible that the keiki is an orchid that does not yet have any roots? If you offer your keikis the correct conditions, they will be able to grow roots.
Orchid keikis can even benefit from root-growth hormones. Ideally, you should leave your orchid keiki on the mother orchid for as long as you can. Do not remove the keiki until it has established roots and leaves that are at least two inches long.
Should Orchid Roots Be Exposed?
Orchids grow with their roots exposed in their natural habitat. For support and to absorb water and nutrients, roots of plants are essential. Exposed roots don’t pose a concern because of this. Indeed, certain orchid varieties benefit from having their roots exposed in the potting material in order to grow more quickly.
In addition to the roots put in the growth media, most epiphyte orchids also develop aerial roots. These exposed aerial roots help the plant to better collect moisture from the surrounding air and the soil beneath it.
Final Thoughts
It is fairly uncommon for orchids to suffer from root rot, however this does not necessarily spell the death for your beloved plant. To prevent the spread of disease, just remove the diseased roots. As a preventative step, apply fungicide to the surviving roots. Afterwards, repot your orchid into a new container with fresh potting soil.
Don’t give up even if your orchid’s roots are rotting. As long as your plant is growing in the proper conditions, it has a good possibility of developing new roots.
Nguồn: https://iatsabbioneta.org
Danh mục: Garden


