As the most common orchid variety marketed in North America, the Phalaenopsis is one of the most low-maintenance orchids on the market.
This does not mean that they are the simplest to maintain.
Bạn đang xem: How To Save A Dead Orchid? Step-By-Step Guide
If you’ve found your way here, you’re probably wondering how to save your dying orchid. If it hasn’t fully died, there are a few simple actions you can take to bring it back to life.
It’ll only take some time and patience to get there..
If you buy something after clicking on one of the links in this post, I may receive a small commission.
Your orchid can be revived even if it has rotten stems, roots, or both.
Removing the plant from the pot or media and cutting out decaying roots is usually all that is necessary to rescue most orchids (sometimes even most of the stem).
Then, if there are signs of fungus, use hydrogen peroxide and repot in a good orchid pot with new orchid bark (media) and some sphagnum moss.
To revive a dead orchid, follow these simple instructions.
Step 1: Observe the Orchid and Diagnose the Problem
To get to the bottom of what’s wrong with your orchid, take a good look at it. Your orchid’s state of dormancy or death must be discernible to you.
It’s possible that your orchid is in its resting period if you’re a first-time parent.
This does not mean, for example, that you should throw out your orchid because its flowers are dying.
It is inevitable that the flowers on any orchid will ultimately fall off and the stem where they flowered will become brown.
Your orchid is not dead if it has brown flower spike stalks. A dormant period of six months to a year is subsequently followed by rebloom in the correct conditions.
There are certain things you can do when the blooms fall off to get it to rebloom if it seems generally healthy aside from the fact that it has done flowering.
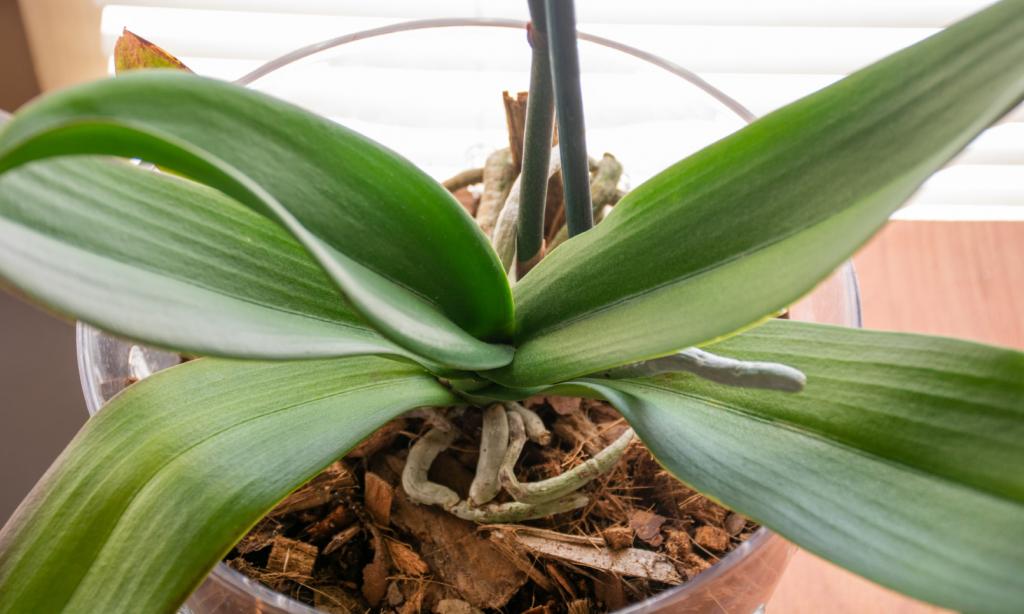
You can tell if an orchid is healthy by the color of its leaves.
Early signs of stress can be seen by the dark green color of the plant’s leaves, which suggests that it needs more light.
There are instances when the bottom leaves of orchids fall off on their own accord. If a leaf at the base is yellowing and thinning, but new growth is appearing at the top, your orchid is still healthy. In order to shift energy into new growth, it’s basically removing old leaves from the plant.
Overwatering or allowing your orchid to sit in water for an extended period of time is the most common cause of a dying orchid. There are many ways this can occur, including root, stem, and crown decay.
Fungus gnats are also a result of decomposing plant waste.
There are many telltale signs of dying orchids, including weak leaves that appear dry and mushy roots that range from yellow to brown to black and crispy.
Root rot is the most prevalent cause of an orchid’s demise, and it can be brought on by either too much water or the use of an improper potting mix that prevents drainage.
Crown rot or stem rot is a symptom that your orchid may not be able to live if all of its leaves fall off or turn yellow.
The aerial roots, on the other hand, may still be salvageable.
Plants with “aerial roots” are those that have roots that extend above the soil.
Because these roots are more resistant to decay than others on the plant, you’re in good shape for reviving the orchid.
If your plant has no or very few roots, it will not be able to absorb the water and nutrients it requires.
Your orchid’s upper stem (the lower middle leaves) may begin to become brown and black if it has crown rot, a disease that can kill an orchid in its last stages.
Water trapped between leaves causes stem rot, which is also extremely similar.
That means you’ll have to get rid of everything else that’s rotting from the plant if it looks worse than merely finished flowering.
Have a problem with your Pearl String? >> Make sure you know why it’s dying and what you can do about it!
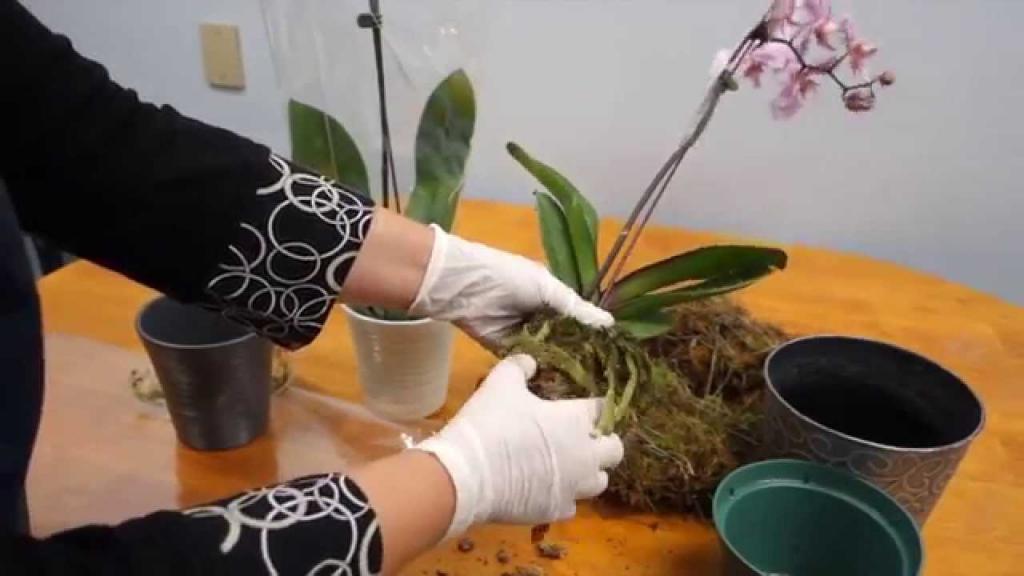
Step 2: Remove the Orchid and Discard Old Media
Remove the orchid from its pot by gently removing it. Remember that they prefer to be root bound, so it may feel confined.
Squeeze the plastic pot’s bottom gently to aid in removal.
It’s time to remove all of the potting media that is attached to the roots — this includes all of the moss, bark, chips, mulch, and dirt.
It is imperative that you exercise caution when doing this step, as the roots have a tendency to entangle themselves in the media mixture.
After that, lightly rinse the roots under running water to remove any remaining material.
You’ll be able to tell which of the roots you need to remove by looking at the exposed ones.
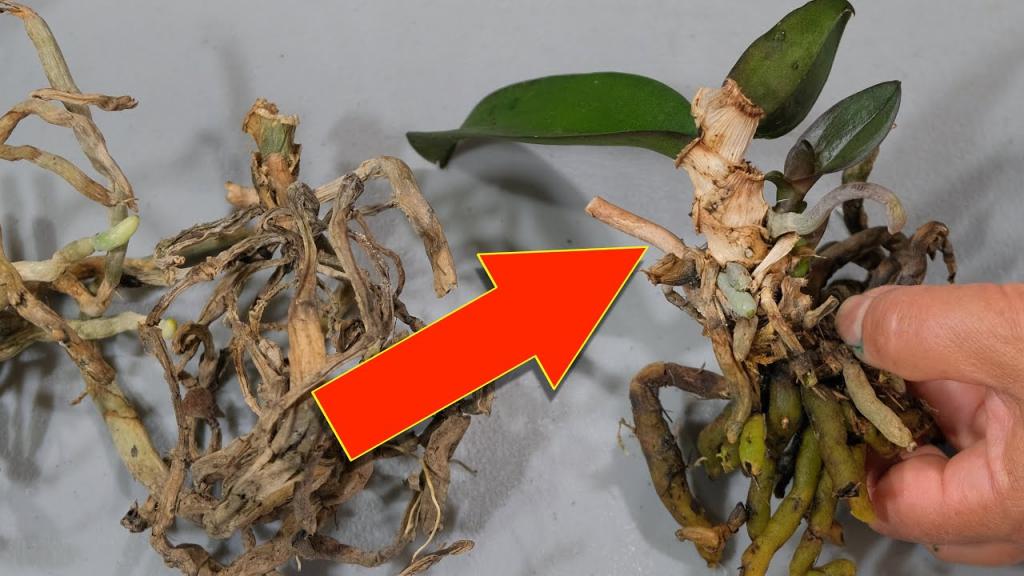
Step 3: Cut off the Dead Roots
Sterilize a razor blade or a pair of sharp shears with rubbing alcohol at this point.
As much as you’re able, begin chopping off the ends of any dead or dying roots.
Remove any and all yellow, brown, and black roots, as well as any stringy ends. Soft and squishy yellow roots are expected.
Cut out any roots that are crunchy, crispy, or hollow. To indicate new growth, any roots or tips that are green should be left alone.
You may have to remove the entire stem, depending on the condition of your orchid.
If the stem of your orchid has rotted away or the roots of your orchid are entirely ruined, you can cut the stem off.
It’s a good idea to cut the stem immediately below the leaves or where it appears that new roots are beginning their growth.
It’s imperative that you remove any and all discolored and mushy stem sections if stem rot is present.
Make sure to pick away any dried leaves at the base of the stem as well as remove any old bloom spikes.
Using 3 percent strength hydrogen peroxide to sanitize an orchid that has been sitting in its pot and soil for long time is an additional option.
Pests and fungus will be killed by this method.
Hydrogen peroxide can also be used to kill off any lingering rot on the orchid’s crown and allow it to regenerate.
Step 4: Repot Your Orchid
Keep an eye on the roots by using a clear pot..
Drainage holes on the bottom and ventilation holes or slots on the side should be present.
Potting mix should fill the pot two-thirds or more of the way up. For the finest results, combine bark chips with moss.
If you’re looking for the greatest orchid mix on Amazon, go no further than RePotme.
LECA – lightweight expanded clay aggregate – is ideal for orchids because it allows them to bounce back quickly. Find out more here.
On top of that, place the orchid.
The roots can be stabilized by covering them up with a few extra pieces of bark or mulch, but don’t go too deep.
Make sure the roots are pushed up against the sides of the pot. They prefer to be cuffed, and this makes it easier to keep an eye on them.
Using a stick and a plastic tie, you can maintain the orchid upright if you had to cut its stem and there isn’t much left to work with.
As an alternative, you could even use a plastic twist tie (like those found in the grocery store) in place of a real root.
Make sure you don’t get rid of any of the stem by covering or burying it in the bark.
Then, cover the bark chips with about an inch of sphagnum moss.
To keep the orchid’s roots healthy, this moss provides a bit extra humidity to the environment.
The use of moss is essential to reviving a dying orchid and should not be overlooked, especially if it has fallen prey to root rot.
Keep the moss away from the orchid’s stem to prevent further moisture damage while it heals.
Quickly water the pot, but don’t overdo it.
Just enough water to wet the ground without causing it to rot.
If your residence is dry or humid, you may need to water the moss every day to keep it from drying out.
The final step is to use root booster to lessen the shock of being transplanted.
Step 5: Let the Orchid Come Back to Life
Put your orchid in a bright, but shady, area.
The best view is from an east-facing window, but a north-facing one can do.
In order to prevent your orchid from overheating, avoid placing it in front of a south or west-facing window.
A healthy Phalaenopsis will not be able to survive in this environment.
If your orchid shows symptoms of recuperation or degradation, you’ll have to wait and see.
You should be able to restore it to its original state as long as you’ve followed all of the instructions above.
It will take some time for Phal to regain its former vigor. There is a good chance that you may have to wait months, if not a full year or more.
But in the end, it will be worth it!
You may now proceed with fertilization as usual.
The Miracle-Gro plant food, which comes in a mist container, is one of my favorite products.
In between waterings, I simply sprinkle the stem, roots, and leaves.
The spray bottle is convenient and helps me prevent over-watering my garden. In addition, orchids are a fan of high humidity.
Your orchid’s chances of reblooming are good if you give it some time and some luck.
To save that orchid, have a look at my handy guide to the 13 indoor plant tools I never leave home without.
Is my orchid dead or dormant?
When it comes to horticulture, orchids are among the most highly prized blooms. However, they have gained a reputation for being one of the most difficult blooms to grow.
After their bloom season is finished, I’ve seen that the orchid blossoms wilt and then fall off. It’s a normal aspect of their development. Even though your orchid’s blooming season is over and its leaves are withering, this doesn’t necessarily mean it’s dead.
Leaves and roots typically grow throughout the dormant period. With correct care and timing, your orchid will blossom again. After the blossoms have faded, I make careful to trim the spike. So the orchid may use all its energy for leaves and roots, you must cut it half an inch from the base.
How do you know if your orchid is dying?
It’s now up to you to figure out whether or not you can save your orchid. If you want to be certain:
If your orchid only has leaves and no roots, I believe it is possible to bring it back to life, but be patient, as it may take some time. Rooting hormones can be helpful in some cases.. In the long run, though, your ability to wait things out and see what happens will be rewarded more than anything else.
An orchid without leaves, on the other hand, is likely to be dead because it is unable to produce food to sustain its own life. Overwatering causes root rot, which is the most prevalent cause of an orchid’s untimely death. The plant will die if its roots are destroyed since it will be unable to retain water.
The orchid’s crown rot is also a factor in its demise. Because of this, you should not allow water to accumulate in the crown. It is possible for the crown to become rotted, resulting in the demise of the orchid’s leaves.
The place at which the leaves attach to the stem is known as the crown. Use a paper towel to carefully wipe away any excess water from the crown during watering.
Can you bring an Orchid Plant back to life?
Don’t freak out if your orchid’s stunning blossoms start to fade or if it otherwise appears to be in trouble. Even if your orchid appears to be in dormancy or has stopped blooming, this does not indicate it has died. For the time being, all that’s required is a little attention and watering as needed to ensure that the orchid’s leaves and roots continue to grow and blossom.
Bringing your orchid indoors and watering it once a week is the best approach to revive it. Water the roots frequently enough to prevent them from drying out. Place your orchid in a room with high humidity, such as the bathroom, as this plant thrives in that environment. Alternatively, consider purchasing a humidity grid.
It is essential that you fertilize your orchid on a regular basis to keep it healthy. Once a month would be plenty to get it going. Get a slow-drip feed or liquid fertilizer for your plant to ensure that it receives a steady supply of nutrients throughout time.
Most likely, an orchid that has all of its roots rotted and no viable roots remaining can’t be restored. Overwatering your orchid is the most common cause of this problem. It is possible, however, to re-pot the plant and revive it while removing the rotting roots.
Crown rot is another cause of orchid death. Don’t let water to accumulate in the crown, which is where the plant’s leaves meet. As the water sits, the orchid’s crown can deteriorate, resulting in its demise.
Steps to save a Dying Orchid
What is the secret to reviving orchids?
Flowers that bloom in cycles are called orchids. The orchid’s dormant phase is symbolized by the dropping of its blossoms, which, as previously said, does not indicate death. Repotting and pruning can help your orchid blossom once more. To help your orchid flower, try the following suggestions:
1. Cut the Stalk
Cut the dead stalk about a half-inch above the node if it has stopped blooming. To cut and trim the stalk, make use of pruning shears or a razor. The orchid will be more likely to bloom again if you follow this procedure.
2. Repot your Orchid
Once you’ve watered your plant, remove it from its pot. Using your hands, gently loosen the roots and dust the growing media, if applicable. Next, carefully transfer it to a new pot. Choose a pot specifically for orchids. When choosing an orchid pot, make sure that it has adequate drainage holes so that the water can be drained away and the air may circulate freely. You should repot your orchid if the roots begin to grow out of the drainage holes because the pot is too small for it.
3. Throw in Fresh Growing Medium
Introduce a new growth medium to give your orchid a nutrient boost as another fantastic way to encourage reblooming. To produce your own growing media, combine the following ingredients:
- There are two pieces orchid bark to this.
- 1 pound of peat moss.
This medium must be used to cover the roots and to add an additional layer on top without covering the orchid leaves. Orchids require special potting soil that drains well and has many air spaces in order to bloom and thrive.
In addition, make sure your plant receives enough light. Don’t forget to provide ample indirect sunlight for orchids. Orchid growers employ artificial lighting and root hormones to boost their yields. But as a home grower, I recommend that you avoid appropriate orchid care and keep to regions that receive a lot of indirect sunlight.
Xem thêm : What Can You Plant in a Mini Greenhouse? Pros and cons of mini greenhouses
In addition to my phalaenopsis orchids, I keep a few other fast-growing house plants near the windowsill.
How to save an orchid without roots?
Even if your orchid’s roots have been destroyed by root rot or dehydration, you still have a chance to save it. Sterilized scissors can be used to cut down on the amount of dead weight. Use 3 percent hydrogen peroxide to kill any remaining fungus or rot. Fresh media should be used to repot.
A plastic container with a lid should be used for the next step. To see the contents, you’ll need a container with a transparent lid. You can use this to help it grow new roots and thrive in a more humid climate, since it will need it. Don’t forget to let it out every day to get some fresh air.
How to revive an orchid with tea?
With the teabag approach, you may revive your wilting orchid plant and get it back to health. Orchids, for all their beauty, are notoriously difficult to grow. As a result, I’ve provided you with this simple teabag procedure to assist you bring it back to life and bloom once more. Tannic acid is released in the orchid roots by using teabags. The orchid’s roots will be able to send out a signal that they’re ready to blossom once again thanks to this. You might be wondering what makes this approach so effective. By imitating nature, the dehydrated orchid is compelled to begin the healing process on its own accord.
Things you need:
- a teabag of black tea
- clippers
- A mixture of 70% isopropyl alcohol and 30% water
- a compact jar of some sort (for catching dirt)
- a little bowl (to hold it overnight)
Teabag Method:
- In a jar of alcohol, submerge your plant clippers.
- Take your orchid out of its pot and inspect its root system with care.
- Clippers can be used to remove the old dirt as well as the old flower spikes.
- Wash the roots quickly with a mild detergent and warm water. Consider looking at the roots for any greener sections. While snipping off the beige and dried sections, let these pieces alone.
- Making a teabag solution is the next step. Steep your teabag in distilled water for 5 minutes. Don’t overdo it with color; just a hint of shading will do.
- Pour the tea over the roots and leaves of your orchid in a small container.
- Remove it during the night after a day like this.
- To revive your orchid, repeat this procedure for the next four days.
Once you have a good understanding of the most prevalent challenges and solutions, it’s time to get to work.
Orchid Care FAQ
Is my orchid dead when the stem turns brown?
The dead flower spike is typically represented as a brown stalk. This spike will never bloom again, so it’s best to remove it to allow the leaves and roots to make use of the stored energy. This is a common occurrence when an orchid has finished blooming, but it does not necessarily imply that your orchid is gone for good. A state of dormancy is all that is required.
What is the average life of an orchid?
Unlike other plants, orchids don’t have a set lifespan. However, after around 15 to 20 years of life, this plant naturally weakens. After this, it blooms less frequently. Fungi and bacteria gradually weaken and wear down plants’ immune systems over time. Regularly repotting orchids every two years can help avoid disease and extend their lives.
What does an overwatered orchid look like?
The roots of an orchid become oxygen-starved if they are overwatered, which is harmful to their health. Too much water damages orchid roots, causing them to become mushy and brown/black in color. There are signs of decay in the roots, which implies the plant is unable to take in nutrients and water from the soil. Leaves appear to be pleated and golden in hue because of this. If an orchid is overwatered, it can be saved if it still has some viable roots.
What does orchid root rot look like?
You can tell whether your orchid is suffering from root rot by looking at its brown/black roots, which turn yellow and pleated when overwatered. To maintain your orchid healthy and avoid root rot in the future, make sure to remove any dead or rotten roots whenever you repot it. Keep the roots from decaying by watering only when the medium is completely dry.
Gerbera Daisy Flowers: Planting, & Growing Tips
Emily Taylor’s Flowers
The Gerbera is a daisy that comes in a range of colors. Gerbera daisies are popular among professionals and home gardeners alike because of their striking appearance and high visibility. It’s a lively addition to any flower garden, regardless of its size, thanks to its vibrant hues. The gerbera flower is an excellent choice if you’re looking to add a splash of color and personality to an otherwise drab part of your property.
Daisies from the Transvaal region are sometimes known as Gerber or Transvaal daisies. They’ve long been used as a symbol for innocence and purity. This flower is also associated with beauty and happiness in the minds of many people. If you have a yard full of Gerberas and other greenery, you can’t help but feel at ease. This is not surprising. You can take your mind off things by looking at this beautiful backyard sight. This flower has a beautiful quality about it.
Gerbera Daisy Facts
The Asteraceae family of plants (Daisy Family)
Genus\sGerbera
It is indigenous to South Africa, however it can also be found in Asia and South America
Various hues of yellow; orange; white; pink; and lavender.
Common names: Transvaal daisy, Gerbera Jamesonii, Barberton daisy, and a host of others
Season of blooming: Spring to Autumn
Cut flowers and as garden ornaments are the primary uses for this plant.
Facts You Didn’t Know
Traugott Gerber, a German doctor, was the inspiration for the plant’s name.
How do you care for a Gerbera plant?
Insects and other plant problems can easily attack this type of daisy.
When it’s too damp outside, the plant can develop grey mildew. If you reside in an area with a lot of humidity, the leaves of the Gerbera will be covered in a horrible grey mildew that is difficult to remove. After this, the plant will be infected from the stems and roots, resulting in the plant’s eventual demise.
If you notice dark stains on the petals of your flowers, you may have an infection. When watering the plant, do not soak the blossoms. Direct your hydration to the base of the stem, where it is most needed.
Gerberas can also be threatened by Aphids. Plant lice are another name for these pests. Aphids can eat the plant’s nutrients until they are stunted or die, depending on the severity of the infestation. Fortunately, even the mildest pesticides are ineffective against these pests. Herbicides that are all-natural or all-organic are the best approach to get rid of aphids without harming your garden or spreading harmful chemicals.
Ideal temperature range for Gerberas
Temperatures between 70 and 75 degrees Fahrenheit are ideal for this plant. It can withstand temperatures as low as 30 degrees Fahrenheit, making it a tough plant. Frost, on the other hand, can damage it. It can be ruined very fast once it arises. When you live in a climate zone with temperatures ranging from 40 to 70 degrees Fahrenheit, it’s wise to have Gerberas around.
If you wish to grow gerberas, you should wait until the season’s last frost has passed before you do so.
Water requirements
If you just water the Gerbera daisies once a week, be sure to do it thoroughly. Since their roots tend to grow deep, it is recommended that you water them to a depth of eight inches. Pooling water isn’t a problem. There shouldn’t be a problem as long as water is being directed to the roots. In order to prevent root rot, avoid very wet potting mixtures when you’re doing your planting in pots.
When the temperature rises to 85 degrees or higher in the summer, you should water your lawn and garden twice weekly instead of once. If you don’t, your plants will become dehydrated.
A simple finger test can tell you if your soil is sufficiently moist. If your soil feels moist and cold to the touch when you push your finger into it, you have enough moisture in your soil. Your finger should be slightly damp, but if it’s not at all, your soil has to be hydrated.
To check if you’ve overwatered your soil, you can perform the “finger test.” on the other hand. If you stick your finger in the soil and find muck or a substantial amount of soil attached to it, your soil is either overly wet or poorly drained.
Sunlight requirements
Gerberas are sun lovers and will thrive even in the late afternoon sun. For at least two to three hours a day, keep them out of direct sunlight. Place, on the other hand, further away from any surfaces that could reflect heat back to the plant.
Ideally, Gerberas should be placed near a window indoors.
How do you grow Gerbera daisies?
Buy from Garden Center
This is by far the most straightforward and ideal solution. Planting the seed or purchasing a plant from a florist are two options you have. The best Gerbera plants, on the other hand, may usually be found in garden centers.
Look for a plant with deep green foliage and white roots that is in excellent health. Taking a close look at the undersides of the leaves can help you avoid plants that have been affected by bugs.
Planting the seed
Plant them as soon as spring arrives. Ideally, you should begin your seeds indoors and then move them to your garden once the weather is warmer.
Seeds of the Gerbera daisy should be sown in a seed tray with moistened potting mix, drilled with a quarter-inch hole all over the tray, and covered with soil. Cover the tray with plastic wrap and re-apply the mist. After that, place it in a location where it will receive direct sunshine for eight hours every day.
To avoid over-drying your plant, place it in an indirect sunlight location. Your Gerbera seeds will begin to sprout in around two to three weeks.
Transplanting outdoors
Plant both sets in a sunny spot with afternoon shadow, then amend the soil where you plan to move them with compost. The root ball of the Gerberas should fit in a hole twelve to eighteen inches apart. Place the seedlings and bury the roots completely in the dirt. Pack it in, soak it well, and try not to get the leaves wet.
Gerbera watering is all about getting the water as close to the roots as possible. This means that only the stem should be hydrated.
Scorpion Grasses (Forget-Me-Not)
Emily Taylor’s Flowers
The Forget-Me-Not, or Scorpion grass, is a flexible plant that can be used in a variety of ways. Once a seed has been planted, it will remain dormant for up to 30 years. When is the best time to see them in full bloom? It’s impossible to say for sure. Because of this, they are known as forget-me-nots. There are some that can take as long as 30 years to appear.
In the end, there is no way to tell, and it appears that the plant will only germinate when it determines that the soil is suitable for germination. As a result, if you’re planning to plant forget-me-nots, you should be certain of your soil’s quality before doing so.
Fleas and even the plant itself can pollinate forget-me-not flowers. As a result of its hardiness, you may assume that your patch has died, but you’d be startled to find that it returns years or even seasons later, roaring to life.
Why is Forget-Me-Not flower so popular?
The scorpion grasses or forget-me-nots may quickly fill in any bare patches in your garden, making it much easier to maintain a lush landscape. There’s a chance your sun protection isn’t very good there. Possibly it isn’t getting enough sunlight. There is no good reason to leave a “bald” place in your landscape, no matter what. When planted in ‘problem’ areas of your garden, “filler” plants like forget-me-not come back roaring in the spring.
If your soil is rich enough, you’ll get an annual “flush” of forget-me-nots as a reward.
What’s Special about forget-me-not flowers?
There are white and pink versions of this shrub as well as ones with delicate blue blossoms. Please be aware that the last two shades are uncommon. Spring is the best time to see forget-me-nots in bloom, when they form dense mats.
What do forget-me-not flowers look like?
Their diameter ranges from three to four millimeters. Stamens and petals can be counted in fives. A calyx tube connects these filaments. At the bottom, there are hairs as well. There is a thin bell-shaped lobe on the united calyx structure. The tube throats of the blooms contain protrusions. Aside from their shape, they are also melded together.
Are Forget Me Nots poisonous? Can you eat?
Non-poisonous Myosotis sylvatica is a species of Myosotis. You can eat the blooms as a snack or use them as a garnish in baked goods, salads, and other dishes.
Keep the Cynoglossum amabile away from your mouth! (also known as Chinese forget-me-nots).
Poisonous to canines, forget-me-nots The Myosotis sylvatica forget-me-nots, as previously stated, are not harmful. So it’s OK to eat these plants with your pets and children.
What is the ideal habitat for forget-me-nots?
Although this plant is more commonly found in the Northern Hemisphere, it can also be found in the South Pacific. Some of their favorite places include deserted gardens and abandoned farmland, as well as exposed rock outcroppings.
How big do Forget Me Nots get?
Where can you find a typical Forget Me Not flower? 20 to 45 centimeters (1 12 feet) tall are the typical height of these flowering plants. Smaller than a foot in length They can, however, grow to a length of two feet in some situations.
Scorpion grasses are regarded as invasive plants because of their aggressive nature. It’s quite impossible to get rid of them after they’ve established themselves in your yard. They are hardy and can be found growing in the wild, much like wild roses themselves.
How do you plant forget-me-nots?
Moisten peat-free seed compost and plant the seeds. This is critical since forget-me-nots are quite finicky when it comes to reproduction and health. In terms of soil quality, it can be fickle, therefore you should proceed with caution while attempting to cultivate this plant there.
Seed compost that is peat-free and well-drained is the best. You can either add more compost on top of the seeds or place them in a shady area. Try to do this in late spring or early summer. At twenty degrees Celsius, germination can take anything from a few days to a few weeks.
Plant the strongest of your seedlings in your garden after they have sprouted. The key is to move them apart by a reasonable amount of space. Keep them at a distance of around 25 centimeters apart as a general rule of thumb.
After winter is done, you can plant the seeds directly into your garden soil. Remove weeds by raking the area and sowing in straight lines. You’ll want to use mulch as often as possible to keep weeds at bay and give your forget-me-nots a fighting chance. Despite the fact that you seeded in a straight line, the lines will disappear as soon as the plants emerge and begin to blossom profusely.
There is good news for those who don’t like forget-me-nots: once they get going, there is no getting rid of them, no matter how difficult it may be. There is a good chance that they will keep coming back if you have placed them in the proper place You will have to cut them frequently due to their abundance.
How long does it take for Forget-Me-Nots to bloom?
For the plant to germinate and grow, it takes around a year. About every two to three months, from April to June, the Scorpion grass or forget-me-nots blooms.
Can Forget Me Nots be grown in pots?
Potted foregt-me-nots are an option. They do well in the shade, but they need a lot of sunlight and a lot of air movement to thrive.
However, they, too, are invasive, much like mint. As a result, it’s possible that you’ll want to utilize a container that can hold their growth.
Plants That Keep Spiders Away
Emily Taylor’s Garden
We’d all prefer not to have spiders in the vicinity. Isn’t this the case for the vast majority of people? Despite the fact that spiders play an essential role in the ecology, many people have a strong desire to eradicate them anytime they are seen scuttling about. In a fortunate turn of events, a few plants have been shown to be efficient in repelling spiders and other insects. Avoid the use of poisonous chemicals by planting spider-repellent plants instead.
Why We Should prefer Growing Repellent Plants?
You no longer have to worry about how to get rid of spiders thanks to the repelling plants. Growing plants that are repulsive isn’t a new idea. People have been using these natural cures to keep mosquitoes, bugs, and other insects at bay for a long time now.
As a bonus, cultivating repellant plants can also improve the aesthetics of your home’s interior and exterior.
8 Types of Plants That Keep Spiders Away
You may keep spiders at bay by growing any of the following plants, both indoors and out.
Indoor Plants That Repel Spiders
1. Peppermint (Mentha piperita)
The mint family includes peppermint, a fragrant herb. Peppermint’s strong scent is a great deterrent for spiders. Peppermint is a pet peeve of this eerie tiny critter. Peppermint plant is a must-have for arachnophobes in the garden.
Homemade spider repellent sprays may use peppermint oil as an ingredient. Mint is a low-maintenance plant that can be grown in almost any environment. A cool, wet climate with partial shade is ideal for peppermint, but it may also be grown in full sun.
Growing and spreading like crazy is something to marvel at when learning about mint plants. In order to protect your containers or pots from getting too big, you need keep your plants trimmed on a regular basis.
2. Basil (Ocimum basilicum)
In contemporary kitchens, basil is commonly utilized as a flavoring element. Your dish will taste better because to basil’s flavor and nutritional benefits. Weirdly, practically all types of basil produce essential oils that are effective at keeping spiders and other insects away.
Basil plants can be placed near your doors and windows to deter spiders from making their way inside. If you’re wanting to keep spiders away from your home, this is a good option. There are a few things that basil plants need to thrive: regular hydration and a slightly acidic or neutral soil.
3. Lemon Balm (Melissa officinalis)
Fruit flies and spiders are both well-known to be deterred by lemon balm from the mint family, which is recognized for its pungent scent. A common herb tea ingredient, lemon balm is often used in the kitchen to create delectable foods and beverages.
Although it thrives best in direct sunlight, the Lemon Balm plant can also be grown in partial shade. Inexperienced gardeners who don’t have a lot of time or sunlight exposure at home can benefit from this plant. Soil drainage and frequent watering are a must for these plants.
It can also be utilized to beautify your home, as lemon balm is a fast-growing plant with brightly colored leaves.
Outdoor Plants That Keep Spiders Away
1. Eucalyptus (Eucalyptus spp.)
Spiders and other creepy crawlies are frightened away by the strong scent of eucalyptus. Active compounds that keep insects away are found in eucalyptus oil, which is derived from the plant.
Your choice of eucalyptus variety and location must be carefully considered because eucalyptus is a tree. The plants can be grown inside in a pot and then moved to your garden when they are large enough.
I would advise against purchasing a mature tree, as this is a bad idea. Selecting a dwarf variety is preferable because it requires less upkeep and is more effective at keeping out spiders. Your plants need plenty of sunshine, wet soil, and regular trimming.
2. Rosemary (Rosmarinus officinalis)
Aromatic and medicinal, rosemary can be used in many ways. Humans enjoy the mildly scented rosemary blooms, while spiders despise and abhor the aroma.
Spiders hate rosemary because it’s a deterrent. Sprigs of rosemary that are in blossom will readily scare away spiders.
Rosemary is a hardy evergreen shrub that can withstand the cold of the winter months. When let to grow in the open, it can reach a height of three feet. They can, however, be cultivated in containers. They can be brought indoors to safeguard the plants from freezing temperatures during the winter months.
To thrive, the plants need ample sunlight and well-drained soil. They thrive in zones 8 and higher. Adding rosemary plants to spider-infested areas can help them flee.
3. Citronella Grass (Cymbopogon citratus)
Mosquitoes hate the smell of citronella grass, a perennial clumping grass. To keep spiders away, you can also use this plant, which comes from the lemon grass family. This grass’ lemon aroma keeps mosquitoes and a variety of other flying insects away, reducing the number of food sources for spiders.
Citronella oil is extracted from this plant and used in a wide range of insect repellents. Citronella grass can be a nice idea to have around.
Citronella grass can be grown in pots so that it can be brought indoors if the weather turns bad. Citronella thrives best in soil that is both moist and well-drained. Full sunshine is best for the plants.
Citronella essential oils can be released by crushing a few leaves. Pests can be controlled with a natural spray made from the crushed leaves.
Flowers That Repel Spiders
Are you aware that certain flowers can aid to keep out spiders and other insects? Flowers such as lavender and chrysanthemum will keep spiders at bay. Chrysanthemum, on the other hand, may be cultivated both indoors and outdoors.
1. Lavender (Lavandula angustifolia)
Your home will smell great and the spiders will be scared away by the powerful scent of lavender. Lavender plants in pots placed near your windows are a good deterrent for these creepy crawlers. To keep spiders away from your home, place lavender plants near your entryways or windows, either in pots or directly in the ground.
Lavender plants are easy to grow and manage because they are drought-tolerant. Well-drained, slightly alkaline soil with enough of sunlight and air is ideal for growing lavender.
It may be difficult to plant lavenders because they constantly need trimming and re-potting, making it a time-consuming endeavor.
2. Chrysanthemum (Chrysanthemum spp.)
The chrysanthemum, also referred to as “mums,” is one of the most beautiful autumn flowering plants. There are various species of insects to which Chrysanthemums can be a deterrent, therefore you should definitely plant them. Chrysanthemums are repulsive to a large number of insects. Arachnophobes will appreciate it greatly.
In pesticides, a neurotoxin known as “Pyrethrin” is commonly employed as an active component since it functions as a repellant. Many insecticides on the market include this active component.
As a result of its long flowering period, Chrysanthemum plants can be cultivated indoors and out with only a little effort. Regardless of the soil type, these plants will thrive in direct sunlight and can tolerate a wide range of temperatures. Increase the number of blooms on your plants by placing them in direct sunshine.
Tips and Things to do
In order to develop repellant plants, some considerations must be taken into account.
Houseplants should be placed in regions of your home where spiders prefer to live and feast on insects and other small animals. You can use this to keep an eye out for spider activity.
Make your own natural spider repellent sprays by crushing aromatic leaves and massaging the extract into your home’s dark, secluded corners, where spiders are most prone to gather.
The best strategy to keep pests out of your home is to place these plants near windows and openings.
You can use lavender plants in hanging baskets to keep cobwebs away from the corners of your ceiling.
Other Ways to Keep Spiders Away
There are a few additional methods that can help you get rid of this problem, in addition to spider-repellent plants.
- First and foremost, you should clean and declutter your home to keep spiders at bay. Take care to remove spider webs as soon as you notice them.
- Spiders despise the sour taste and stench of vinegar. To keep spiders at bay, try cleaning with vinegar.
- To get rid of spiders and other creepy-crawlies, sprinkle a few cedar chips around your home.
- Maintain a free-and-clear landscape at all times. Removing locations where these tiny creatures could hide such as fallen leaves, grass, wood heaps, and cuttings should always be a priority.
- At the beginning of the infestation, you don’t have to worry about the spiders reproducing and causing further problems.
Final Thoughts
It’s safe to say that most of us don’t want spiders in our homes, and we’d prefer to get rid of them as soon as possible. An overpopulation of spiders in the house can be an issue at any time. Spiders and other insects will be deterred from your home by many of the plants on our list of spider repellents. As a result, if you’re trying to keep spiders and other insects away, growing repellent plants is a good solution.
Wild Roses: Types and Identification
Emily Taylor’s Garden
Roses may be found in nearly every state in the United States, making them a common sight. It’s also true that in cooler climates they blossom and go dormant much more quickly. With that in mind, you may plant them just about wherever. They can withstand a lot and are a tough flower. You could believe the roses are done for good in some parts of the country where frost arrives early, but they’re back in full bloom when April comes around.
As a result, novice gardeners who fear they have a brown thumb instead of a green thumb can consider trying wild roses as a test. Wild roses can be a great addition to your garden if you’re looking for something a little different. What distinguishes this wild rose from its more cultivated cousins? How can we tell them apart from the rest of the flowers in the world? Here are a few distinguishing features.
Wild Rose Identification Tips:
How can I tell the difference between wild roses and roses grown in a garden? It’s easy to spot by the number of petals on the flower, the color, and the leaf form and size.
Look for its shrub form
Xem thêm : How Do You Get Rid Of Whiteflies? Complete Step-by-Step Guide
A rose’s shrubs are an excellent way to learn more about the variety. The stems of wild roses are often rigid and straight, whereas the stems of other rose types are arched. To tell them apart, look at how they grow in both full sun and shade.
Also, some species have few thorns, while others have many. Its blossoms, which are densely covered with thorns, are very venomous. You can also get a sense of their kind by looking at the environment in which they are likely to thrive. If they reside in a mountainous area or near sandy beaches or in a swampy environment, for example.
leaf texture and shape
Examining the texture and shape of the leaves of a wild rose plant can also help you identify it. For most wild roses, each leaf is attached to its own stem. There is a large leaf with three or more leaflets surrounding it that you can find. A serrated edge and a ridged or flat leaf surface characterize this leaf. The Japanese rose, a species of rosa rugosa native to northern Asia, has leaves with a corrugated pattern.
Wild roses have a few basic traits.
Other characteristics to look for while identifying wild roses in your area include:
When the flower blooms
Keep a close eye on the rose to see when it blooms. What time of year do they bloom? Is it during the summer or at the end of the summer? There’s a good likelihood that what you’re seeing isn’t a wild rose at all. You may be gazing at a cultivated variety that has escaped from its grower and taken over the world.
Take a look at the scale. Wild roses often have smaller flowers with pink pigmentation, though this can vary widely. However, the predominant color of wild roses is pink.
There are five petals to this flower.
What are the most common varieties of wild roses?
Western wild roses:
Bristly rose (Rosa Nutkana)
These have one-inch-wide pink flowers. This species is frequently found on or near the slopes of hills or highways that lead to hills.
Woods’ rose (Scientific name: Rosa woodsii)
These bloom in a range of shades from white to dark rose. Thickets of nutkana and woodsii can grow to a height of four or five feet. Keep your mind that some kinds can get rather thick when planting them. Thorny thickets are difficult to deal with. So spread out your woodsii and nutkana areas, and you’ll do yourself a huge favor.
Give your garden a little more breathing room than usual. Make sure you don’t overestimate the amount of space you’re leaving between plants. If you don’t do anything about it, they’ll swiftly take over the area.
Rocky mountain wild roses
Rosa blanda, popularly known as the “smooth rose,” is a wild rose that can be found from Ontario, Canada, all the way down to Texas. This flower features light pink blossoms that fade to virtually white, and it grows on a vine
The Arkansas River gave its name to another rocky mountain flower, the prairie rose (Rosa arkansana).
Swap Rose – East to Nebraska
Rosa palustris can be found all the way from the East Coast to Nebraska. Swamp roses, as the name implies, may only be found in swampy places.
Carolina rose
Rosa Carolina is also available. These are roses from the Carolina region, which includes both North and South Carolina. Both are tiny bushes with two-inch-thick pink blossoms.
Domesticated rose varieties that have gone wild
Some elder rose varieties have ‘gone feral’ or ‘gone wild’ over the long history of rose cultivation and domestication. Some of the roses that used to be in the commercial areas are now blooming in the wild because they have been neglected. Only by adhering to strict variety criteria and specifications can today’s commercially popular rose types be considered ‘domesticated’. Some of today’s most popular rose cultivars are likely to produce wild progeny if their popularity declines.
Beach Rose (Rosa rugosa)
These big, 1.5-inch-wide plants have large, large-flowered, summer-blooming purple to pink flowers, as well as corrugated leaves.
Sweetbriar Rose (Rosa eglanteria)
Shakespeare’s Eglantine roses are represented by these blooms. The foliage and delicate pink blooms give off an apple pie scent. Additionally, they are capable of growing to be enormous bushes.
Seven-sisters Rose (Rosa multiflora)
The huge white rose blossoms of this plant, which are considered a noxious weed in some areas, bloom in clusters. When it comes to height, the Rosa multiflora may be a true show stopper. We’re talking about fifteen feet here.
Wild roses are an excellent choice if you want to add a bit of the exotic to your yard. A little bit of unpredictability in your backyard garden patch will set you apart from the rest of the neighborhood. Your backyard might be a great place to start a conversation.
Plants That Grow in the Dark
Emily Taylor’s Garden
Is it possible to cultivate plants indoors that thrive in full darkness?
Photosynthesis is something you learned about in school, right? Carbon dioxide, water, and light are all necessary components of photosynthesis in order for plants to thrive. Even in caves and forest floors, certain plants have evolved to thrive. This article will cover indoor plants that thrive in shaded locations.
1. Chinese Evergreen (Aglaonema)
It is a low-growing, compact plant with pale green variegated leaves.
Keep out of direct sunlight for best results.
2. Cast Iron Plant (Aspidistra elatior)
Long thin leaves of dark green or green and white are born on several thin stems of this plant, which is slow-growing.
They don’t like direct sunshine, but moderate light is plenty for them to thrive, and they’ll even grow in darkness.
3. Kangaroo Vine (Cissus antarctica)
The leaves of cissus are lustrous green and occasionally variegated.
Refrain from placing in the sun’s direct rays!
4. Kaffir Lily (Clivia Miniata)
The Bush Lily, commonly known as the Kaffir Lily, is able to thrive in shady locations. If you want flowers, you’ll need bright light, but they’ll make it in a shady spot as long as there’s no drought. The tongue-shaped leaves have a dark green color.
5. Goldfish Plant (Columnea gloriosa)
Small, velvety green leaves and bright orange mouth-like blossoms can be found on this hanging plant. Flowering occurs when they receive some shade and minimal irrigation. In order to thrive, Columnea needs a well-ventilated location that is neither too hot nor too cold.
6. Umbrella Grass or Umbrella Plant
It’s another plant that can thrive in a wide range of light conditions: umbrella grass. As a water plant, it should not be allowed to completely dry out. Huge bunches of slender palm-like leaves cling to the long stems.
7. Dumbcane Dieffenbachia
Large variegated leaves and a preference for high temperatures make this a popular houseplant. They need to be protected from the sun’s rays and can handle both partial and total shade.
8. Devil’s Ivy and Umbrella Tree
Both umbrella tree (Schefflera Arboricola) and devil’s ivy (Epipremnum Aureum) are tough and hardy plants that tolerate most circumstances except direct sunlight. Even in the absence of soil, Devil’s Ivy can flourish.
9. Ferns
As classic examples of forest floor living plants, ferns would benefit from milder temperatures and dappled shade. They can put up with some heat, but they can’t stand cold air. Ferns come in a wide range of colors and shapes.
10. Rubber Fig (Ficus elastica)
As the name suggests it is a tree with a single stem that bears a huge number of glossy green leaves. When it’s not too hot, they prefer to be in a shady area with limited direct sunlight. You may grow ficus inside or out, but it is one of the most rapid-sprouting houseplants. They can handle full shade, but not too much hot, and won’t survive temperatures beyond 29 degrees Celsius (85oF).
11. Prayer Plant/Rabbit Tracks
Maranta leuconeura (Maranta leuconeura) is another easy-to-grow indoor plant. As long as the sun is out, they won’t be able to survive for long at all. Warmth is required for their well-being.
12. Swiss Cheese Plant (Monstera deliciosa)
Hurricane Plant and Mexican Breadfruit are some names for these plants. They may grow up to twenty feet/six meters in height and are a beautiful foliage plant for a shady part of a room. Despite the fact that they are unable to receive direct sunlight, they are content with all other light conditions.
Primula
They do require light, but it should not be in full sunshine or extremely hot temperatures. For brief periods of time, they can survive shade as long as they are well watered, but not submerged in water.
Rhoicissus
Thistle
A little trilobed climbing plant with glossy dark green leaves. Anywhere they aren’t exposed to bright sunlight or draughts is a good place for them to thrive.
Spathiphyllum
Lily of the Valley
They occasionally produce exquisite white blooms amongst their dark green, single-leafed foliage. As long as they aren’t in full sunlight, they’re fine with a spot in the shade.
Syngoniumpodophyllum
Plants of the Arrowhead Genus
Climbing tropical plant that can reach six feet if let to grow, but may also be clipped to a bushy plant. Easy to care for and tropical. Although they prefer low- to medium-intensity and indirect light, they are able to withstand full shadow for brief periods.
Edible Plants that grow in darkness
Mushrooms
The mushroom is one of the most well-known plants that thrives in low light conditions. Mushrooms are the fruit of underground-growing Mycelium, which is a fungus in and of itself. Kits for growing button mushrooms are easily accessible.
Chicory
Chicory grown in the dark is less bitter than chicory grown in the light and is a technique to ensure a nice and fresh salad over the winter.
Chinese Beansprouts
Sprouts are ready to consume in a week if they are kept out of direct sunlight, which takes only a week to grow.
Grass/Wheat Grass
To grow, all you need is a temperature of at least 6 degrees Celsius and some light and moisture. As long as the temperatures are high enough, grass will continue to grow during the night. Humans, on the other hand, don’t usually consume grass. Wheat grass, on the other hand, thrives in complete darkness and can be harvested in six to ten days. What type of grass is most commonly cultivated in hydroponic systems in the dark.
Grow Mint Indoors
Emily Taylor’s Indoor Plants /
After producing spinach at home, I decided to try growing mint indoors.
Fragrant and culinary herb mint, or the Mentha genus, is a perennial perennial aromatic and culinary plant. It can be identified by the white purple flowers that bloom on the plant, and it can be found just about anywhere. Mint can be cultivated in a variety of ways, but the most common method is to grow it in a home garden. Mint plants can be grown inside in soil-filled pots or water bottles with relative ease.
Depending on the kind, mint plants can grow up to 10 to 120 centimeters, or they can expand indefinitely through their fast-growing underground rhizome. Some mint species are classified as invasive because of their unpredictable growth. The aroma of mint is usually the first clue that a plant is minty.
Peppermint and spearmint are just two of the more than 3500 varieties of mint plants that exist. Mint plants are easy to grow and provide a plethora of flavor options in beverages, meals, and other culinary preparations.
Can Mint be Grown Indoors?
Yes. It’s simple to cultivate mint and other herbs indoors. Most indoor plants don’t grow as vigorously as outdoor plants, despite the existence of fast-growing varieties. If you grow mint indoors, you’ll always have fresh mint leaves, even in the winter.
In general, individuals like to grow mint in pots on their kitchen counter or window sill. Mint plants can be grown in soil beds, on balconies, in backyards, and even on terraces and in backyards. Soil type, pot size, light requirements, propagation methods, harvesting/pruning procedures, and other considerations come into play when growing indoors. Keeping track of the best time of year to plant and maintain a plant’s health profile is also critical.
Can Mint be Grown in Pots and Container?
Yes. It is possible to cultivate mint in pots, trays, and water bottles. Mint plants grow rapidly in any container shape or size with little care. Some mint species are deemed invasive because of their tendency to spread quickly and not grow in harmony with their surroundings. They fight for water and nutrients with other plants in their area, making it impossible to grow anything else. Because of this, it is critical that they be kept under control.
Pruning and harvesting must be done as soon as possible because of the invasive nature of this plant.
How to Grow Mint Indoors?
Container size:
It’s recommended to use pots or containers with a drain hole and measurements of 10-12 inches deep by 8 inches in diameter. A lot of shallow pots is bad. Drainage holes in small pots may allow mint roots to spill out. Because of this, the roots of plants extend out in the surrounding region in bare soil.
Grow from cuttings vs seed:
Mint plants can be grown in three main ways.
- Starting with a seed
- From the stem of a plant
- From the roots
Growing from seeds
It’s not a good idea to grow mint from seed. There are a large number of mint species that generate seeds that do not germinate. Because of their low germination rates, some seeds generate plants with a wide range of features.
It is nevertheless feasible to grow mint from seed under natural conditions, despite all of the above. In late winter or early spring, you can start mint seedlings indoors. Germination of mint seeds might take up to two months. Make sure you buy high-quality seeds before you start planting. In order to later develop a germinated seedling into a mature plant, you must also use high quality pots or containers.
Fill the pots to the brim with a soil mixture that has been prepared and moistened. Immerse the seeds in 1/3rd of the soil’s depth. To hasten the emergence of seedlings, cover the pot with plastic wrap. Check on the seeds every few hours and remove the plastic cover to ensure appropriate aeration and ventilation.
Growing from Stem Cuttings
Propagation of mints is best accomplished by cutting the mints into pieces. It is possible to cultivate different mint varieties from stem or root cuttings in this manner.
It is possible for mints to spread quickly in an area where they are planted. Mint plants are easy to produce through vegetative propagation methods because of their invasive character. Plants that have been given to you by your neighbors or friends or purchased from the nursery can be used in this technique.
Here are the actions you need to take to get started.
- Cut a healthy stem from a volunteer plant that is growing well in your yard.
- When you get to the bottom of the last leaf, cut a stem that’s about 4-6 inches long. Check the stem for blossoms before cutting it.
- Remove any superfluous leaves from the stem’s lower side and only preserve a few leaf pairs at the stem’s upper end for aesthetic reasons.
- Take a water glass and place the cutting in a slightly shady and aerated location.
- Take out the water from the glass every day.
- A few days later, you’ll start to notice that your cuttings are beginning to root.
- After a little over a week, your cuttings are ready to be transplanted into pots filled with a high-quality potting soil.
When cutting, it is important to make a clear and clean cut in order to minimize the risk of wounds. Insect pest diseases can quickly spread through open wounds and cuts.
Growing from Root Cuttings
Root cuttings are comparable to mint stem cuttings in that they are both methods of propagation.
Mint plants must be dug up and their roots removed before you may use this method of propagation. Cut off a root extension up to a maximum of six inches in length. Make a hole in the bottom of the container and insert the root cuttings horizontally into the soil mixture.
Keep the soil moist by watering it frequently and ensuring that it doesn’t dry out. For new roots, stems, and leaves to grow, it takes between two and four weeks of growth time.
Growing Media
Coconut coir and water are the most common mediums for growing mint.
Grow in Soil
It’s possible to grow mint in the ground, which is a viable choice. Sand, peat, and perlite can be combined to create a soil conditioner. All kinds of organic matter can be found in high-quality potting soil, from coco coir and peat moss to farm land manure and anything else.
Make sure the pot has a drainage hole before filling it with potting mix. Mint plants thrive in soil with a pH between 6.5 and 7.0. Organic fertilizers necessitate yearly topdressing of the soil.
Coconut coir
One of the best growing mediums for mint is coconut coir.
As the outer husk of coconuts is a valuable resource for a wide range of industries and crafts, coco coir is a popular choice for many.
Because it degrades slowly compared to other organic materials, this coir is employed for crop organic needs in the same way that peat moss is. This coir, like a sponge bed, is capable of holding a lot of water and keeping it in the root zone. At the same time, it is capable of removing excess water to prevent waterlogging of plants.
Coco coir is devoid of nutrients, yet it aids in the retention of soil nutrients and the subsequent release of those nutrients to plants. Adding 40 percent coco coir to garden soil is a simple way to increase the quality of the soil. As a result, the air, drainage, and moisture content will all be improved.
Growing in Water
When it comes to mint plants, you can grow them in water for up to two weeks before moving them to soil.
Cut the mint stems to a 5-6-inch length from a mature plant. Using a water bottle or a glass vase, remove the bottom leaves. Place it in a window that receives at least 4-6 hours of direct sunshine each day.
Temperature:
To keep your mint plants healthy indoors, you’ll need a temperature range that isn’t too hot or too cold. Daytime temperatures should be 60-70 degrees Fahrenheit, while nighttime temperatures should be 55-60 degrees Fahrenheit.
Mint plants may thrive in both hot and cold climates. Light woodland conditions can be tolerated by them. Despite the fact that mint plants die back in extremely cold settings, they are able to regrow in warmer temps.
Lighting:
Is direct sunlight necessary for mint plants? The short answer is yes.
How much natural light do we get?
Mint can be grown indoors near a window so that it receives enough light without drying up the soil.
Watering: How often should I water mint?
Mint plants necessitate a proper amount of water. The soil should be sufficiently hydrated, but not soggy, with an adequate amount of drainage.
Water-logged roots are the result of plants that have received too much water and not enough oxygen. Keep an eye on the moisture levels of your mint plants, and don’t let them overflow. The soil’s moisture content can be determined simply by touching it. Keep the soil humid but not sopping wet.
When the temperature is low, watering early in the morning is ideal so that plants have enough moisture and can endure the heat of the afternoon sunlight.
Fertilizer for mint
In contrast to many other herbs, mint doesn’t require a lot of fertilizer to grow well. Mint leaf may taste less minty if it is overfed with fertilizers. Small amounts of compost tea or fish emulsion fertilizer can be applied to your plants while they are growing inside.
Dosage intervals are also critical. Fertilize your plants at least once every four to six weeks because constant watering causes potting nutrients to drain out faster.
How long does mint take to grow?
Growing mint from seed or stem and root cuttings has already been demonstrated. It might take anywhere from 10 to 15 days for seeds to germinate, depending on the variety. Removing the plastic sheet after sprouts are visible is a good idea. Plants need to be moved to a larger container when they have two or three leaves, so they can grow to their maximum potential.
The plant grows from seed to full size in around 90 days.
Although starting mint plants from seed is a time-consuming and labor-intensive process, cuttings taken from stems and roots of the plant can be grown fast. As compared to starting a seedling from scratch, cuttings are a fraction of the time and effort.
Harvesting
Mint can be harvested as soon as the plants reach a height of 6-8 inches and have many stems. In the case of seed-planting, harvesting begins in around two months, whereas cutting-planting takes a lot shorter time. Harvesting more than one-third of the mint plant might weaken the plant and make it more vulnerable to decline.
Benefits of Growing Mint
In addition to the apparent benefits of using mint in your food and drink, mint is also beneficial to bees and other pollinators.
Mint is a wonderful therapeutic perennial herb as well. You can either use the fresh leaves right now or dry them to save for another time.
Deodorizer or room fresheners can also be made from the pungent odour of the leaf.
Finally, don’t forget the mojito, a traditional cocktail made with mint and lime.
Tea, chewing gum, drinks, toothpaste, and other food items with a minty flavor can be found nowadays.
Mint has become one of the most important plants ever found because of its flexibility.
Nguồn: https://iatsabbioneta.org
Danh mục: Garden


