While it is possible for beginners to try their hand at this particular home gardening task, experienced gardeners should proceed with caution.
I’m going to present you with a step-by-step instruction so that your propagation effort will be met with success now that you’ve been cautioned that cultivating these festive plants isn’t without its obstacles.
Bạn đang xem: How To Propagate Poinsettias? Comprehensive Guide
An early look:
Wait for New Growth
Once you have a live poinsettia plant, you’ll need to wait until spring or summer to take cuttings.
It’s ideal to take cuttings from young, active growth, says Curtis W. Smith, Ph.D., a New Mexico State University Cooperative Extension Service Extension Horticulture Specialist.
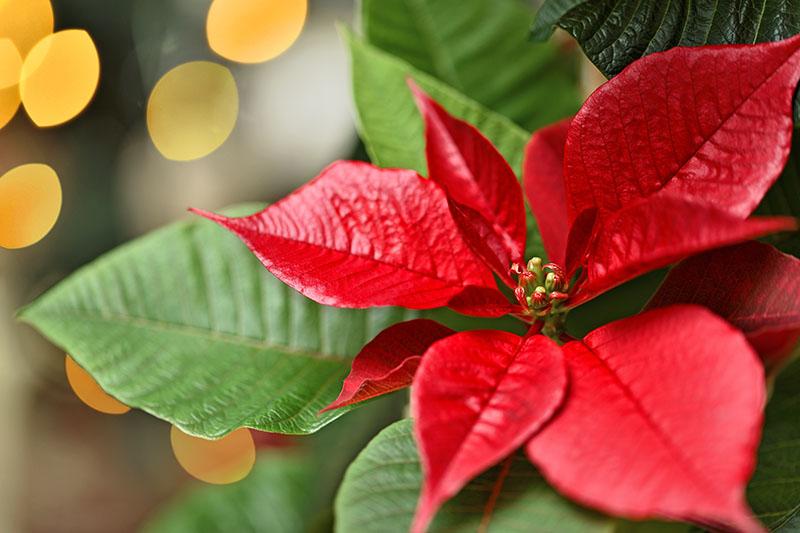
So, if you want to undertake this endeavor in the dead of winter, you can, but your odds of success will be reduced significantly.
Gather Your Materials
Begin by gathering your resources and making sure that you have everything that you need to get started.
You’ll need the following:
- A poinsettia plant that is thriving and showing signs of life.
- Trimmer or pruners that have been cleaned and sanitized.
- Small nursery pots, plastic cups, or a seed starting flat are all examples of sterilized growing containers.
- Coconut coir, potting soil, or a blend of vermiculite and perlite are all examples of growing media.
- Cover the plant with a humidity dome or transparent plastic bag.
- A spray bottle or mister.
- Pot up rooted cuttings in four- or six-inch pots.
- In the garden or in rubber gloves (optional).
- Hormones that stimulate the growth of roots (optional).
Each of these items will be explained in detail as I walk you through the seven steps. Before beginning, it’s a good idea to go over the entire procedure with fresh eyes.
Things You Will Need
- Plastic pot with a 4-inch diameter
- Sand with a fine grain
- Gloves
- shears for pruning
- Indolebutyric acid rooting hormone at a concentration of 0.2%
- Atmospheric dome
- A frosted display case
- Mat for the spread of seeds
- A cannister with a spray nozzle
- A 6-inch jar of spices
- Adding soil to a pot
Propagate Poinsettias in 7 Steps
It’s time to start propagating now that you’ve waited for the right time and acquired your resources. Ready? All aboard!
1. Protect Your Skin and Eyes
Put on a pair of gardening gloves or rubber dish gloves before you begin. Those with latex allergies may find the white sap from poinsettias particularly bothersome when they are cut or broken.
Regardless of whether you are allergic to latex, avoid getting sap in your eyes at all costs. As an added precaution, you should consider donning safety eyewear.
The safety talk is over, so let’s get on with the business of the day.
2. Choose Your Containers
Once you’ve done that, it’s time to get your pots ready for cuttings.
Because they will only be used during the first four weeks of the cutting’s life, these containers don’t need to be overly large.
Seed starting flats, like as these from SOLIGT, can be used to start your baby poinsettias.
Once your cuttings are in place, you may use the humidity domes that come with them to keep them moist.
Alternately, small nursery pots or even plastic cups can be used for the initial germination. Prior to utilizing nursery pots, disinfect them well.
3. Add Growing Medium
Poinsettia cuttings are typically started in floral foam or peat moss by commercial poinsettia growers.
This means you don’t need damp soil to start the cuttings – in fact, you don’t need soil at all to start the cuttings.
Instead of using floral foam or sphagnum peat moss, which are both harmful to the environment, I suggest using sterile seed starting mix or coconut coir.
It is better for the environment than sphagnum peat moss.
Prococo’s Chips-N-Fiber is a high-quality coconut coir product that’s free of germs and fungi, making it suitable for your new plants. The fact that data is compressed further reduces the amount of storage required.
Vermiculite and perlite can also be used as an alternative.
With a seed starting flat, you can simply pour your growth medium into the flat and get started.
Depending on the length of your cuttings, you’ll need a potting media at least two to three inches deep in your container.
Keep the potting soil dry. Until the roots of your tiny Christmas flowers are established, they will get their water from their leaves, not from the soil as you would expect. Below, I’ll elaborate on the topic..
Poke holes in the potting mix where you intend to plant your clipping. This can be done using a pencil, a chopstick, or even a finger.
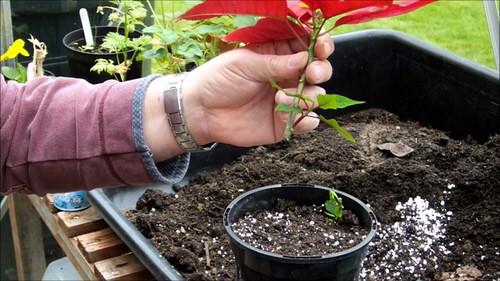
4. Take Cuttings
Now that your containers are prepped with your preferred medium, it’s time to take some cuttings from your plant.
You can now take some cuttings from your plant and prepare your containers with your desired material.
In order to get the moisture it requires, leave two or three leaves on the cutting’s top.
5. Apply Rooting Hormone
This section can be omitted. Use a rooting hormone if you want to go the additional mile to help your cuttings develop new roots.
Xem thêm : How To Stop Plants From Growing Tall? Step-by-Step Tutorial
As you’re dipping your cutting, be sure to get the powder or gel on every last node of the stem and leaves.
If you don’t have a large enough container, you can pour a little bit onto a piece of scrap paper and dip the stem into this lesser amount of rooting hormone before inserting it in the container.
The longer your rooting product lasts, the better off you’ll be.
Following application of rooting hormone, place the cutting into growing medium, being careful to ensure that any exposed leaves are fully submerged.
When you push the stem into soil or coir, you don’t want to accidentally rub off the rooting hormone.
I’d propose Olivia’s Cloning Gel as a rooting hormone recommendation. So you don’t have to worry about inhaling it because it is gel rather than powder.
In two-, four-, or eight-ounce bottles, Arbico Organics offers Olivia’s Cloning Gel for purchase.
6. Place in a Bright, Humid Location
It’s time to mist now that you’ve put all of your cuttings into your growth medium.
Use a mister or spray bottle to wet the leaves of your new plants.
As long as the spray bottle never contains any chemicals or cleaning goods, a plastic one will do.
However, if you prefer a more aesthetically pleasing method of caring for your baby poinsettias, you could appreciate using a glass spray bottle.
A word about water: it’s possible that the quality of your water has an impact on the survival or death of your young plants. A wide range of plants are susceptible to pollutants in municipal water, as well as bacteria and minerals present in well water.
I only use filtered water to water my houseplants.
Poinsettia cuttings will root most successfully in conditions with very high humidity, between 90-100 percent.
Poinsettia cuttings will root most successfully in conditions with very high humidity, between 90-100 percent.
It is best if the humidity level is between 90% and 100% for poinsettia cuttings to root.
The best place for your plant kids is in an area that receives good indirect light but not direct sunshine. A grow light can brighten up your home if it’s too dark.
You should mist your young poinsettias every day, but don’t water the growing medium; at this stage, the young poinsettias acquire the moisture they need from their leaves, as they don’t have roots.
Okay, thus far, this seems like a simple task, right? This is when it becomes tricky.
While high humidity is necessary for poinsettia cuttings to thrive, it also increases the risk of some of the bacterial and fungal diseases to which these plants are vulnerable.
In order to avoid this problem, some professional poinsettia growers keep some fans running at all times (which can also help strengthen the branches).
As long as your greenhouse is well-ventilated, it shouldn’t be too difficult to maintain these plants in a humid atmosphere.
If you have a home that has a high level of humidity but not enough ventilation, it can be difficult.
In the event that some of your cuttings don’t make it, I recommend taking more than you need.
Make sure to keep your plants apart from each other if you’re growing more than one so that if one of them succumbs to a bacterial or fungal disease, the others won’t be at risk.
Using a fan on a low setting will also assist circulate the air in the room.
If everything goes according to plan, your baby poinsettias will thrive and begin generating new leaves. Poinsettia cuttings take ten to fourteen days to establish roots.
7. Pot Your Rooted Cuttings
Your seedlings should be ready to be transplanted into pots in about four weeks. Use well-draining potting soil and pots with drainage holes before transplanting because Christmas flowers do not like wet feet.
Alternatively, you can put three cuttings in a seven to eight-inch pot, or one in the center of a four-inch pot, to create a full-looking plant.
When your plants have been successfully transplanted, you can resume regular watering.
The drainage pores in the bottom of the pot should be drenched enough to let the water to drain out. Between waterings, the soil’s surface should feel completely dry to the touch.
Poinsettias can be grown outside in partial shade if the temperature stays above 50 degrees Fahrenheit throughout the growing season.
They can grow into big, lanky plants if they are left to their own ways.
When the rooted cuttings are about six weeks old, pinch the shoot tip back to encourage branching.
Xem thêm : What is Hemp? How To Grow Hemp In Colorado?
Here’s how it works:
Your cutting was a simple stem with a few leaves when you removed it.
Take a look at the roots of your plant. Below the expanding point, a few bigger leaves should appear.
Pinch off the top half an inch or so of the stem’s growing tip, then remove the rest of the stem.
The plant will send out new shoots at the following leaf nodes if you pinch the growing point back. As a result, you lose one shoot but gain two in return. You’ll get more flowers and color in the long run if your plant generates more shoots.
You’ll want to get this done by the beginning of September so that you’ll be ready for the holiday season’s colors.
You’ll need to expose your poinsettia to a period of lengthy evenings in order to stimulate it to develop the vibrant colors it is recognized and loved for.
Photoperiodic plants, like poinsettias, only bloom when they are exposed to long, dark nights.
Creating these circumstances may require a lot of work, but it will be worth it when you can admire your homegrown Christmas bloom and be proud of its vibrant color.
Here, you’ll find more tips and tricks on how to keep your poinsettias blooming for years to come.
Grow Your Own Holiday Joy
These are the seven steps to successfully producing poinsettias in your own yard.
With a little bit of luck, you’ll be able to decorate your home with homegrown poinsettias this season.
Do you think you’re up for the challenge, gardener? Have you ever attempted to grow poinsettias on your own, or know someone who has? Please share your story and a photo of your experience with us in the comments section below!
Please check out our other posts on the subject if you’d want to learn more about these winter-blooming plants:
Comprehensive Guide On How To Propagate Poinsettias
Seeds
Poinsettias may be started from seed, which is unexpected. Some people may be intimidated by the process, but you should be able to effectively root these plants if you have a good grasp of the techniques. When pollinating your own plants, you can schedule when to collect the seeds.
Step #1. Seed collection
Buying poinsettia seeds is an option, but you may also gather them from your own plants. When your poinsettias begin to fade, be on the lookout for the seed pods on the stalks of your blooms. Once the pods turn brown, you may begin gathering them.
In the same way as with other seeds, you should first dry them in a paper bag. After a few weeks, open the bag and begin gathering the seeds. To open the pods, you don’t usually require any special tools; you can simply use your hands.
Poinsettia seeds, on the other hand, must be germinated according to specific instructions in order to grow. To break dormancy, you need to do seed stratification on the seeds. After three months in the refrigerator, you’ll be ready to plant.
Step #2. Planting
After stratification, you’ll notice how easier it’ll be to pop the pods and remove the seeds. There no unique methods for sowing poinsettia seeds. However, you’ll have an easier time growing them in the greenhouse because the indoor conditions doesn’t fluctuate.
Pop the pods and retrieve the seeds much more easily after stratification. Seeds for poinsettias can be planted in the same way as any other seed. Growing them in a greenhouse is more easier, though, due to the constant indoor climate.
Cuttings
For some gardeners, cuttings may be a more convenient method of propagating poinsettias. Poinsettias can be grown from cuttings, which is a time-saving method. The clones you receive will be identical to the parent plant you select because this approach does not necessitate any prior steps.
Step #1. Prepare cuttings
If you’re going to use a parent plant, be sure it’s in good health. Make sure it’s disease-free, including the stem you’ll be chopping off. It’s best to take a 6-inch cutting early in the summer when the plants are showing signs of fresh growth.
Remove the lower leaves from the cuttings, but save the upper ones. Rooting hormone can be applied to each cutting to aid in establishment. It’s fine to use any type of sterile potting mix to hold the cuttings.
Step #2. Planting
It’s easier to control the indoor conditions in a greenhouse for rooting cuttings. If you want your cutting to root even more quickly, you should put a plastic bag over the container without it contacting it. Maintaining a constant level of moisture is made easy by creating a humid environment.
Place the cuttings in an area that is neither too hot nor too cold, but not in direct sunshine. Regularly check to see whether watering is necessary. Eventually, you’ll be able to select whether or not to transfer the cuttings outside.
Even if the weather outside is still unfavorable, they can be kept in the greenhouse for a period of time. The fall is the best time to transplant cuttings outside. To avoid transplant stress, acclimatize them first.
Poinsettias that are just getting started will be harmed by any high temperatures.
Watering And Fertilizing Poinsettias
Keep the soil moist but avoid overwatering your poinsettias like you would other plants. The plants may wilt if you wait too long to water once the surface seems dry.
When poinsettias show new stems and leaves, you can begin feeding them with fertilizer. It is sufficient to use an all-purpose fertilizer, but it must be diluted. Maintenance and plant health are best served by fertilizing every four weeks.
Conclusion
Poinsettias are a certain way to get people in the holiday spirit. You may use this knowledge to increase the number of gorgeous blooms in your garden, regardless of the time of year. Poinsettias can be grown from seed or from a clipping taken from an existing plant.
Seeds can be purchased or collected from your poinsettias once their flowers fade. To ensure germination, dry and stratify the pods. Taking cuttings, on the other hand, is a simple task.
Cut around 6 inches of stem from a healthy parent plant. Before planting, remove the bottom leaves and soak the cutting in rooting hormone. Create a humid environment by covering the pot with a plastic bag.
A greenhouse can be used to ensure establishment in either case. Make sure to verify your calendar before transplanting poinsettias outside.
Nguồn: https://iatsabbioneta.org
Danh mục: Garden


