The process of planting peacock orchid bulbs is a simple three-step process. There are a lot of things you need to know about planting, growing, and maintaining these tropical summer bulbs in your garden. Peacock orchids stand out from the crowd because to their white flowers with crimson accents and sword-like green foliage. They’re also easy to cultivate, as you’ll discover.
It’s good to know that peacock orchids aren’t actual orchids, so you can relax a little bit more about growing them. However, if you opt to grow this iris in a greenhouse, you’ll have an advantage. It’s best to start plants in a greenhouse if you want to make sure they grow well from the fragile stage they’re in.
Bạn đang xem: How To Plant Peacock Orchid Bulbs? Complete Guide for Beginners
How To Plant Peacock Orchid Bulbs For Beginners
Planting
A long growing season is required for peacock orchids, which bloom from mid to late summer. Bulbs can be planted in the ground or in pots early spring, as is customary among seasoned gardeners. Note that peacock orchid bulbs can be used interchangeably with corms because they don’t have an actual bulb of their own.
Rather than planting the corms in rows, you can group them into clusters of up to 25 plants. Alternatively, the little bulbs might be spaced six inches apart. They should be five inches deep in well-draining yet moist soil.
Where should peacock orchid bulbs be planted? These flowers thrive in full light, and you can even mix them with other plants for a more visually appealing landscape. When paired with prairie dropseed, fountain grass, licorice plant, or blue fan flower, peacock orchids provide a beautiful contrast.
It’s easy to combine peacock orchids with other plants in containers thanks to their small size, which enhances their maroon features. If you want to avoid any problems, be sure that all of your plants are the same. As a final precaution, ensure that the soil is kept moist but not over-watered to avoid rot.
Growing
After planting peacock orchid bulbs in the spring, it is common practice to dig them out in the fall and store them in a cool, dry place. To avoid the risks of freezing temperatures, utilize a greenhouse instead of the preceding procedure. In order for the bulbs to survive, the soil temperature must be at least 50 degrees Fahrenheit.
By checking your hardiness zone and starting the bulbs indoors a month before the last day of frost, you can be productive and avoid delays. Plants can be transplanted outside without danger of cold weather or wind killing them as a result of this procedure. Before adding compost, make sure to prepare the location and see if the soil has to be loosened.
Make sure to keep little orchid bulbs or corms at a lower depth than larger ones. For easier emergence, the corm should be oriented with the pointed end facing upward and the flat side facing downward. Keep the soil moist around the bulbs to help them grow and establish themselves.
Maintenance
Those that put peacock bulbs in the ground will eventually have to remove them before the earth freezes over in the fall. After a little frost, the best time to do so is when the foliage turns yellow. The bulbs should be rinsed and dried away from direct sunlight or freezing conditions after being dug up.
After trimming the stems to a length of 4 inches, you’ll need to let the bulbs or corms cure for two weeks in a dry, shady location. You can then store them at 60°F in dry peat moss or vermiculite for replanting in the spring after twisting off their tops this manner, making it easier to remove them. After three weeks of curing, you can store your bulbs for the winter, but some gardeners choose to keep them in the ground.
If you live in a growth zone 7, you can use mulch to protect your plants throughout the winter months. To ensure that your bulbs last as long as possible, divide them every three or more years if they were not dug up for winter storage. To ensure that they continue to blossom, do this.
Additional peacock orchid care includes regular watering and checking to see if they’re getting enough afternoon sun. You can also apply a liquid fertilizer every two weeks till the conclusion of the growing season if you fertilize in late spring when the plants are showing signs of growth. Liquid 10-10-10 fertiliser is ideal for peacock orchids.
How To Grow Peacock Orchids
Xem thêm : Growing Asparagus In Pots
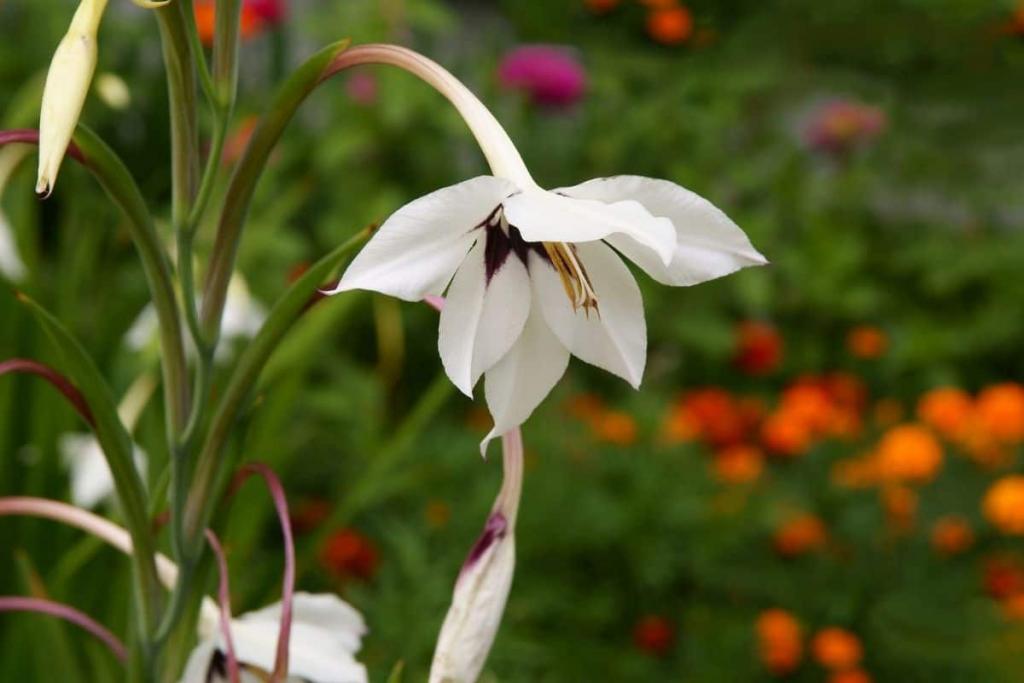
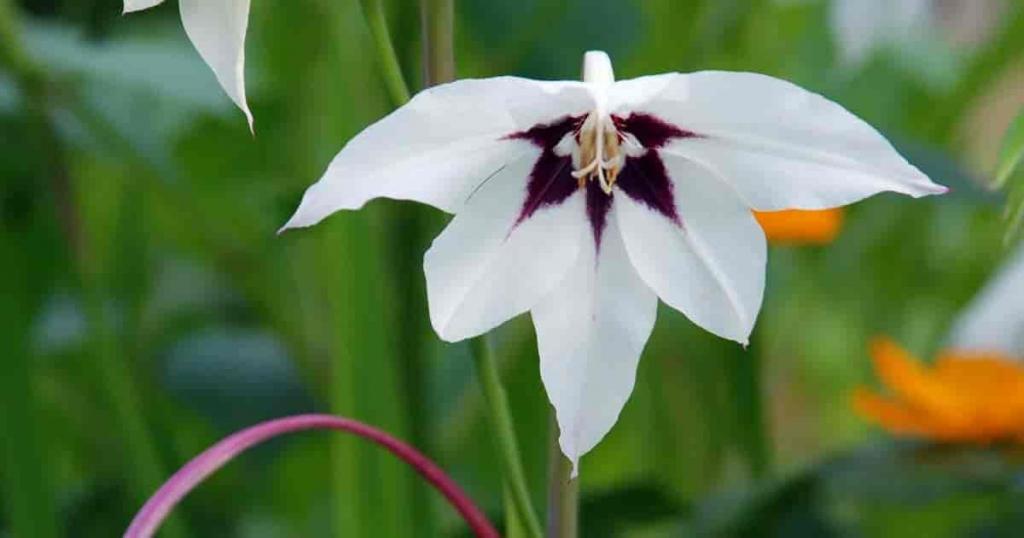
To begin, you should know that the peacock orchid belongs to the Iris family. They’re not real orchids, but rather close relatives of gladiolus. They grow to a height of 28-40 inches.
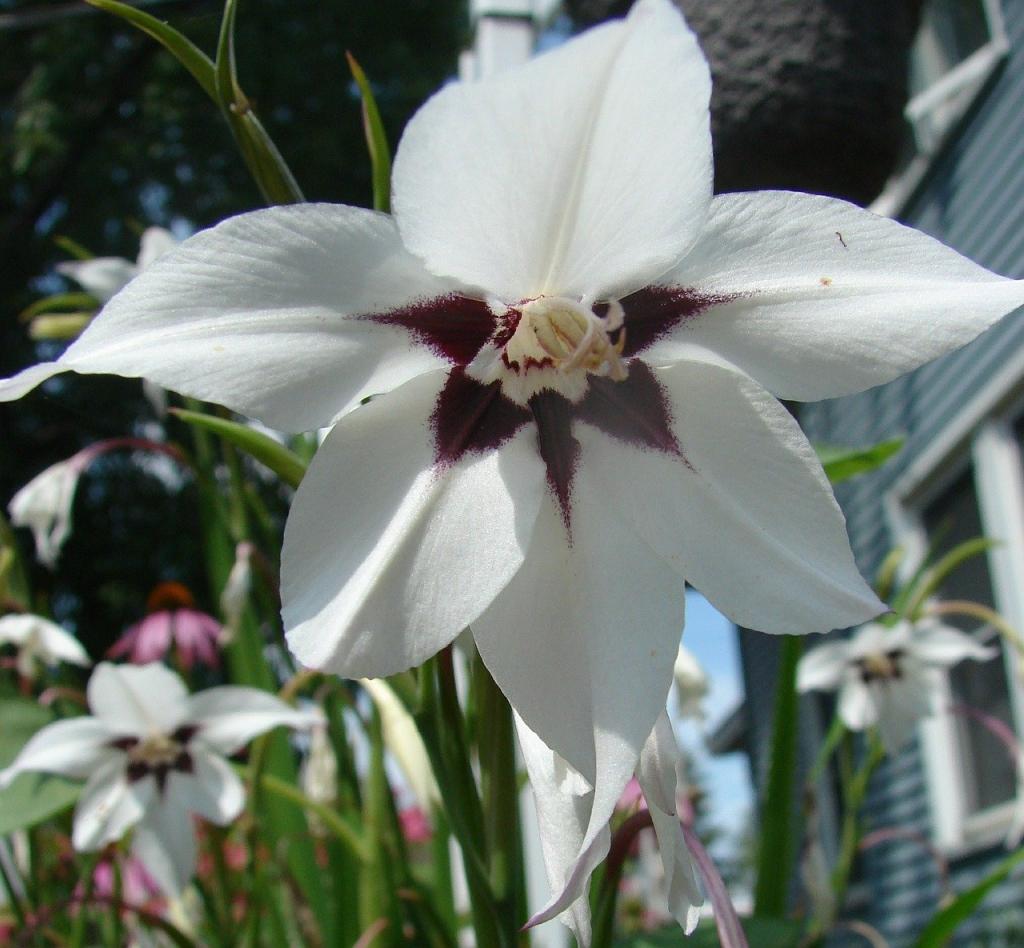
The tall, curved stems of these blooms are ornamented with a few close-spaced blossoms that give them the appearance of a funnel. These flowers have a strong, sweet scent, are white with a purple ring, and have a purple center. Anyone who sees them will be awed by their beauty and they’ll look wonderful in your garden.
Peacock lily, sword lily, Abyssinian glad, and fragrant gladiolus are just a few of the names given to this flower. Summer bulbs are often incorrectly referred to as “globose corms” rather than real bulbs. When the plant was first collected in Boston in 1876, it was only 44 years old when it began blooming in 1888.
It is indigenous to the Ethiopian highlands, where it can be found in abundance. Malawi and Mozambique, on the other hand, are in the southern hemisphere. It thrives in rocky outcrops of thin soil on cliffs in the wild. If you’re looking for it, chances are you’ll find it in an area with few other plants. These plants can grow up to a foot in height and have four to eight soft-textured leaves in the wild.
If the weather is particularly windy or there is no nearby shelter to protect the plant’s stems, stakes may be necessary. Zones 7-11 can grow the plant in the ground because it can withstand temperatures as low as 10 degrees Fahrenheit. Indoor overwintering is also possible in cooler climates.
Planting peacock orchids
As soon as you can get corms at local nurseries, plant them as soon as the risk of frost has passed. One to two weeks apart is ideal for a succession of flowers. When they begin to expand, this will produce a stunning effect. However, if grown in containers, this plant can thrive in colder areas as well.
Corms (bulbs) should be placed in the soil at a depth of four times their height and four to six inches apart. 65 to 90 days after planting, they’ll begin to blossom. In order to keep tabs on the progress of the plantings, it’s a good idea to include this in your calendar. Avoid planting in frost-prone regions during the winter months.
Full sun and high temperatures are required for this plant to blossom. Outside in the summer, it can thrive against a bright wall. A longer growing season is required for this gladiolus than the typical hybrid.
From mid to late summer, depending on the location of the plant, peacock orchids will blossom. You’ll notice that the flowers look a lot like gladiolus, but they’re a lot more calm and delicate than their more showy hybrid cousins.
Growing peacock orchids in the ground or in a container is a viable option. If you’re going to plant them, put them in a spot where you’ll get the most enjoyment from their scent. If you want to make a big impression on the landscape, avoid straight rows and plant in groups and clusters. Maintaining the health and beauty of your peacock orchids is critical to their long-term viability.
Watering and feeding
If you’re gardening in the summer, make sure to water and feed your plants frequently (5 to 6 times total). Corms should be kept dry during the winter months. If it has been a long time since there has been rain, you may need to water your plants if they have been established. In order to give it an extra push, you can use liquid fertilizer, but be careful not to overdo it and damage the roots. If you overwater your plants, you run the risk of fungus, root rot, and powdery mildew.
On a bright windowsill, the lovely plants thrive as well. However, keep them out of the sun for as long as possible to prevent sunburn. If you live in a region where the afternoon sun is particularly intense, you may want to consider moving your window position periodically throughout the day. Be sure to hydrate your containers as well.
Soil
The Acidanthera bicolor prefers a well-drained garden soil that is rich in organic matter. Before planting, add some fertilizer and compost to your soil. You should plant it in the spring when there is no longer a risk of a frost. Soil temperature of at least 50 degrees Fahrenheit is ideal when planting this kind. It prefers soil that is well-drained, but not soggy. In addition, you must avoid overwatering and ensure that the soil you use has adequate drainage.
Xem thêm : How To Prevent Mold With Seedlings In Small Greenhouse? Step-by-Step Tutorial
In colder regions, if you plan to grow them in containers, be sure to select a large one so that they have enough room to grow to their full potential. Alternatively, you can place your containers outside, but remember to bring them inside before the first frost to store for the winter. In the event that this is your goal, make sure that the containers are not too heavy for you to transfer when the time comes.
Some individuals grow peacock orchids on clay soil and peat moss. To avoid sunburn, they need some partial shade when planted outside.
How to propagate peacock orchids
Corms can be divided and “mother tubers” removed to increase the number of plants in your garden in the quickest time possible.
For the first year, keep them indoors in pots or trays. A few years later, they will begin to bloom.
To save money, you can sow seeds in April or May, depending on how long you have to wait. After a few weeks, remove the seedlings from their pots and place them in a new one. As corms take several years to develop large enough to produce flowers, seed propagation needs patience.
The proper way to store corms
However, because of their sensitivity to cold, the corms can only be used for one year at a time. The corms in your garden can be left in your yard if you live in an area with a zone higher than 7. When temps begin to fall, bring your plants indoors.
It is important to remove any dead leaves and dust the corms with diazinon before to storage at 40F to 50F.
Where to plant peacock orchids
If numerous are arranged in large bowls or tubs, they make a striking display. They’re great for edging and securing containers. You want them to be able to get some sunlight, but not all day long. The best-looking green leaves will be those that are well-fed and put in direct sunlight. Cold weather and frost may not be a problem for your plants if you live in a warm climate with pleasant winters.
Incorporate the scent into your cut flower garden by planting them. When placed against the side of a garden wall they make an attractive addition to a sun porch or a heated patio or balcony. Another reason they are so popular is because they look great almost anyplace you put them.
Peacock orchids are simple to grow, so give them a shot and take pleasure in their stunning beauty and fragrant blooms.
Conclusion
Even though they are not real orchids, having peacock orchids will surely make your garden stand out. There are three steps you can follow to learn how to plant peacock orchid bulbs. Recall that corms rather than true bulbs are used to propagate these plants.
Even if they are not actual orchids, having peacock orchids would undoubtedly make your yard stand out. If you knew how to plant peacock orchid bulbs by following these three procedures, it would be beneficial. Always keep in mind that these plants do not grow from true bulbs, but from corms.
Even these peacock orchids aren’t actual orchids, they’ll nevertheless make your garden seem fantastic. There are three steps you can follow to learn how to plant peacock orchid bulbs. Always keep in mind that these plants aren’t true bulbs, but rather corms, which are used to multiply them.
Nguồn: https://iatsabbioneta.org
Danh mục: Garden


