All gardens should include asparagus because it is a resilient, long-lived vegetable. You may worry whether you can grow asparagus in pots if you don’t have a lot of area for a garden, but it’s a viable option.
- How To Keep Small Hobby Greenhouse Warm? Energy Efficient Ways
- How To Plant Lantana Seeds? Complete Guide for Beginners
- In Spokane WA Area How To Keep A Small Greenhouse Cool? Complete Guide
- How To Cut Back Delphiniums? Tips Before Cutting Back Delphiniums
- How Does The Concentration Of Fertilizer Affect Plant Growth? Perfect Information For You
Asparagus may be grown in containers, but there are a few things to keep in mind.
Bạn đang xem: Growing Asparagus In Pots
It’s possible that the plant won’t live as long as you had planned, and don’t forget that you won’t obtain a harvest from these plants the year you plant them. Perennial vegetable gardening requires a certain amount of patience.
Planting seeds, on the other hand, requires a minimum of four years before you can reap any substantial benefits. It may take up to three years to reap the benefits of using crowns.
That’s not a problem for you? Finally, you can get started.
- A variety of seed, crown (roots), and transplant sources are available for growing asparagus in containers.
- Starting asparagus seeds indoors in February or putting them outside in April is the best way to get started.
- If you’re planting a crown, be sure to leave a six-inch void above the crown so that the roots can grow as evenly as possible.
- Soil will cover the spears until they are level with the earth once more.
- Throughout the growing season, asparagus plants require constant watering and fertilization.
If you don’t know if you’ll still be in your current location in three to four years, growing asparagus in pots may be a better option than planting directly in the ground.
It’s time to ponder it! Why would you spend so much time and effort planting and tending to asparagus if you were about to move?
It is possible to grow asparagus in pots while you are looking for a permanent home, so long as you have somewhere to put them.
What are you waiting for? Everything you need to know about growing asparagus in containers is right here. You’ll learn how to sow the seeds and crowns and how often to fertilize.
What Are The Different Varieties Available?
Any variety of asparagus may be grown in a pot because it all requires the same amount of labor. However, I prefer to use a male plant because it produces more asparagus and the spears are larger.
Here is a list of male asparagus plants that you may want to consider while making your selection.
When is the Best Time to Grow Asparagus?
Perennial asparagus takes several years to mature and mature enough to be harvested. Spring is the ideal time to start an asparagus plant.
To germinate and thrive, the plant need a temperature of at least 75 degrees Fahrenheit. However, it will develop more slowly at lower temperatures.
Sow seeds inside and then transplant them when they are at least three inches tall if your growth season is short.
The seedlings should not be transplanted outside until the last frost date of the season has passed.
Spring, summer, and fall are all good times to harvest asparagus because it keeps growing all year long. The plant will begin to dry out as the temperature drops and it prepares to overwinter.
During the winter, it will go into hibernation, but the roots will remain active. Once spring approaches and the temperature warms, the plant will begin to develop again.
How Long Does Asparagus Take to Grow?
Asparagus plants require a lot of patience to thrive. Perennial in nature, it matures over a period of two to three years before flowering.
An asparagus plant that is started from seed will produce roots its first year. The crown and roots will continue to grow in the second year. After the third year, it’ll be ready for harvest.
Asparagus can be harvested from the second year onward if it is grown and transplanted.
Asparagus can only be harvested for a few weeks the first time it is harvested. And from the following year, you’ll be able to harvest them for eight weeks.
How to Choose a Pot to Grow Asparagus
Asparagus prefers to have deep roots and spreads wide. In other words, opt for a container with at least 12 inches in depth and width. As long as you wait a few years before harvesting the plant, this will help it flourish.
Asparagus prefers to have deep roots and spreads wide. In other words, opt for a container with at least 12 inches in depth and width. As long as you wait a few years before harvesting the plant, this will help it flourish.
With strong roots and vast spread, asparagus prefers to grow. Consequently, a 12-inch-deep and 12-inch-wide pot is recommended. This will help the plant grow for at least a few years before you can reap the benefits of harvesting it..
Drainage holes in the bottom of your container, regardless of what you choose, are a must. When fully grown, asparagus is a drought-tolerant plant. The first few years of asparagus plant growth necessitate a lot of attention to watering.
Plant roots are susceptible to fungal diseases like root rot when they are over-watered, and drainage holes can help avoid this.
How to Prepare the Container for Planting
You could have purchased a new pot or recycled an old one. I would sterilize the pot in both circumstances. Using a mixture of one part bleach and ten parts water, you can clean it.
Keep the pot in this solution for at least 1 hour. You can then rinse it with clean water and dry it before use.
Keep the pot in this solution for at least 1 hour. You can then rinse it with clean water and dry it before use.
For at least an hour, soak the pot in this solution. After that, you can clean it up and dry it before using it.
A neighborhood garden center, nursery, or online retailer all carry this type of potting soil. It’s also possible to make your own by mixing 1 part coco coir, 1 part perlite, and 1 part vermiculite.
Adding some compost and rock phosphate to the potting soil is also a good idea. Adding nutrients and a dose of phosphorus to the asparagus plant will help it thrive.
Drainage holes at the bottom of the pot are a must. You can even drill your own holes if you choose. There are little holes on the bottom, so cover these with newspaper to keep the dirt in the pot.
Fill the pot to the rim with potting soil, but allow about an inch or two of space at the top. When watering, the potting soil and water won’t run out of the pot, thanks to this design.
The Main Problem Growing Asparagus In Containers
As a result, we must first understand the major disadvantage of growing these vegetables in pots.
While growing asparagus in a container can save you some floor space, it has a negative impact on the plants’ longevity.
Only 2-4 harvest seasons can be expected when the establishment stage is over. Containers restrict the size of the root systems.
You have to determine if the 2-3 years of waiting is worth the 2-4 years of harvesting while the plants are establishing.
How To Grow Asparagus In Containers
Asparagus plants can be grown in containers. We are ready to go now.
1: Decide How You Want To Grow Asparagus
When it comes to growing asparagus in containers, you have a lot of options to choose from, and you need to make those judgments first.
The first step is to figure out if you want to cultivate them indoors or out. Grow them indoors, but be aware that they require a lot of sunlight even in the winter. It may be difficult to achieve the same effect in your own home.
Seeds or crowns? You have to make a decision. It takes a lot longer to grow asparagus from seeds than it does from crowns.
When shopping for baby crowns, see if your local nursery has any that are two or three years old. Allows for a considerably faster harvesting time.
Another thing to think about is when to plant the seeds or the crowns. Between March and April, temperatures rarely rise over 64°F, making this the ideal time to visit.
2: Pick The Right Spot
Look out the window and take a moment to appreciate the rays of sunlight. Every day, even in the winter, the asparagus plants require an average of eight hours of direct sunlight to grow properly.
In the event that the location you originally selected doesn’t provide enough sunlight, moving the pot is an advantage of growing in containers.
But if you pick the appropriate location the first time, it will be easy to get back into the swing of things.
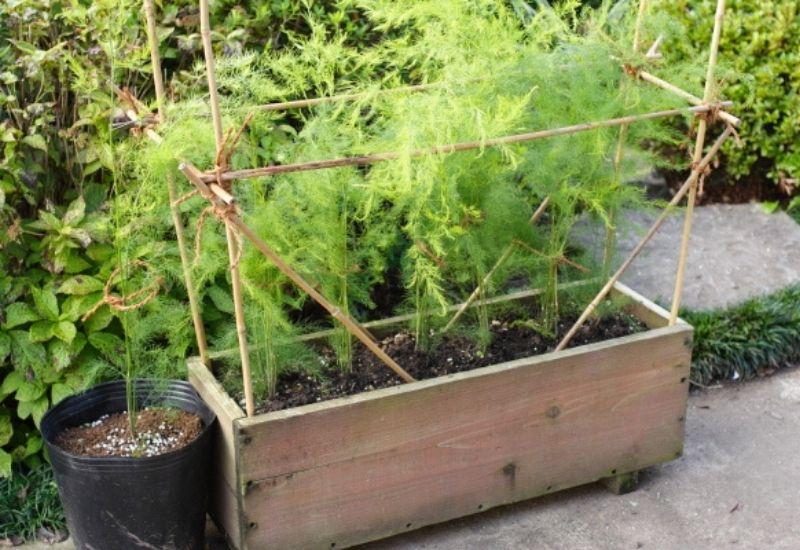
3: Select A Properly Sized Container For Asparagus
One of the most important aspects of producing asparagus is choosing the right container size. Having a pot that is too small can result in the entire operation failing.
It’s difficult to grow asparagus in a container since it requires a lot of room for the roots to grow.
Because of this, you can only grow one plant in a single container! There’s a good chance that one of your plants will get sick, or even die, if you try to place more than one in a container. It’s not a good idea.
As a result, you’ll need a pot that is at least 20-24 inches deep and 20-24 inches wide to cultivate potted asparagus plants.
Both plastic and terra cotta pots will work with these plants, although most people go for plastic because it is less expensive and more likely to not shatter.
Xem thêm : How To Cross Breed Orchids? Comprehensive Guide
Another important consideration is that the container’s underside should have a sufficient number of drainage holes.
Standing water can destroy plants faster than most illnesses or pests, so avoid it at all costs.
4: Add Gravel To Your Pot
One other technique to avoid your plants’ aversion to having their feet wet: use this method. In addition to drainage holes, a layer of gravel at the bottom of the pot is an option.
Each container you use to produce asparagus should have two inches of gravel in it.
Your plants will not only have less moist roots and better drainage, but they will also be less likely to acquire fungi that could harm or kill them.
5: Create The Right Soil For The Plants
It is not possible to remove the soil from the ground and place it in a pot. There are weed seeds and microorganisms in the soil, which could harm your crops.
Make your own garden soil mix at home instead.
Compost, perlite, vermiculite, or peat moss are the primary ingredients in these sterile soil mixtures, which are then blended to create the final product. Container gardening necessitates something that can keep moisture in.
To grow asparagus, you must plant it in soil with a pH of at least 6.5. If you want to raise the pH, try using lime; if you want to lower it, try sulfur. At your local garden center, you’ll find all of these items.
Compost should be added to your soil as well. Nutrients are added, and drainage is improved, all of which benefit your plants.
6: Starting Asparagus Seeds, If You Want
When it comes to cultivating patience, planting asparagus seedlings is a great option. Nothing is going to happen quickly for your plants because it can take up to a year for these seeds to mature into established plants.
This is a wonderful time of year to plant the seeds because the soil is warm enough for germination at this point in the year.
Starting the seedlings inside in February is a possibility as well. Plant one to two seeds in each container, 12 inch below the surface.
Then, get a good supply of water. Germination of these seeds is a lengthy process. Germination usually takes 10-14 days.
You should also make certain that you are sprouting in a warm location with a temperature of approximately 77°F.
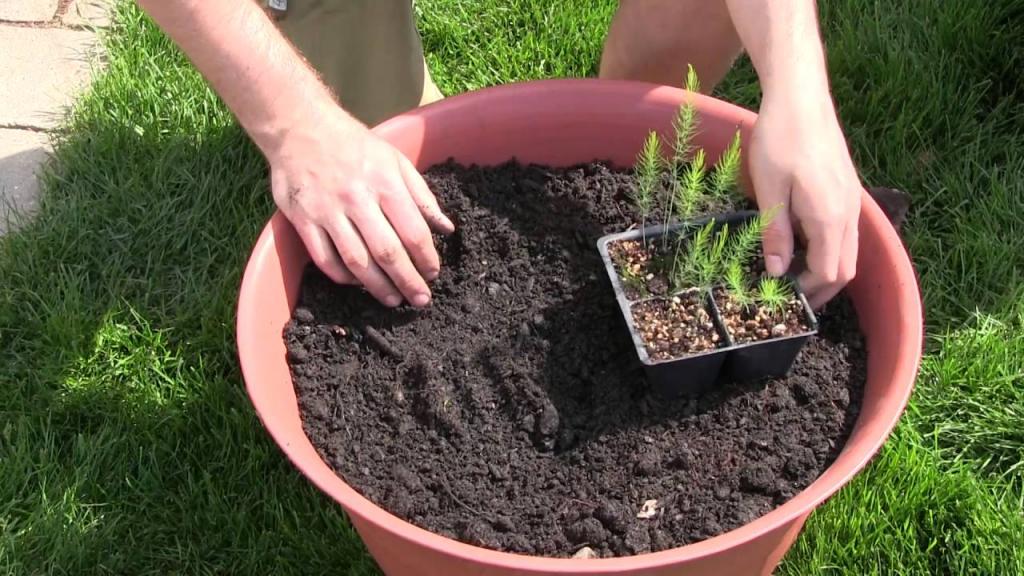
7: Plant Your Crowns Outside In The Container
When starting from crowns, you’ll be a year closer to harvesting asparagus than if you were to start from seed.
Asparagus crowns can be planted outside in this manner.
- Get your shovels out and dig a hole at least eight inches deep and 18 inches broad. Asparagus crowns require a comfortable place to rest.
- Gently spread the roots of the crowns now that they have been taken apart. Make sure the roots are evenly distributed before putting it in the ground.
- The crowns should be covered with a layer of dirt about two to three inches thick. When you do this, a little cavity will be left behind. Until new growth appears, this should remain bare.
- Fill the hole gradually as the shoots grow, leaving only a small portion of the sprouts visible. The hole will soon be filled when the shoots level with the surrounding soil.
How To Take Care Of Asparagus In Containers
You’ll need to learn how to care for your asparagus plants now that they’re growing in containers.
Perennial plants tend to be easier to maintain over time.
As a result, the first two years of a child’s life are the most critical in terms of their health and development.
8: Water Your Asparagus Often
The soil should be damp but not soggy wet in order for your plants to thrive. Root rot, which can be fatal to asparagus plants in pots, can occur as a result of overwatering.
Why do you need so many drainage holes in your container? That’s one of the key reasons!
9: Add Fertilizer Or Compost Regularly
Compost or composted manure should be sprinkled around your plants around once a month.
Side-dressing your plant is the term for this practice. You may also use compost tea to water the plant. For the duration of the growing season, it provides additional nutrients.
Your plant could also benefit from some fertilizer.
You can use either 10-10-10 or 15-15-15 fertilizer around the plant after planting in the spring. For months, the plant will be fed by the fertilizer.
10: Harvesting Asparagus
A harvest of asparagus can take up to three years or more, which is the most frustrating aspect.
Harvesting too early can reduce future harvests and harm the health of the plant as a whole.
As a result, the plant will produce spears in its first year. Encourage the growth of them into bushy stems.
Berries may be visible. To get rid of them, simply remove the stems and let them die back.
Cut the asparagus all the way to the ground in the fall, usually in October. Then, keep up the care for another year.
This happens every year.
To harvest asparagus, you’ll need to leave most spears behind in your third year of growing asparagus in a container.
99 By allowing your plant to strengthen and produce more spears the following year, leaving some behind aids in hardening it off.
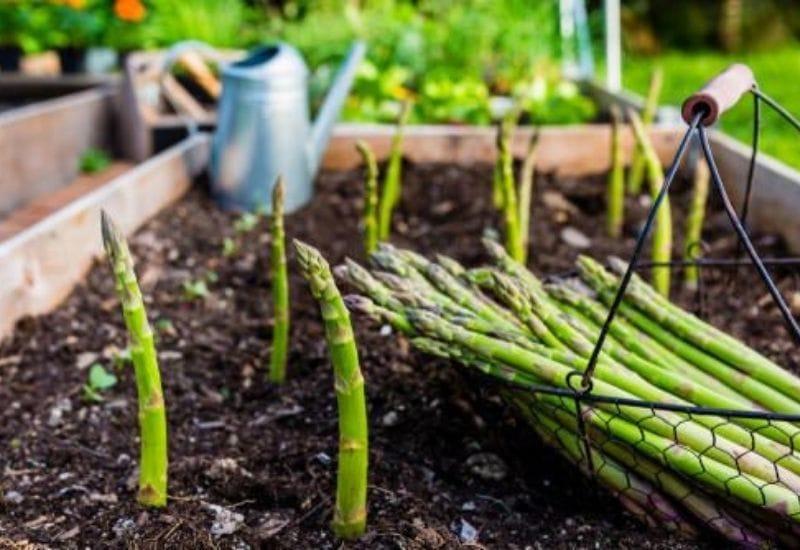
How To Harvest Asparagus Spears
When picking asparagus, there is a good and wrong way to do so.
It is ready to harvest when the spears are around 5 inches tall. Cut the stem about three inches below the soil’s surface using a sharp knife.
Allow your plant to rest after harvesting so that it can produce new spears. Throughout the year, they will continue to produce additional spears as you gather them.
Pick An Asparagus Variety For Containers
When it comes to asparagus, there aren’t a lot of options; there are just a few different varieties available for growing in pots.
They’re all identical in terms of nutrients, establishment time, and harvest size.
The following are some of the most common asparagus cultivars.
Jersey Knight
Known for its excellent yields and ability to thrive in hotter regions, this cultivar is a popular choice. The mature height ranges from 2 to 4 feet.
Mary Washington
Among the open-pollinated varieties, this one features spears with a dark purple hue. The Midwest is a good place to raise them.
Jersey Supreme
Hardiness zones 3-8 can tolerate this variety, and it may thrive in partial shade.
Common Pests And Diseases That Bother Asparagus
Compared to other crops, perennials have less pests and illnesses problems, but it doesn’t imply they don’t happen at all.
Some of the most prevalent pests and diseases can be found listed below.
Purple Spot
If the spears of your plants have purple lesions that are depressed and oval-shaped, you know they have purple spots.
To get Purple Spot, rainwater and other detritus on the plants might infect the plants with fungi.
Make sure the plants have plenty of room to breathe, and if necessary, use a fungus spray to get rid of the problem.
Rust
Rust, a foliar disease that causes a variety of lesions to appear on your crops, affects many plants.
As a preventative measure, place your asparagus plants far apart and in the direction of the wind to ensure enough air circulation.
Make an effort to cultivate disease-resistant varieties. Fungicides can be used in the early phases, but in the latter stages, the plants will have to be destroyed and burned.
Fusarium Crown And Root Rot
When your plants are under stress due to drought, they are more likely to develop russet-colored lesions on their roots, lower stems, or crowns. A yellowing of the ferns is possible.
Unfortunately, this is a soil-borne fungus with a long life cycle that can be difficult to eradicate from the garden.
Xem thêm : How To Grow Penstemon From Seed? Comprehensive Guide
The greatest way to protect yourself is to prevent an illness from forming in the first place. Keep an eye out for disease-resistant varieties, as well as any weeds or debris that may grow around the plants.
Asparagus Miners
Because they’re tiny black flies that measure just 0.2 inches long, these plants might be difficult to find. You’ll observe damage to the base of the stem from mining.
Debris should never be left lying about to provide a breeding ground for bugs. Remove any weeds that have sprung up in your pots.
An organic remedy for asparagus miners is neem oil.
Asparagus Beetles
Asparagus beetles come in several varieties, including the common beetle and the spotted beetle.
Adults can grow up to 0.25 inches long, and they’re known for their fondness for fern leaves.
Keep a watchful eye on your plants and check for damage on a regular basis. During the afternoon, their activity level is at its maximum, therefore this is the perfect time to check.
To get rid of asparagus beetles, you can use a pesticide or an organic oil like neem oil.
How Much Sunlight Does Asparagus Need?
Asparagus thrives in broad sunlight. Your plant needs at least 6-8 hours of direct sunlight each day. However, the germination and growth will be delayed in partial shade.
In order for the plant to thrive, the temperature should be between 75 and 85 degrees F. The plant’s growth will be stunted by an environment that is either too cold or too hot. Asparagus can lose their shape if heated to a temperature that is too high.
One of the advantages of growing asparagus in a pot is that it is portable. This can be used to keep the plant safe from extremes of temperature. To avoid overheating, you might move the pot to a spot with some shade. You may either bring the pot indoors or cover it with a row cover if the weather is too chilly.
How to Water Asparagus in Pots
It’s possible to grow asparagus in dry conditions because it’s a drought-resistant plant once it has developed. In the first few years of its life, it requires a lot of water because it is still developing.
Asparagus plants need a lot of water, therefore it’s best to keep the potting soil moist. Checking on the potting soil first thing in the morning is the most effective method.
If the tip of your finger doesn’t feel damp after sticking it 1-2 inches into the potting soil, it’s time to water the plant. When watering, you should add water until it reaches the bottom of the pot’s drainage holes.
This helps the plant grow a robust root system by making sure the water gets to every part of the potting soil.
The potting soil can be watered with a watering can. A timer-controlled drip watering system is an option if your container garden has a large number of plants. This will make watering the plants easier for you.
Mulch can also be added to the potting soil to assist keep the soil moist for a longer period of time. Mulch protects the potting soil from evaporation by acting as an insulator.
Materials such as dried leaves, wood chips, hay or moss can be used as mulch on top of the potting soil to help retain moisture. After your seedlings have grown a few inches, it’s time to add mulch. In the absence of mulch, seeds will be smothered and unable to germinate.
Watering the asparagus plant in the morning, in my opinion, is ideal. Before the sun comes out, this aids the potting soil in absorbing the necessary moisture. The excess water will then be drained from the soil and leaves.
A humid environment that could lead to fungal disease attacks on the asparagus plant is avoided in this way.
How to Thin the Asparagus Seedlings
It’s common for us to start seeds with two or three seeds per container. So that at least one seed will germinate, this is done.
Seeds may germinate within two to three weeks of planting. You can’t put them all in the same pot because they’ll compete for nutrients and overcrowd each other.
You have two options: either transplant them all into a new pot or trim them out and leave only one in the original container. Thinning implies removing undesirable seedlings and keeping only one.
Keep the seedling that appears to be the most healthy and discard the rest. The seedlings you pick can go in your compost pile.
When seedlings are 2-3 inches tall and have a couple of leaves, it’s time to thin them out.
When starting your asparagus plants from the crown, you can skip the thinning step because the seed has already germinated and has a good chance of succeeding.
How to Fertilize Asparagus Plants
If you want your asparagus to thrive, you’ll need to supply it with the optimum nutrients possible. Preparation of the pot includes the addition of composted potting soil.
The compost will enrich the potting soil with nutrition, texture, and beneficial microbes. While the asparagus is growing, you can keep amending the potting soil with compost on a monthly basis.
Rock phosphate is an additional fertilizer you’ll want to incorporate into your potting soil. Because of the potassium in this, the asparagus plant thrives.
A slow-release fertilizer can be added to the potting soil every month once the plant has begun to grow. The ideal organic fertilizer to use is one with a low nitrogen content and a high potassium content. Asparagus plants benefit from fertilizer with an N-P-K value of 5-10-10.
If you don’t follow the manufacturer’s directions, you may end up using too much fertilizer and not enough.
How to Prune Asparagus Plants
The asparagus plants need to be pruned twice. One is when the plant begins to dry out and become brown in the fall and winter. Asparagus spears can be harvested in two ways: mechanically and by hand.
Asparagus is well-known to be a long-lived perennial. It will go into hibernation for the winter, but will emerge again in the spring. Pruning the dried asparagus plant, which may be yellow or brown in color by winter, is a necessary task.
In order to prevent wasting energy on the dead areas, the asparagus roots will benefit from the trimming procedure. They’ll have to put it to good use when they start growing again in the spring.
Knives or bypass pruners can be used to remove the dead wood at the base of the plant. If you have a compost pile, you may just cut the component and throw it in there.
You run the danger of harming the roots if you try to dig up the potting soil and prune the plant underneath it.
How to Harvest the Asparagus from Pots
Asparagus spears can be harvested in the third year of growth if you started with seeds. It’s possible to begin harvesting crowns in the second year of growth if you started from seed.
This is due to the fact that the roots and crown of the asparagus plant take a few years to mature before the asparagus spears appear.
You’ll be able to gather them for 2-4 weeks in the first year. A typical growing season for asparagus can last 8 weeks after that, depending on the variety.
Asparagus spears are ready to be harvested when they are 6-9 inches tall.
The asparagus spear can be cut off the plant with a scissor or a bypass pruner. My recommendation is to cut at the spear’s base rather than beneath the dirt. Because you run the risk of harming the young asparagus spears and the roots.
With the cut end in a jar of water, you can tie the asparagus stalks together. They’ll stay fresh for a week if you do this.
You can freeze them if you need to keep them for a longer period of time. Before doing this, you’ll need to blanch them. Asparagus spears can be boiled for a minute after being chopped into spears. For a minute, immediately submerge them in ice water.
Remove them and let them air dry. Next, put them on a tray, wrap it in plastic and put it in the refrigerator for an hour to freeze them solid. After that, you’ll be able to keep them in the freezer for up to a year.
Here are some of my favorite container gardening tools
Sincerely, thank you for reading. I hope this information is useful to you in your garden. I’ve compiled a list of helpful items for container gardening below. Use these links and I’ll get a cut of the profits.
Pine Tree Tools – I locate the gardening gloves I need. For both men and women, Bamboo Gardening Gloves are an excellent choice. Because it’s composed of bamboo, it’ll help keep you dry. In addition, they’re quite comfortable and fit perfectly.
Picking the correct container for your container gardening is critical, as you well know. You may get more information about the best containers to use in a piece I wrote recently. The Bloem Saturn Planter is a plastic container if you’re fine with it.
When you’re cultivating plants in pots or grow bags, a watering can is a must-have item. It makes it easier to irrigate the potting soil without causing any damage to the plant’s leaves. Kensington Watering Can is a beautiful watering can that is both sturdy and precise.
a trowel, a gardener’s tool My favorite tool is the trowel because it’s long-lasting and easy to use. Trowels can be used for digging dirt, combining fertilizer, moving seeds, leveling out the soil, mixing compost or mulch, and splitting tubers in the garden.
Using the Corona Bypass Pruner is great since it’s long-lasting and offers a clean cut, which aids recovery time for plants. If you’re on a budget, the Fiskars Bypass Pruner is an excellent choice.
The top container gardening tools recommended by gardeners can be found in this resource I’ve put together for you.
Final Thoughts
Asparagus in pots doesn’t have to be as difficult as you imagined it would be.
For those who don’t have a lot of area for a garden, container asparagus is an excellent option for growing perennial vegetables.
Nguồn: https://iatsabbioneta.org
Danh mục: Garden


