Do you have any questions on how to keep seedlings from developing mold in a small greenhouse? There are a slew of variables to take into account, such as the greenhouse’s temperature, ventilation, and amount of light. You should also think about how far apart your seedlings are placed in their tray and how much water you provide them.
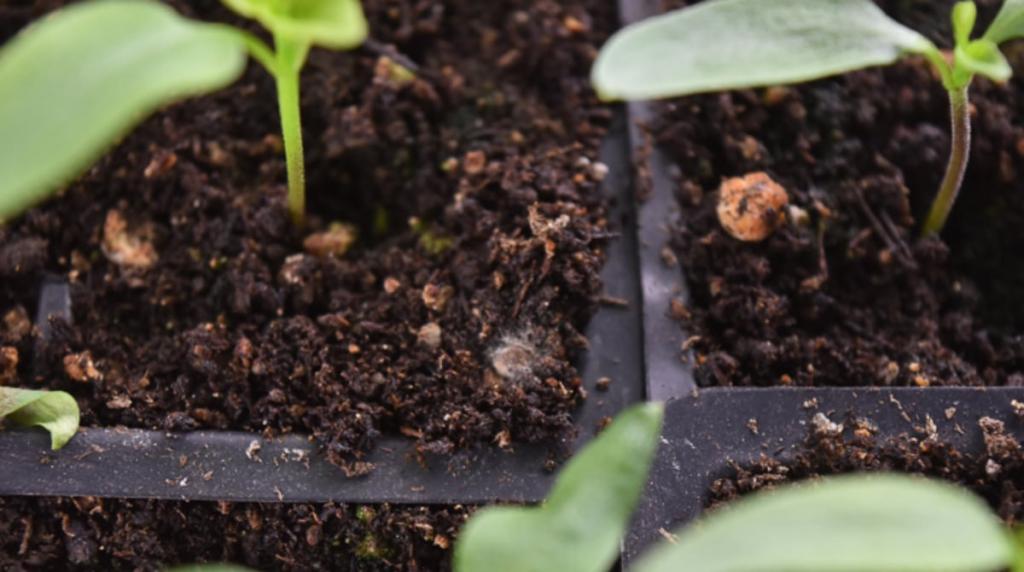
Despite the presence of molds on your seedlings, they will not harm the plant. It’s more of a sign that your soil is excessively damp than anything else. The seedlings’ weak roots can be swiftly rotted by overly damp soil. The rest of the plant will succumb to death if the roots are not revived.
Bạn đang xem: How To Prevent Mold With Seedlings In Small Greenhouse? Step-by-Step Tutorial
You’ll learn seven techniques to prevent mold from forming on seedlings in a small greenhouse from reading this article.
Steps To Prevent Molds On Seedlings
Mold prevention with seedlings in a tiny greenhouse is now up to you to learn about and practice. We’ve outlined all of the necessary actions in this section so that you don’t have to think about it. Read on for more!

#1 Temperature management
Your plants thrive in a specific temperature range for photosynthesis. A temperature range of 77-82F should be maintained inside your greenhouse. If you have a heating mat under your seedlings, anything above this can cause them to overheat.
When it comes to preventing mold in seedlings in small greenhouses, the first step is to control the temperature.
#2 Water management
Overwatering is the most prevalent cause of mold on seedlings. People prefer to overlook the dangers of overwatering plants because watering is a vital part of the process of seedlings sprouting.
Make sure the dirt isn’t wet by pressing your finger into it. If so, you should water your seedlings at that time. It’s simple and straightforward, but it’s often overlooked.
Applying water from the bottom system can also help prevent overwatering. The top of the soil is kept dry, allowing the roots to soak up the water from the bottom, thanks to this watering technique.
However, don’t leave the tray full of water for too long. Make careful to flush off the remaining water after 30 minutes. Keeping stagnant water will damage your plant more than benefiting from it.
However, don’t leave the tray full of water for too long. Make careful to flush off the remaining water after 30 minutes. Keeping stagnant water will damage your plant more than benefiting from it.
#3 Provide better air circulation
However, don’t leave the tray full of water for too long. Make careful to flush off the remaining water after 30 minutes. Keeping stagnant water will damage your plant more than benefiting from it.
Make sure that you don’t let the tray’s bottom watered down too long. Keep in mind that after 30 minutes, you’ll need to flush off the remaining water. Keeping stagnant water around your plant will do more harm than good.
Pay attention to how much moisture your soil has when you follow this advice. When a fan is present, the soil soon dries out. Of course, dry soil is necessary, but not to the point of depriving plants of hydration.
#4 Provide better lighting
A plant’s primary requirements are water and light. To avoid direct sunlight in this scenario, keep the seedlings covered by the plastic coverings. A heated atmosphere hurts seedlings in trays that are covered, because the heat is trapped inside.
Most seedlings require a couple good hours of strong and indirect light on a daily basis. Your seedlings require a lot of indirect light in order to grow properly, so do some research on how much light they need.
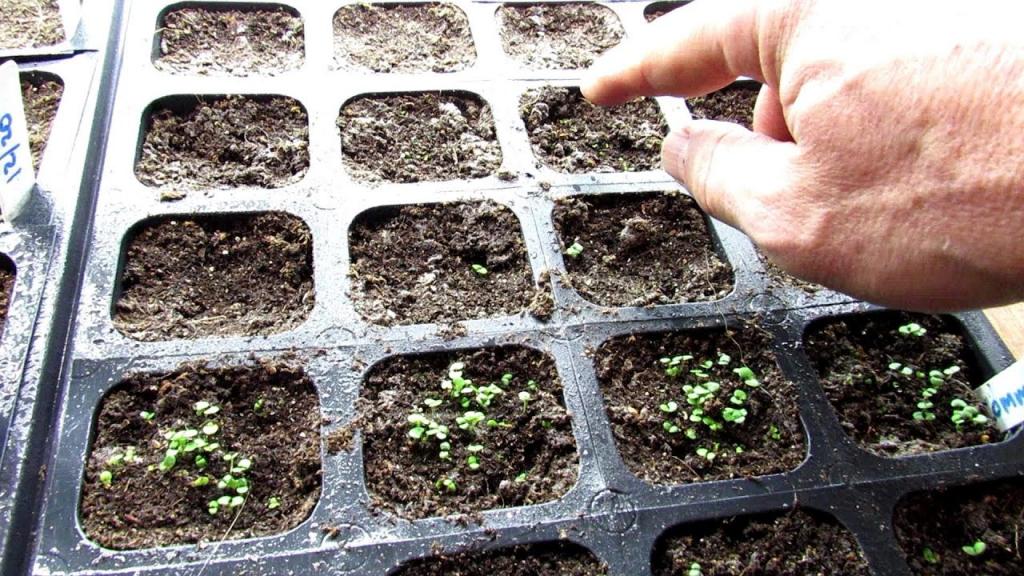
#5 Thinning out the seedlings
A lack of air circulation can result from overcrowding seedlings. As we have already mentioned, good air circulation is a fantastic approach to avoid the growth of molds.
Thinning out your seedlings can help. Pulling a few seedlings out of their trays is required for this procedure. Seedlings can grow more freely and avoid the problem of overcrowding.
Seedlings can be thinned out using these methods:
1. Repot your seedlings
Thinning out involves plucking seedlings and discarding them, whereas repotting involves shifting them to a new pot. The seedlings can be replanted in a reusable plastic pot after they have been carefully removed from the main tray.
In addition to plastic pots, there are a variety of additional environmentally friendly solutions available to you. Plantable pots are becoming increasingly popular, both as a practical convenience and as a long-term solution. Cow excrement has even been used to create a pot.
2. Disinfecting seed flats
Check your seed trays for mold as well as the seedlings and the soil they are growing in. A mold spore is dormant on seed flats for a period of time before reactivating.
Make sure to disinfect your seed trays after each use in order to avoid any issues. There is no need to merely proceed on planting without first checking to see if there is no mold in the soil.
What You’ll Need
Equipment / Tools
- The tiniest of fans
- Watering trough with a shallow depth
Materials
- Bleach solution that has been diluted
Instructions
Avoid Wet Soil
Having fungus in your soil is a symptom that it is excessively damp. An overly damp soil might lead to plant death by rotting the seedlings’ sensitive roots. When beginning seedlings, it’s critical that your seed starting mix doesn’t dry out and harm the seedlings’ roots.
Every day, check the mix in the containers to see if they need any watering before adding any more. There’s no need to water if the soil feels damp. In order to avoid damp soil, make sure to use trays or containers with drainage holes on the bottom.
Increase Airflow
In order to keep mold from growing on your seedlings, you may simply increase the airflow in the area where they are growing. During the day, have a fan running near your seedlings to keep them cool. In order to improve air circulation, you can prop open or remove the lid of a tray that contains your seedlings for a short time. Additionally, the circulation of air supports strong stems, resulting in a more robust seedling.
Improve the Light
Keep an eye on the seedlings to assess how much light they are receiving. In order to thrive, newly emerged seedlings necessitate between 12 and 16 hours of daily good, strong, indirect light. This aids in the dispersal of water and prevents it from pooling. Covered trays should not be exposed to direct sunlight since the heat will harm the seedlings.
Use Clean Tools
Xem thêm : How To Propagate Bacopa? Step by Step Instructions
Sterilize your seed beginning trays or pots with a weak bleach solution before filling them with seed starting mix. In order to provide your seedlings with a sanitary and safe environment, wash all of the trays, pots, and equipment (such as shovels or plant tags) in a solution of 10% bleach and 90% water. After scrubbing, use clean water to rinse.
Manage the Temperature
Few seedlings will thrive in conditions that are either too cold or too hot. When the temperature is between 77 and 82 degrees Fahrenheit, photosynthesis is at its finest. Make sure your seedlings aren’t overheated by utilizing a heating mat if you’re using one.
Thin or Repot Seedlings
Most gardeners use the same seedling pot or tray to plant multiple seeds. All of the seeds might germinate if you’re lucky. Eventually, however, they will begin to compete with each other. Fungus growth can occur as a result of reduced ventilation due to overcrowding. 1
Simply pinch out a few seedlings from each of your pots to avoid this issue. Repot your seedlings as soon as possible. It’s time to pot up the seedlings once they have two sets of “genuine” leaves.
Tip
The cotyledon, or “seed,” leaf, is the first leaf to emerge on the seedling. Before transplanting, wait until there are two sets of true leaves.
Pay Attention to Watering
The majority of seedling mold is caused by overwatering. Don’t water your future plants unless the seedlings specifically want it. Watering them every day or so “just to be sure” might become a habit, but this can occasionally cause more harm than good. Using your finger, check the soil’s moisture level, and only water if necessary. Even so, be sure that the seedlings aren’t fully dried up. 1
When you water your seedlings, reconsider the amount of water you use. Another strategy to lessen the amount of white fuzzy mold on your seedlings and ensure healthier ones is to minimize the amount of water you use per seedling. Seedlings should not be allowed to sit in water for long periods of time.
Consider a solution that allows you to water the seedling container from the bottom if at all possible. Fill a solid-bottomed tray with water, then place the seedling insert in it. Let it soak in the liquid for an hour, then drain it. You can help your plants stay healthy by not getting water on the tender stems and fresh leaves.
What Causes Mold in Seedling Flats?
An overly damp potting soil might cause mold to grow on seedlings. The seedlings may appear to be healthy, but they are at risk of getting a condition known as damping-off, which causes the stems of the seedlings to collapse and they die. If the seedlings are placed flat in direct sunlight in a warm area, they are more likely to develop mold. Mold grows on potting soil, forming a hard crust that prevents seeds from sprouting.
How to Treat Mold in a Seedling Flat
The seedlings could be damaged if you remove the mold from the seedling flat, but you can prevent it from spreading. Allow the potting soil to dry completely before watering the seedlings again, and keep the potting soil moist but not saturated. If the seedling flat is located in an area that does not allow for adequate air circulation, transfer it to an area that does. However, avoid placing the seedlings in direct sunlight or in an area that is frequently hot.
How to Prevent Mold From Growing on Potting Soil
When it comes to potting soil mold, prevention is better than cure. There is a risk of harming the stems of the seedlings if the mold is removed after it has developed. Use a potting soil that does not contain compost or manure to prevent the growth of mold. Vermiculite and peat moss, when combined, generate a mixture that is evenly moist and does not develop a moldy crust in the sun. As a substitute to compost and manure, use a liquid fertilizer for seedlings that is suited for seedlings after the seedlings have established two sets of true leaves. Follow the manufacturer’s instructions for dilution and application of the fertilizer.
How to Sterilize Seedling Flats
Mold spores and serious plant diseases can spread more easily if seedling flats are not sterilized before use. To make a 10 percent bleach solution, mix 9 cups of water with 1 cup of household bleach. Before adding potting soil, soak the seedling flats for 30 minutes in the solution, then rinse them thoroughly under running water.
How to Prevent Mold in Your Greenhouse
Water, oxygen, and cleanliness are the three most important factors in keeping mold at bay in your greenhouse. Keeping your greenhouse mold-free is considerably easier if you follow these three simple rules.
Warm temperatures are ideal for mold growth. Mold can’t survive without a high level of humidity (at least 85 percent). Having a lot of stagnant water around is another condition that encourages mold growth.
Mold may be avoided in the vast majority of cases by carefully monitoring and controlling the flow of water and air.
Carefully Control Water and Air Circulation in Your Greenhouse
Mold can grow on the leaves of your plants, so make sure they are adequately watered and that the foliage is kept as dry as possible.
Keep Your Plant Leaves Dry
Wet plant leaves provide the ideal environment for mold to flourish. When a plant is infested with mold, it can quickly spread to other plants in the area, resulting in an all-out infestation.
Keeping plant leaves dry is an important part of preventing mold formation in your greenhouse. There are a few things to bear in mind when doing this.
Misting your plants with a hose attachment, watering from above, or spraying their leaves are all ways to ruin your plants’ health. Using any of these methods may cause the leaves to become damp, which will encourage the growth of mold.
Instead of drenching your plants’ foliage, water them near to the ground. The plants may benefit from a side-dressing of nutrients, which can be accomplished by incorporating nutrients into the soil and soaking it in.
As a last note, exercise caution when selecting a location for your plants. Keep them out of the way of condensation drips from the greenhouse’s plastic or glass roof. Mold can grow on the leaves if they become damp, as explained above.
Finally, water your plants in the morning rather than the evening. When it’s chilly outside, watering in the morning allows the water to penetrate the soil and reach the roots of plants.
The heat and sun of the day will evaporate more of the water if you water later in the day. As a result, mold might thrive in the greenhouse due to high humidity levels.
Avoid Over Watering Your Plants
Another mistake that can lead to mold formation in a greenhouse is over-watering your plants. Because of excessive watering, the soil has more moisture than the plants can utilize.
Mold can grow immediately on the soil’s surface if the soil is too damp for too long. Afterwards, it can infect plants and soil throughout the greenhouse.
Water your plants deeply, but less frequently, to avoid this issue. Thus, between waterings, the soil can dry out and avoid mold formation.
Always check the soil moisture before watering – if it already feels moist, then there is no need to add more water. In fact, you can “kill your plants with kindness” by over watering.
Leave Enough Space between Plants
Xem thêm : How To Plant Canna Seeds? Comprehensive Guide
The soil should always be checked before watering, and if it’s already damp, there’s no need to add more. Watering your plants too much actually has the effect of “killing your plants with kindness”.
In the event of an outbreak of mold in the greenhouse, it is important to leave enough distance between plants to avoid the spread of the disease.
Allow Ventilation in Your Greenhouse
Providing enough spacing between plants is only half the battle. You’ll have to open the greenhouse’s vents or doors to let in some fresh air to replace the stale one.
Also, you can use dehumidifiers and fans to circulate the air in your greenhouse. To avoid spreading mold spores, take sure to maintain these machines clean.
Keep Your Greenhouse Clean
Mold can’t grow in your greenhouse if you don’t keep the humidity and air flow balanced. A plan for cleaning up the greenhouse and its tools of the trade (pots and containers) must be devised after you have completed this step (glass, plastic, wood, or metal surfaces).
Sterilize Pots, Containers, and Tools
Maintaining a regular cleaning plan for all of your greenhouse instruments will help keep mold at away.
In order to remove any mold spores that may be lurking in the background, you should clean even if you don’t notice any mold developing. Start by cleaning and sanitizing your containers and pots.
To begin, remove all the soil and plants from the containers. If you have a compost pile, you can add the soil and plant debris to it and utilize it again in the future.
Once the soil has been removed from the pots, use a rag and soap and water to clean them. Remove the soap from the pots by rinsing them.
To get rid of any mold, fill the pots halfway with water and the rest with vinegar (3 parts water to 1 part vinegar).
The last step involves giving the pots a thorough scrub, followed by letting them air dry. For the following year, keep them in a clean, dry location.
On a frequent basis, you may wish to sanitize your gardening tools, including pruning shears. You can disinfect your tools by wiping them down with an alcohol-soaked rag and sanitizing them.
The spread of illness will be prevented, and a healthy plant is more likely to resist mold.
Clean Surfaces between Seasons
Clean all surfaces that may hold mold growth, as well as the tools and containers in your greenhouse. Included in this are:
- Metal containers have a rim on the top and sides.
- the entire wooden bench’s top and sides
- The greenhouse’s top and sides are covered with plastic or glass panels.
To disinfect your greenhouse, utilize the following methods:
- The first step is to remove any dirt or dead plant stuff from the surface.
- With a moist cloth, remove any leftover dirt or dust.
- Afterwards, clean the surfaces with a solution of one part vinegar and three parts water. This procedure may necessitate the use of gloves, as vinegar can irritate the skin if left on for too long.
- Finally, use a dry rag to remove any remaining vinegar and water from the surfaces.
In the same way that you sow seeds and transplant seedlings, you should arrange a time to clean and mold-free your greenhouse.
How to Get Rid Of Mold in a Greenhouse
We’ve discussed ways to keep mold at bay in a greenhouse.. Getting rid of mold once it has already taken hold in your greenhouse is the next step.
Because mold can cause allergic reactions in some, it’s important to use the following precautions: a mask, safety goggles, and gloves when doing the cleaning processes. That way, you won’t inhale mold spores or get it in your eyes or hands.
To avoid breathing in mold later, wash the clothes you were wearing after finishing your work.
Remove Infected Plants and Soil
Remove any mold-infected plants first. The color of mold that grows on plants can vary greatly (commonly, you will see mold that is white, gray, or black).
For mold prevention, you can bury these plants instead of composting them, as spores on the wind can carry the mold spores.
The next step is to dispose of any moldy soil (typically a white or gray fuzz on the soil’s surface) by composting it or burying it.
Use Vinegar to Clean Surfaces
Even if mold has already begun to grow on a surface, vinegar can assist to keep it from spreading.
Spray the moldy area with a vinegar solution made up of one part vinegar to three parts water.
Allow the vinegar to do its job on the mold for a few minutes before using it again.
The mold can then be removed off the surface with a rag. To avoid spreading mold, you may wish to use many towels when scrubbing the surfaces. The rag can be washed by wringing it out in a pail of water.
This article from the University of Massachusetts Amherst Extension provides additional details on how to properly clean and disinfect a greenhouse.
Conclusion
We’ve compiled a list of seven great strategies to keep seedlings from developing mold in a small greenhouse. Various issues are addressed, and appropriate solutions are provided for each of them. Molds on your seedlings will be a thing of the past once you have this information.
Nguồn: https://iatsabbioneta.org
Danh mục: Garden


