Using the words “hydroponics” and “orchids” can be a little scary. Orchids are noted for their grace and elegance. Also, some people believe that maintaining orchids, whether indoors or out, can be difficult and time consuming. Hydroponics has a scientific ring to it, but it also has an air of tedium about it. In reality, they’re not that tough to grow, and when you mix them with hydroponics, amazing things can happen. Here’s everything you need to know to grow orchids in water successfully.
Can you grow orchids in water?
If you take good care of them, orchids can thrive in water. Some people may find it more convenient to grow orchids in water because they don’t have to deal with soil upkeep or watering. However, there are a few factors to keep in mind.
Bạn đang xem: How To Grow Orchids In Water? Complete Guide for Beginners
It’s crucial to pick the correct container. As the size of your orchid varies greatly, you’ll want a bowl that’s big enough to retain all of its roots and give them room to expand and flourish. In order to prevent the orchid from falling over, make sure your bowl is tall enough to accommodate the stem.
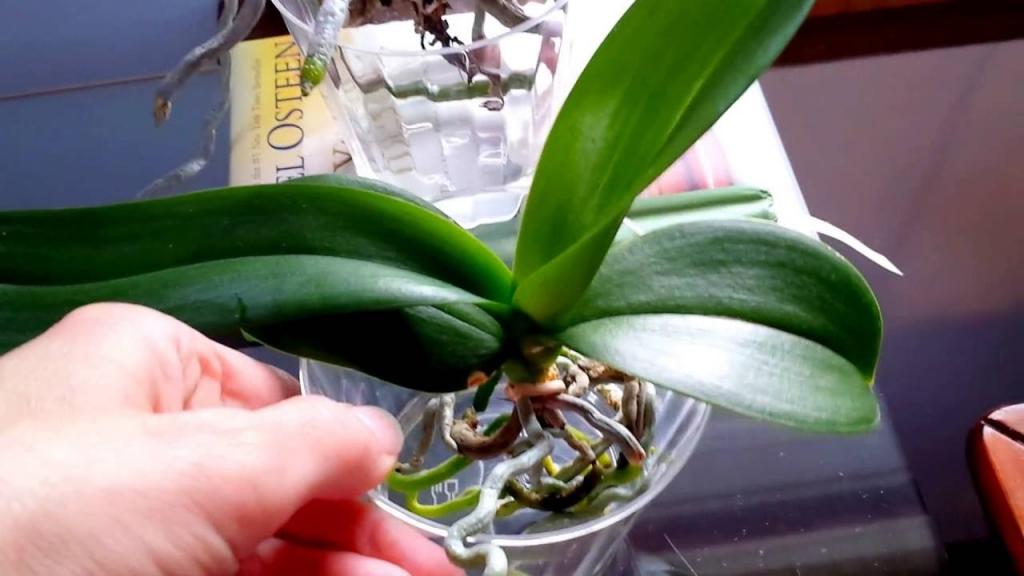
Put the orchid in the bowl only after you’ve checked the roots to make sure they’re clean and healthy. Take care to remove all soil from the roots of your orchid if you’re shifting it from soil to water. Examine the roots of your orchid for damage or decay and remove any infected areas. The roots of your orchid should be gently pulled apart if they are knotted or root bound.
To avoid shocking your plant, the water in your bowl should be at room temperature. The hardness of your water may determine whether or not tap water is safe to drink. Chemical water treatment is common in some cities, which is acceptable for humans but bad for plants. You can use rainwater if you don’t reside in an acid rain area, but distilled water is the best.
Make sure your water covers the roots, but not the leaves. Leaves that are wet and rot can damage the plant, make the water dirty, and seem unappetizing. Slowly and carefully add water to your plant’s bowl so that it doesn’t get above the leaves’ water level.
The choice is yours as to whether or not to embellish your bowl. Decoration of your bowl is up to you if the items are water-safe and correctly sealed. Fish tank pebbles and ornaments are generally safe to use. In order to avoid adding harmful minerals, do not add rocks from your yard to your plant’s water. To avoid algae accumulation, be conscious of the need to clean any new decorations you install.
Can any orchid adapt to hydroponics?
Transferring newly purchased or young orchids to a hydroponic culture is recommended. Changing the potting media on orchids that have been in it for a long time and seem happy with it isn’t a good idea. To push people to adjust to a new environment and drastically change what they’ve done for years is akin to a mid-life crisis. Opt for brand-new or recently purchased orchids.
In their natural habitat, epiphytic orchids have spongy roots that are exposed to the air, making them ideal for hydroponics. The roots of terrestrial orchids are designed to collect nutrients from the soil, not the air, thus they will not be able to adapt as well to this strategy.
What are the cycles or rotations of dryness and watering?
Hydroponic orchids can be grown in two ways.
Full water culture is the first method of growing plants in a pot with nothing but the roots and water in it. Make sure the orchid has some wet time and some dry time by using a watering schedule Orchids (not species or subgenres, but individual plants) have their unique set of tastes and characteristics. You’ll have to experiment to find out what works best for each plant, and then replicate those circumstances over and over again.
You can start with a two-day watering cycle and work your way up to a five-day drying cycle. This resembles the unexpected and scattered rainfall that occurs in some woodlands. Make sure your orchid is in the best possible condition and see how it responds.
Keep in mind that orchids grow slowly and adapt slowly as well. This procedure cannot be verified in a matter of days or weeks. Take your time.
For example, it normally takes six months to a year to discover if a change in potting material is beneficial or detrimental to the orchid. You’ll have to wait several months for the orchid’s growth to resume after every transplant or change of media. Adaptations don’t happen in a week, as they do in therapy following a catastrophe in life.
Your actions have completely destroyed the orchid’s basis, therefore think about this from the orchid’s point of view. Despite the fact that you’ve given it something better, don’t expect it to express gratitude. The orchid will be better off if you give it time to learn how to adjust to new conditions and then work with it to develop roots specifically for water culture. It will eventually come to realize that the adjustment was beneficial.
Perhaps this is how our Creator works, too.
Semi-hydroponic is another term for this type of orchid care in which water is always present in an orchid pot while leca stones are placed on top of the orchid (organic expanded clay pebbles). Even if the roots are never in contact with water, the stones are, and this ensures a consistent level of hydration and humidity.
Using this strategy, you’ll swap out the water on a regular basis, replenishing the bowl’s water reservoir. A biweekly water change is the norm for some orchid gardeners, while others do it weekly. Again, each orchid will indicate how well it adjusts to the hydroponic system, so experiment and discover which ones the orchid responds better to. to the system.
How do I transfer and orchid into a hydroponic culture?
Remove them from the plastic pot and clean out the roots of any sphagnum moss that may have been stored there. Moss, debris, pine bark, and anything else must be removed completely.
Everything must be disposed of.
On the market in department stores and local shops, orchid producers focus on the least amount of investment for their money when it comes to potting and selling orchids. Because sphagnum moss is usually the greatest medium for new plants, they begin with a little, delicate plant in sphagnum moss.
A small amount of pain and suffering is inflicted onto an orchid each time it is handled roughly. To put it another way, it is best for the orchid if the grower has as little contact as possible with the plant. In order to replace an orchid when it has outgrown its pot, the cost of doing so will increase, since there is now twice the expense. If they don’t want to do this, they fill in the pot with additional moss around its outer edge and leave the older moss within.
Xem thêm : How To Convert A Greenhouse Into A Chicken Coop? Comprehensive Guide
Moss can be divided into two distinct phases: the outer layer, which is more easily removed, and an inner layer, which is more densely compressed and adhered between the plant’s roots.
Leave the plant in tepid water for twenty minutes to help remove the moss. This makes it easier to remove the sphagnum because it floats.
To be clear, all of the potting medium must be removed.
This is the most critical part of the orchid’s transplantation. When you leave even the tiniest piece of bark, moss, or other debris in the hydroponic system, it will disintegrate in the water and encourage root rot. This is the perfect time for germs and mold to thrive, allowing your orchid to suffer in the future.
In a way, it’s like rekindling an old flame. Before you go on to the next relationship, make sure you’re clear of anything left over from the past one. If you don’t, that one little slither will wreck everything.
In the case of our orchid, this involves removing all traces of its presence. Remove photos, emails, and potting material from your computer. Get started on a new path; start at the beginning. A clean slate on which to build.
Don’t hurriedly go through this process.
Now that the orchid has been freed of its previous potting material, it’s time to examine its roots. Squishy, molded or discolored sections of the roots are a sign that something is wrong. When cutting the orchid, use sanitized scissors to avoid spreading illness.
If you’ve ever grown orchids previously, you’ll be able to handle this portion of the transplant better. If you’ve never grown an orchid before, I don’t recommend starting off using hydroponics. Start using hydroponics once you’ve gained some experience and know what to look for when clipping away roots. It’s possible to remove the outer layer of the root to reveal a fine, wire-like root that lacks a velamen in severely damaged or spongy areas. The root will live, and it will still be able to take in water, even if this procedure appears to be harsh. Although the final feature is a bit disconcerting, and the orchid will not appreciate this procedure, it is a workaround for retaining one or two more roots when possible.
What pot do I use with hydroponics?
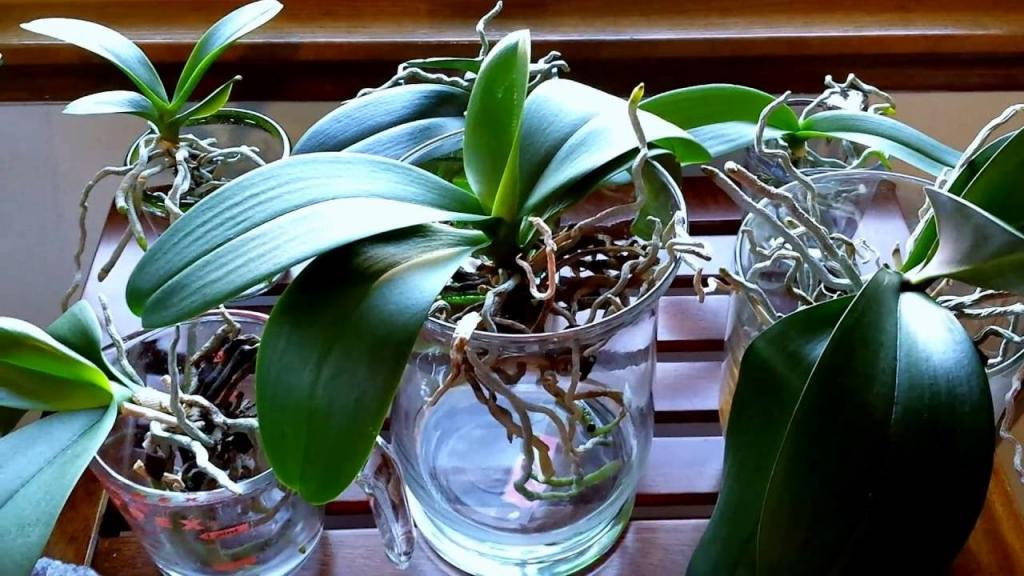
Any water cultivation method that uses the pebble method (semi-hydroponic) or a tall jar with long, high-curved sides will work. Any round or globe-shaped glass with a small “mouth” will work. This particular form is ideal for retaining moisture while also allowing for adequate airflow.
It all boils down to the top layer’s area. Evaporation is accelerated if there is more surface area exposed to the outside environment. Fast evaporation isn’t what we desire.
The exposed surface area of wide, shallow baking pans like jars grows dramatically. Avoid using jars that are too broad, as this can lead to faster evaporation. As a result of the same rationale, higher containers are preferable since they provide a more direct connection to the outside environment and so make evaporation more efficient.
You can think of a whiskey bottle and how long it would take water droplets to reach the tight hole if you use the pebble method. In contrast to the shallow, wide, baking pan-like jars, this is the ideal example of a jar to imitate.
Another requirement that cannot be waived is the clarity of the content. Glass or plastic are both suitable materials. This gives you an up-close look at the orchid’s development and how it’s adjusting to its new home. You must regularly monitor the orchids in water culture to see how they are adapting to their new environment.
The size of the bowl is the final consideration. Transplant the orchid into a container where the roots will reach the bottom and the leaves will sit outside the top, adjacent to the basin, for full water hydroponics.. For semi-hydroponics, a taller basin is needed to provide the roots room to grow between the reservoir and the basin.
How much water do I fill the pot with?
For a complete water culture, you need to pay attention to one more detail: the amount of air that is circulated around the plant’s root system. In order for the water to evaporate completely and for the air to circulate freely, you’ll need a fishbowl-shaped jar. There must be holes drilled on each of the pot’s sides for this to work.
Add stones up to two-thirds of the jar’s height. You must keep the water level in the bottom third of the jar at a constant height, perhaps by drawing a mark on the glass. It’s best to keep the water level at 13 of the pebble height, which is far away from the roots, by watering everyday or every other day.
Water should be exchanged once a week.
Because the roots aren’t in direct contact with the water, never allow the water to totally evaporate. With this strategy, you don’t have to worry about root rotting. This is the simpler of the two approaches, making it ideal for those just getting started.
The second procedure involves soaking the root for two days in water, followed by five days of air drying. Only water may be found here, with no stones or marbles can be found. If the procedure is not rigorously followed, it might cause root deterioration and root rot.
You must pay attention to the quality of the water you’re utilizing in order to use this procedure. Some cities’ water treatment and purification systems use a plethora of chemicals that benefit humans, but are poisonous to orchids.
Because of this, you can either: 1) acquire rain water, or 2) fill a basin with water and leave it out overnight to collect rainwater. As a result, the water will be safe for use in orchids because the dangerous compounds will be evaporating into the air. There are many supermarkets and food stores where you can purchase distilled water.
What are some of the signs that my orchid is not adapting well to hydroponic culture?
For a complete water culture, you need to pay attention to one more detail: the amount of air that is circulated around the plant’s root system. In order for the water to evaporate completely and for the air to circulate freely, you’ll need a fishbowl-shaped jar. There must be holes drilled on each of the pot’s sides for this to work.
This is what an orchid would say if it had a mind of its own: I can’t survive here. It’s too painful. I’ve had enough. In the hopes that my species will continue to exist, a bloom is my final distress call. There was a blossom as a result.
Xem thêm : Recreate Wild Conditions When Growing Mint In A Greenhouse? Ultimate Guide
A flower stalk doesn’t necessarily mean hydroponics is working, so don’t get too excited about it just yet. You can compare the outcomes after a year or two in the hydroponic medium. Is there a lot more blooming? In other words, do your plants appear to be flourishing under the circumstances you’ve set up for them?
Root deterioration is one of the early warning indications of problems. This is why it is so critical to keep a close eye on your surroundings.
The second sign is a yellowing or discoloration of the leaves. The most common cause is a fungal infection. In a hydroponic system, bacteria and fungi multiply by a factor of 13. You must notice it quickly and begin therapy right once.
Over-watering in a non-hydroponic setup is another explanation for the yellow leaves (assuming it isn’t from too much direct sunshine or cold temps, which both turn leaves yellow). Your orchid is dying because of the high humidity and frequent irrigation. How might hydroponics help with this issue? This is a good question, thank you. I’m still looking into this one, though.
You may conclude that your hydroponic or semi-hydroponic system has been successful if the orchid blooms again. Although it pains me to say it, this could be an indication of stress.
Why are many orchid growers against hydroponic methods?
Hydroponics has a lot of drawbacks.
Hydronic gardening will not save you time to begin with. Hydroponics and semi-hydroponics are not “hands-off” methods, and you will still need to water your plants. A more thorough examination of the roots will take longer because you’ll have to spend more time on each one.
Using this strategy also has the drawback of necessitating a certain level of problem-solving expertise, which might take time to develop for a novice orchid grower. To prevent the exposed roots from being recovered, root rot can swiftly spread throughout the soil. Adding bacteria, mold, root rot, and decay to the orchid’s already-stressed environment isn’t a good thing.
Thirdly, not all of an orchid’s roots, not just the bottom ones, need to be moist. This is the case for many phalaenopsis. While the lower portion of the roots is saturated, the upper portion is close to drying out completely. A constant air-conditioner running in a low-humidity environment, such as in most homes, can be a factor.
For a moment, imagine yourself as an orchid, with its top dry and its bottom submerged in a pool of water. No potting media means it must adjust to two drastically different levels of humidity inside the same root, which is a loss of foundation and stability. That’s quite a bit of adjusting.
If you’re a parent or a teacher, this is for you:
I stumbled across this 29-page PDF book about hydroponics in the classroom by accident. You may access the PDF version of the book by clicking here. Using hydroponics in the classroom is a great way to get students interested in science. Not only does it go through the basics of hydroponics, but it also includes a number of experiments that students can conduct on their own or in a group environment.
To be clear, I am not compensated in any way for giving this information. To be honest, I just thought it was cool and wanted to show my appreciation for someone else’s effort.. In terms of format and appearance, it’s a little old, but the material hasn’t really changed since 1995. It’s worth checking out, in my opinion. Hydroponics is everything you need to know now that you’ve learned about it and what to look for when you’re transplanting an orchid into a new medium. Learn how to create a beautiful floral arrangement or make an orchid terrarium in our lessons. In case you’re not convinced hydroponics is the best way to grow your own food and want to learn more about the various types of growing media we provide, check out our other articles on the subject.
Never, ever, ever give up on learning!
To thank you for your interest in orchid fertilizer, I’ll send you a 14-page booklet in the mail. You can save it to your computer and then print it. To keep things lighthearted, I created a coloring book for the guide.
I don’t spam, but I do send out an email every two months with a few interesting things. If you’d like to learn more about this topic, go here to visit a page on my website where I go into greater detail.
In addition, if you’re looking for an orchid diary to preserve your notes on orchid care, check out my two solutions for that on this page. There is a free Excel spreadsheet that you may download if note-taking isn’t your thing. Detailed instructions can be found here.
Please let us know in the comments if this information was helpful to you or if it helped clear up any lingering questions. I enjoy exchanging ideas and stories about orchids with other people who share my interest. Make sure to share this page with a friend who owns an orchid, leave a comment below, or simply give it a thumbs up.
How long do you keep orchids in water?
When it comes to orchids in water, there are two options. There are a number of ways to keep your orchids happy and healthy. After two days in the water, remove the orchid and allow it to dry out for another five.
Given that neither approach has a certain advantage, it all comes down to personal preference and time constraints. Take a look at both approaches and see which you prefer!
Can orchids grow without soil?
Without soil, orchids can and do grow. To begin with, they require a modest bit of soil, but as they grow older, they require less and less. Orchids are air plants in their natural habitat. In other words, they have a very shallow root system and typically rest on tree limbs, so they acquire most of their nutrition from above. Orchids prefer humid environments because that’s how they prefer to take in water.
However, not all orchids have the same level of aversion to air. To adapt to a soilless existence, varieties that have been far removed from their wild ancestors and cultivated to grow in soil may be more difficult. However, don’t give up! With a little perseverance, you can successfully cultivate any kind of orchid in water.
Prepare to dazzle your relatives and friends with an eye-catching setup that requires little upkeep! Be on the lookout for root rot, make sure your water is fresh, and jazz things up a bit with some flowers or other decorative accents Spice up your home and keep the plant happy with this simple addition.
Nguồn: https://iatsabbioneta.org
Danh mục: Garden


