Pine bark or specific orchid potting mixes should be used instead of moss or regular potting soil while growing orchids.
- How Does The Concentration Of Fertilizer Affect Plant Growth? Perfect Information For You
- How To Propagate Chinese Evergreen Aglaonemas? Comprehensive Guide
- How To Divide Black Eyed Susans? 3 Easy To Follow Steps For You!
- How To Grow Hydroponic Strawberries? What You’ll Need To Get Started
- Ultimate Guide to Choosing a Best Plants For Northern Nevada
If you want to save fading orchids, you must mimic their natural environment and prune back their dying roots in order to achieve optimal conditions.
Bạn đang xem: How To Save Orchids? 5 Steps to Revive Orchids
Keep reading to find out what’s killing your orchid and what you can do to bring it back to life.
How to Save a Dying Orchid in 5 Steps
In North America, the Phalaenopsis orchid is the most common variety sold. Despite this, it is one of the most low-maintenance orchids.
Though, this doesn’t mean they’re the easiest plants to care for.
However, this does not imply that they are the most simple plants to maintain.
It is possible that if you click on an affiliate link and purchase something, I will receive a tiny commission.
It doesn’t matter whether your orchid has bad roots or the first signs of stem or crown rot, you can save it if you catch it early enough.
It is possible to salvage the majority of orchids simply by cutting out the rotting roots and discarding the potted plant as a whole (sometimes even most of the stem).
For fungus, use hydrogen peroxide and repot the plant into an orchid container with new bark (media), as well as sphagnum (moss).
To revive a dying orchid, follow these instructions.
Step 1: Observe the Orchid and Diagnose the Problem
To begin, carefully examine your orchid to understand the nature of the problem. You must be able to distinguish between a dying orchid and one that is simply dormant.
As a new orchid owner, it is possible that your plant is in a resting phase.
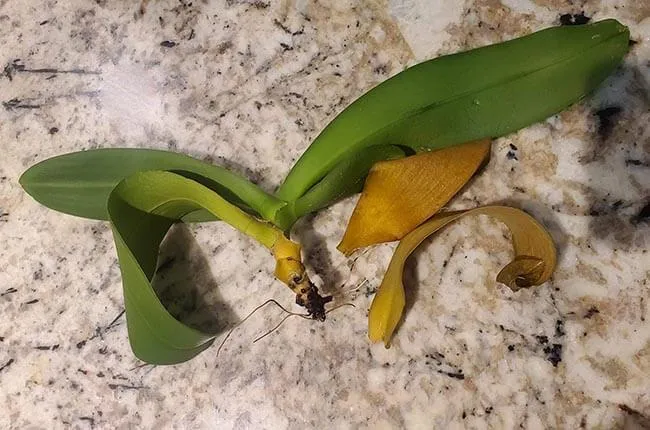
If the blossoms on your orchid plant start to fade, don’t assume the plant is dead and toss it in the trash.
It is inevitable that the flowers on any orchid will eventually fall off and the stem where they flowered will become brown.
Your orchid is not dead if it has brown stems (flowers spikes). A dormant period of six months to a year is subsequently followed by rebloom in the correct conditions.
There are certain things you can do when the blooms fall off to encourage it to rebloom if it is otherwise healthy.
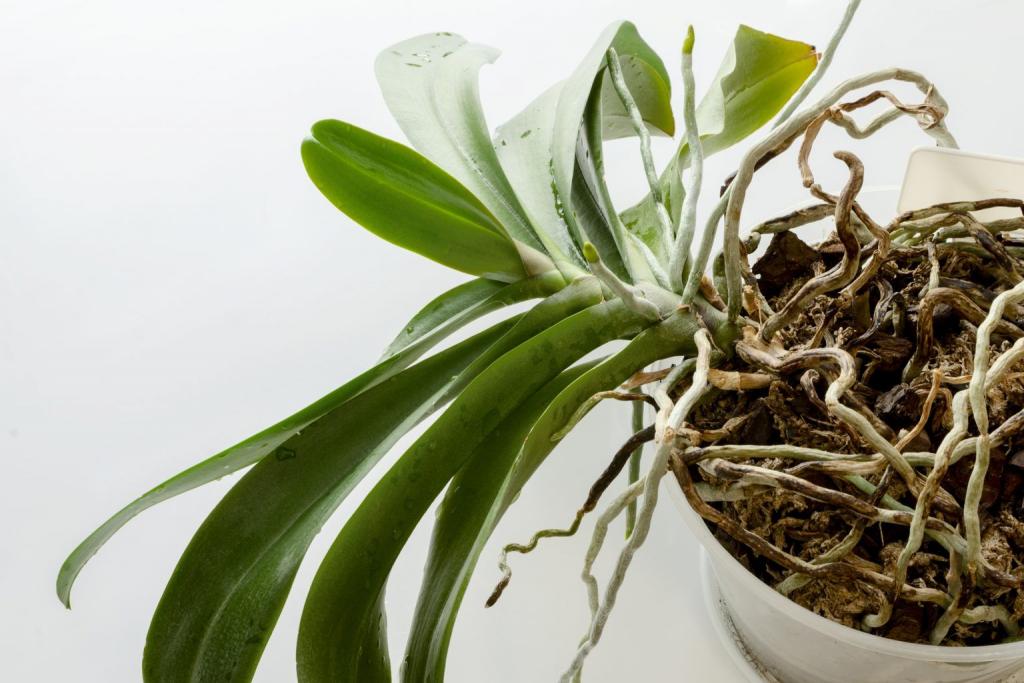
A healthy orchid has leaves that are an attractive shade of olive green and free of creases.
It’s an early symptom of stress if the leaves are dark green, indicating a lack of light.
Orchids naturally shed their lower leaves from time to time. A healthy orchid will have new growth coming from the top even if a leaf at the bottom is yellowing and thinning. It’s only removing the old ones to make room for the new.
Overwatering or allowing your orchid to sit in water for an extended period of time is the most common cause of a dying orchid. Root, stem, and crown rot are all examples of this.
Fungus gnats are attracted to decaying plant debris.
There are many telltale signs of dying orchids, including drooping leaves that appear dry and mushy roots that range from yellow to brown.
The most common cause of orchid death is root rot, which is caused by overwatering or using the improper type of potting soil.
Crown rot or stem rot may be the cause of your orchid’s death if it is losing all of its leaves or becoming yellow.
The aerial roots, on the other hand, may still be salvageable.
Plants with “aerial roots” are those that have roots that extend above the soil.
As long as you have any of these on your orchid, you’re in excellent condition for reviving it, as these roots are less vulnerable to rot.
Your plant’s ability to absorb water and nutrients is compromised if there are few or no roots left.
In the last stages of crown rot, the upper half of the stem (the lower part of the leaves in the center) will turn brown, and then black.
Similar to stem rot, which develops when water is trapped between the leaves, stem rot can also occur.
That means you’ll have to get rid of everything else that’s rotting from the plant if it looks worse than merely finished flowering.
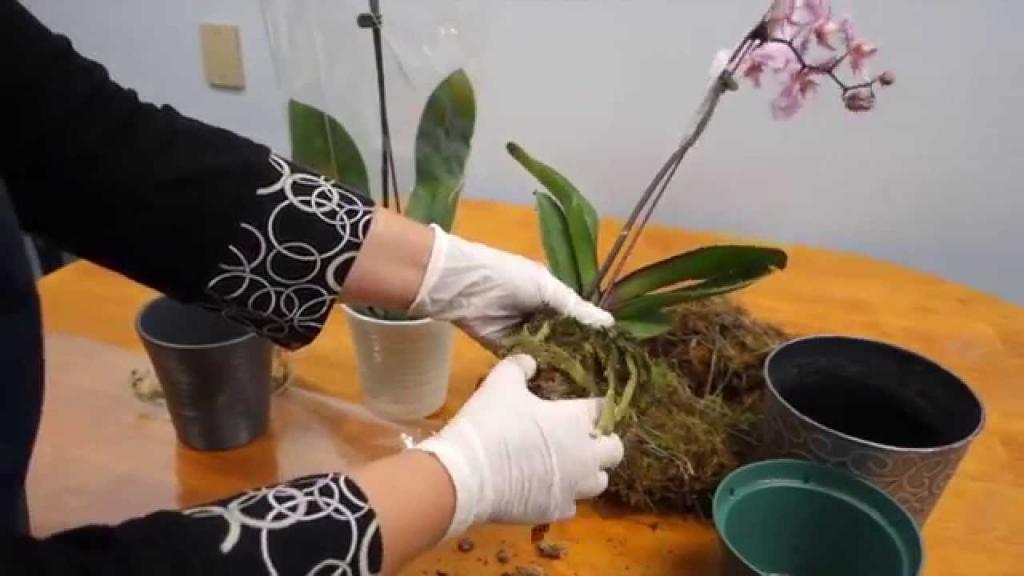
Step 2: Remove the Orchid and Discard Old Media
Remove the orchid with care. If you’re feeling cramped in there, remember that root-bound animals enjoy it.
Using your fingers, gently squeeze the bottom of the plastic pot.
The roots should be free of any and all potting media, such as bark, chips, moss, mulch, and soil clumps.
Make sure to keep an eye on the media mix at this step, as the roots tend to tangle around it.
Then, spray the roots with a little water to remove any remaining debris.
Now that the roots are exposed, it will be much easier to identify which ones need to be cut out of the plant.
Step 3: Cut off the Dead Roots
Xem thêm : How To Save An Overwatered Orchid? Comprehensive Guide
Sterilize a razor blade or a pair of sharp shears with rubbing alcohol at this point.
As much as you’re able, begin chopping off the ends of any dead or dying roots.
Make sure to remove all of the roots that are yellow (yellow-brown), brown (brown), and black (black). If you eat the yellow roots, expect them to be mushy and gooey.
Any roots that are crispy, crunchy, or hollow should be removed as well. Leave any roots that are still green or have green tips, as this indicates that the plant is still growing.
In some cases, you may need to cut the entire stem off of your orchid.
The stem might be cut off if your orchid’s roots are completely rotten.
It’s a good idea to cut the stem immediately below the leaves or where it appears that new roots are beginning their growth.
If stem rot is present, it is necessary to remove the brown and mushy areas of the stem.
In addition, remove any old flower spikes to the base of the stem and remove any dry leaves from the base of the stem as well.
For a rotted orchid, you could use 3 percent hydrogen peroxide.
Any fungus or pests will be killed off by this method.
Hydrogen peroxide can also be used to kill off any lingering rot on the orchid’s crown and allow it to regenerate.
Step 4: Repot Your Orchid
Keep an eye on the roots by selecting a transparent pot.
Drainage holes on the bottom and ventilation holes or slots on the side should be present.
Your favorite potting mix should be around two-thirds of the way full, if not a bit more. The finest combination is bark chips and moss.
The greatest orchid mix on Amazon can be found at RePotme.
LECA – lightweight expanded clay aggregate – is ideal for orchids because it allows them to bounce back quickly. Find out more here.
On top of that, place your orchid.
The roots can be stabilized by covering them up with a few more pieces of mulch or bark, but not too deep.
The roots should be pushed up against the pot’s sides as they are lowered into the pot. They prefer to be cuffed, and this makes it easier to keep an eye on them.
Put up an extra stake in the ground, place the orchid against it, and use a plastic tie to hold its position if you have to cut the stem.
An orchid root can even be secured to its media using a plastic twist tie (like those found at your local grocery store).
Make sure you don’t get rid of any of the stem by covering or burying it in the bark.
Then, cover the bark chips with about an inch of sphagnum moss.
Adding a little extra humidity to the orchid’s environment can help keep it well-hydrated, and it will also encourage root growth.
Moss is essential to reviving an orchid that has been damaged by root rot, and should not be overlooked in the process.
Moss should be kept at least a few inches away from the orchid’s stem to prevent it from absorbing additional moisture as it tries to recover.
Don’t overwater the pot; just enough to keep it moist.
Just enough water to wet the ground completely.
If your home is particularly dry or humid, misting the moss on a daily basis may be necessary.
Finally, add root booster to lessen the shock of replanting your plants.
Step 5: Let the Orchid Come Back to Life
Make sure your orchid has filtered light and is kept in a warm, dark place.
Ideally, the window should face east, although a north-facing one could be used.
In order to prevent your orchid from overheating, keep it away from windows that face south or west.
Even a Phalaenopsis in good health will not be able to withstand such conditions.
The only thing you can do now is wait and see if your orchid recovers or declines.
You should be able to restore it to its original state if you’ve followed all of the procedures above.
After some time, it will return to its former glory as a thriving Phal. In all likelihood, you’ll have to put up with the wait for several months or maybe several years.
But in the end, it will be worth it!
Xem thêm : How To Oxygenate Water For Plants? Comprehensive Guide
It’s fine to fertilize as normal at this point.
The Miracle-Gro mist bottle plant food is one of my favorites.
Intermittently spraying the stem, roots, and leaves with a fine mist suffices for me.
With the spray bottle, it’s easy to control the amount of water I use. Orchids, on the other hand, thrive in humid environments.
Your orchid may one day rebloom for you if you give it time and a little luck!
How to Revive Orchids With Wilting, Yellow Leaves and Stems from Overwatering
- Cut back on watering and allow soil to dry up completely as a first step. Orchids need to be watered around every seven days on average, although the amount of time between waterings depends on your environment, the type of potting material you use, and the size of the container you use. For further information on how to water orchids, please see my post on the subject.
- You should use a potting mix designed exclusively for orchids if you want your orchid to thrive. Because of its aerated structure and efficient drainage, pine bark-based mix is the ideal choice for growing orchids because it mimics the native soil conditions of the orchids. Repotting your orchid to a pine bark potting mix (rather than moss) will avoid root rot if it is currently planted in standard potting soil or moss. This excess moisture will impede the orchid’s capacity to absorb nutrients and water, resulting in yellowing leaves and eventual death.
- Look for any symptoms of disease in the roots. Orchid roots that have just been irrigated should be green to light gray in color and should feel firm and plump to the touch. The roots of your orchids should be pruned if they become mushy, brown, or black, frequently with a foul odor, which signals disease or stress due to a lack of oxygen.
- Snip any unhealthy roots that appear to be infected and return healthy growth to the area. Make sure to use a pair of sterilized pruning tools to remove any brown, black or mushy roots from your orchid, since these roots are no longer able to supply your plant with water or nutrients and could lead to its demise. Pruning can transfer fungal diseases to healthy tissue if the blades of your pruners are not disinfected between cuts. Cut diseased roots all the way back to the base, if required, to restore healthy growth.
- The orchid can be saved if there are still some green (or light grey) roots that are healthy and alive. It may seem drastic, but orchids are more resilient than their reputation would suggest when it comes to recovering and regrowing after being cut off from the sick or rotten roots.
- Remove any yellow stems, even if it means cutting down to the orchid’s base, as long as they remain healthy. When the stem turns yellow, it can no longer serve its purpose and spread illness. Cutting back encourages new stems to sprout.
- Do not remove any yellow leaves that are still attached to the tree. The orchid may be damaged if the leaves are forced off, but they will ultimately turn brown and fall off on their own.
- Use pine bark or an orchid mix that has been specifically designed for orchids to transplant your plant. To revitalize your orchid, use pine bark potting mediums, which have the perfect aerated structure for root respiration and efficient drainage. To avoid the spread of disease-causing fungi, never use old potting medium.
- After repotting, give the orchid a good soak to help alleviate transplant shock and place it in bright indirect sunlight for a week or more, preferably in conditions that are chilly but not frigid. When roots are removed, the orchid can experience some shock, so it’s crucial to reduce stress to a minimal. The orchid’s thirst for water is heightened by high temperatures and direct sunlight, which reduces the amount of roots that can assimilate water in order to save the plant.
- You should water the orchid every 7 days or so when the top inch of the potting material is dry, at a maximum daytime temperature of 75°F (23°C), with indirect light. The recommended nighttime temperature range for the orchid is 55°F (12°C).
- Maintain a humid micro-climate by misting the leaves with water every two or three days. This mimics the humid conditions of the orchids native habitat. Water loss from the leaves is reduced as a result, which is critical for the orchid’s recovery while it grows new roots.
When there are healthy green (or light grey) roots that feel solid and plump, the orchid may be able to survive.
Unlike other plants, orchids are able to manufacture energy and re-grow even when their leaves are yellow and decaying because their roots are capable of photosynthesis (the process of converting light into energy).
With no functioning, healthy leaves to provide light to the roots for photosynthesis, clear plastic containers (rather than decorative pots) can boost your orchid’s chances of survival.
You may observe new leaves sprouting from the base of your orchid in a matter of weeks if you give it the correct conditions, and new roots will begin to grow in a matter of months if the orchid was seriously damaged or had a large number of its roots removed.
Watch this handy YouTube video if you have any questions:
Orchid Leaves Yellow or Brown Because of Sunburn
- Symptoms. As the orchid’s leaves turn yellow or brown, they appear to have been burnt. Stress can lead to the loss of leaves and blooms.
- Causes. It is possible for orchids to burn in direct sunlight, even if the light is brilliant and filtered.
As epiphytes (plants that grow on other trees) in their natural habitat, orchids are well-suited to growing in partial shade, away from direct sunlight, but yet receiving adequate illumination.
In order to mimic the conditions of their natural habitat, you should always plant orchids in an area with bright, indirect light or even some filtered morning light rather than full sun. This is because orchid leaves tend to be sensitive to the effects of direct sunlight.
There’s a risk of scorching and browning the leaves of an orchid if they’re exposed to too much direct sunlight.
Symptoms of drought stress can be exacerbated by very bright light, which can cause the orchid’s leaves and potting material to dry out prematurely.
The leaves become yellow, die back, and fall off on their own. Unfortunately, it is rare to be able to rescue a single sun-damaged leaf, but the orchid can still be saved if new leaves are produced by the plant.
How to Revive Orchids With Sun Burnt Yellow Leaves
- Use strong, indirect light to alleviate stress on your orchid and prevent more damage. Because orchids prefer the shade of the canopy, it’s critical to mimic this environment when planning where to plant them.
- Allow any leaves that have been seriously damaged to dry and fall naturally. Removing leaves that have been damaged by the sun too early can harm the plant.
- Repot your orchid in a clear plastic pot if at all possible. Because their roots are capable of photosynthesis and producing energy for the plant, orchids are common in the plant world. Even though this isn’t their major role, reviving orchids and promoting new leaf growth might be aided by placing them in transparent containers.
- The orchid can begin to recover with proper care (adequate watering and making sure orchids are kept at the proper temperature range) and the eventual emergence of new leaves.
There is a considerable period of time it takes for orchids to recover from burnt leaves since the leaves often fall off and it takes the orchid time to grow new ones. However, with a little time and care, orchids can once again bloom.
Orchids Dying From Drought (Drooping Leaves)
- Symptoms. It appears like the roots are shriveled, white, and withering away. Floppy rather than firm leaves fall to the ground and droop. Drought stress can cause the leaves and flowers to yellow and wither. Occasionally, the orchid’s stem can turn brown and eventually die.
- Causes. Watering orchids too infrequently, watering them too lightly, and exposing them to excessive heat, low humidity, and direct sunlight
Since they like aeration in their potting medium and proper drainage, orchids are more susceptible to overwatering than underwatering.
Watering too infrequently, watering too lightly, or placing the orchids in a hot, low-humidity area can all cause drought stress, and the roots will be unable to absorb the water that is lost from the leaves.
An orchid typically requires watering once every 7-14 days (depending on climate) in order for the surplus water to flow out of the drainage holes at the base and reach the roots.
Soaking the medium too little results in only a small portion of the medium becoming wet, which prevents root access to water.
The first indicator that an orchid is suffering from drought stress is the drooping of its leaves. Leaves turn yellow and roots shrivel, turn white and papery and die back in severe drought stress.
Some of the orchid’s roots may shrink and die back, resulting in the plant’s leaves and flowers becoming yellow and wilting. This can cause the plant to die.
You can help your orchid recover from a dry spell if some of its roots are still alive, but you’ll need to make sure that it’s kept in a cool, shaded area with temperatures between 55°F (12°C) to 75°F (23°C).
How to Revive a Drooping Orchid
- Make sure the orchid’s roots are completely submerged in the water for 10 minutes. When compared to other home plants, orchids don’t need to be watered as frequently, but they do better when the potting material is thoroughly saturated after each watering. Place a drought-stressed orchid in a basin of water to guarantee that the roots receive much-needed hydration and that the potting material is evenly hydrated. 10 minutes after placing the orchid in the water, remove it and allow any remaining water to drain freely from the drainage holes.
- Always moisten the orchid’s potting soil. You don’t need a basin every time you water your orchid, but you should water it generously so that water drips out of the bottom. That way, the potting material will be evenly moist, which will aid in orchid root absorption of the water it needs to replace its stored reserves (so that they feel plump, rather the shriveled).
- Increase the frequency of your orchid’s watering (if necessary). The potting media should not dry out entirely between waterings for orchids, even though they require less frequent watering than most other house plants do. When it comes to watering, orchids should be watered once a week in the spring, summer, and fall, although this might vary according on the weather and other environmental factors.
- Feel the potting soil with your finger to determine how often you should water your orchid in your climate. Allow the potting medium to dry out between waterings in order to meet the orchid’s watering needs and avoid root rot. Delay watering for a few days if the top inch of soil seems moist. When the top inch of your orchid feels dry, this is the best time to give it a generous soak with some water.
- The orchid’s leaves and roots should be misted and rooted on a regular basis. When the orchid is in a drought, mist its leaves and roots to reduce transpiration (water loss) from its leaves. If you live in an area with low humidity, spraying or using a humidifier is the best way to keep your orchid’s leaves from drooping. Every other day, mist the leaves and roots of the drooping orchid to create a humid micro-climate.
- Consider a location with strong, indirect light rather than direct sunlight for your orchids to thrive. It’s important to keep a drought-stressed orchid out of direct or filtered sunlight as you work to revive it, as this might speed up the drying of the leaves and roots. Most orchid species prefer to avoid direct sunshine, which might burn their leaves, because they prefer to thrive in forests.
- Drought-stressed orchids require a temperature range of 55°F to 80°F. The orchid is able to recuperate at colder temperatures without the stress of drying out.
Also, chopping back the dead white, papery roots will aid stimulate the creation of new healthy roots as these roots cannot be revived.. To encourage new growth, trim brown stems or flower spikes all the way to the base with scissors or pruners.
Over the next few weeks, with constant watering, misting the leaves for greater humidity, and placing the orchid in bright, indirect light at the proper temperature, the orchid should begin to show signs of recovery and finally begin to flower again.
Too Much Fertilizer can Burn Orchid Roots
- Symptoms. The orchid’s leaves droop, its petals fade, and its roots turn brown or black. The leaves may turn yellow from time to time.
- Causes. Orchids should not be fed with regular houseplant fertilizer, since it is too strong for them. Fertilizer should not be applied too frequently or in excessive amounts. Salts from fertilizer can impede the orchid’s roots from absorbing water, resulting in yellowed leaves.
A large amount of fertilizer is not necessary for orchids, as their roots are accustomed to growing in loose soil or near other trees.
However, feeding your orchids is a necessity if you want to see healthy growth and flowers, but only orchid-specific fertilizer should be used.
All of the nutrients an orchid needs to grow and flower are contained in a specially prepared fertilizer for orchids.
Using too much fertilizer might cause the orchid’s leaves to droop, preventing it from displaying its flowers properly. The roots can also be burned, causing the orchid to die back and the roots to not function properly.
How to Revive an Orchid with Burned Roots
- The first step is to reduce the usage of fertilizer and wash the roots of the orchids in a basin for about 10 minutes under the faucet. After using too much fertilizer, salts can build up in the soil, and thorough watering helps dissolve those salts. In order for the potting media to dry, allow the water to drain via its drainage holes.
- Remove the orchid from its pots and check for roots after dissolving the extra salts under running water and drying the top inch of the potting material. They should be green or light gray in color and firm to the touch if they’re in good health.
- The roots should be snipped back to the plant’s base if they appear brown or black, as these roots are no longer functional.
- As a result of overfeeding your orchid, it’s best to repot it into pine bark or an orchid potting mix that doesn’t hold too much moisture (Sphagnum moss, for example, is a no-no).
- There is a good chance that any leaves that have turned yellow will turn brown and die back and fall off. Forcefully removing these leaves could harm the orchid.
- Take good care of your orchid, and you should see new leaves or new roots replacing the old damaged roots in the next few months.
When feeding orchids, be sure to use a specialized orchid fertilizer (available at garden centers and on Amazon).
Ordinary fertilizer can’t handle the delicate roots of orchids, which prefer to grow on trees and rely on rainwater or water vapor for nourishment. ‘Orchid’
To ensure healthy orchid development and flowering, make sure to follow the manufacturer’s directions for using special orchid fertilizer.
Orchid Flowers and Flower Buds Falling Off
- Symptoms. Orchid blossoms or buds abruptly dropping off.
- Causes. This is due to a variety of circumstances, including a drastic change in temperature or relative humidity. Both low light and full sun might lead to the buds falling off. Dehydration or overwatering can cause stress.
Flowers or buds that fall off an orchid are usually a sign that the plant’s surroundings isn’t suitable for the orchid’s natural habitat.
When there is a considerable change in temperature or humidity, orchid blossoms fall off quickly. Stress caused by temperatures below or over 75 degrees Fahrenheit (23 degrees Celsius) is the most prevalent cause of orchids losing their blooms and buds.
Because orchids thrive in a moist environment, sudden changes in humidity might cause them to lose their blooms. Indoor heating, draughts, and air conditioning can all cause humidity to fluctuate.
As a survival tactic, orchids drop their blooms and buds if they are underwatered or watered too sparingly.
Overwatering can produce a variety of symptoms in orchids, including the death of blooms and buds as well as the withering of foliage.
How to Revive Orchids with Flowers Dropping Off
- As soon as the flowers or flower buds fall off, the only thing you can do is correct the environmental stress that caused the flowers to fall off in the first place.
- It is important that the orchid is kept in an environment that is neither too hot nor too cold. Even within their ideal temperature range, orchids can be sensitive to temperature variations, so it’s important to maintain things as steady as possible for them. You should keep your orchid away from open windows, direct air conditioner currents, and radiators or other sources of heat to avoid damaging it.
- Compared to the orchid’s natural environment, the air in homes tends to be more drier. You may create a humid microclimate in your orchid’s habitat by spraying the leaves, which will raise the humidity level. If you live in a low-humidity area, you should spray your orchids once every two days. Orchids thrive in high-humidity environments, such as bathrooms and kitchens.
- To encourage flowering, place your orchid somewhere in your home that receives bright, indirect light but isn’t directly exposed to the sun. If the orchid is kept in a dimly lit room, it will not be able to produce as many blossoms.
- Most home plants should be watered more frequently, but orchids should not be allowed to dry up completely. It is important to allow the top inch of the potting media to dry completely between waterings in order to prevent root rot and other problems associated with overwatering.
- It is important to follow the manufacturer’s directions while using a particular orchid fertilizer, which is designed to help encourage flowering in orchids. Do not use regular houseplant fertilizer on your orchid because it can destroy it.
Orchids should be able to keep their blooms and buds and re-bloom in the Spring or Fall if the appropriate circumstances are met
Orchid Dying After Repotting
If your orchid dies after repotting, there are a number of possible causes:
- transplantation shock As with any other plant, orchids are susceptible to stress when their roots are damaged or they are relocated to a new place with a drastic change in light, temperature, or airflow. It is important to keep your orchids away from draughts and air currents after repotting, and to keep the temperature between 55°F (12°C) and 75°F (23°C) in bright indirect light (rather than too much shadow or full sun).
- Planting an orchid in a medium that retains moisture. Aerated planting mediums, such as pine bark or specially developed orchid potting mixes, are ideal for orchids to thrive in. When sphagnum moss holds too much moisture, orchids die back of root root (yellow leaves, withering appearance and roots that are turning brown or black with a mushy texture) because the orchid can’t handle it. Soil that is not specifically designed for orchids is excessively wet and dense and does not allow the roots to breathe properly.
- Overwatering. Overwatering is a big problem for orchids. Before watering again, wait until the potting medium’s top inch is completely dry.
- Using trays and saucers instead of pots with drainage holes on the base. Make careful to use a pot with drainage holes at the bottom when repotting your orchid so that water may flow away easily. Orchid root rot can occur as a result of water pooling around the roots in decorative outer pots, saucers, and trays. After watering your orchids, make sure to remove any excess water from the pots, saucers, and trays and dispose of them properly to avoid root rot.
Key Takeaways:
- The root rot that causes orchids to die is caused by overwatering or soils that are overly damp. When watering orchids, make sure the top inch of soil is completely dry in between applications. Orchid leaves and stems turn yellow and die from root rot if they are overwatered.
- Planting orchids in moss or regular potting soil results in yellowing and wilting of the leaves because the soil retains too much moisture, resulting in root rot. To avoid yellow leaves and root rot, orchids should be planted on pine bark to mimic their native soil conditions of adequate drainage and aeration around the roots.
- Dehydration from underwatering and low humidity is the cause of drooping orchid leaves. In order to mimic the orchids natural growing circumstances and rejuvenate drooping orchid leaves, water orchids once every seven days and mist their leaves once every two days.
- Excessive fertilization may cause root death, yellowing of the leaves, and a lack of flowering in orchids with sensitive roots. As a general rule, orchids can’t handle regular houseplant fertilizer, thus they need a specially formulated orchid fertilizer.
- Overwatering, sunburn, excessive fertilizer, and freezing temperatures can all promote root rot in orchids, resulting in yellowing leaves. Overwatering and over-fertilizing can destroy the roots of orchids, resulting in yellowing leaves. In direct sunlight, the leaves of an orchid turn yellow and burn.
- Stress from high or low temperatures, dehydration, overwatering, or low humidity causes orchid blossoms to drop off. In order to keep their flowers and buds from wilting, orchids need a constant temperature of 55°F to 75°F, intense indirect light, and moderate humidity.
- Make sure that the orchid is in indirect light, that the temperature is stable, that any dying roots are removed, and then repot the orchid into pine bark potting medium. To avoid overwatering, don’t water orchids until the top inch of their potting medium is completely dry.
Nguồn: https://iatsabbioneta.org
Danh mục: Garden


