If you’re looking to add a burst of color to your yard, look no further than the amaryllis, Hippeastrum x hybridum.
Flowering plants can be grown outside in USDA Hardiness Zones 9-11, but they can also be grown indoors and used as decorations throughout the winter months.
Bạn đang xem: How To Grow Amaryllis From Seed? Step-by-Step Tutorial
Growing amaryllis from seed, dividing bulbs, and separating offsets are all viable options for the amateur grower.
It’s our goal to connect you with merchants who have relevant products. Our links may earn us a profit if you make a purchase through them.
Here, we’ll explain how to grow amaryllis from seed and why it’s a good idea to do it. What we’ll be talking about is:
What You’ll Learn
- What Are the Advantages of Starting Amaryllis from Seeds?
- Pollination
- Making Seeds from Scratch
- How to Plant
- Taking Care of Seedlings
Why Grow Amaryllis from Seed?
It might take anywhere from three to five years for a seedling to mature into a flowering plant, depending on the variety.
Collecting seeds from existing amaryllis plants makes sense if you can’t afford to buy expensive or hard to find varieties.
Because many of these plants are a hybrid, the seeds you harvest may not produce true to their parent plant, but they may exhibit some of its traits.
It’s easy to develop new varieties of amaryllis by cross-pollination and collecting seeds from your own plants!
Check out our tutorial if you want to learn more about bulb re-sectioning or separating offsets if you want to develop a clone of a parent plant
Seeds can be obtained from other gardeners or by pollination and hybridizing your own blooms because they aren’t commonly available on the market.
How to Harvest Seeds
Hand pollination is recommended for indoor plants because insects are more likely to pollinate flowers cultivated outside.
Pollination
Even if you only have one plant, you can do this because the blossoms are self-fertile. Even if the seeds do not create an exact clone, hybrid plants are likely to preserve some characteristics of both parents.
Cross-pollination can also be experimented with if you have more than one kind.
To extract pollen from the anther of your amaryllis bloom by hand, use a little paintbrush.
To see this in action, go here to see an image of pollen on a flower’s stamens:
In order to transfer pollen from one bloom to the stigma of another, you’ll need to use a soft brush and the same blossom several times. Located at the apex of a flower’s style, the stigma can be seen projecting from the center.
In order to ensure successful pollination, repeat this procedure once daily for a few days.
Xem thêm : What To Know When Growing In A Greenhouse? Helpful Information!
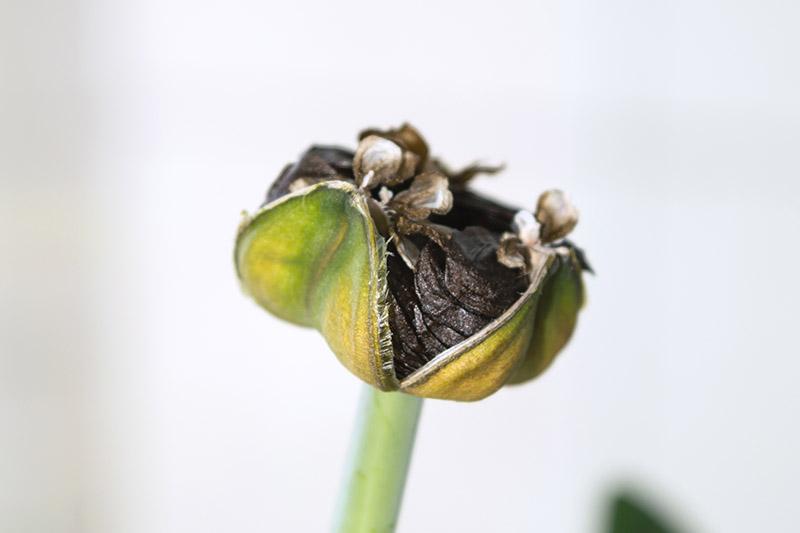
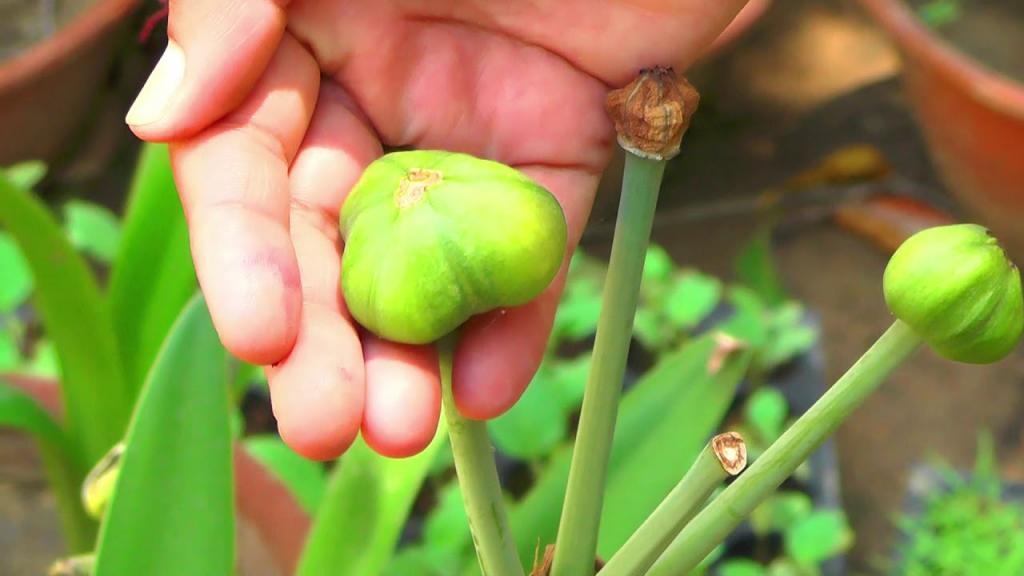
As the flower fades, a little green pod will begin to form at the base of the bloom, below the petals. If it is done correctly.
At some point in the future this pod will swell to the point where the seams begin to separate, becoming yellow or brown and drying out. It usually takes four to six weeks for the fruit to fully ripen.
HOW TO GROW AMARYLLIS FROM SEED
Amaryllis is done flowering, and I don’t know what to do with it. The flower’s stem is now topped with two enormous seed pods. Is it possible to grow fresh amaryllis plants out of these pods? I’m not sure how to go about it.
A. The seeds in the pods of amaryllis plants (Hippeastrum spp.) can be used to start new plants. After three to five years, the bulbs will be able to produce flower buds of their own. You may not get identical progeny if you buy holiday-themed amaryllis bulbs because they are hybrids.
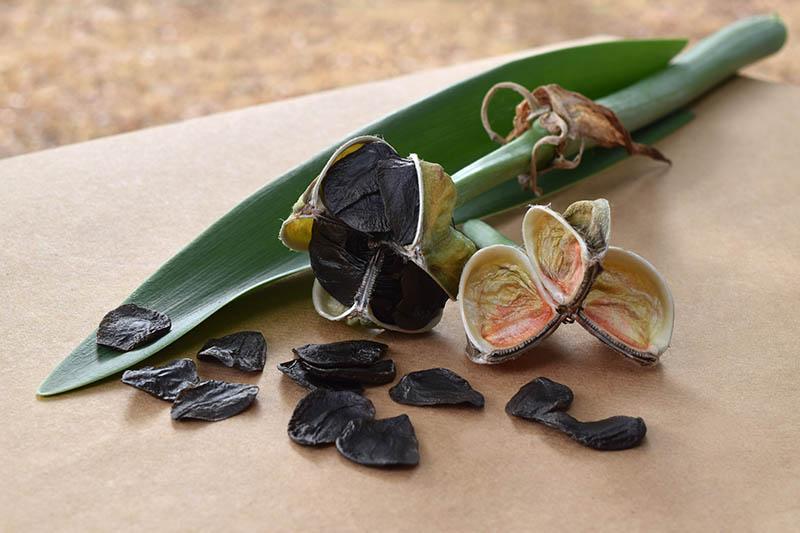
Seed pods should be ready in four to six weeks after the pollination of the blooms. Allow the fruit to fully mature on the tree. After they turn yellow and crack open revealing rows of winged seeds, they are ready. The real seeds, which are slightly larger than a poppy seed, are wrapped in papery sheaths. You can feel a small seed inside if you brush them between your thumb and fingertips lightly. For best results, let the winged seeds air dry for a few days prior to planting.
PLANTING AMARYLLIS
Plant them as soon as possible in a flat or in small pots. It’s important that the containers include drainage holes so that the planting media doesn’t become saturated with rainwater. Only lightly cover the seeds with a soilless seed starting mix. If you’re using a flat or pots, choose a sunny spot out of the way of direct sunlight. Keep the soil moist but not sopping wet at all times. Grass-like seedlings should appear in three to four weeks after the seeds have been sown. Move them to a spot with more sunlight as they grow.
TRANSPLANTING AMARYLLIS
If you began your seedlings in a flat, you’ll want to separate them into individual pots once they’ve grown. Once the risk of frost has passed, you can leave them outside in a sheltered position over the summer. It’s best to find a spot with plenty of morning sun and afternoon shade. To avoid wilting, allow the plants to dry out slightly between waterings. According to the label, you can use a water-soluble fertilizer like Peter’s 20-20-20, fish emulsion, or liquid kelp. Remember that when it comes to fertilizer, more is never better; you might easily kill these seedlings with a fertilizer solution that is too powerful. Prior to the nighttime temperatures falling below 50 degrees Fahrenheit, remove them from the outdoors. Don’t let the seedlings rest like the mother bulb. For the winter, place the plants in a south-facing window so that they can continue to thrive. To prevent them from becoming unbalanced, rotate them on a regular basis. Amaryllis striped
AFTER HARVESTING SEEDS
The mother bulb’s energy has been exhausted by allowing it to produce seed. Taking proper care of it after gathering the seeds will ensure that it continues to bloom for you in the future. Carefully remove the old flower stalks to avoid damaging the foliage.
As a result of the photosynthesis taking place on those leaves, the bulb will receive a steady supply of carbohydrates to fuel its growth and replenish its energy reserves. The mother bulb and her children should be moved outside for the summer. Peter’s 10-30-20 Blossom Booster, Miracle-Gro, Fish Emulsion or Liquid Kelp can all be used during the growing season. Beautiful Amaryllis flowers with enormous blooms!
THE MOTHER BULB
In late summer or early fall, allow the mother bulb an eight-week rest period before its flowering stage begins. if your amaryllis doesn’t go dormant on its own, stop watering it. After the foliage turns yellow and dies naturally, remove it. You can leave the potted bulb in a corner of your basement or garage, as long as it doesn’t get colder than 45 to 50 degrees F (11 to 15 degrees C). During the dormant season, avoid watering and fertilizing your plants. It will bloom again if you bring the plant into a room with temperatures between 68 and 75 degrees Fahrenheit and begin watering. In six to eight weeks, the mother bulb will begin to flower. When the flowers have faded, you can resume fertilizing.
Collecting the Seeds
You can remove the pod from the plant once it has dried and starting to split open. So many seeds! Pods are normally divided into three portions, each carrying 50-60 seeds.
Continue drying the ripe pod by placing it in a dark place for a few more days.
Using a basin or plate, shake the pod to dislodge the seeds. The ones that look to be damaged or moldy should be discarded.
Allow them to dry for a few more days, or perhaps a week, on a paper plate or tray.
Seeds should be sown as soon as possible after drying, as they have a short shelf life and do not keep well in the refrigerator. They don’t need cold stratification because they’re tropical plants.
It’s best to keep the seeds in a cold, dark place like a cupboard after drying them out for a week. Keep in mind that the longer you store them, the less viable they become.
TRANSPLANTING AMARYLLIS
If you began your seedlings in a flat, you’ll want to separate them into individual pots once they’ve grown. Once the risk of frost has passed, you can leave them outside in a sheltered position over the summer. It’s best to find a spot with plenty of morning sun and afternoon shade. To avoid wilting, allow the plants to dry out slightly between waterings. According to the label, you can use a water-soluble fertilizer like Peter’s 20-20-20, fish emulsion, or liquid kelp. Remember that when it comes to fertilizer, more is never better; you might easily kill these seedlings with a fertilizer solution that is too powerful. Prior to the nighttime temperatures falling below 50 degrees Fahrenheit, remove them from the outdoors. Don’t let the seedlings rest like the mother bulb. For the winter, place the plants in a south-facing window so that they can continue to thrive. To prevent them from becoming unbalanced, rotate them on a regular basis.
AFTER HARVESTING SEEDS
The mother bulb’s energy has been exhausted by allowing it to produce seed. Taking proper care of it after gathering the seeds will ensure that it continues to bloom for you in the future. Carefully remove the old flower stalks to avoid damaging the foliage.
Xem thêm : How To Deadhead African Violets? Step-by-Step Tutorial
As a result of the photosynthesis taking place on those leaves, the bulb will receive a steady supply of carbohydrates to fuel its growth and replenish its energy reserves. The mother bulb and her children should be moved outside for the summer. Peter’s 10-30-20 Blossom Booster, Miracle-Gro, Fish Emulsion or Liquid Kelp can all be used during the growing season.
THE MOTHER BULB
In late summer or early fall, allow the mother bulb an eight-week rest period before its flowering stage begins. if your amaryllis doesn’t go dormant on its own, stop watering it. After the foliage turns yellow and dies naturally, remove it. You can leave the potted bulb in a corner of your basement or garage, as long as it doesn’t get colder than 45 to 50 degrees F (11 to 15 degrees C). During the dormant season, avoid watering and fertilizing your plants. It will bloom again if you bring the plant into a room with temperatures between 68 and 75 degrees Fahrenheit and begin watering. In six to eight weeks, the mother bulb will begin to flower. When the flowers have faded, you can resume fertilizing.
How to Sow
Alternatively, you can plant your seeds straight into a potted mix that has been adjusted with perlite or vermiculite to increase water drainage.
If you’re using flats, plant one seed in each cell. If you’re using a container, space seeds an inch apart. Then add an eighth-inch of potting medium on top. The well has water.
To keep the potting mix evenly moist, but not waterlogged, maintain an even level of moisture in the mix. Grass-like leaves will appear in three to five weeks to show that they have germinated.
If you’d rather, you can sprout the seeds first, then plant them in the ground.
Because you can start a huge number of them and just plant those that have germinated, this method is advantageous.
Floating them in water is an option. Fill a transparent glass or baking pan at least an inch deep with lukewarm water to accomplish this. Discard any seeds that sink to the bottom, as they will not germinate.
Set the container in a warm spot where you can remember to check on it every day and refill it if any of the water has evaporated, and cover it with a loose lid.
One to four weeks after germination, a single root will be formed from a viable seed. A bulb will eventually form from this root. When the seedling’s root is at least a half-inch long, it is ready to be planted.
Wrapping seeds in a moist paper towel and putting them in a ziplock bag is an alternative approach for sprouting. Keep an eye on the bag and spray it frequently to prevent the paper from drying out.
After one to four weeks, the seeds should germinate, at which point you can begin planting them.
Individually in tiny pots, or in groups in a bigger pot, plant sprouted seeds in a sterile potting mixture that drains well. The containers should be at least three to four inches deep.
Create a small hole for the root using a toothpick. Make a small hole in the ground and gently insert the root, making sure to leave the seed casing on top or just covering the dirt. The seedlings don’t mind being a little crowded, so leave an inch or two of space between each of them.
Environment in a warm, dry place away from direct sunshine and water lightly.
Label and date your pots so you don’t lose track of them.
A larger container can be used when bulblets form from the roots.
Seedling Care
It will take several years for sprouts to grow from the size of a blade of grass to a full-fledged plant.
A quarter-strength liquid fertilizer like MiracleGro All Purpose Plant Food, available on Amazon, should be used to lightly nourish your seedlings every week or two.
Nguồn: https://iatsabbioneta.org
Danh mục: Garden


