Gardeners may seem like natural-born orators to those who are just starting out in the hobby. If you ask them, they’ll go on and on about everything from the merits of chrysanthemums (Chrysanthemum morifolium; hardy in USDA zones 5 through 9) to whether cuttings are the most efficient method of propagating mums. To quiet a boisterous gardening dispute, nothing beats relating a personal story. Consider growing chrysanthemums and then propagating mums via cuttings and later by division to see which move you’ll argue for in future debates.
- How To Start Growing Plants In A Greenhouse? Comprehensive Guide
- How To Deadhead Dianthus? Special Tips and Tricks
- How To Overwinter Ferns? The Simple Secrets To Success
- How To Propagate Verbena? Easy Step-by-step Guide
- Do You Need Humidity Domes When Planting Seeds In A Greenhouse? Helpful Information!
Mums Can Be the “Jewels” in Your Garden
In Greek, “chrysanthemum” means “golden” and “flower,” according to the Old Farmer’s Almanac, which describes the plant as belonging to the Asteraceae family. When most chrysanthemums were only available in deep gold, this made more sense. Today, chrysanthemums are available in a wide range of colors, including burgundy, coral, pink, and white. Chrysanthemums are obvious candidates for “the best fall flowers to plant” because of their wide range of colors – the first group so closely connected with autumn.
Bạn đang xem: How To Grow Mums From Cutting? Things You Will Need
Xem thêm : How To Propagate Dogwood Trees? What are the Things that You Need to Consider?
Another reason chrysanthemums are so popular is that they are little and easy to care for. According to the Missouri Botanical Garden, annuals can grow to a width of 1 to 2 feet and a height of 2 to 3 feet. But if you remember to pull back the stems from late spring through summer, you can develop thicker, bushier chrysanthemums.
What we’ve learned is enough to spark yet another debate: Do chrysanthemums grown in the ground or arranged in containers impress guests more at the front door?
Propagate Mums by Cuttings
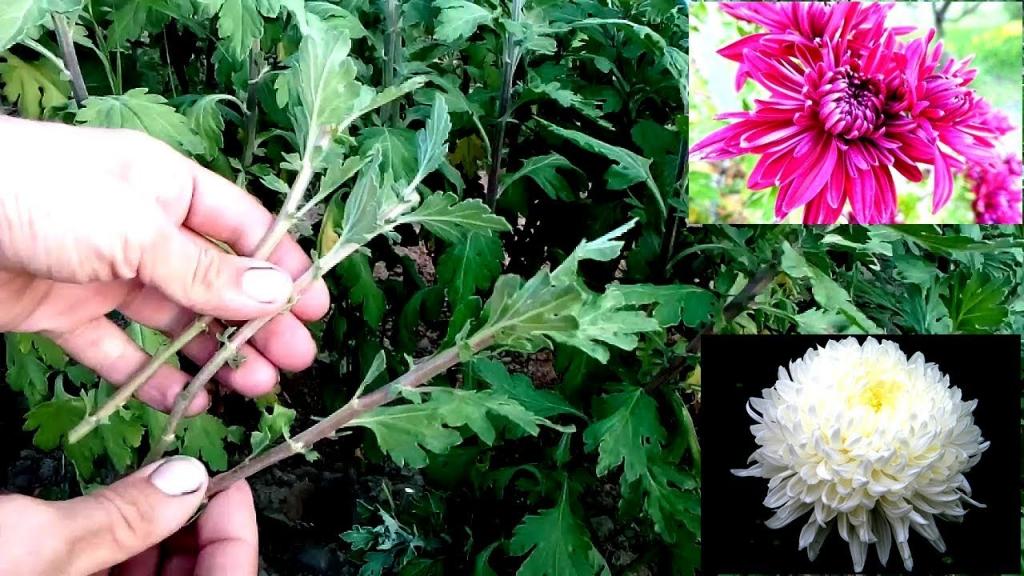
Whether or whether you started your chrysanthemums from mum seeds, you may want to spread their beauty to other areas of your home………………………………………….. This can be done in the spring or early summer by taking a cutting, according to Iowa State University. To get started, you’ll need a sharp knife, rooting hormone, and rooting medium.
With a knife, cut off the top 3 or 4 inches of a long stem. Cut off any remaining lower-level leaves with a pair of tweezers. You can use liquid, gel or powder rooting hormones to coat the stem. Some gardeners, on the other hand, may start a new controversy by utilizing honey. Although some claim that it is a safe and effective natural remedy for fungal infections.)
Put the stem in a container filled with a rooting media and water it thoroughly. The container should then be placed in a room with plenty of natural light. You should keep the medium constantly wet for around four weeks or until a small tug on the stem indicates root development. After that, it’s time to move it to a permanent location.
Division Means Cutting Through the Roots
So, why is it so difficult to grow mums from cuttings? There is “absolutely nothing,” some gardeners would respond. To be honest, it couldn’t be any easier. Mike’s Backyard Nursery, on the other hand, advocates for division. To be precise, the nursery claims that it is the simplest method for producing new plants.
Most likely, it’s because propagating plants by digging them up and slicing straight through the root mass is a common practice for all sorts of plants. You have the option of cutting it in half or slicing it again (into quarters). To many gardeners, this is the most terrifying part of the process because it involves working with the roots, and a single mistake might spell disaster for the plant.
Xem thêm : How To Transplant Cannas? A Step-by Step Learning Guide
When you proliferate by cutting, you don’t have to worry about this. Yes, this procedure is more time-consuming than the other options. You’ll have to be patient. However, when dealing with one of the most stunning fall flowers to plant, you should err on the side of caution. In fact, no gardener would argue with that statement.
Things You Will Need
- Knife with a fine edge
- Hormones that stimulate the growth of roots (or honey)
- Medium for rooting (perlite, peat moss or coarse sand)
Easy Mum Propagation Through Division
When dividing moms, the process is swift and simple. Division of mums every three to four years improves the plant’s shape and flowering. This is done in the spring and results in one or two more plants. With age, the centers of mothers can become sluggish, and in some cases, even die. Dig out the entire root ball of the mum in the spring when it starts to emerge. Cut the root ball into three to five portions using a sharp soil knife or spade. One chrysanthemum can be grown from each of these pieces.
Planting Mum Seeds
When you sow mum seeds, you never know what you’re going to receive. However, they may not be loyal to the original plant in the first year following planting. Growing mums from seed is simple, but it can also be a bit of a mystery as to what kind of blooms you’ll get.
Starting mum seeds inside six to eight weeks before the last frost date or sowing the seed in the spring in a well-prepared bed is preferable because of their long growing season. Keep the soil evenly moist and lightly mulch the plants. After they’ve grown to a height of 6 to 8 inches (15-20 cm), it’s time to plant the mums.
Growing Mums from Cuttings
Cuttings are the best way to get a head start on your mums if you want them to flower quickly. Mum plants propagated from cuttings grow the fastest and flower in the shortest amount of time. The optimal time to take cuttings for mum propagation is in the spring or summer. Remove a 2- to 3-inch (5-8 cm) slice of fresh growth from the stem’s tip using a sharp, sterile knife.
Insert the cutting into peat moss or perlite and remove the bottom 1 inch (2.5 cm) of leaves. Moisture but not sogginess are essential for the cutting to be successful. The new plant will generate lateral growth if you pinch off the top growth after it has rooted for a few weeks. As a home gardener, you can take pleasure in propagating mums.
When it comes to starting moms, you have a wide range of options. Chrysanthemums can be grown as annuals in the garden or as potted gifts for special occasions. You can put them in the house or put them out in the fall for some late-season color.
Gardeners may seem like natural-born orators to those who are just starting out in the hobby. If you ask them, they’ll go on and on about everything from the merits of chrysanthemums (Chrysanthemum morifolium; hardy in USDA zones 5 through 9) to whether cuttings are the most efficient method of propagating mums. To quiet a boisterous gardening dispute, nothing beats relating a personal story. Consider growing chrysanthemums and then propagating mums via cuttings and later by division to see which move you’ll argue for in future debates.
Mums Can Be the “Jewels” in Your Garden
In Greek, “chrysanthemum” means “golden” and “flower,” according to the Old Farmer’s Almanac, which describes the plant as belonging to the Asteraceae family. When most chrysanthemums were only available in deep gold, this made more sense. Today, chrysanthemums are available in a wide range of colors, including burgundy, coral, pink, and white. Chrysanthemums are obvious candidates for “the best fall flowers to plant” because of their wide range of colors – the first group so closely connected with autumn.
Bạn đang xem: How To Grow Mums From Cutting? Things You Will Need
Xem thêm : How To Propagate Dogwood Trees? What are the Things that You Need to Consider?
Another reason chrysanthemums are so popular is that they are little and easy to care for. According to the Missouri Botanical Garden, annuals can grow to a width of 1 to 2 feet and a height of 2 to 3 feet. But if you remember to pull back the stems from late spring through summer, you can develop thicker, bushier chrysanthemums.
What we’ve learned is enough to spark yet another debate: Do chrysanthemums grown in the ground or arranged in containers impress guests more at the front door?
Propagate Mums by Cuttings
Whether or whether you started your chrysanthemums from mum seeds, you may want to spread their beauty to other areas of your home………………………………………….. This can be done in the spring or early summer by taking a cutting, according to Iowa State University. To get started, you’ll need a sharp knife, rooting hormone, and rooting medium.
With a knife, cut off the top 3 or 4 inches of a long stem. Cut off any remaining lower-level leaves with a pair of tweezers. You can use liquid, gel or powder rooting hormones to coat the stem. Some gardeners, on the other hand, may start a new controversy by utilizing honey. Although some claim that it is a safe and effective natural remedy for fungal infections.)
Put the stem in a container filled with a rooting media and water it thoroughly. The container should then be placed in a room with plenty of natural light. You should keep the medium constantly wet for around four weeks or until a small tug on the stem indicates root development. After that, it’s time to move it to a permanent location.
Division Means Cutting Through the Roots
So, why is it so difficult to grow mums from cuttings? There is “absolutely nothing,” some gardeners would respond. To be honest, it couldn’t be any easier. Mike’s Backyard Nursery, on the other hand, advocates for division. To be precise, the nursery claims that it is the simplest method for producing new plants.
Most likely, it’s because propagating plants by digging them up and slicing straight through the root mass is a common practice for all sorts of plants. You have the option of cutting it in half or slicing it again (into quarters). To many gardeners, this is the most terrifying part of the process because it involves working with the roots, and a single mistake might spell disaster for the plant.
Xem thêm : How To Transplant Cannas? A Step-by Step Learning Guide
When you proliferate by cutting, you don’t have to worry about this. Yes, this procedure is more time-consuming than the other options. You’ll have to be patient. However, when dealing with one of the most stunning fall flowers to plant, you should err on the side of caution. In fact, no gardener would argue with that statement.
Things You Will Need
- Knife with a fine edge
- Hormones that stimulate the growth of roots (or honey)
- Medium for rooting (perlite, peat moss or coarse sand)
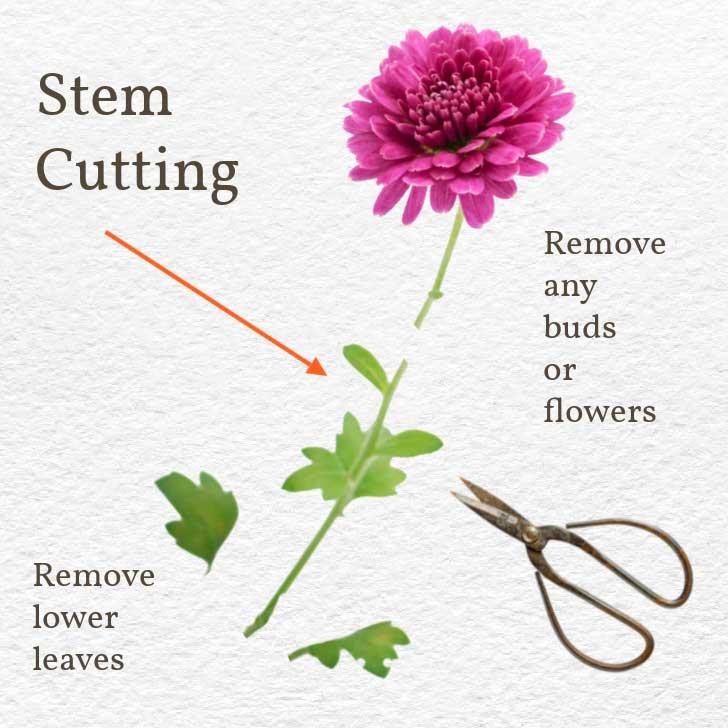
How to Grow Mums From Stem Cuttings
Stem cuttings can be taken from nearly any plant using the same technique.
- Trim just below the first set of leaves on the stem you’ve just taken from your mother.
- Remove any blooms or buds and their stalks to the first leaf node, then remove the rest of the plant.
- Removing any of the bottom leaves. We don’t want any leaves to come into contact with the water or potting mix in the area of the stem that will be submerged. However, the stem’s uppermost leaves are what we desire.
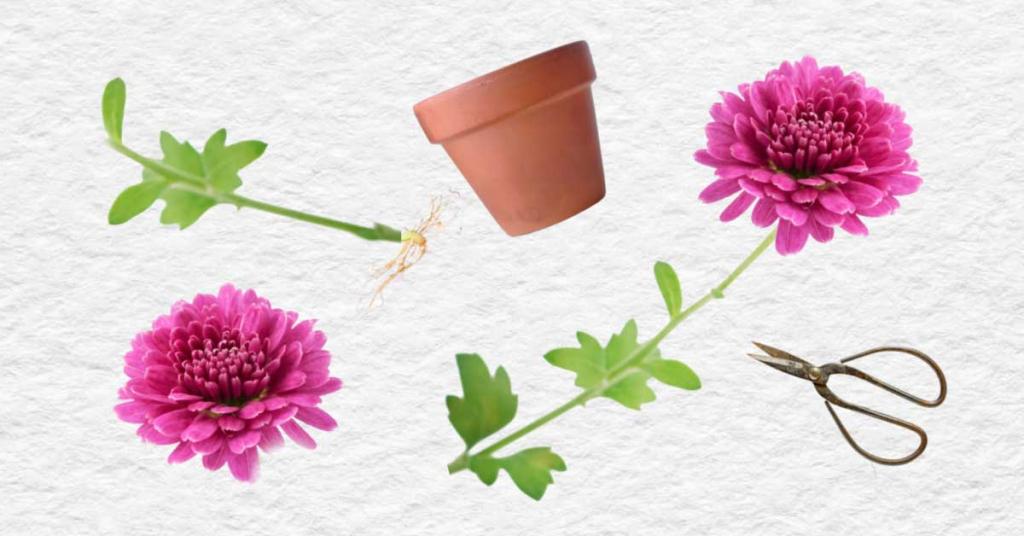
- Rooting hormone can be applied to the base of the stem and planted in moist potting soil or water.
- Your cuttings should be kept in indirect light and at a temperature of 70°F (21°C) during the rooting process.
- The cuttings can be kept wet by placing large, clear bags loosely over them if the humidity drops below 50% relative humidity. To avoid mold, keep the bags away from the plants, but do not let them touch them.
- Always keep the potting mix moist, and never let it dry out. If you’re growing your plants in water, make sure to change the water every few days.
- Root formation allows for the transplantation of seedlings that were initiated in water. Also, you’ll notice fresh leaves and stems on the top.
- Do not allow cuttings to freeze in pots over the winter to keep the process going. You can put them in a cold frame or a greenhouse, or you can keep them outside with some insulation like straw or mulch. When the weather warms up in the spring, growth will resume.
The best of luck to you in the future. You can also try a variety of cuttings at various points during the growth season if you don’t succeed the first time.
Nguồn: https://iatsabbioneta.org
Danh mục: Garden


