If you think you know everything there is to know about growing food in a greenhouse, think again. Even the advanced greenhouse owner may not yet fully understand certain concepts such as humidity domes. Today’s focus is on heavy-duty equipment known as your humidity dome.
Humidity Domes Defined
It’s time to reevaluate your knowledge about greenhouse farming and harvesting. Some concepts, such as humidity domes, may be unfamiliar to even the most experienced greenhouse owner. The humidity dome is the topic of discussion today because it is a piece of heavy machinery.
Bạn đang xem: Do You Need Humidity Domes When Planting Seeds In A Greenhouse? Helpful Information!
The dome’s internal humidity and temperature can be raised by using flexible, low-cost plastic. So, if your greenhouse has the correct temperature for these herbs, commodities, and plants, then the humidity dome will add to this benefit as well. ”
The optimal temperature for successful germination is between 50 and 65 degrees Fahrenheit on average. It is recommended that the domes be used indoors, as most homes aren’t this warm. Temperature and humidity levels can be controlled and stabilized with the use of these equipment.
Should I Use A Humidity Dome On Seedlings?
Keep in mind that humidity domes are for horticultural purposes only, in order to avoid any misunderstandings. To put it another way, they serve as accessories that, even if not used, nonetheless allow you to get the greatest possible results. Humidity domes aren’t necessary for growing seeds. The seeds may germinate without the dome, however it is possible that the dome will increase the rate of germination for these particular seeds.
Keeping the soil moist for seed germination can also save time and effort, thanks to the use of hydroponics.
Does A Humidity Dome Need Holes?
Humidity domes don’t need any openings, to be honest. The dome’s primary function has always been to increase humidity by trapping air moisture beneath the cover.
Occasionally, you can tell if the dome is excessively humid by looking at its vent holes. Molds might grow in the soil or on your seedlings if the humidity is too high. For seeds that take a long time to germinate, the holes in the humidity dome may be more enticing than the rest of the dome.
It’s common to see these holes positioned on the top or side of the humidity dome, but they can also be included into the design of your unique vault. Gardening is a delicate process, and the appropriate amount of humidity helps to ensure that it doesn’t go out of hand.
Less humidity, on the other hand, can cause the soil to dry out, upset your seeds, and reduce germination rates.
Will Seeds Germinate In A Cold Greenhouse?
Seeds can be grown in greenhouses because they can be kept at the right humidity and temperature for germination and development. The gardener can begin seeding at any moment because you have a regulated environment. greenhouses have a lot to offer when it comes to growing food.
Planting seeds in the greenhouse should begin around eight weeks before your area’s “last expected frost date,” even if you plan to transfer them into outdoor gardens in the spring.
There are seeds that must not be germinated at temperatures higher than 80 degrees Fahrenheit in order to achieve greater success. As a final precaution, the greenhouse’s temperature needs to be closely checked. When the sun is shining, greenhouses are toasty, but as the day wears on, the temperature drops. You can always get more information about these standards from other sources.
What Temperature Should A Greenhouse Be At Night?
The recommended temperature for greenhouses is 75 degrees Fahrenheit, or 24 degrees Celsius, at night (90 degrees Fahrenheit, or around 32 degrees Celsius, during the day). Cooler temperatures have been shown to produce better results for vegetables, yet the type of crop may influence the ideal temperature.
In general, plants cultivated in cooler temperatures produce more branches and flower buds than those in warmer climates.
Having a basic understanding of humidity is essential to making an informed decision about whether or not you need a humidity dome in your garden. A greenhouse’s moisture content is directly influenced by the amount of water vapor present in the air and the percentage of that vapor present.
When starting seedlings in a greenhouse, do you need to utilize humidity domes? One of the most fundamental elements to learn in gardening and horticulture is the importance of humidity.
As a result of the wide range of customisation options available to gardeners, greenhouses make it easier to manage humidity levels. Depending on your requirements, you can select from a variety of structure sizes. Protecting your plants from changing weather conditions, such as high winds, low temperatures and ground frost, is possible with the correct greenhouse.
Do You Need A Humidity Dome For Seeds? (Read This First)
A humidity dome may be on your mind if you plan to start your own plants from seed. To minimize wasting seeds, a humidity dome can be used to increase the germination rate, but it will cost money to acquire one or take time to make one.
Is a humidity dome necessary for seeds? Without a humidity dome, seeds can germinate without difficulty. A humidity dome, on the other hand, will aid in the germination of your seedlings. Keeping soil moist for seed germination will take less time and effort using this method.
The use of a humidity dome raises a number of other problems, of course. Does a humidity dome require vent holes, for example, and do humidity domes require light to grow seeds?
We’ll take a closer look at humidity domes in this article and answer some frequently asked questions. We’ll also cover some DIY humidity dome options.
Let’s get this party started.
How to start seeds indoors: a step-by-step guide
Step 1: Gather your seed starting supplies.
- Seeds
- Cell trays or seed starting pots
- Specimens of plants
- Pre-seeding mixture (homemade or store-bought)
- Humidity dome for the seed trays (often called a 1020 plant tray or propagation tray, or use any DIY drainage tray with plastic wrap)
- A water-filled spray bottle or squirt bottle
You’re ready to go if you’ve already made your recycled newspaper pots. Seed starting pots and cell trays should be thoroughly cleaned if you plan to use them.
Egg cartons, Dixie cups, and yogurt cups can also be used as seed starting containers. Simply clean them and use a nail or awl to make a few drainage holes in the bottom.
Step 2: Fill your pots or trays with seed starting mix.
In a large container or bucket, add your seed starting mix, water, and stir thoroughly with your hands or a trowel.
When the seed starting mix begins to dry out, add more water. Peat-based seed starting mixes are sluggish to absorb, so this may take a while. The mixture should be consistently damp, similar to sand after it has been sprinkled with water.
Step 3: Sow your seeds.
Using your hands, carefully push two to four seeds into the seed starting mix until they’re firmly embedded.
Small seeds, like basil or mustard, can be left out in the open.
Vermiculite or seed starting mix can be used to cover larger seeds, such as beans or peas, or those that require darkness to grow (see the seed packet directions).
Step 4: Label your newly planted seeds.
Each pot should be labeled. You won’t be able to recall where you planted your seedlings because they all look the same when they’re just a few days old.
Keep your metal plant markers for the garden at this early stage, where they’ll be more visible and less obstructive.
Step 5: Keep your seeds moist and warm.
Wet your seeds before planting.
Place your pots in a seed tray (or reuse an aluminum roasting pan, a baking pan, or even that plastic clamshell that your salad greens came in) and cover with a humidity dome (or just plain old plastic wrap).
During the sprouting stage, open any vents on your dome if it has any.
It’s time to turn up the heat. It’s not necessary for your seed trays to be in direct sunlight at this time; they can be placed in an attic, a bathroom, or a laundry room.
Keeping your seedling pots in a warm spot with low humidity can ensure that your seeds will sprout. They’ll be depressed if it’s too humid. If the seeds seem dry to the touch, spray them with extra water.
The seeds will germinate between a few days to a few weeks. Your seedlings will appear to be sporting little seed hats when they emerge.
Don’t worry if it seems like germination (the sprouting process of a seed) is taking a long time. Seeds usually germinate in three weeks or less (after that, try starting a new round of seeds).
Do You Need A Humidity Dome For Seeds?
Seeds do not necessitate a humidity dome. Without a humidity dome, your seeds will germinate without issue.
In contrast, a humidity dome has numerous advantages when it comes to seed starting, such as:
- It’s easier to germinate seedlings faster when the soil and air beneath the humidity dome are kept warm. Tomato and pepper seeds germinate more quickly when the soil temperature is higher.
- Seed Protection – a humidity dome will keep seeds safe from pests and illnesses carried by the wind, whether you start them indoors or in a greenhouse.
- When seeds are kept warm and moist in a humidity dome, they have a better chance of sprouting. As a result, you get better seed germination rates and waste is reduced.
If you are trying to germinate older seeds, a higher germination rate is beneficial.
To learn more about how long seeds last, check out my post on the subject.
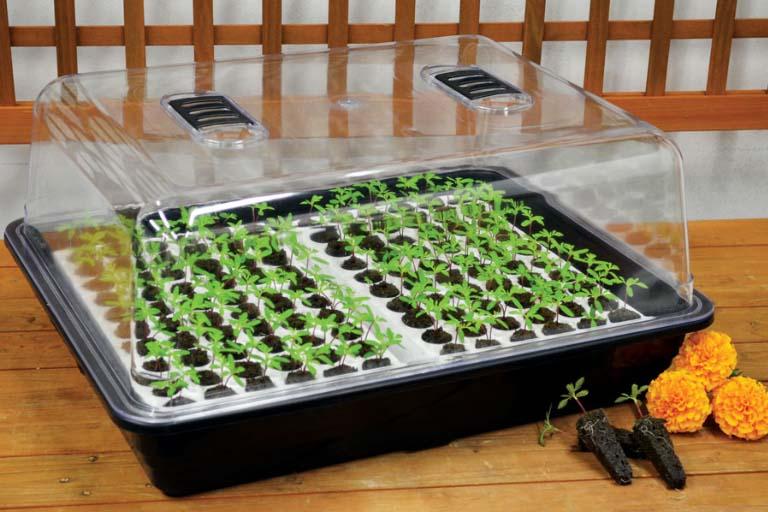
What Is A Humidity Dome?
To keep soil and seeds moist, a humidity dome is placed on top of the container. Plastic or glass humidity domes are available.
Newly sprouting seedlings need sunlight, therefore the dome is usually clear. A humidity dome also acts as a mini-greenhouse by trapping heat in the air and soil beneath it.
Xem thêm : Where to Put a Greenhouse in Your Yard? Comprehensive Guide
Nonetheless, the primary function of a humidity dome is to retain water in the surrounding atmosphere and soil.
Under the dome, the relative humidity rises as a result of the trapped moisture. Seed germination is encouraged because the growth media is kept moist.
Seeds should germinate at a relative humidity of 98 percent. Humidity domes help to make this goal a reality.
The ideal humidity level for plants may be found in my post on the subject (and how to achieve it).
You can construct your own humidity dome if you so desire (more on this later). A wide variety of humidity domes are available, including:
- Round Humidity Dome – also called cloches, there are often used to protect a single plant from cold and pests. However, you could also use a cloche, like this one from Gardener’s Supply Company, as a humidity dome to keep your plants healthy.
- Humidity domes, or cloches, are commonly used to shield a single plant from the cold and pests. However, a cloche, like this one from Gardener’s Supply Company, can also be used as a humidity dome.
- When it comes to humidity domes, rectangular ones are generally the most popular. This is because they fit snugly over most standard seed trays.
Plant propagation trays measuring 10″ by 20″ can fit in many domes (seed tray). Choose a taller tray if you wish to grow plants from cuttings.
There are humidity domes that are at least 7.5 inches tall. Check out Bootstrap Farmer’s website for additional information about humidity domes.
Adjustable humidity vents are standard on many humidity domes, allowing you to add or remove water as needed. Controlling moisture levels under a dome is made easier by these vents.
In order to help your seedlings adjust to the environment outside of the dome, this is a lifesaver (or plant saver). Helps seedlings avoid overheating under the dome.
Does A Humidity Dome Need Holes?
Holes aren’t necessary in a humidity dome, strictly speaking. The dome’s function is to increase humidity by retaining moisture in the air beneath it.
Vent holes in a dome can be useful if high humidity is an issue in specific situations. Mold growth in soil or on seedlings can occur as a result of prolonged exposure to excessive humidity.
When seedlings are infested with mold or fungus, this is known as damping off. I’ve written an article on it, and you can read it here.
When To Open Vents On A Humidity Dome
If the temperature under a humidity dome is too high for your seeds, you should open the vents.
Tables from the University of California provide the appropriate soil temperature for seed germination for numerous common crops.
If some of the seeds have sprouted, remove the humidity dome and open the vents (or remove it entirely).
Mold growth is more likely if the humidity dome is left on after germination, according to the Bootstrap Farmer (the time it takes seeds to sprout).
You can use a plant mister (spray bottle) to water any seeds that have not sprouted after you remove the dome.
Humidity domes frequently have openings on the top or sides for the purpose of providing ventilation. If you build a bespoke dome, you can place the vent holes wherever you like.
It’s a delicate balancing act to get the right humidity level for seed germination.
As previously discussed, moldy soil or seedlings are the result of too much humidity.
The soil will dry out if the humidity is too low, killing some of your seeds and reducing germination.
Do You Need Light To Germinate Seeds In A Humidity Dome?
The majority of seeds can germinate in a humidity dome without exposure to light. Science Focus reports that seedlings use gravity to guide their growth.
It’s because of this that the majority of seeds don’t require light as a signal to germinate. As a matter of fact, many seeds germinate in total darkness, deep underground.
Some seeds, on the other hand, require light to germinate (or at least a thin coating of soil). You may find out more about them by visiting this page.
After your seeds have sprouted, though, the plot twists and turns. In order to grow, seedlings require light, and they will do so in whatever way possible.
Seedlings will “stretch” themselves out if there is not enough light for them to grow. The seedlings will eventually grow “leggy,” or long and slender, as they try to move closer to a light source that is weak.
Following germination, supply seedlings with grow lights to prevent them from becoming long and lanky. Place the seedlings in a place that receives enough sunshine (such as a bright windowsill).
When transplanting seedlings outside, take cautious to adequately harden the seedlings off. Seedlings are hardened off by progressively changing their light, temperature, watering, and humidity conditions.
There is less risk of seedlings being killed or damaged by a sudden shift in environmental conditions as a result.
Check out this Penn State Extension article on seeds and seedlings for more information.
When To Remove The Humidity Dome For Seedlings
Removing the humidity dome after the seedlings have sprouted their first leaves is recommended by the University of New Hampshire. From a few days to a few weeks depending on the plant, the timing will vary.
Mold and other fungi can form if the humidity dome is left on for an extended period of time. Your entire seed tray is at risk if you do this.
Every day, keep an eye on the seedlings and check if they’ve sprouted. When the seeds begin to sprout, remove the humidity dome.
It is possible to alter the humidity level of the humidity dome if your seeds germinate at various times. While this may be the case, it is better to avoid it all together.
In this case, you can use a dome to only sow seeds of the same kind together. As a result, a large number of seeds will germinate at the same time.
You should “harden off” your seedlings after the dome is removed, as stated earlier. You do this by gradually introducing them to their new surroundings in the garden and the outer world.
How To Make A Humidity Dome
DIY humidity domes might save money if you don’t want to buy one. In addition to the cost advantages, the ability to tailor the dome to your specific needs is an additional benefit.
To make things even better, you’ll also be able to recycle some of your own household waste. Making your own humidity dome can be accomplished in a variety of ways:
- Plastic Wrap and a Container
- Plastic Bag with Paper Towel
- Plastic Wrap with an Egg Carton
- a plate with a bottle of plastic
- Stainless Steel Container with Lid
The ideal way will ultimately rely on the materials you have on hand. Each method has its own advantages.
Humidity Dome From A Container & Plastic Wrap
Filling a pot or other container with soil is an easy approach to create a humidity dome.. In order to minimize damp soil for your seeds and seedlings, it is best if the container contains drainage holes.
Plant your seeds at the proper depth and spacing next. Make sure the dirt isn’t completely drenched before watering it.
After that, cover the pot with a piece of plastic wrap. The dirt should be completely covered with plastic by the time you’ve finished wrapping the plastic around the container’s rim.
Alternatively, you can use a piece of plastic wrap that’s long enough to wrap around the pot and secure it in place. To secure the plastic wrap to the pot, you can use an elastic band or a piece of twine.
Untie the elastic or twine and pull up the plastic to allow the air to circulate and dry out a little bit.
Make sure to keep in mind that plastic pots are more water-resistant than clay pots. In order to learn more about the differences between clay and plastic pots, see my post on the subject.
Humidity Dome From A Paper Towel & Plastic Bag
Xem thêm : How To Grow Tomatoes In A Mini Greenhouse? Comprehensive Guide
A humidity dome can be made without the need of pots, containers, or soil. Paper towels and plastic bags are enough to get the job done.
The first step is to dampen the paper towel, but not completely soak it. In this method, the growing medium will be a damp paper towel.
After that, place your seeds on the damp paper towel and wrap it over them.
A damp paper towel containing seeds should then be placed inside a plastic bag. Keep the moisture in the bag by sealing it..
The humidity in the bag will rise when the paper towel’s water evaporates. An increase in moisture will be caused by doing this.
As a result, your seeds will germinate in a wet environment. In addition to saving time and money, sprouting seeds allows you to plant them immediately in the ground or a larger container without having to deal with dirt.
Humidity Dome From An Egg Carton & Plastic Wrap
Using a humidity dome instead of a pot or container is another benefit. Egg carton and plastic wrap are all that is needed.
The first step is to fill each empty egg carton cell with a small amount of soil.
The next step is to sow a seed in each cell’s soil. Each cell should be watered.
After that, wrap the entire system in plastic wrap (you can also use a plastic bag that seals, such as a larger freezer bag).
The seeds will germinate since the bag/plastic will hold in the moisture, much like the other techniques on this list.
Wet egg cartons may dissolve, making it difficult to transport the containers without breaking. Put your egg carton on a tray to make moving it easier if you want to avoid this.
Humidity Dome From A Tray & Plastic Bottle
If you have a small tray and a few plastic bottles, this is an easy humidity dome to make.
To begin, fill your tray with dirt. The water will spill out if you don’t leave enough room at the top for watering.
The next step is to sow your seeds. Make sure the soil is moist but not dripping wet before watering them (a spray bottle works well for this).
Then, remove the bottle’s bottom (be careful not to cut yourself).
Lastly, place the plastic bottle’s lid on top the soil, covering the seeds.
The cap on top of the plastic bottle can be used as a humidity dome vent!
Humidity Dome From A Food Container & Lid
It is possible to use a food container with a lid as a humidity dome.
Fill the container’s bottom with soil. Make sure there’s plenty breathing room at the top for air and water to get to the seedlings.
The next step is to sow your seeds. The soil should be damp but not saturated when the seeds are planted.
Place the container’s lid on top to complete the process. After sprouting, seedlings will benefit from a transparent lid.
After your seeds have sprouted, keep an eye on them and remove the lid. Keeping a lid on your seedlings as they grow taller will not be a pleasant experience for them!
Something a little more substantial could pique your interest if you are handy. Please check out this instructables.com post on how to create a humidity dome for seeds if you’re interested.
How Long to Use Plastic Domes when Starting Vegetable Seeds Indoors?
You may get a wide selection of veggies for your yard by starting vegetable seeds indoors. In order for seeds to thrive, they must be placed in a sterile medium, be watered, and be kept warm. A humidity dome, used to start seeds, keeps the planting medium moist and warm, which helps the seeds germinate faster. Remove the dome as soon as the seedlings begin to grow out of it.
Tip
Keep the seed starting tray covered with a plastic dome or plastic wrap until the seeds germinate and the seedlings are visible. Ensure the leaves don’t touch the plastic by removing the dome.
Start Seeds Indoors
The sterile seed starting mix loses moisture less quickly with the help of the humidity dome. In order for water to reach the embryo inside the seed’s outer shell, it must be kept moist, but not waterlogged. Seeds, according to the University of Illinois Extension, need water, air, and the appropriate temperature to germinate.
Before starting seeds inside, be sure to read the instructions on the seed packet. Sow seeds six to eight weeks before the last frost date to ensure that the new plants are ready for planting when the air and soil are warm enough for that particular vegetable type.
Use a seed heat mat or a flat pan, such as a cookie sheet, to place the seed-starting tray. Make sure the seed starting trays are moistened with seed-starting mix before you begin planting your seeds. In each cell, place one to three seeds and cover the seed if instructed to do so. Lightly mist the plastic dome or other covering and keep it in place. The University of Minnesota Extension recommends that you remove the dome when the tiny seedlings are almost long enough to touch the plastic.
DIY Humidity Dome for Seedlings
It is not necessary to use prepackaged seed-starting trays that come with a plastic cap or dome. As an added bonus, when you keep the tray for the next growing season, the cover may be damaged and inoperable. You need not be concerned; you still have a wide range of choices.
Seedlings can be protected by covering them with saran wrap if the seed-starting tray is undamaged. Discard the plastic wrap once the small plants appear and uncover the dish. In the event that you’re utilizing biodegradable containers like toilet paper rolls or peat pots, you may simply put the pots on a tray or pan and wrap them in plastic wrap to protect them from the elements.
Recycle bins and garbage cans are a great place to look for easy solutions. With a 10% bleach solution, takeout containers with clear lids can be cleaned and sanitized before being used as seed starting trays. You may plant seeds in each compartment of the clear plastic tray your muffins or cupcakes come in, and the hinged clear cover clicks down over the tray to create a humidity dome. For your seedlings, you can even use a fast food drink cup and some plastic wrap to make a little greenhouse out of them. Before adding the sterile mixture, take sure to poke a hole in the bottom of each one.
Care for Your Seedlings
After removing the plastic dome, continue to water the seedlings when the soil is dry to the touch. Burpee recommends checking the seeds and seedlings daily to ensure they don’t dry out. Wait a week or so before fertilizing new seedlings, per the University of New Hampshire Extension, then dilute a liquid houseplant fertilizer according to the manufacturer’s instructions and feed the seedlings weekly. Place the trays of seedlings in a brightly lit location or add a fluorescent fixture 3 to 4 inches above the plants. Turn off the light after 16 hours, so the seedlings “rest” at night.
When the soil feels dry to the touch, continue to water the seedlings. You should inspect the seeds and seedlings every day to make sure they don’t dry out. Seedlings should be fed diluted houseplant fertilizer according to the manufacturer’s directions for a week or so before planting, according to the University of New Hampshire Extension. Make sure the seedling trays are in a well-lit area or place a fluorescent light 3 to 4 inches above the plants. To allow seedlings to “sleep,” turn off the lights after 16 hours.
FAQs
Do you need a humidity dome for seeds?
Do not stop watering your seedlings just because you’ve taken away their plastic domes. You should inspect the seeds and seedlings every day to make sure they don’t dry out. Once the seedlings are about a week old, dilute a liquid houseplant fertilizer according to the manufacturer’s recommendations and feed them every week, as advised by the University of New Hampshire Extension Service. Place the seedling trays in a highly lit area or install a fluorescent fixture 3 to 4 inches above the plants. To allow seedlings to “sleep” at night, turn off the lights after 16 hours
How long should seedlings be in humidity dome?
After removing the plastic dome, continue to water the seedlings when the soil seems dry to the touch. Every day, Burpee recommends inspecting the seeds and seedlings to make sure they don’t dry out. The University of New Hampshire Extension recommends waiting a week or so before fertilizing seedlings, diluting a liquid houseplant fertilizer according to the manufacturer’s instructions, and feeding the seedlings monthly. Place the seedling trays in a well lit area or place a fluorescent light 3 to 4 inches above the plants. After 16 hours, turn off the lights so the seedlings can “sleep” at night.
How do you germinate seeds in a greenhouse?
A depth of 1/8 to 1/2 inch is appropriate for most seeds when following the instructions on the seed packet. Soak the seeds in water, then sprinkle soil over the top of them. Plastic wrap should be used to protect the pots or trays from spills. Place them in a comfortable, well-lit area.
Do I need to cover seeds in greenhouse?
Starting seedlings in a greenhouse, polytunnel, or cold frame allows keen gardeners to get a head start on the growing season.. Sowing seeds indoors while the weather is still not optimal allows you to grow robust, healthy seedlings that can withstand the cold winds and pests of the outside world.
Do seedlings need heat after germination?
Constant heating is necessary for the propagation of your seedlings. When a seed has successfully germinated, you’ll see tiny sprouts poking out of the earth, along with the first signs of developing leaves. Remove the seedling mat from the tray and turn off the machine.
How often should I water seedlings?
To keep seedlings from drying out, they need soil that is always wet. Depending on how quickly they dry out, you may need to water them many times a day in this manner. Fingernail-test your seedling’s soil to about an inch deep. Soil dehydration necessitates the application of water to your seedling.

Should I cover my seeds with plastic wrap?
Cover the pots with plastic wrap or a plastic dome that fits over the seed-starting tray to expedite germination. Seeds can germinate more quickly and easily if they are kept moist.
What do I do after my seeds sprout indoors?
Observe your seed trays for germination on a daily basis, and if the soil surface appears to be drying out, spritz them with water. Remove the humidity dome and place the trays under lights once the seeds have sprouted. Seedlings should have the lights no more than two inches above their heads.
Do seeds grow faster in a greenhouse?
It is true that plants develop quicker and better in greenhouses because the temperature is more controlled, and the carbon dioxide level is higher than in the outside environment.
When should you start seeds in a greenhouse?
You can start seeds in greenhouses at any time because of the controlled environment. However, if you’re planning to start plants in greenhouses for spring planting, you should do so 6-8 weeks before the last projected frost date in your area if you’re starting seeds.
What temperature should a greenhouse be for seedlings?
The ideal greenhouse temperature is between 7 and 21 degrees Celsius (45 and 70 degrees Fahrenheit). The roof vents should supply the majority of the airflow, while the side vents should only be used when the weather is warmer outdoors.
Nguồn: http://iatsabbioneta.org
Danh mục: Garden


