Interested in learning how to make a smoker out of a refrigerator? Remove the unnecessary pieces of an old fridge, drill a few holes for airflow, add as many shelves as you wish, and finally install your heat source at the bottom of the fridge. That’s all there is to it!
- Zero Breeze Air Conditioner Where To Buy? Helpful Information!
- How To Attach A Dust Ruffle To An Adjustable Bed? Effective Guide For You!
- How To Install Frigidaire Air Conditioner? Complete Step-by-Step Guide
- What Causes A Bed Frame To Break? How To Fix A Broken Bed?
- How To Hang Curtains From Ceiling? Comprehensive Guide
Is smoked meat, fish, or vegetables your favorite food type? There’s a good chance you’ve thought of making them at home if you haven’t already. Food smoking, on the other hand, may be a little out of your price range.
Bạn đang xem: How To Build A Smoker Out Of A Fridge? Step-by-Step Tutorial
If you have an ancient refrigerator that you no longer use, you may still smoke your food. You may be able to find a used one at a discount at your local junkyard.
Alternatively, you may have an old fridge lying around that you have no idea what to do with. Please continue reading if any of these statements strike a chord in your heart. Learn how to make your own food smoker out of a fridge by reading this article.
Designing Your Very Own Smoker
Make a plan before you begin dismantling your fridge. Depending on what type of food smoker your fridge will be, the layout of your new smoker, and how you’ll change the internal layout of your fridge, should already be clear to you.
Your fridge’s model will also influence the design. In terms of refrigerators, older and taller models are the way to go. When you’re done looking through your fridge. You may begin to think about how you want the interior of your fridge to function as a food smoker by imagining what you want it to look like. Once you’ve completed your design, you’re ready to bring your vision to fruition.
Steps on How To Build A Smoker Out Of A Fridge
As long as you don’t mind experimenting, you can use your fridge to smoke food. If you’ve never built a food smoker before, this instructions will merely serve as a starting point.
In order to provide exact recommendations, we cannot know the sort of fridge you have or its dimensions and shape. You may also be able to use other materials that you already own. You’d be able to be as creative as you want with your food smoker if you did this. The following are the instructions for constructing a smoker out of a refrigerator.
Step #1. Disassembly
Getting rid of any unneeded elements is the first step. Remove all of the machine parts, as well as any pieces that can be removed without harming the machine. Make sure you have removed everything that has to be removed before you start heating up your smoker to ensure that nothing else is at risk.
Remove everything that can be removed from the refrigerator’s interior. The idea is to provide you with as much room as possible. It’s fine if this involves removing the insulation from the interior walls. If the fridge is dirty and soiled, you won’t be able to proceed with the next step.
Step #2. Interior layout
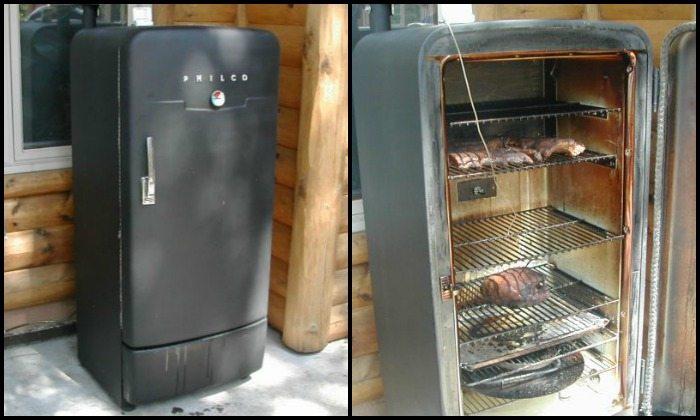
Your design should take advantage of the refrigerator’s original internal structure, depending on how the fridge is designed. Suppose your fridge includes a lower drawer for storing vegetables and fruits. You might use this space to store the charcoal you’d be utilizing.
The covering that separates the upper and bottom compartments of your refrigerator can be removed if it is a fridge freezer. In its place, you might alternatively use a steel plate. In this way, the smoke can go through to your upper freezer compartment and reach the meat you’ve stored there.
Refrigerator shelves or trays can also be used as platforms for more meat or a water pan. As the leader, everything is in your hands. Just make sure you’re familiar with the process of food smoking and the specifics of what you’re doing.
Step #3. Airflow
Drilling holes in the fridge’s sides and top to let air flow is the final stage. Smoke production would cease immediately if the fires that fuel it ran out of oxygen. Make sure they’re not too large or numerous so that smoke can readily escape.
To manipulate the airflow, simply cover and uncover the openings. You can begin smoking your favorite foods once you have placed your heat source at the bottom of your new smoker.
Cold Smoking Is Cooler in a Fridge
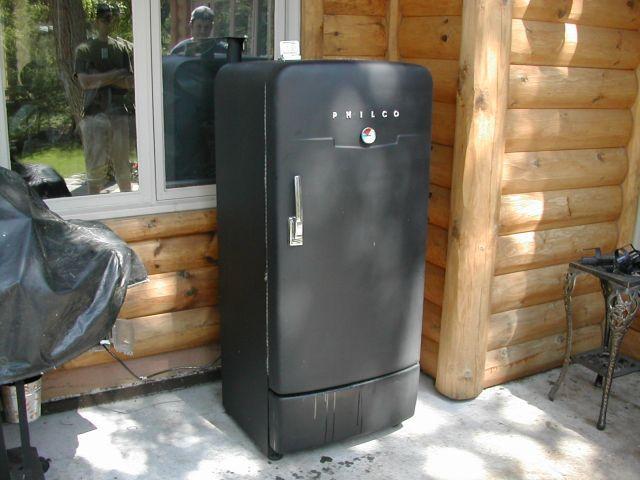
You’ve been wondering what to do with your old refrigerator that’s been sitting around waiting for disposal. You might want to reconsider getting rid of that old appliance and instead use it as a smoke cabinet.
As soon as my old fridge quit operating, it was slated for transformation into a smoking cabinet, but it wasn’t until lately that I was able to get started on the project. As it turned out, the effort was well worth it and the cold smoker turned out fantastic! If you’re interested in cold smoking food, this article will show you how I did it using an old broken fridge as a cold smoker.
It was thought that because of the nature of the project, it would be desirable to work as cheaply as possible to keep the total cost of the build lower than that of cold smoking-specific models on the market.
Secondly, I wanted to keep the complexity and tool needs as minimal as possible, so that everyone who likes smoky deliciousness and has an old fridge at home may turn their hand to greatness…
From Fridge to Smoke Cabinet: An Overview
This section explains how I converted my fridge into a freezer. Even if you don’t have the exact same model, the same principles apply to all refrigerators. Despite my best efforts, you are free to spend as much money as you choose. The following is a high-level breakdown of the procedure:
Time needed: about ten hours
Difficulty: Medium
Overview of Project
- Clean out the fridge.
- Decide on a schedule for storing and hanging items.
- Removeable metal rods can be installed by cutting and attaching slats.
- Metal rods should be cut to suitable lengths and gathered in desired quantities.
- Build and install the chimney.
- Seal any holes or cracks with sealant.
- Fire retardant bottom for use with a smoke generator in a refrigerator.
- Install a thermometer or thermometers to keep an eye on the temperature within the building.
- Check for smoke and perform a final cleaning.
Important Safety Information Before You Start
In order to maintain low temperatures, refrigerators use a heat exchanger to circulate refrigerants.
Xem thêm : How To Make Tab Top Curtains? Important Tips to Remember
To cut or remove any of the heat pumps or heat exchange tubing from the fridge, it is not recommended. There are a few varieties of refrigerants. In order to avoid the chance of the refrigerant leaking out, it is advisable to leave the cold smoker alone.
Make sure the fridge is in a well-ventilated place and do not inhale any fumes if you accidently damage the pipes and refrigerant leaks out. Get out of the house as soon as possible if you’re inside and open the windows. Refrigeration fluids can be hazardous to your health and the environment, so use caution when handling them.
How to Care for the Coleus Plant
This informative guide from The National Archives contains a wealth of information on refrigerants.
Because most refrigerators are lined with polyethylene terephthalate (PET), they are not appropriate for hot smoking. Never try hot smoking in your refrigerator!
Step 1: Clean the Fridge
As a result of being left out in the elements for some time, the fridge I used had turned green on the outside and had some snails nestled within. I evicted the intruders and began cleaning with a hose and warm soapy water. Do not forget to clean the inside of the door like I did when I washed it for the first time. My fridge was back to normal when I fixed the mistake I had made.
Before moving forward, make sure your fridge is completely dry.
Step 2: Choose Where You Want Your Shelves
Smoke cabinets can be used for a variety of uses, including hanging huge joints from butcher hooks, or storing fish and cheese on horizontal racking.
Make a list of the items you want to store in your fridge and think about where you want to put shelves. The following stages will explain how to accomplish the design depicted in this step’s picture.
Step 3: Cut Slats to Allow Fitting of Removable Metal Rods
Slats are the next step after you’ve decided on the number of shelves and the amount of hanging space.
Draw horizontal lines (with a steel rule or set square) where you want the base of each slot to be on the longest central slat. This ensures that the racks are level.
Using the measurements you’ve taken for the rack heights, measure the distance between them and mark out the same distances on the slats of the shorter length.
The central slat has an additional top notch that does not align with the shorter slat notches for me. A single bar can be hung from this slot.)
When all the slats have been marked out, you can start cutting the notches (see picture below).
I held the slats in a bench vice while using a coping saw. In order for your metal rods to fit snugly, you must ensure that your notch is a bit larger than the width of the metal rods.
Step 4: Attach the Slats
There are several tools you’ll need for this project, but the most important is a cordless drill and a drill bit for wood and metal of the same size. Using a 6 mm bit, I drilled both holes.
First, I positioned the central slat in the desired location. In order to designate where to drill the holes, I used a center punch and a small hammer to make sure the slat was vertically perpendicular to the fridge.
A 6 x 80 mm coach bolt was used to attach the slats, the head of which I installed inside the fridge and which I secured to the outside of the fridge using the appropriate drill bits (metal for metal and wood for wood).
The bottoms of the notches are aligned vertically to ensure that the shelves are level. Before securing anything too firmly, be sure that both sides are aligned.
Step 5: Cut Metal Rods to Size in Desired Quantity
Cut the metal rods 10–15 mm shorter than your fridge’s internal width with a hacksaw (or an angle grinder with a metal cutting disc).
To smooth off the edges and eliminate any burs or sharp points, file the ends. Three sets of two rods each for the horizontal shelves/racks and two rods (a little thicker) each for the central hanging were cut from the eight that I had originally planned.
Metal filings in your hands or eyes aren’t fun, so be sure to use proper safety gear!
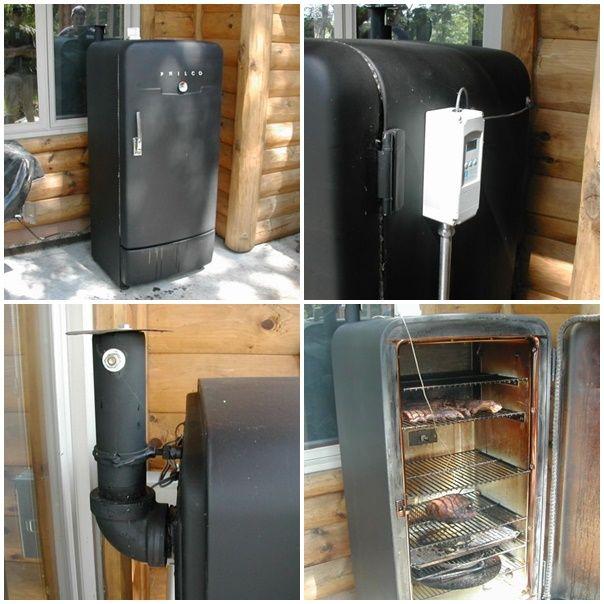
Step 6: Create the Chimney
A smoke cabinet should look like this at this point in the process.
If you don’t have one, now is the time to install one so the smoke doesn’t go stale. However, if the chimney is excessively large, there will be an excessive amount of air exchange.
Because it had been used in an old shower rack that was no longer in existence, I located a piece of mild steel tubing. Hammerite black paint was all that was needed to transform this 1 1/2-foot section of pipe into an eye-catching piece of art (a paint for metal).
Metal can be punctured in numerous ways. If you have a circular cutter of the suitable size for your pipe, this should work.
Xem thêm : How To Keep Swivel Recliners From Moving On Carpets? Comprehensive Guide
To cut out a circular hole in metal, I was lacking a suitable instrument. In the end, I went with the far more primitive approach of repeatedly piercing the metal with a nail in the necessary diameter circle. If you do this, be aware of sharp edges.
Step 7: Make an Aligning Hole for the Chimney
While drilling a second alignment hole beneath the first may seem difficult, your fridge’s lining may make it possible.
Using the initial hole in the fridge, I removed part of the insulation that had been exposed and pushed my chimney down until it was firmly pressed against the inner liner. It’s easier to do this by twisting your body.
Step 8: Fit the Chimney
It’s best to leave about 2–4 mm of pipe protruding out of the fridge’s interior so that you may apply sealant to it afterwards.
If you scraped the paint during installation, you may need to reapply a second coat of paint to protect your chimney against rust and extend its lifespan.
Step 9: Apply Sealant to Any Gaps or Holes
Make sure that no creepy crawlies can get inside between uses by using a sealant gun to put silicone around the holes you cut (top and bottom).
Step 10: Fireproof the Bottom Portion of the Fridge
Almost done with your smoking cabinet!
Even though most smoke generators don’t produce much heat, it may be required to fireproof the bottom half of your fridge depending on how your fridge is constructed and how you want to generate smoke.
With the help of an elevated rack and some sheet steel, I was able to keep my fridge from overheating.
The battery in my camera died, so I’m not able to document this stage.)
Step 11: Install Thermometers
Temperatures in the 10–32 degree Celsius (50–90 degree Fahrenheit) range are ideal for cold smoking. Because of this, it is strongly advised that you put a thermometer in your smoke chamber.
I went with two long-stem thermometers from River Country, one above the smoke generator box piece and one just over the middle of the racking section where food would be. Everything is running smoothly for them. A year-long warranty and solid workmanship are a nice bonus.
To acquire an accurate reading from the inside of the fridge, make sure your thermometer probe is well-insulated from the fridge’s housing. For this, I used cork to line the hole (from wine corks).
My thermometer probe could be passed through the little hole in the wine corks after I had made holes in them using a 15 mm circle cutter. Using a sharp knife, I trimmed the cork sides so that they would fit tightly into the hole.
To keep the thermometer from touching the fridge door, I inserted two corks, each about 3/4 of their original length.
Step 12: Do a Final Cleaning and Smoke Test
Double-check the cleanliness of your smoke cabinet and all of your racking. A minimum of 24 hours is required for sealer and paint to dry.
To test out your new smoker, wait until all the paint and sealant is dry.
Please do your research on the subject of cold smoking first, before you do any kind of experimentation. If done incorrectly, it could result in you accidentally cultivating some harmful microorganisms.
Make sure your smoker’s temperature isn’t too high, and that your hygiene and product sources are top-notch. You’ll be fine if you follow these instructions to the letter.
Wishing you the best of luck, safety, and joy.
Tips on How to Make Smoke
So, now that you’ve finished your smoke cabinet, you’re excited to start smoking some food. In order to get the most out of your smoking experience it is important to know how to generate smoke in a variety of ways.
A homemade smoke generator is conceivable, although I have yet to experiment with one.
The A-MAZE-N Pellet Smoker has been used by me personally. It’s easy to use, affordable, and a good starter smoke machine for people just getting started. Because of the mesh’s maze-like design, only a small portion may burn at any given time, resulting in long-lasting smoke.
The dimensions of your smoke cabinet must be taken into consideration when purchasing a smoke generator, since a fridge with a door that won’t close is of no use to anyone.
Final Words
By the time you’ve finished reading this, I hope you’ve figured out how to turn a refrigerator into a smoker. You’ve made it this far in the article because you’ve shown interest. We truly value the time and effort you have put in.
Nguồn: https://iatsabbioneta.org
Danh mục: Home