Epiphytic, lithophytic, and terrestrial orchid species make up the vast Orchidaceae family. Some orchids in the Dendrobium genus can be grown from stem cuttings, despite the fact that most orchids cannot be grown from cuttings. One of these species is the Noble Dendrobium (Dendrobium nobile), which is hardy in USDA zones 10 through 11. It’s a beautiful houseplant that blooms from late winter to early summer.
- How To Grow Vegetables In A Greenhouse Year Round? Comprehensive Guide
- How To Grow Lavender In Arizona? Complete Step-by-Step Guide
- How Do I Keep My Roses Disease Free? Everything To Know!
- How To Grow Pole beans In Pots In A Small Greenhouse? Step-By-Step Guide
- How To Get Rid Of Wild Rose Bushes? Complete Guide
Dendrobium Nobile Flowers
Nodes on the stem or pseudobulb of the Noble Dendrobium produce single blossoms or small clusters of flowers. Cut the spikes with scissors or shears once the petals have faded. Use rubbing alcohol to clean the blades of your cutting tool between each cut.
Bạn đang xem: How To Start An Orchid From A Cutting? Comprehensive Guide
Stem Cutting
Select one or more stems of up to a foot in length once the blossoms have faded. Make portions of three to four nodes apiece by snipping them off of the parent plant. Set aside the trimmings.
Rooting Tray
Pebbles, moss, or bark can be used as a base for a rooting tray. Allow the moss or bark to soak in water until it is totally saturated; then let the water drain from the medium. The medium should be spread evenly in the tray. Spray the stem cuttings with water before placing them on top of the media. Keep the tray moist by covering it loosely with plastic wrap. Add some warmth and darkness to the area by placing the tray there.
Cutting Care
75 to 85 degrees Fahrenheit should be maintained in the roots tray. A seedling heat mat can assist keep the temperature consistent. Keep the cuttings wet but not waterlogged by misting them frequently. After a light sprinkling of water, use a water-soluble nitrogen fertilizer or liquid seaweed extract every two weeks for the first two months of growth. Alternate weeks of foliar fertilizer 6-6-8 can be applied to the cuttings. Keep applying the foliar fertilizer every two weeks until the cuttings have leaves and roots in place. Cuts that appear to be decaying should be thrown away.
Potting Basics
The cuttings will continue to grow new roots and shoots after they have been cut using sterilized anvil pruning shears. The term “keikis” refers to the tiny plants that form naturally on the pseudobulbs or stems of their parent plants.
They tend to grow in small containers, such as the dendrobiums. Using a loose orchid medium of bark, volcanic rock weathered over time or sphagnum moss, put the young plants in 2-inch pots. To ensure that the medium is completely saturated, begin by soaking it in warm water for several hours. When planting the new plantlet, make sure the old stem is erect and the new shoots are pointing outwards or upwards. If necessary, use a stake to keep the plant upright and in place while it grows. The roots and fresh leaves will emerge from the potting media as the plant grows.
Dendrobium Care
Place the Dendrobium in a well-lit area, such as a window with sheer curtains on the south or west side. In the daytime, they enjoy 68 to 85 degrees Fahrenheit, and at night, 65 to 75 degrees Fahrenheit. If it’s winter, you should let the temperature to drop to around 55 degrees Fahrenheit at night. In order to thrive, noble Dendrobiums require a temperature differential of 10 degrees between day and night.
By placing the flower pot in the sink and adding water until it drains, you can rehydrate the medium when it is nearly dry. On the other hand, huge plants may only need watering once a week for little orchids. During the fall and winter months, watering should be reduced and the potting material kept barely damp.
Keep the orchid in an area with a high level of humidity. It’s best to keep the plant away from air ducts if you can. A cold steam humidifier and a collection of plants are two easy ways to increase the humidity in your home or office space.
Foliar fertilizer should be applied on a monthly basis during the spring and summer growing seasons. An alternative is to water in a weak solution of 12-12-12 water soluble fertilizer, diluted to one quarter strength.
What Doesn’t Work for Growing Orchid Cuttings
Orchids can be grown in a number of various ways, none of which are included in the top-ranking articles on the subject.
If you’re looking for the best advice on how to grow orchids from cuttings, you’ll find it in the most popular articles on the subject. Not only does this not function, but it’s a scam. The outcomes they produce are spikes and keikis that were already on them before. In order for nutrients to flow through the xylem of a flower spike, it must be linked to the stem.
That these films are gaining attention and ranking in search results enrages me beyond words… It’s impossible to do. On a Phalaenopsis orchid, of course. Although this procedure has been used successfully for Dendrobium orchids, a sealed container is required for the entire stem to be placed inside.
The flower spike is a completely separate structure from the stalk (inflorescence). The nutrients in a stem are sufficient to avoid the requirement for immediate roots that absorb water and nutrients.
Because of this, the stem can be kept in a vase and still produce new roots. Nothing of the type can be found on a flower spike. It has a one-week shelf life after being slashed. To make an orchid centerpiece last longer, clipped Phalaenopsis spikes should be used.
Succulents are a distinct kind of plant, but they can be used in the same way. Succulent leaves that are placed in moist sand will sprout new plants, one leaf at a time. Orchids, on the other hand, can’t meet their nutrient needs by cutting their flower spikes.
To compose this post, I researched and tested each of the ways that have been deemed successful. Each of the following methods has been categorized as either a myth, a real approach, or a research project in progress.
Again, these are only my opinions, and I have no problem with you expressing your own. Talking about our own experiences is a great approach to learn new things and grow as people.
Method that works:
There are two primary methods for cultivating orchids: asexual reproduction and seed propagation. The orchid bloom dies after the male anther gets the female pollen from the stigma. This is because the fading bloom’s seed development is now a priority for the flower. These male and female orchid parts will produce a seed pod.
Because I’m not familiar with seed propagation, I can’t begin to advise you on what to do. Dustin Miller’s website, Here But Not, in Canada, has an entire piece dedicated to this topic, and it’s excellent. If you’re interested in pollination and seed propagation, I recommend checking out his work.
If you have a lot of patience and time, this method is ideal. Seeds might take up to five years or more to mature into full-fledged blooming plants. It’s a great approach to learn about orchid care because it’s a hands-on experience.
Orchid seed propagation is a legitimate and exciting way of orchid propagation. In the case of Catasetum orchids, the story of seed germination and pollination is particularly interesting. Because of that, I keep a couple Catasetum orchids on hand. Read about the male and female Catasetum orchids here, as well as about Catasetum’s watering cycles, in these two articles:
Even though I am interested by their growth and seed pollination with the Euglossine bee, I have yet to test growing seeds, and I doubt that I would in the future.
Approved Approach:
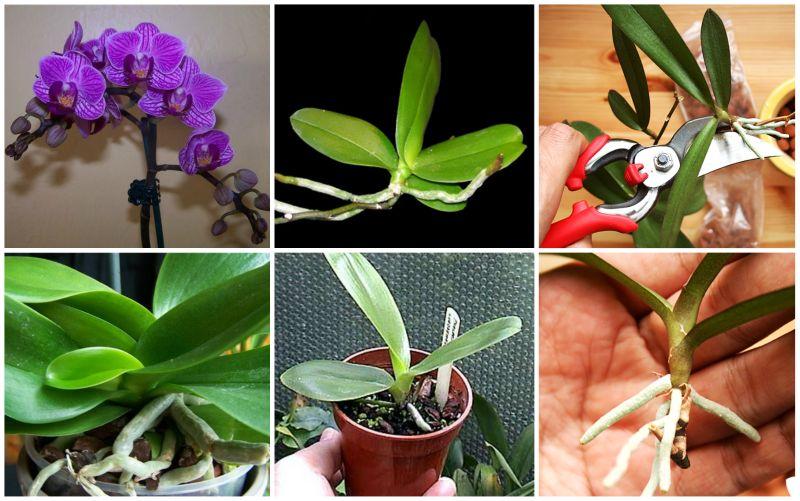
Back Bulb Cuttings, or Natural Divisions, are the most common form of orchid propagation, according to me. Vegetative propagation does not get any easier than this. It is possible to divide an orchid into two or three plants by separating the rhizome of the orchid, such as a Cattleya. (Source)
If your orchid has grown too large for its pot and you don’t want to buy another one, or if you have a friend who wants an orchid cutting, you can utilize this technique to encourage new growth. Either way, splitting the rhizome into equal pieces is how you’ll divide the plant.
After cutting, you’ll only have two divisions, and the oldest back bulb will be on one of them. Keep a watch out for regions that may sprout new pseudobulbs, such as dormant eyes. In order to ingest its nutrients, the rear bulb will produce new growth from the dormant eyes after the rhizome has been severed. This approach should result in a rapid shrinkage of the rear bulb.
Each of the pseudobulbs will thrive if you leave three or four healthy ones on the divide. They have a sufficient number of developed, healthy pseudobulbs to support fresh development. Growth can occur on either side of a branch in specific situations. However, the most common trend is to only detect fresh development at the latter end.
Xem thêm : Growing Sweet Potatoes In Arizona
Pseudobulbs in the back provide nutrition to the newer bulbs even though they are no longer actively growing. Each orchid division has a good probability of developing into a healthy plant the size it was when the rhizome was divided with enough pseudobulbs.
Division is only the name given to the portion of the plant that contains the lead bulb and is actively growing. “Back bulbs” refers to all other sections of an orchid that have been split off and are not actively growing. As long as the rhizome has multiple new growths, you can divide the orchid multiple times. In this case, there is only one way to divide the rhizome because it is linear.
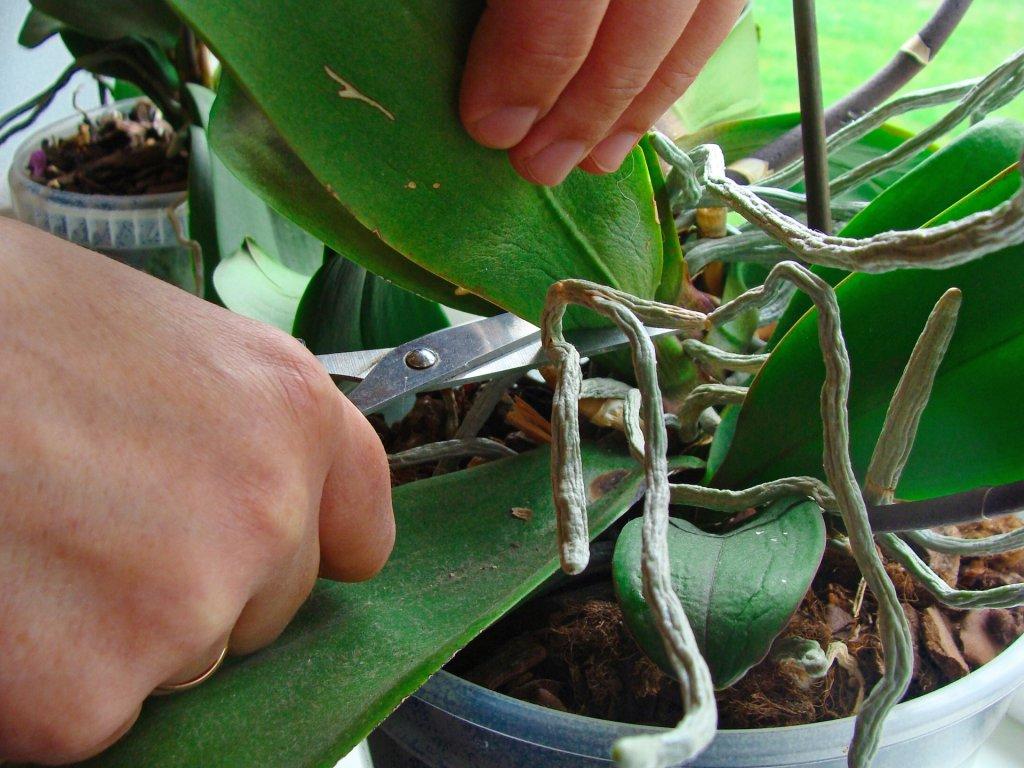
If you want to share an orchid with a buddy, this is the best way to do so. After the orchid has bloomed, but before you repot it, is the perfect time to divide your orchid and take cuttings from the back bulbs.
The reason for this is that when you repot an orchid, you’ve already disturbed its roots, making it more susceptible to root damage. You’ll have to disrupt the roots again if you’re dividing the orchid via cuttings.
Use sterilized pruners and clean cuts while separating the rhizome. After removing the rhizome, plant the older pseudobulb near the pot’s outside edge. Over the course of two years, the vase will be filled to the brim with fresh growth.
Currently untested:
Sympodial orchids can only be grown using the first method of back bulbs and division. Phalaenopsis orchids do not have a rhizome, so this method will not work on them. It doesn’t work if you cut the Phal stem in half and try to grow it in sphagnum.
Yet…
There is a method called topping. I haven’t tried it, and I doubt I’ll ever do so. The method states that you can cut the orchid stem in half. If you have a Vanda orchid that has grown too tall, you can cut the stem into two parts, potting the top half with no roots into a pot with moist sphagnum.
There is a method called topping. I haven’t tried it, and I doubt I’ll ever do so. The method states that you can cut the orchid stem in half. If you have a Vanda orchid that has grown too tall, you can cut the stem into two parts, potting the top half with no roots into a pot with moist sphagnum.
There is a technique known as topping that can be used. I’ve never tried it, and I doubt I will. In accordance with the instructions, you can slice the orchid stem in half. If you have a Vanda orchid that has grown too tall, you can cut the stem into two pieces, potting the top half with no roots into a container with moist sphagnum.
Approved Approach:
A rear bulb that hasn’t shriveled or died is taken and planted on its own using this technique. Catasetum, Cymbidium, and Oncidium orchids are commonly grown using this method. Despite its age, the orchid’s eldest pseudobulb has stopped producing new growth but hasn’t shrunk enough to die.
The dormant eyes are not stimulated to produce new growth if they are linked to the entire plant. Taking away the pseudobulb could wake up any eyes that have lain dormant for a while.
A pseudobulb that would have been considered “useless” by the orchid produces fresh development. It wasn’t fair, was it? Nutrients are provided to the entire plant, thus it isn’t completely pointless.
Area the old pseudobulb in moist sphagnum moss and preserve it in a dark place when you remove it from the rest of the plant. To prevent the sphagnum from drying out completely, spray the growth every day.
You can also use wet sand in this approach. Until the water evaporates and reaches the pseudobulb, the orchid will continue to generate new roots as long as it is not submerged in water.
In order to repot your orchid, wait until the back bulb shows the first signs of new roots and then use whatever is best for your particular species. It will produce new roots and a new plant as a result of this.
Orchid back bulb propagation is a labor-intensive process, but the results are priceless when done correctly. You give a purpose to a piece of the plant that would otherwise be thrown away and make it part of your orchid collection.
Myth-Busted:
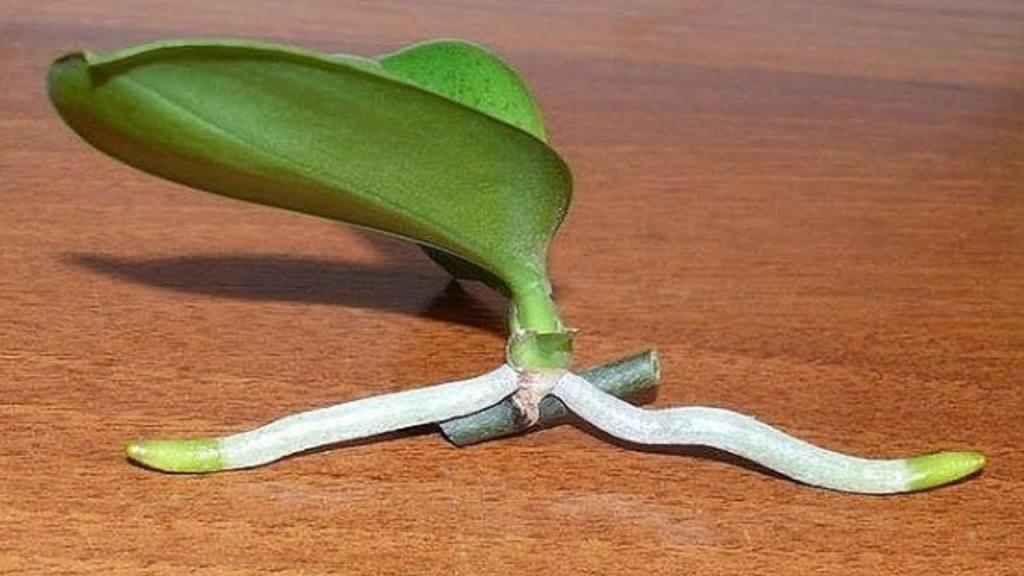
If you take off a piece of the leaf from a succulent, it will regrow. Orchids, on the other hand, don’t follow a set pattern. You may read about my experience with rescuing an orchid without leaves here, but an orchid with only one leaf that then produced new roots?
In order for this to work, the stem must also be attached. A stem with no roots and just one leaf would not be a legitimate propagation in this situation. The orchid’s stem is where all of the plant’s functions are coordinated. All of the plant’s components will fail if it doesn’t have a strong, robust stem.
This holds true for illnesses of the stem as well. Root rot can be treated, allowing you to save your orchid. A damaged leaf can be pruned or regenerated with the right treatment. However, there is little you can do if your stem already has stem rot to stop it from spreading. The stem of the orchid is not very sensitive, yet it will not regenerate as well as other orchid structures if damaged.
Orchids can’t be propagated using solely leaves, hence this approach is invalid. When you add a stem to the leaf, we’ll be on our way.
It’s fine if not everyone is on the same page. I’m not saying that I have all the answers, because I’m continuously learning. Author of Micropropagation of Orchids claims to have used leaf propagation in his work. Other researchers have claimed that orchids can be propagated solely from their leaves, according to a paper published in the Linnean Society’s Botanical Journal in 1988.
“A commonly accepted belief is that the ideas and framework for orchid micropropagation developed de novo in 1960 from the work of Frenchman Georges Morel,” he writes in his book. Gavino Rotor and Hans Thomale made the most significant advances in micropropagation in the United States and Germany, respectively, in 1949; Morel’s work should be viewed in the context of a long history in the in vitro culture of a wide range of explanted tissues and organs from plants of many species, according to this paper. The events behind clonal orchid proliferation are examined from a critical historical perspective in this article.
Micropropagation of orchids using activated charcoal to darken nutrient media and liquid culture settings are both explored in-depth for the first time. A patent filed in the United States for ‘a method for rapidly reproducing orchids, particularly cattleyas,’ is also examined. The patent’s nominal inventor claims that the micropropagation process dates back to 1950, although this claim remains unverified.
Finally, challenges of adjudicating unambiguous priority for ‘discovery’ of a process as sophisticated and extensive as micropropagation are taken into account.” The full article is available here. There is a link on that page to a full article that you can read instead of just the abstract.
Every rule has an exception, or so I’ve been taught in Portuguese grammar. Only one orchid, the Jewel Orchid, has been successfully grown using the leaf method to my knowledge. The Ludisia orchid is a terrestrial orchid that behaves more like a succulent than an orchid, despite the fact that it is an orchid.
It may be because of this that it can thrive on just one leaf… Possibly.
Valid Method: Propagating Orchids from a Stem
The finest choices for this procedure are Dendrobium orchids. Remove an old stem from the orchid if it isn’t producing any flowers anymore and repot it on its own.
Xem thêm : How To Propagate Caladium? Comprehensive Guide
The non-productive stem (cane) is cut off and placed in a rooting tray, which is a shallow dish filled with sphagnum moss to encourage root growth. The pot is then covered or sealed and placed in a dimly lit area with plenty of heat.
When the temperature drops below 65 degrees Fahrenheit at night, a heating pad may be needed to bring the temperature back up. This one (Affiliate Link) is what I now use, however it’s far from ideal. This article explains the features to look for when purchasing a heating pad.
The only difference I could see in this procedure is that it doesn’t need to be sprayed every day. It is only opened once a week to check for fresh growth. A high nitrogen fertilizer or root stimulant, as recommended by a number of authors, could help stimulate the roots.
The more you learn, the more you grow!
If you sign up for my newsletter, I’ll send you a 14-page guide to the most important aspects of orchid fertilization. You can save it to your computer and then print it. To make it more enjoyable, I included a section of the handbook that can be used as a coloring book.
I don’t spam, but I do send out a few interesting emails every two months. If you’d like to learn more about this topic, go here to visit a page on my website where I go into greater detail.
Also, if you’re searching for an orchid diary to preserve your notes on orchid care, check out my two solutions for that on this page. If taking notes isn’t your thing, you may always use a free excel spreadsheet. To find out how to accomplish that, click here.
All in all, I hope you discover a way to make orchid cuttings and share them with your friends. Regardless of how you go about it, recognize that some procedures are more a matter of trial and error than a matter of science. Some cuttings thrive while others perish.
How to grow an orchid from a cutting
Using a flower stem cutting to propagate an orchid like a Phalaenopsis is not possible. stem cuttings aren’t out of the question!
Monopodial orchid stem cuttings
It is possible to reproduce an orchid like Phalaenopsis or Vanda by cutting the stem. What we’re dealing with here are adult orchids that have so many leaves stacked on top of each other that they’ve produced a substantial stem.
A clean knife or pair of shears can be used to “top” the plant, essentially cutting the orchid in half. Even if you remove the roots at the bottom, the plant will continue to develop if you take good care of it.
Sphagnum moss can be used to plant the rootless top section. It’s possible that it will sprout roots and continue to develop as normal if all goes well.
Sympodial orchid stem cuttings
Orchids with sympodial growth develop several canes or bulbs from a single stem. A large majority of these stems are unsuitable for grafting or other methods of graft multiplication.
Dendrobium nobile is a notable exception. This species’ canes can be chopped up and placed in a seedling tray filled with damp sphagnum moss. When a cutting has a few nodes, new Dendrobiums will grow from them.
Vining orchid stem cuttings
There are several orchids that grow on vines, despite their lack of popularity. Vanilla planifolia, also known as the vanilla orchid, is a good example. The species of plant that produces vanilla pods is indeed that one! A cool addition to any orchid collection, albeit it’s not the easiest to maintain.
Vining orchids are easy to propagate, as you may expect. Topping or slicing canes is unnecessary; simply snip the vine where you want it to root. Using Ludisia orchids is also possible!
How to propagate an orchid through division
The rhizome must be separated in order to divide an orchid. Only multi-stemmed (sympodial) orchids like Dendrobium or Cattleya can accomplish this. There is nothing to divide in monopodial orchids like Phalaenopsis.
To successfully divide an orchid, you’ll need a healthy, mature plant with plenty of canes/pseudobulbs available. Make sure to take the orchid out of its pot and untangle the roots so that you can create young orchids that each have three to four active bulbs/canes. In the majority of cases, this entails halving your plant.
Ensure that both parts of your orchid are planted in a suitable soil. As each plant has its own root system, they should be able to continue to grow without much difficulty.
How to propagate an orchid from keikis
Hawaiians use the term “Keiki” to refer to a baby or infant. To cultivate orchids, the term “clones” applies, because the mother plant of an orchid can produce microscopic copies of itself on its stems or at its base.
As you might imagine, if your orchid produces a keiki, you’re in luck. Isn’t it amazing how much work your plant is performing for you? This is particularly useful for propagating the monopodial Phalaenopsis, which is difficult to top but frequently produces keikis. Dendrobium is another typical keiki producer.
In the event that your orchid’s stem or base has developed a keiki, what should you do?
- Allow the keiki to develop a healthy air root system and a few leaves before interfering with it.
- Once the keiki is ripe, use clean shears or a knife to detach it from the mother plant.
- Using the same container and soil that you used for the mother plant, pot up your baby orchid. Alternatively, you can use the same container to house both the baby and the original plant.
- A root system is already in place, so it should be able to develop normally.
How to propagate an orchid from back bulbs
The term “back bulb” may be recognizable to those who are familiar with sympodial orchids. Pseudobulbs on the canes of some orchids, like Cymbidiums, are for people who don’t know. Water or fertilizers can be stored here. Back bulbs are pseudobulbs that have stopped growing but nevertheless provide nutrition.
Back bulbs can be revived and used to grow an orchid unless they are severely shriveled and decrepit. Their stems are still capable of producing new growth, but they don’t use them unless they’re potted up and left to fend for themselves in the wild.
It’s really simple to propagate back-blooming bulbs. A moist sphagnum pot will OK, as long as you remove the roots from the back bulb first. A typical orchid medium can be used once it appears to be rooted properly.
Remember that the back bulbs of your orchids don’t grow as quickly as the rest of the plant. Back bulbs should not be neglected. Getting out of dormancy and into flowering stage can take a long time, but it works!
Try to avoid dividing your orchid while it is in bloom. If you disturb it too much during this time, it may lose its blossoms.
Propagation methods that aren’t available to us as amateur houseplant lovers will be used by nurseries. Using tissue culture, plants can be multiplied from a single cell, for instance.
Bonus: How to grow an orchid from seed
Planting an orchid from seed, like many other houseplants, is a task best left to the most dedicated gardeners. Creating new orchids by vegetative propagation is simply more convenient (the methods listed above). It takes a long time to grow a plant from seed, but the payoff is enormous if it succeeds!
There are a few options for starting an orchid from seed. You can buy seed pods from an established business, get them from another orchid grower, or self-pollinate your orchids.
More than 99.9 percent of potential hobbyists are scared off by the complexity of the rest of the procedure. It’s common for orchids to be cultivated in flasks, with particular nutrient combinations and careful management of the young plants. The American Orchid Society has a lengthy PDF on the subject, so I’m not even going to try to describe it here..
Nguồn: https://iatsabbioneta.org
Danh mục: Garden


