For some reason, orchid propagation is typically overlooked by houseplant aficionados. Because they’re considered finicky plants that are already tough to maintain alive, many people think it’s best to ignore them. Learn how to grow orchids from seed so that you can have a steady supply of healthy specimens.
- How To Grow Vegetables In A Greenhouse Year Round? Comprehensive Guide
- How To Remove Aphids From Kale? Helpful Tips To Remember
- How To Transplant Coneflowers? Comprehensive Guide
- How To Care For Potted Tulips? Complete Step-by-Step Guide
- How To Take Care Of Mini Greenhouse Properly? Comprehensive Guide
Find out how to grow orchids in five different methods by reading on in this article.
Bạn đang xem: How To Propagate Orchids? What You Need To Know
How to propagate an orchid: What you’ll need
Most of the time, propagating an orchid is not difficult and doesn’t necessitate a lot of equipment. Although the methods are quite specific, anyone can do it at home with the right instructions, even if you’re new to orchids.
- Cleared-of-contamination shears (you can disinfect with rubbing alcohol)
- Appropriately sized orchid planters or orchid hangers
- The right-sized orchid pots or hangers
- Make sure your orchid is healthy and not in bloom!
How to propagate an orchid: The myths
You should be aware that, as with other parts of orchid maintenance, there are a number of myths about how to propagate the orchids.
- To begin, I’ve read in a number of places that an orchid can be propagated only by the use of air roots. However, this is not the case. Just because the roots lack the proper cells for new growth, it doesn’t work.
- Phalaenopsis orchids (also known as moth orchids) cannot be propagated from flower stem cuttings in the same way. Unless there is a keiki present, the flower stem cannot be used to develop new plants (for more details, see the section below!).
- Finally, there’s the process of propagating leaves. Some plants, such as succulents and Begonia, can be regrown from a single leaf, while orchids cannot. The only component of the leaf that contains the correct cells for regrowth is the stem, thus the leaf would need to be linked to the stem somehow.
That being said, let us move on to discussing the various methods of re-propagating orchids.
There are exceptions to the last myth, as stated by Orchideria: gem orchids (genus Ludisia). They can be propagated by cuttings from the stems, as well as by cuttings from the leaves. You won’t find them anywhere else!
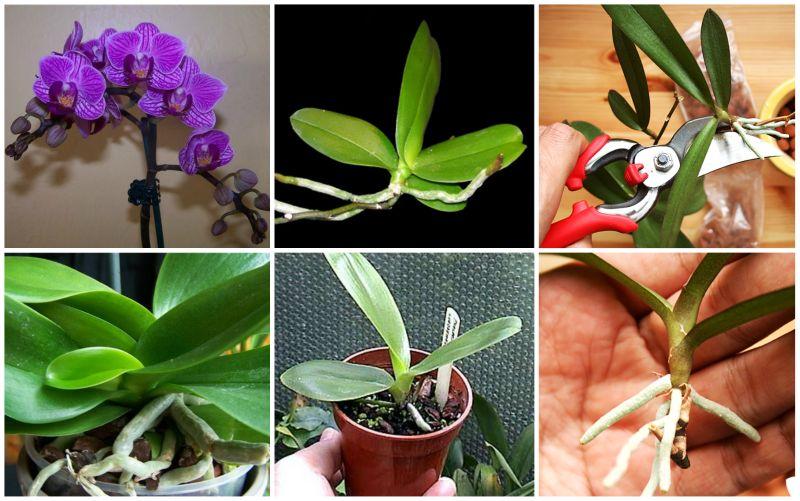
How to grow an orchid from a cutting
Phalaenopsis orchids, for example, cannot be grown from a flower stem cutting, as previously stated. Taking stem cuttings is still an option.
Monopodial orchid stem cuttings
It is possible to reproduce an orchid like Phalaenopsis or Vanda by cutting the stem. Because mature orchids have grown to such an extent that their leaves are stacked on top of one another, a substantial stalk has formed.
Topping the plant is the process of cutting your orchid in half with a clean knife or shears. If you take good care of the roots at the bottom, you can leave them in the current container and they will continue to grow.
Sphagnum moss can be used to plant the rootless top section. It’s possible that it’ll take root and grow normally again.

Sympodial orchid stem cuttings
Orchids with sympodial growth develop several canes or bulbs from a single stem. These stems cannot be utilized for cuttings to propagate them.
Dendrobium nobile is an exception to this rule. Canes from this species can be cut up and placed in a wet sphagnum seedling tray. Some cuttings will produce new Dendrobiums if they have a few nodes.
Vining orchid stem cuttings
There are several orchids that grow on vines, despite their lack of popularity. Vanilla planifolia, also known as the vanilla orchid, is a good example. There you go! A cool addition to any orchid collection, but a bit of a challenge to maintain alive.
To put it another way, growing a vining orchid is a piece of cake. There is no need to worry about removing or splitting up canes: simply snip the vine and the cuttings will root. Using Ludisia orchids is also possible!
How to propagate an orchid through division
The rhizome must be separated in order to divide an orchid. Only multi-stemmed (sympodial) orchids like Dendrobium or Cattleya can accomplish this. Since Phalaenopsis is a monopodial orchid, there is nothing to divide.
To successfully divide an orchid, you’ll need a healthy, mature plant with plenty of canes/pseudobulbs available. Using a pair of scissors, cut the rhizome clump into three or four separate plants, each with three or four active bulbs or canes. Your plant is likely to be split in half as a result of this procedure.
Xem thêm : How To Transplant Ornamental Grass? Complete Step-by-Step Guide
In a suitable medium, plant the two parts of your orchid. Because each plant has its own root system, they should continue to grow normally.
How to propagate an orchid from keikis
The Hawaiian word ‘keiki,’ which means baby or child, is derived from the Hawaiian language. Orchid mother plants can produce microscopic duplicates of themselves on their stems or at the base of their roots, thus this is a very true description when it comes to developing orchids.
If your orchid produces a keiki, you’re in for a treat. Isn’t it amazing how much work your plant is performing for you? With the monopodial Phalaenopsis, which is difficult to propagate through topping but frequently produces keikis, this is a particularly useful tool. Dendrobium is another typical keiki producer.
What should you do if your orchid has sprouted a keiki?
- Keep an eye on the keiki until it has developed a robust air root system and a few leaves.
- Once the keiki is ripe, use clean shears or a knife to detach it from the mother plant.
- Using the same container and soil that you used for the mother plant, pot up your baby orchid. Planting the infant in the same pot as its parent is also an option.
- Because it already has roots, the keiki should be able to continue to grow normally.
How to propagate an orchid from back bulbs
As a sympodial orchid enthusiast, you may already know what a rear bulb is if you’ve ever seen one. Some orchids, such as Cymbidiums, have pseudobulbs on their canes. For those who don’t know, Water or fertilizers can be stored here. Back bulbs are pseudobulbs that have ceased to grow but continue to feed nutrition.
To propagate an orchid, you can use rear bulbs that aren’t too withered or sad. In spite of this, they have eyeballs on the stems of their plants that are capable of producing new growth, but they only use them when they are potted and left to fend for themselves.
Back-blooming bulbs are a breeze to propagate. A moist sphagnum pot will do, as long as you remove the roots from the back bulb first. A standard orchid medium can be used when the roots appear to be well established.
Your orchids’ back bulbs aren’t going to grow as quickly as the rest of the plant. Even though it can take a long time for a plant to come out of dormancy, it works!
Don’t divide your orchid when it is in bloom. Disturbing it during this time will likely result in it losing its flowers.
Bonus: How to grow an orchid from seed
Unlike most other houseplants, orchids can only be grown from seed if you’re a true enthusiast. Vegetative propagation makes it much simpler to produce new orchids (the methods listed above). Even if starting from seed takes a long time, when it does, the results are worth the wait.
To start an orchid from seed, you can buy seed pods from a trustworthy business (not AliExpress, Wish, or Amazon), receive them from another hobbyist, or pollinate your orchids yourself.
More than 99.9 percent of potential hobbyists are scared off by the complexity of the rest of the procedure. Orchids are often grown in flasks, with special nutrition combinations and careful management of the babies. The American Orchid Society has a comprehensive PDF on the process, so I won’t even try to discuss it here.
After successfully propagating an orchid, you may be wondering how to care for your newly minted plant. The most popular orchid houseplant, Phalaenopsis, has a comprehensive care guide you may check out.
Lighting Conditions for Orchids
Choosing the right location for your orchid is the first step! The most crucial part of orchid care is the amount and type of light the plant receives.
When a plant is kept in poor lighting conditions, it is unlikely to generate new blossoms. During the day, a healthy blossoming orchid in its native habitat receives filtered light. The plants are shielded from the sun and harsh light by other overhead plants, yet they still get a few rays of light each day.
Orchids grown in a nursery will fare well in bright light indoors. As long as you keep it out of direct sunlight, you should be fine. Each day, orchids need at least three to four hours of bright, pure light.
The use of fluorescent lighting in flower production may be useful, although it is rarely sufficient as a sole source of illumination. Consider the amount of light that your orchid is receiving if you want it to flower more than once.
The Best Temperature Conditions for Growing Orchids
Most commercially available orchids can thrive in a wide range of temperatures, although not all varieties enjoy the same circumstances. Orchids thrive at temperatures between 70 and 75 degrees Fahrenheit during the day and 60 to 65 degrees Fahrenheit at night in order to flower.
Xem thêm : How To Transplant Phlox? Comprehensive Guide
Plants thrive when placed near a bathtub or shower, where they can benefit from the steam. Orchids thrive in a well-ventilated, but not overly hot, area near a window that is well-protected.
Keep a watch on things, since flower production can be halted if it gets too cold. An orchid humidity tray is an easy and effective solution to keep your orchid healthy and happy.
Watering Orchids
The debate rages on: should I water or should I not? Most indoor orchids only need to be watered once a week in the cooler months of the year. Using a sink or tub, place plants in the water and allow them to soak for at least an hour or so before draining. Rather of overwatering, underwatering is preferable since the roots need a chance to dry out and decay if they are constantly saturated.
The plants should be watered twice a week during the summer months, and misted with a sprayer on hot days. On a regular basis, fertilizing an orchid plant will help it produce flowers. In order to increase blossom production, fertilize your plants at least every 3 weeks and ideally every week. Consider using an orchid-specific fertilizer.
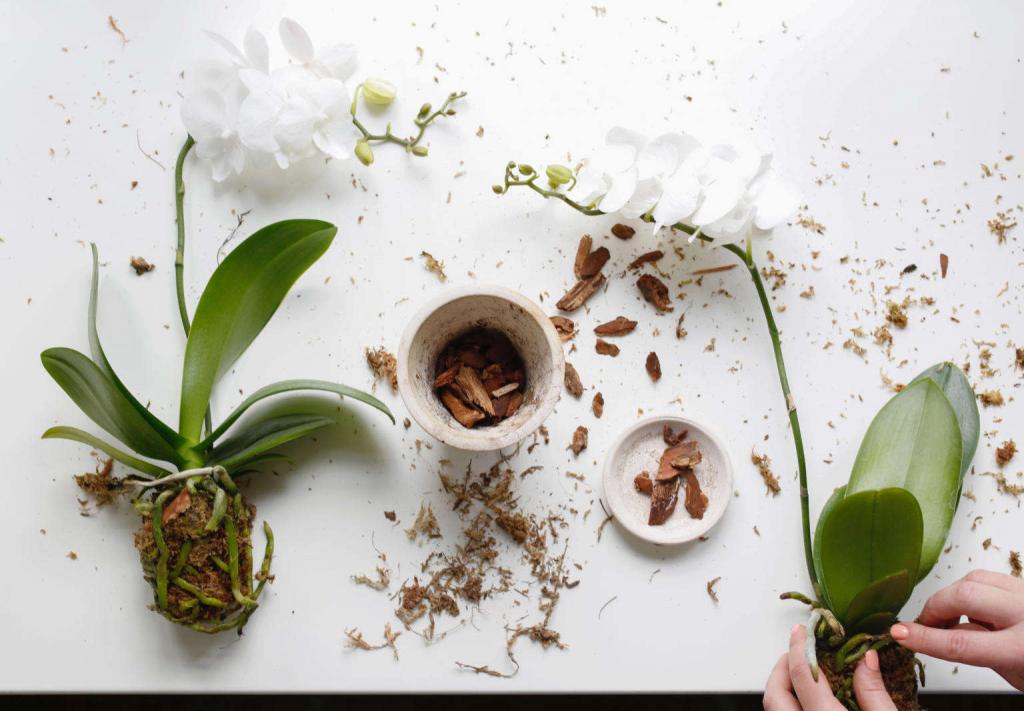
Replanting Orchids
Orchid roots can decay if they are exposed to excessive moisture, which is why most prefer to be slightly crowded. A wide range of orchid potting mixtures can be found in nurseries, with many featuring a high bark content to help the roots to breathe.
When it comes to repotting an orchid, the most important considerations are ensuring proper drainage and air flow. Every two years, repot an orchid or give it some new potting soil.
An orchid’s ability to develop new blossoms depends on a few simple actions. A healthy orchid will continue to produce spectacular floral displays for many years if the right parameters of light, temperature, and moisture are met.
California’s Orchid Centre
Floricultura’s Salinas, California, location was a treat for me in 2017. It was quite remarkable, to say the least. Their California spring trials were in full swing and they were cultivating orchids on a daily basis.
Being in a warehouse full with plants in various stages of development, from small cuttings to fully flowering giants, is like being in a gardener’s paradise. On my windowsills, there isn’t enough area to grow!
Because orchids are notoriously difficult to propagate, most people never consider it an option. It’s well worth the time and work, though, because they’re so pretty. The Floricultura staff gave me some wonderful advice during my visit, and I’d want to share some of it with you.
Orchid Propagation Tips
Orchids can be propagated in a number of ways at home. Division, stem cuttings, and offshoots will all be covered. Because different approaches work best for different kinds of orchids, it’s important to thoroughly inspect yours before beginning any care.
Stem Cuttings
This is my favored method for orchid propagation, and it is also one of the simplest. Determine which stem to cut first. It should be at least 10 inches tall, vigorous, and have a well-developed aerial root system. Just above a node, or leaf joint, cut the stem of the orchid. This will allow the cut stem to produce more new orchids.
You’ll now need to cut your stem into parts that each have at least two nodes on them. Afterwards, I like to apply an anti-fungal, such cinnamon or charcoal, to the ends.
Place the stems on a tray of moist sphagnum moss, horizontally. Place the tray in bright (but not direct) sunshine after sealing it in a clear plastic bag to help keep moisture out. At all times, support humidity! After a few months, you should begin to observe new growth, such as leaves and roots.
OffShoots
If you’re lucky enough to have access to orchids, this is the quickest and most straightforward method of propagation. In Hawaiian, a keiki, or baby, is the name given to these diminutive offspring. They’re little plants that grow at the orchid’s base or at the end of a stem from the main plant. You should wait until the parent plant has finished flowering before cutting keikis.
Spritz the plant with water first, before making any cuts. Once the offshoots have grown to a reasonable size (at least 3 leaves and 1 inch roots), remove them from the plant’s stem and roots.
The roots should be close to the surface of the sphagnum moss when planting it. Prevent direct sunlight until your keiki has established itself by keeping it moist at all times.
One of these approaches should work for you if your orchid is in good health and happy. You could also just keep babysitting your one if you’re fine with it.
Cut a little portion of the stem, such as a quarter of an inch in diameter, at the base of the orchid, like cinnamon or charcoal.
Nguồn: https://iatsabbioneta.org
Danh mục: Garden


