To grow strawberries vertically in tubes, there are three simple steps you need to follow. Getting started is as simple as thinking about support and planning. With vertical farming, there are many advantages, including higher usage, ease of maintenance and better water quality.
- How To Grow Mums For Sale? A Few Tips and Ideas for Growing Mums for Profit
- How To Breed Orchids? Complete Step-by-Step Guide
- How To Add Terpenes To Flower? Complete Guide
- What Is The Ideal Temperature For Growing Cannabis In A Greenhouse? Helpful Information!
- How To Grow Periwinkle From Cuttings? A Few Tips to Remember
Vertical gardening is best done with vines, and with strawberries, you can grow 1,500 in 25 tubes. To get the most out of a little plot of land, remember these tips. As a result, vertical gardening can help reduce fruit problems and make harvesting, watering/spraying, and other tasks more convenient.
Bạn đang xem: How To Grow Strawberries Vertically In Tubes? Step-by-Step Tutorial
It’s a good idea to combine vertical gardening with regular gardening if you already have a greenhouse. The only thing to keep in mind is that the greenhouse should not provide a difficulty because it provides the ideal conditions and requirements for every type of plant.
DIY-Friendly Tower Structures for Strawberries
Plant growers, particularly those who cultivate tiny crops such as strawberries, place a high value on space efficiency.
It’s a great solution for individuals who need to produce their food but don’t have a lot of room.
It’s a lot of fun to grow upstanding strawberries. However, if space is at a premium, what kind of strawberry structure can you fit vertically?
There are countless possibilities for vertical gardening. You may grow fresh herbs, strawberries, and many other fruits and vegetables in your own backyard. Vertebrate gardening is simple to do at home, and in addition to conserving valuable floor space, they are also a beautiful addition to any home.
However, if you lack the skills or time to construct your own vertical planter stand, buying a lovely but inexpensive stand can be a better option.
The Mr. Stacky 5-Tier Vertical Strawberry Planter is the most highly recommended stand for strawberry cultivation.
Strawberry Planter Pot Mr. Stacky 5-Tier 5-Pot
$35.97$59.95
Purchase Right Now
Utilize some of our low-cost DIY-friendly vertical structures for your strawberry’s upward growth.
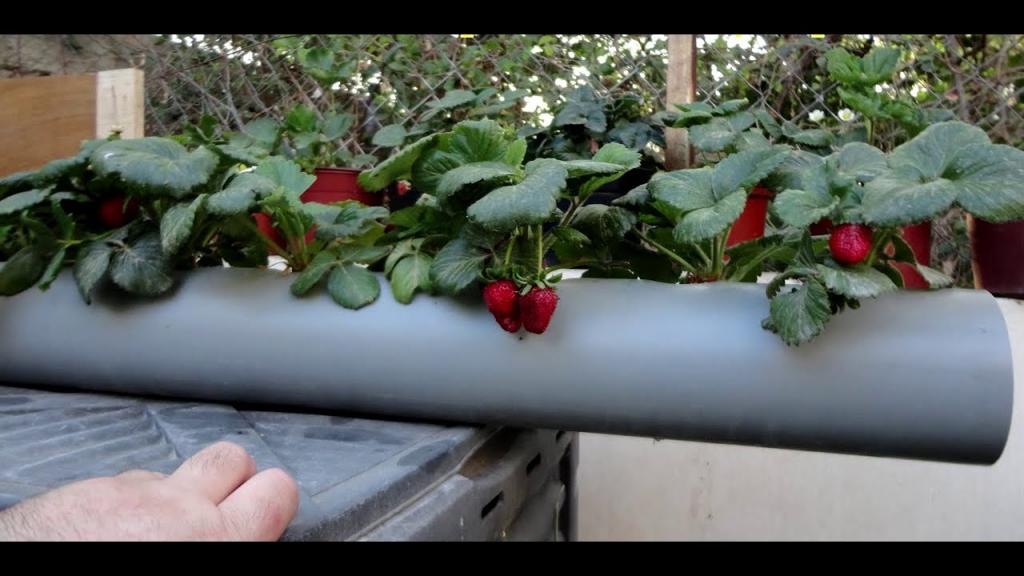
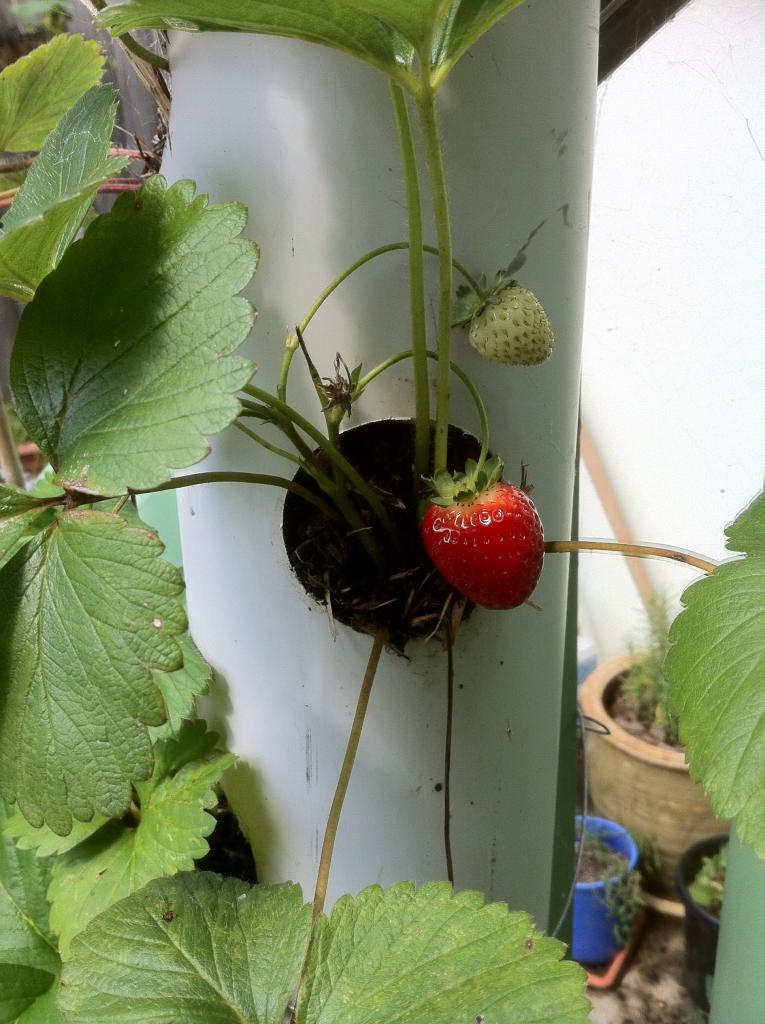
1) Strawberry Tower out of PVC Pipe
You’ll need these items:
- 4 inch PVC schedule 40 pipe x 6 feet
- Drill bit for holes with a hole saw
- A pole-drilling machine
- Plotting mix
How to build a PVC pipe tower, illustrated.
- The optimal height for a tower planter is 6 feet, but you can cut the PVC pipe to any height you like.
- Cut 2 12 inch holes, 1 foot apart, on one side of the board, leaving the last 12 inches untouched.
- It’s time to bury the last 12 inches of the PVC pipe in the earth.
- For each side, cut a new row of holes, being sure to do the same for each side. The goal is to create a spiral design by cutting holes in alternating directions.
- To install your PVC pipe, create a beautiful, deep trench.
- Add soil amendments to the pipe. (Your strawberry seedlings are now ready to be planted in your PVC pipe vertical tower.)
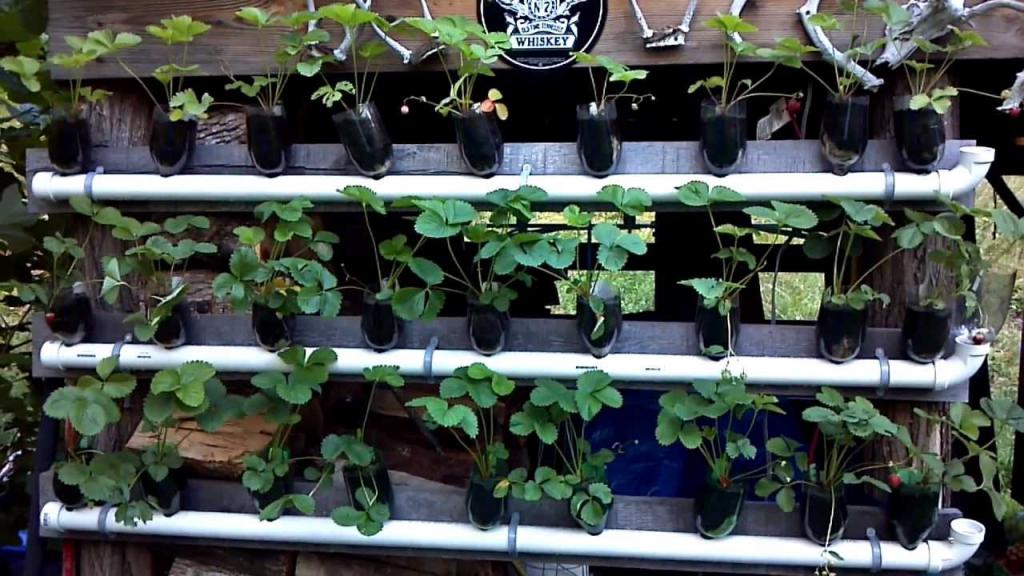
Other ideas you can also try using PVC pipe:
You’ll need these items:
- 2-4 buckets (5 gallons each)
- A 30″ x 36″ piece of weed cloth or garden cover
- Composted potting soil was added to the mix.
- 30 strawberry plants
- Spaghetti tubing and soaker hose, each 14 inch in diameter (for drip irrigation.)
Set up your plastic bucket tower the right way with these simple steps.
- Pliers can be used to remove the bucket handles.
- Using a tape measure as a guide, mark the bottom of the first container at 12 inch.
- After you’ve done that, move on to the second. Add an inch to the bottom to make it shorter than the first bucket.
- Repeat steps 3 and 4 for the rest of the buckets.
- Hold the buckets in place with the help of a hacksaw or two hands.
- Then, using a utility knife, carefully remove the buckets from the ground at the points you marked.
sand the edges of the buckets to ensure they fit snugly into each other..
- Make a series of 4 inch-diameter marks in each bucket (approximately 5 to 6 in total). (these are the areas where you will grow your crops)
- It is best to avoid marking too close to the bucket’s base because the buckets will be nested together.
- Drill holes in the side of your buckets using a 2-inch hole bit, following the marks you’ve made.
- Repeat the procedure with the remaining buckets.. To ensure that they fit snugly together, sand the edges.
- Assemble the buckets and set them in a bright location. (Painting the bucket is an option, if desired.)
- Your garden cover can be used to line them. This is a good opportunity to put in a drip line if you want to.
- Incorporate compost and fertilizer into the potting soil before adding it to the pots. Using clothespins to keep the fabric in place while filling the bucket tower with soil is a good idea.
- Strawberry seedlings can now be planted in your plastic bucket tower.
3) Strawberry Tower Using Plastic Bottles
A tower of 2 gallons of plastic water bottles or 2-liter plastic soda bottles might be an inexpensive and sustainable vertical garden structure.
Drip irrigation tubing, four plastic spaghetti tubings, and four irrigation emitters can all be installed with this structure in 10 feet of 34-inch drip line.
You’ll need these items:
- A four-by-eight-foot post
- Plastic bottles containing 16 liters
- Three-quarter to one-inch screws
- Pots with a capacity of three gallons each
- The strawberry season is about to begin.
- a can of aerosol paint
Xem thêm : How To Store Unplanted Tulip Bulbs? Comprehensive Guide
Instructions:
- To make a bottle hanger, cut the bottom of your soda bottles midway through use.
- Reduce the penetration of bright sunlight by painting your soda bottles.
- Set the pole firmly in the ground, about 2 feet deep, and cover it with earth to keep it in place.
- To hang the bottles, attach a screw to each of the four corners of the pole.
- Irrigation systems can be installed now.
- The next step is to secure the bottles to the pole by tying them to the screws.
- Secure your spaghetti tubing on top of the pole with one emitter on each side of the pole.
- One emitter on either side of the pole should be enough to hold your spaghetti tubing in place atop the pole.
- One emitter on either side of the pole should be enough to hold your spaghetti tubing in place atop the pole for now.
- Strawberries can be planted in your plastic bottle tower now.
There is an option to remove the pots from the table. However, they are used to remove surplus water, fertilizer, and salt from the environment.
Other ideas you can also try using plastic soda bottles:
4) Growing Wall of Strawberries with Wooden Pallets
You’ll need these items:
- Recycled pallets (the one that is not pressure treated or sprayed with pesticides)
- Potting soil in a 5 cubic foot container
- A few pieces of landscape fabric are needed.
- Twenty to twenty-five strawberry seedlings
- heavy-duty stapler
Learn how to make a pallet garden with the steps below!
- Place the pallet on the ground. Staple a piece of landscape fabric to the pallet to keep it in place.
- Retain moisture in the cloth by covering it with plastic wrap to reduce soil smearing from the back.
- Fill your wood pallet with modified soil and turn it over.
- Begin incorporating strawberries into your diet as soon as possible. In order to assist the roots establish contact with the new soil, water them in (strawberries don’t need a lot of root space – 6 inches apart is plenty).
- For the first two weeks or so, keep your pallet horizontal to allow the roots to properly establish. First week, water them every day, and then every two or three days for the next week. Using compost or extra straw, fill in any holes in the ground.
- Set your pallet garden against a wall or fence two weeks after you’ve completed it. A wall-mounted anchor would be ideal to keep the pallet from falling to the ground.
- All you have to do now is encourage the growth of your strawberries, and you can look forward to a bountiful crop.
5) Hanging Strawberry Bag Planters
You’ll need these items:
- Large bag (you can purchase a hanging grow bag, or you can create your large bag like a plastic feed sack)
- A huge tote bag (you can purchase a hanging grow bag, or you can create your large bag like a plastic feed sack)
- Scissors
These instructions will show you how to hang your planters.
- Puncture the bag’s sides with 3 to 4 inch-wide holes.
- Using duct tape to reinforce the edges of the holes, space them about 12 inches apart.
- Add a high-quality potting mix to the bag.
- The crown of the strawberry plant protrudes slightly from the soil during the commencement of growth.
- To avoid overpopulation, clip runners as they grow..
- In a place that gets a lot of sun, put the bag.
- Water the plants frequently to maintain a moist environment.
- Your hanging bag planter is now ready for you to begin planting.
Other hanging ideas you can also try:
6) Stackable Strawberry Planters
You’ll need these items:
- Stackable Pots (either rectangular or cross-shaped)
- Soil for Plants
- It is made of gravel (to fill the base and be safe from tripping)
Stackable planters are easy to assemble.
- To prevent tripping, fill the planters’ bottoms with gravel. (soil should be left 8 to 10 inches from the planter’s rim)
- Top it off with the medium-sized planter, and you’re ready to go.
- The medium-sized planter should be surrounded by a large planter full of soil.
- On top of the medium-sized pot, add another small-sized planter.
- There will be an abundance of sweet, juicy strawberries when they grow out of the planters’ edges.
Other stacking strawberry planting ideas you can also try:
Guide On Strawberry Vertical Growing
When it comes to vertical gardening, strawberries are arguably the most popular plant to grow. Additionally, these plants may be grown year after year, making them a low-maintenance option in many places. Another advantage is that it’s easy to grow, so your kids won’t have a hard time eating their homegrown food.
Strawberry plants can be grown vertically, as seen in this tutorial.
Prep the Soil
When growing strawberries, you need an enriched potting mix because the plants need to be kept in the planter for a long time. Perlite, coconut coir, peat moss, compost, worm casting, and other organic soil additives work best in a loose mixture.
Wood chips, topsoil, and soil used in container gardens should be avoided.
Strawberry plants thrive in soil with a pH of 5.5 to 6.8; this is the ideal range. The pH of your potting mix can be checked using a meter reader at the store and even a few times a year if you’re worried about it.
Study Your Growing Zone
Before you buy any supplies for your strawberry crop, you should take into account your area’s growing conditions. In zones 3-8, most types of strawberries are perennial.
Apart from saving space, it is necessary to stock up on varieties of berries that can survive the winter. It’s common for plants to be a little colder in containers than they are in the ground.
Strawberries do best in broad sunlight. For any kind of variation, eight hours or maybe more is optimal. To get the best out of your plants, always arrange them in a sunny location.
One Strawberry Plant in Each Pocket
Most strawberry producers choose to start a plot using bare roots rather than seeds. A lot of people don’t have the patience to wait for seeds to germinate.
The bare-root type of strawberries is often less expensive. Despite the fact that bare-root may appear to be dead, they can be revived in as little as a few days.
Make sure you follow the instructions on the package when you buy bare-root plants for your garden. Until they are ready to plant, growers advise adequate care. In addition to the bare-root form, starting plants are also available.
The best results are obtained by placing one strawberry plant in each pocket. If you do this, your plants will be able to grow strong and healthy. In addition, always remove the runners from the strawberry plants to ensure that they thrive and bloom even in their first year of growth.
Don’t Bury the Crown of Your Strawberry Plant
It’s critical how you plant your strawberries. When their roots are buried under the soil, but not their crown, they are in heaven. Bare-root and starter plants should be planted at the crown level.
Water as Needed
When the soil is always wet and humid, strawberries’ roots will decay. As a result, most gardeners only water their plants once or twice a week, if necessary.
Allow the soil to dry out between waterings, but ensure that the plants are completely wet when you do so. Before watering your berry plants in the summer, conduct a soil finger test to check they are not suffering from root rot.
Dealing with Pests and Diseases
Xem thêm : Ultimate Guide to Choosing a Best Flowers To Grow In Utah
You will have to deal with various pests and plant diseases from time to time. Pest and disease problems can be greatly reduced by growing a wide variety of plants beside your strawberries.
Overwatering is another else to watch out for. There are numerous issues that can arise as a result of this. Neem oil and/or hydrogen peroxide are used by certain growers to combat insects, while a birds net is used to keep birds away from ripening crops.
Overwintering Tips
In order to make it through the upcoming season, your plants will need to be watered every two weeks if your garden is in the middle of the upper end of your growing zone. Normal for strawberries to appear dead during the winter months. Once the temperature warms up, they’ll reappear as if they never died.
There is a lot more work involved in growing strawberries in colder zones like 3, 4, and 5, compared to warmer zones like 8.
Make sure your plants have the best chance of surviving this winter by following these tips.
- If you live in an area with a lot of wind, consider locating your vertical garden nearer to your house.
- Use a frost net cover to help insulate your plants if you have access to one.
- When the weather is expected to be extremely cold, you can protect your plants by moving them into a shed.
- Mulch straw can be be added to the pockets’ tops for additional protection.
- During winter, only water the plants when the ground is frozen solid.
Even with the best winter care, some plants will not survive. Around 15% of strawberries will perish in the winter, but you can expect to get 85-95% of your harvest for the next three to four years from one planting.
Plants that are still producing seed are known as “mom plants.” When the roots have fully established, remove the runners from the plants and replace them with new ones.
Check out these resources if you’re having problems raising fresh strawberries:
Sweet Strawberries: The Best Ways to Grow Them
How To Grow Strawberries Vertically In Tubes In 3 Steps
Fabric tubes vs PVC tubes
When it comes to vertical strawberry growing, there are two types of tubes that you can utilize. When it comes to saving money, cloth tubes are the best option. In addition to being more cost-effective than PVC tubing, these pipes may be easily watered from the side.
They have a little capacity and will lose their shape with time, which is a drawback. Add more potting soil and fertilizer because of this. Since they maintain their shape well, PVC tubes will require less soil.
Although more expensive up front, PVC tubes can also house more strawberry plants. Consider it, instead, as a long-term investment in durability, capacity, and upkeep.

Planning
Spacing for PVC tubes
When growing strawberries vertically, planning is just as important as in regular gardening. Use a 5-inch high PVC tube that is also 6-inches in diameter to grow 100 strawberries. This allows you to place the 1.5-inch holes at 2.5 inches vertically and 4 inches in rows to guarantee that the plants have enough room to thrive.
Spacing for fabric tubes
What if you like fabric tubes? Begin by cutting each hole out of the fabric with a 2-inch-wide slit. Rows of holes should be spaced 8 inches apart, and each hole should be 4 inches wide vertically. Remember that a 5-inch-high cloth tube is just big enough to grow 75 strawberry plants, compared to PVC tubes.
Supporting
Choosing PVC tubes may have led you to believe that supporting strawberry vertical planting is unnecessary. Fabric and PVC tubes, on the other hand, need to be supported from above. Before attaching the cloth tubes to the frame, you must first reinforce them with fence wire.
You’ll have more confidence in the stability of your tubes if you grow vertically in a greenhouse. When it comes to growing outside, you’ll need to be prepared and aware of any environmental issues in order to succeed. Winds might alter the stability of your tubes, therefore you must make sure that your tubes are supported properly.
Maintenance
Watering
A potting mix can be used as the soil in the tubes of a vertical strawberry garden. In addition, the medium is expected to dry more quickly than gardening on the ground due to the overall design. Using a micro-sprinkler above each tube can immediately alleviate any potential drought or watering issues that may occur.
Automated timers are used by some gardeners to ensure that their strawberries receive the amount of water they need. The water drips through the tubes swiftly and conveniently because of the micro-sprinkler above them. What is the best way to fertilize strawberries grown in vertical tubing?
Fertilizing
You can use a variety of fertilizers according on your needs. Since foliar, time-release, and liquid fertilizers have extra recommendations for application, the frequency of use is different. Feeding using PVC tubes is easier because fabric tubes have a lower soil volume, as previously stated.
Caring
Strawberries may be easily stored during the winter in the greenhouse. Make sure they have plenty of water and that the surroundings in the house are suitable. To keep the strawberries warm and wet while also protecting them from the elements, use a row cover cloth outside.
In the event that a plant dies, the runners it generated can be used as a replacement and grown over the winter to be planted in the spring. As a final benefit of the vertical position, harvesting will be simple and safe for all ages, including the elderly. Harvesting the berries usually takes six weeks after flowering, however this varies by variety.
Are there any other concerns with strawberry care? When strawberries are grown vertically in tubes, you won’t have to worry about other upkeep tasks like cleaning or weeding. Because the fruits are off the ground, you can easily prevent fungal development and weeds from taking hold.
Final Thoughts on Growing Strawberries Vertically
Finally, you’ve got the answer you were looking for! We’ve provided instructions on how to grow strawberries vertically, as well as some simple do-it-yourself projects. In order to maximize your limited garden space, you don’t have to sacrifice quality food in exchange for convenience.
We’d love to hear about your experiences implementing any of the suggestions above. Please don’t be afraid to tell us about it in the space provided below. We can’t wait to find out.
Nguồn: https://iatsabbioneta.org
Danh mục: Garden


