Cross-pollination or the use of a laboratory are two ways to learn how to cross-breed orchids. Many gardeners are afraid to cross-breed orchids or any other plants for that matter. When you think about it, it’s not just a simple matter of propagating or breeding from a single parent plant.
However, employing various parent plants is the only method to produce truly distinct orchids. Despite the fact that there are over 24,000 hybrid species, there is still potential for creativity and new combinations. A gardener must be willing to learn new things, such as how to cross-breed plants that are particularly productive, such as orchids.
Bạn đang xem: How To Breed Orchids? Complete Step-by-Step Guide
How Are Orchids Propagated?
Unlike many other plants, orchids are able to reproduce themselves both sexually and asexually; this is similar to how most plants reproduce themselves. Vegetative propagation is a popular method for novice orchid growers. Division, back bulbs, and offshoots are all methods of vegetative multiplication. The primary differences between the methods used by each are in the means used to create the new individual and the early care provided.
DIVISION
Beginners are faced with a dilemma when their mature orchid plant, which has been growing and flowering for several years, outgrows the size of the container it is now in. A larger container or splitting the plant into two or more smaller ones is an option. Cutting the plant into groups of three or four pseudobulbs can be done if the plant has only one new growth. A “division” would refer to the front group with the lead pseudobulb. Another set or groups of pseudobulbs that lack a current source are known as rear bulbs. One or more divisions and one or more back bulbs can be created from a plant with several leads.
There are two types of pseudobulbs: divisions and back bulbs. Divisions are groups of pseudobulbs that contain active leads or new growth after the plant has been broken up; however the back bulbs are a group of old pseudobulbs that contain dormant “eyes” that may be coaxed into active development. Figure A depicts a Cattleya plant’s rhizomes and pseudobulbs arranged around a single lead. Cutting through the rhizomes or root stock at the place indicated by the letter x can be used to divide such a plant. Using this method, you’ll get one division and two backlight lamps. In Figure B, a Cattleya plant with many leads is cut as indicated, resulting in three divisions and a number of back bulbs, as shown.
Cutting of the rhizome is usually done after the plant has bloomed, but before repotting. Rhizomes are often notched more than halfway through to create a V-shape. When the “eyes” on the back bulbs begin to burst, the plant is not disturbed. The plant can be taken out of its pot, dismantled, and re-potted as soon as new growths appear. Until root growth is clearly visible, the plant should be sprayed but not watered after its division. Afterwards, the plants can be watered more heavily and treated as mature plants.
BACK BULBS
Repotted back bulbs can be handled like divisions if they were obtained through the methods indicated above and have an active growth commencing; otherwise, they should be potted in a small pot of two and a half to three inches, with the “eyes” elevated above the medium. The potted back bulbs can then be placed in the greenhouse’s weakest area. The pot should not be submerged, but the bulbs and foliage should be misted on a regular basis. “Eyes” may begin to crack within a few weeks in some circumstances.
They can even lie latent for two years before unexpectedly reactivating. If the leaf or bulb is still green, there is still a chance of development. Back bulbs can also be placed in six-inch pots of sphagnum moss, and the live moss can be used as a substrate. To quickly produce “eyes,” keep the plants in a humid environment. Sphagnummoss-lined wooden flat or tray can also be used to save the rear bulbs, which can then be placed in an area of your greenhouse that is warm and moist to keep them from drying out. Every day or so, spray the bulbs and foliage, and keep an eye on the back bulbs. It’s important to pot your plant as soon as you get it going. Any bulbs that are showing signs of damp rot should be removed and destroyed as soon as possible.
OFFSHOOTS
Dendrobium orchids, for example, have stem-borne offshoots. They appear to be, and are, individual plants that are modest in stature. Once they’ve reached their full size, they can be removed from the parent plant with care. Keiki, as the juvenile branch is commonly known, can be potted up in the same manner as a back bulb. Learn how to remove and pot keikis in our Video Library, which also includes an explanation of air roots and what they are.
How to Breed Orchids
Orchid breeding, or pollination of adult orchids, is the process of resulting in seeds. In some orchid kinds, you can pollinate them using pollen from the same plant or from plants of a similar species, making it easier to grow orchids. Having both male and female reproductive components, orchid blossoms make it easy to find pollen and stigma. Keeping your hands clean and using a sterilized pollinating tool will ensure that your breeding technique is not destroyed by fungal infections.
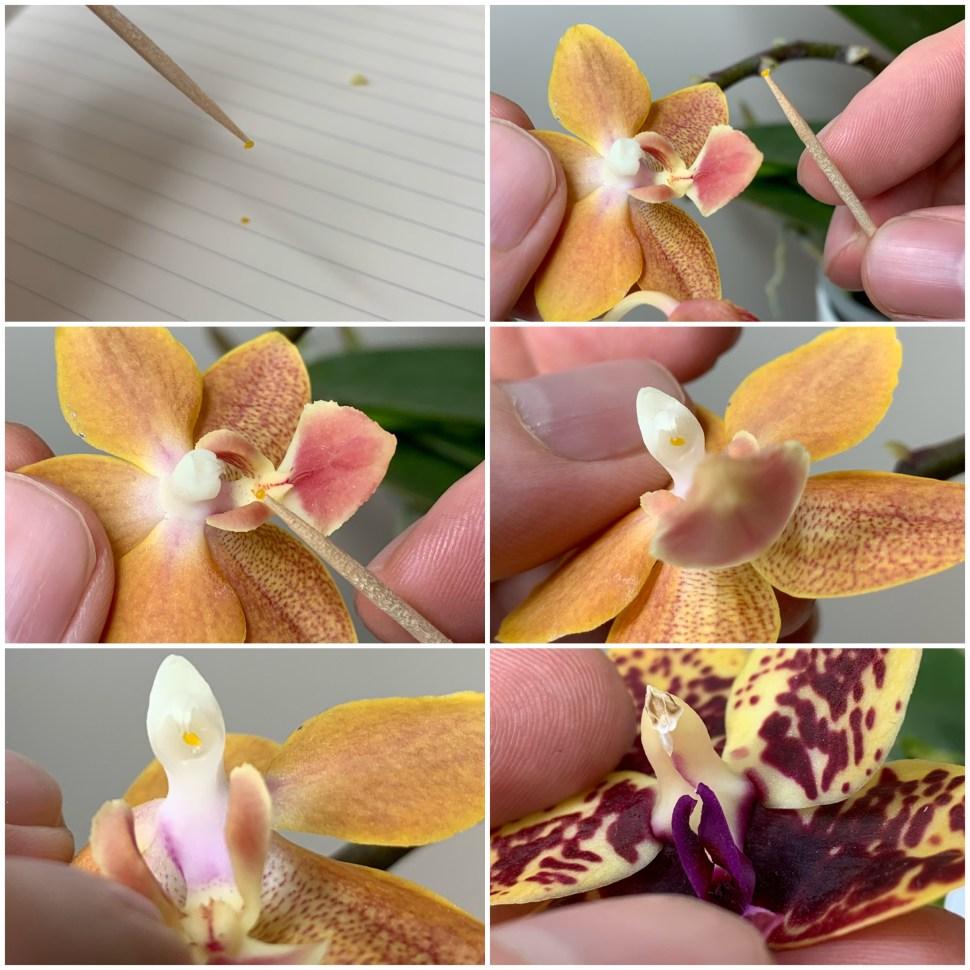
Step 1
Before commencing the pollination process, wash your hands with an antibacterial soap. To make a toothpick germ-free, sterilize the end with rubbing alcohol. Let the toothpick air dry before using it. A white piece of paper should be used to place the two plants close to each other.
Step 2
A toothpick can be used as a pollinator for an orchid blossom by inserting it inside the flower’s column. Flowers have reproductive organs located in the middle, which is known as the column. The stigma can be accessed by inserting a toothpick into the back of the column. Pollen will attach to the toothpick better if it is coated in a sticky material.
Step 3
The toothpick should be pushed into the anther cap from the backside. Pollinia, the anther’s tiny pollen clusters, adhere to the toothpick. Remove the pollinator’s toothpick with caution.
Step 4
Xem thêm : How To Collect Calibrachoa Seeds? Complete Guide for Beginners
When you get to the other orchid plant, take the toothpick and place it in the column of one of the flower’s bud. Using the toothpick, you can retrieve the pollinia from the white paper if you accidentally drop them.
Step 5
The pollinia should be pressed into the stigma at the back of the flower’s column. The pollinia will be held in place by the stigma’s adhesive nature. Removing the toothpick will finish the job.
Step 6
A greenhouse is a good place to keep the flower you have pollinated in the shade. Allow the potting soil to dry out before using it. You’ve successfully bred two orchids together if the stigma swells and the petals begin to drop or wrap around the center of the flower.
Step 7
During the seed germination period, keep the fertilized orchid in a shady location of the greenhouse. Begin a regular watering routine again. – Keep the orchid alive until the seeds are ready to be harvested. Depending on the species, this period can range from nine to eighteen months.
Breed Your Own Orchids in 3 Easy Steps
You are in awe of the beauty and sophistication your orchid adds to your home. This sentiment is shared by most orchid owners, and it is only natural to want to grow your collection. Aside from the convenience of a local garden center, you have all of the supplies you need to create your own hybrids at home. Despite your lack of experience, you will succeed in propagating orchids if you follow three simple methods.
The term “orchid propagation” refers to the practice of starting a new plant from a cutting taken from an existing parent plant. During their active periods, most orchids produce fake bulbs that are ideal for the propagation process. Because they are already hydrated and nourished, these growths can be simply removed from the parent plant.
When propagating orchids, it is recommended to utilize this method in the springtime when the pseudo bulbs are present and the environmental parameters necessary for these plants to survive are also present. To begin propagating orchids, follow these three simple steps:
Step 1 – Prepare the Pot
For an orchid, its root system can be somewhat temperamental. For orchid proliferation, it’s critical to have a climate that’s both dry and well-ventilated. You can do a number of things to ensure their happiness and health. Small pots made of earthenware, a porous and natural material, are the best way to get your hands dirty. The roots will stay dry and the new growth from orchid propagation will be protected from germs and fungi as this helps absorb any excess water from the potting mix. Sanitizing the pot, the tools, and your hands should always be a priority.
Step 2 – Prepare the Filler
Use a specific filler to enclose the faux bulb in its new container to ensure the greatest possible environment for your orchid propagation. Your local garden supply store or online will have a variety of these mediums available, which are made up of huge chunks of organic matter that allow optimal air flow for the roots while also absorbing excess water.
Step 3 – Prepare the Pseudo Bulbs
When it comes to orchid propagation, this may be the most dreaded step, yet it’s actually rather simple. It is imperative that you first remove the parent orchid from its pot and thoroughly clean its roots. Keep an eye out for any cracks or breaks in the roots. Snip off any dead or diseased pseudo bulbs and divide them into smaller clusters. To ensure proper orchid multiplication, you’ll need at least three bulbs clustered around the new growth. If you’re able to, gently separate the tubers by hand if possible. You can use a knife to carefully split them if it’s too difficult. Just make careful to sterilize the area where you cut. You are now ready to add the cluster to the pot and fill the space around it.
That’s all you need to do in order to grow orchids at home. It’s so simple and quick to grow orchids that I’m confident you’ll have your own personal orchid garden in no time.
Comprehensive Guide On How To Cross Breed Orchids
It’s possible to create your own orchid hybrids if you do your homework and follow the instructions. It’s crucial to plan the plants you want to cross ahead of time, regardless of the approach you use. In addition, a greenhouse is a good place to cultivate the flower because it provides the ideal conditions for its development.
Cross-pollination
With cross-pollination, creating hybrid orchids is the simplest method. In addition, orchids can only be created by cross-pollination or sexual reproduction. Cross-pollination is the simplest method of cross-breeding orchids, regardless of whether you’re doing it for fun or profit.
When to start?
Xem thêm : How Do Poinsettias Change Color? Comprehensive Guide
So, how does one go about pollinating two different orchid species? See if the seed pods on your flowers are beginning to mature. At this time, you must remove the flower spikes or the cluster of flowers without an upright stalk.
How to prepare?
Keeping the plant’s energy focused on the seed pod ensures that it has no competitors. Remember to utilize pollen from a different type of orchid once you have prepared the orchids. The female and male plants will be represented by the two kinds you’ve chosen.
How to cross-pollinate orchids?
For example, the pistils and pollen of one orchid variety will be provided by a male orchid variety. Near order to capture pollen, locate a flower’s petal column in the middle. An anther cap can be pushed aside to extract pollen from the higher end.
You can then manually pollinate with the pollen and pistil. Because your orchid may be both a female and a male, you’ll want to brush up on your knowledge of orchid anatomy if you want to be successful. When it comes to collecting pollen and cross-pollination, this knowledge of orchid parts will make life easier.
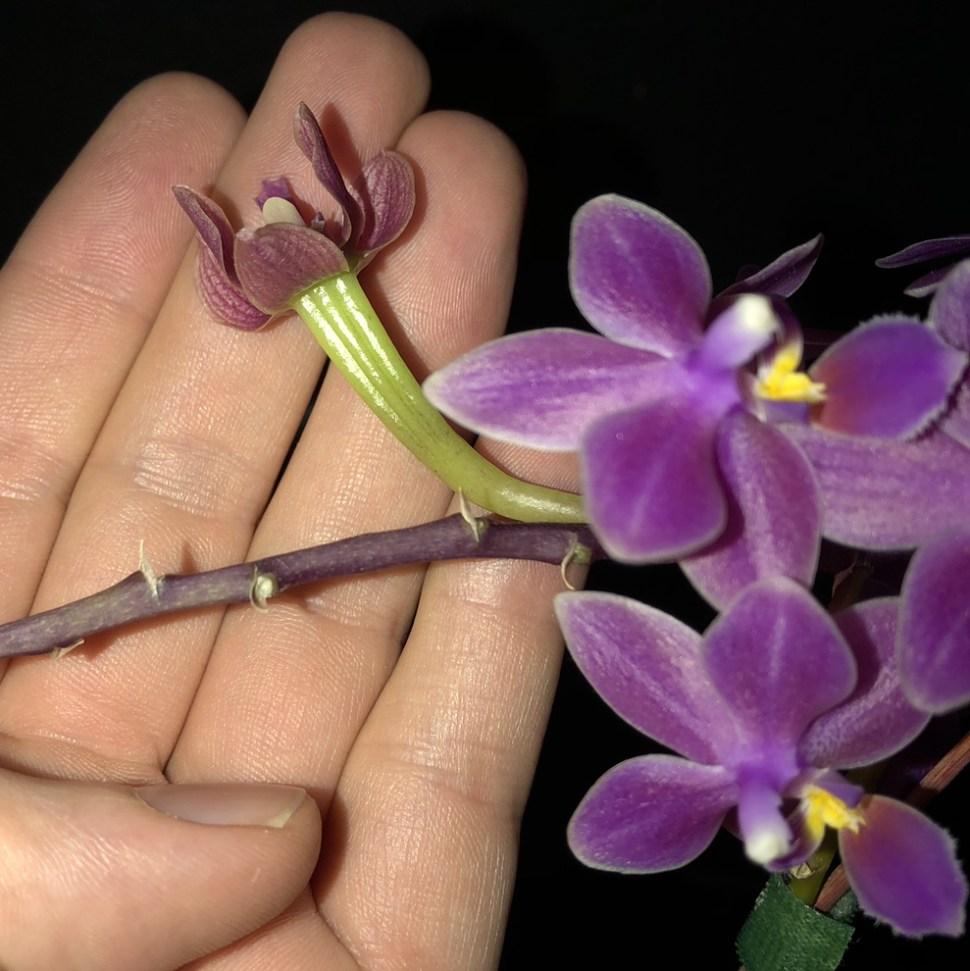
How to know if cross pollination is successful?
If you’re just getting started with cross breeding orchids, cross-pollination is as simple as it sounds. Eventually, the stigma will seal and the petals will begin to dry if all goes well. Seed capsules are formed from the pedicel or stem of a flower.
In the laboratory
If you’re familiar with orchid anatomy, the first way of cross-breeding them is straightforward. This does not mean that you can’t produce hybrids in the lab. This strategy is more time-consuming, but it’s a great way to create one-of-a-kind pairings between species and genera.
The fact that you’re growing orchids from seed makes cross breeding challenging in the lab. When it comes to growing conditions, orchid seeds are picky little things. For experienced growers, clean, sterile containers are used for the seedlings to thrive.
What makes this method complicated?
To get a feel for the procedure, you can start by planting orchid seeds in a mother flask to get a sense of what to expect. This flask’s orchid protocorms can be transferred to another flask after some time. Once the seedlings are established, you can transfer the protocorms of these seedlings to a new flask for further growth.
The most significant requirement
This simplified explanation must be emphasized, as is the necessity of consistently sterilizing the components throughout the process. During the cross-breeding procedure, you’ll need to employ additional supplies. Finally, transfer the green blobs to a new flask before deflasking.
An orchid crossbreeding laboratory is not recommended for those who lack the required equipment and resources. When it comes time to apply and try to register your new hybrid with the Royal Horticultural Society, this procedure works best.
Conclusion
While cloning orchids through propagation is a great option, some people prefer to create their own hybrids. There are a number of ways to cross-breed orchids, including cross-pollination and using a laboratory. As expected, the first option is the simplest and most suitable for novices.
To properly assign male and female plants, you’ll need to have a basic understanding of orchid anatomy. In order to collect pollen and determine whether or not the hybridization was successful, you must also be conversant with orchid components. Nonetheless, what if you’d like to have your hybrid orchid registered?
In the laboratory, you can cross-breed orchid seedlings. In order to ensure success, breeders must be prepared to go through the extensive processes and standards that go along with raising such tiny animals in a sterile environment. There’s no doubt that orchid breeding and cross-breeding can be accomplished by those who are willing to put in the effort.
Nguồn: https://iatsabbioneta.org
Danh mục: Garden


