It is possible to propagate an orchid by dividing it into two or more sections. Using tree bark as potting material simulates the natural environment of orchids as epiphytes, which grow on the trunks and branches of trees. Most orchids are divided by cutting the pseudobulbs (or inflated stems) that grow from the horizontal stem in the middle of the roots, rather than the stem itself. Dendrobiums, which can grow in USDA zones 9 to 11, have pseudobulbs that can be split, unlike Phalaenopsis orchids, which may grow in USDA zones 10 and 11, necessitate cutting their stems.
- How To Propagate Heuchera? The Best Growing Conditions for Heuchera
- How To Grow Lemongrass In A Greenhouse? Comprehensive Guide
- How To Keep Hydroponic Basil Alive? What You Need to Know
- Ultimate Guide to Choosing a Best Herbs To Grow In Colorado
- How Is A Liverwort Different From A Moss? Helpful Information
How to Split Orchids
Prior to the spring growth phase, use a sterilized knife or razor blade to cut through the root system. Allow three leafy pseudobulbs and one dormant bud in each section at the very least. Next year’s budding and flowering will be healthy as a result of this. If you have a Phaelanopsis or any monopodial orchid with a single stem, cut the stem just below a node (a tiny, fleshy bump) with healthy roots.
Bạn đang xem: How To Divide Orchids? 10 Easy To Follow Steps For You!
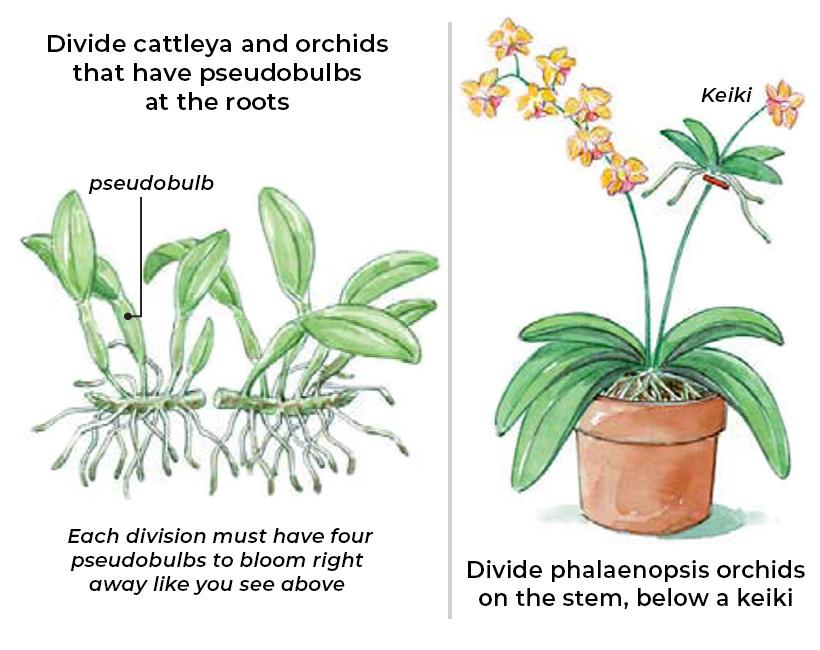
Toss out pseudobulbs with no “live eye” or dormant bud that have no leaves.
If your orchid is old and has formed a new pseudobulb, cut the fresh pseudobulb from the backbulb, which is the old, dormant pseudobulb. A young pseudobulb can put a lot of stress on an older orchid, so it’s best to wait until it has at least two backbulbs before removing it.
Xem thêm : How To Start Vegetable Plants In A Mini Greenhouse? Comprehensive Guide
Use boiling water to sterilize and moisten your potting materials, such as fir tree bark chips and sphagnum moss, in a container without a bottom hole. Drain the materials and then transfer them to the orchid pots after they have cooled.
Set up a separate pot for every single newly sprouted pseudobulb with a live eye. Use tree bark or any other well-drained material to separate the backbulbs and plant them in their own pots.
In order to enhance humidity, mist newly potted pseudobulbs, backbulbs, and orchids twice a day. In three to four months, you should notice new development from the backbulbs, at which point they will require new potting material. Depending on how many pseudobulbs you retained each area, the next year or several years should see fresh flowers develop from the other bulbs.
What Type of Orchid Do I Have?
Both sympodial and monopodial orchids are available. It’s common knowledge that rhizomes are used by sympodial orchids like cattleyas and oncidium to grow. Orchids like vandas and phalaenopsis, which are monopodial, develop from a single stem or flower spike, producing roots and occasionally offshoots (keiki). For monopodial orchids, division is not necessary. Orchids of the sympodial kind can be multiplied via division during re-potting.
Why Repot or Divide Orchids?
Xem thêm : How To Sterilize Sand For Plants? Easy Step-by-step Guide
There are numerous explanations for this. There is a chance it has outgrown the container. Alternatively, over watering or fertilization may have harmed the root system. Fir bark mixtures are the most frequent potting soil for orchids. After a year or two of watering and fertilizing, these combinations will degrade and will need to be renewed. Degrading fir bark combinations become darker and more porous, and they may emit a musty or rotting smell. The fragile roots of orchids can be damaged by this degraded combination. Root systems can potentially be damaged by the buildup of fertilizer salts in the potting mix. All plants, at some point, will need to be removed from their current potting material and given a fresh start.
When Should You Repot Your Orchids?
After the flowers have faded, re-potting most orchids is the best option. Re-potting many orchids at this time will benefit from new growth. Phalaenopsis, for example, is a typical orchid that blooms in the dead of winter and then regrows in the spring and summer. After the orchids have finished blooming in the spring, it is time to repot and divide them. Repotting your orchids every three years is recommended as a best practice.
When you buy an orchid, check the potting medium. A year or two is about the average shelf life for a fir bark blend. Sphagnum moss is sometimes used to package some orchids for sale. Even though it’s a great medium for orchids that require a lot of moisture, it might be difficult for those just getting started with the hobby. When watering Sphagnum moss, avoid over-watering the outside borders, as the moss tends to dry up. Re-potting the orchid in a more convenient media may be beneficial.
When Should You Avoid Repotting Orchids?
When your orchids are in bud or blossoming, you should avoid re-potting them. Too much of the plant’s resources are being invested in the bloom. This can cause the buds to fall off and limit the life of the flowers.
Cleanliness Counts
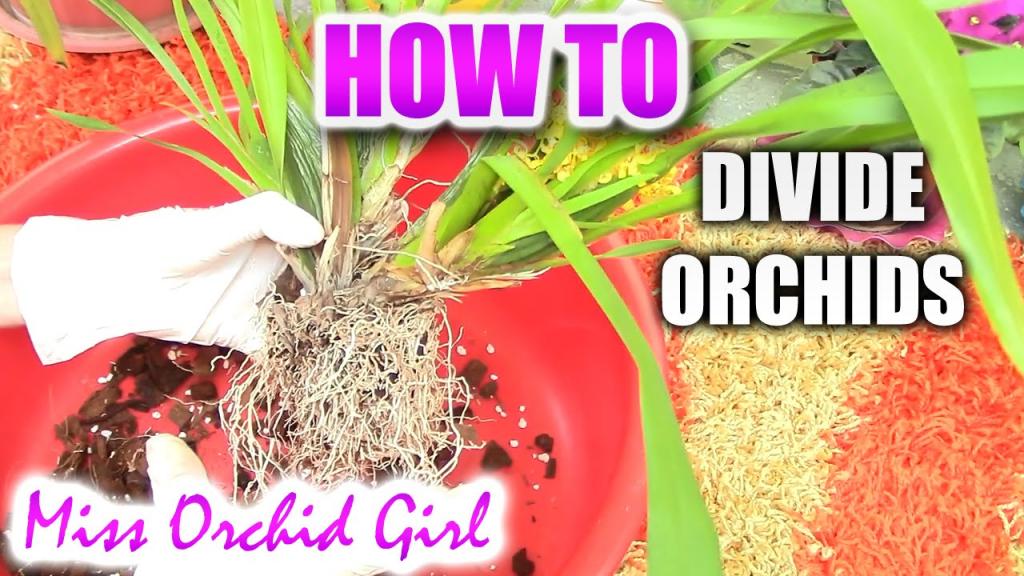
When working with orchids, it is necessary to use clean instruments and sanitary hands to prevent the spread of plant viruses. Use latex gloves or frequently wash your hands when working with different orchids. Use newspaper to separate your orchids and re-pot them in layers. This will make it easier to clear up the trash from one plant before moving on to the next. Clean equipment with rubbing or isopropyl alcohol, or a 10% bleach solution (1 part bleach to 9 parts water) (70 percent straight from the bottle). You should soak for at least ten minutes. To cut roots and divide orchids, use a disposable utility razor blade, which can be found at any hardware shop. The 10% bleach solution can be used to disinfect pots.
Steps for repotting and dividing orchids:
- Let the water drain out of your orchid’s pot thoroughly before watering it again. When the potting media is wet, it is easier to take an orchid from its pot and to work with it.
- Take a sanitized knife and run it down the inside of the container to remove the roots that have gotten caught.
- Make sure to remove as much of the old potting medium as you can. Root rot thrives in moist areas, which is why it’s important to replace old potting material as soon as possible.
- Remove any dead or damaged roots from the orchid’s roots. The roots of most orchids can range in color from a hairy chestnut brown to a succulent greenish-white color in healthy condition. Squeezing a healthy root will reveal whether or not it is in good condition. It’s best to remove any black, mushy roots along with the papery ones. Sterilized scissors, pruners, or a razor blade can be used to cut roots. Remove any sick or dead leaves from the orchid.
- If you need to divide a sympodial orchid, search for logical areas to do so before cutting it up. A minimum of three pseudobulbs should be present in a new division (stems). It’s easy to dissect some sympodial orchids with only your hands. Others will have to be hacked apart with a sterile knife or pruners in order to be separated. Some of the older pseudobulbs can be removed if the orchid is large enough. Dry and decaying ones should be removed. Keep in mind that even after the leaves fall, old pseudobulbs continue to retain water and photosynthesize, so don’t get rid of them too hastily.
- Sterilize the container in which you’re re-potting your orchids. Houseplants like orchids prefer to stay in their pots. The root system of the plant should be taken into consideration while determining the size of the container. Drying times for larger pots are significantly longer, and the potting solutions themselves are less adequately aerated. Increase the pot size by one pot size when re-potting an orchid. If you’re going to divide it, use a pot big enough to hold two years’ worth of growth. Porous terra-cotta pots allow the medium to breathe, making them ideal for growing plants. For orchids that prefer not to be watered for a few days, these are ideal. Plastic pots are ideal for orchids that like a constant supply of water.
- Any kind of orchid can only thrive if it has adequate drainage and aeration. Choose a potting mix that is appropriate for your orchid’s growing needs. Fir bark, which comes in three sizes (small, medium, and large), is frequently included in blends. Perlite, tree fern fiber, charcoal, and sphagnum moss are also frequent additions.
- Monopodial orchids should be placed in the middle of the container, with the bottom of the plant at eye level with the surface. Aerial roots can be planted now, but you don’t have to — they’re an essential element of the plant’s growth. Sympodial orchids should be placed in a pot with the oldest pseudobulb facing outwards and the new growth facing inwards. It will have the most room to expand this way. Rhizome should either be level with the surface of the potting mix or just below the surface.
- Scoop the new potting mix into the pot while holding the orchid in one hand. Using your fingers or a pencil, gently press it down. To help the mixture settle, gently shake the pot on its side. To keep the plant in place, press hard on the surface of the medium. As the plant gets established in the new pot, you can add extra supports such as bamboo stakes. Repot the orchid and then give it a good soak. This will also aid in the mix’s ability to settle..
- Make sure your orchids have a place to call their own. If you’ve removed a lot of roots, it’s a good idea to put them somewhere shady until they’ve recovered. After repotting, pseudobulbs and leaves may become shriveled until the roots have a chance to grow back. Avoid fertilizing for a few weeks while they’re adjusting to their new environment.
Nguồn: https://iatsabbioneta.org
Danh mục: Garden


