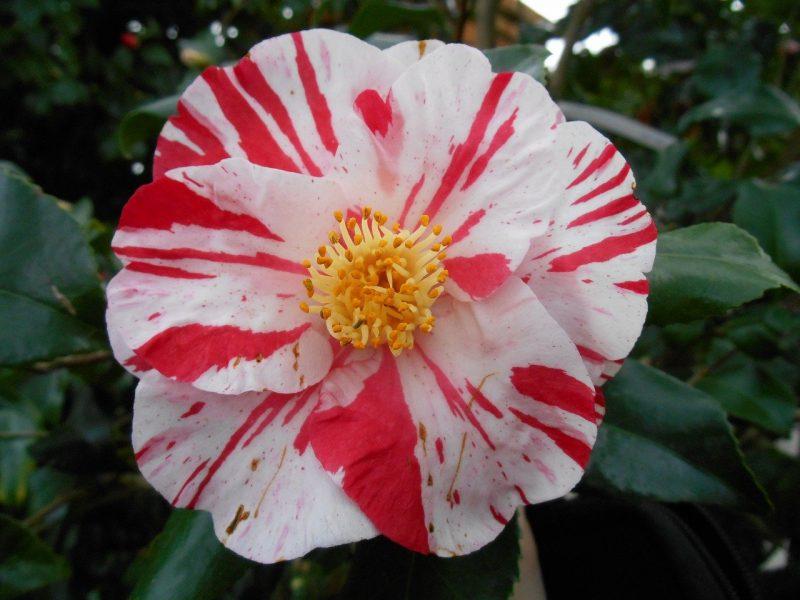
Known as camellia japonica, this shrub has large leaves unique to Japan. Camellia evergreens are planted primarily for the showy blossoms they produce in the autumn and winter. It is possible to cultivate camellias in zones 6 through 8 of the United States Department of Agriculture. Camellias typically reach a height of 6 to 12 feet, but they are capable of reaching a staggering 25 feet. In acidic soil and moderate shade, these bushes thrive. Rooted cuttings can be used to propagate nearly every species.
- What Temperature To Start Planting In A Greenhouse? Helpful Information!
- What Is The Temperature For Growing Lettuce From Seed In The Greenhouse? Helpful Information!
- How To Grow Ice Plant From Cuttings? Easy Step-by-step Guide
- How To Keep Bugs Out Of Mini Greenhouse? Comprehensive Guide
- How To Stop Plants From Growing Tall? Step-by-Step Tutorial
Late spring or early summer are ideal times to cut healthy stems from the camellia shrub. Make a slanted incision immediately beneath the fifth or sixth leaf node from the stem’s tip, then remove the leaf. The part of the stem where the leaves grow is known as a node. All save the first two or three leaves should be removed.
Bạn đang xem: How To Root Camellias From Cuttings? Step-By-Step Process
Add equal amounts of peat and sand to a 4- to 6-inch-deep container. Wet the planting media and let the extra water run out of the container before replanting. In the planting medium, use your finger to make holes spaced about two inches apart.
In a disposable container, add 2 to 3 teaspoons of rooting hormone. Rooting hormone should be applied to the naked stems of the camellia cuttings and inserted into the planting holes at least three inches deep. Keep the clippings in place by securing the medium around them.
Create a propagation chamber akin to a greenhouse by covering the camellia cuttings with clear plastic or sliding a plastic bag over the container. Keep the humidity level high by sealing the plastic or bag.
In a warm, bright, and out-of-the-way spot, place the camellia stem cuttings on a garden heat pad to dry. The cuttings are cooked when the propagation chamber is overheated by too much sunlight. Preferably, the heat pad should be set at a temperature of 75°F.
Once a day, open the plastic bag and check for mold growth on the camellia cuttings. Toss out any dead or moldy clippings. During the rooting phase, make sure the soil is moist but not saturated.
After around three months, check the camellia cuttings for root growth. Pull on the leaves of each cutting to see if there is any resistance to the movement. In this case, the roots have formed. The new camellias should be transplanted into separate containers and grown on until they are large enough to survive in the landscape. The camellias should not be trampled on, therefore mark the area where you planted them with a marker.
Which Method Is Best?
The best way to propagate your camellia plant depends on what you want to achieve. Some strategies are better than others in achieving a desired outcome.
Growing from seed is not the ideal option if you want to recreate a specific specimen due to the hundreds of years of crossbreeding that has taken place.
Camellias that are grown from seed often yield plants that are different in color or flower type, or that have a different growth habit than the parent. Infertile plants may also fail to bloom as a result.
Grafting is the preferred method of propagation for most plant producers when propagating camellias. When a cutting from an ideal plant is paired with root stock from a hardy variety, the result is a plant that thrives together.
Camellias, roses, and fruit trees are among the most popular plants for grafting, in part because farmers want to pass on certain traits, such as the shape or color of their blossoms or the type of fruit they produce.
Even in mature specimens, you can often detect if a shrub has been grafted by looking for calluses. Plant grafts that have reached maturity may no longer be distinguishable.
It is possible to observe a “seam” or ridge along the base of the trunk, just above ground level, that indicates where a scion or cutting from a parent plant was grafted onto the root stock.
Rooting cuttings, grafting, layering, or air layering are also the best ways to propagate grafted plants, as these methods preserve the parent plant’s properties.
Let’s see, where to begin. Next, let’s take a look at the top six strategies.
Camellia Propagation Methods
Plants can be propagated using a wide variety of techniques.
For our purposes, we’ll stick to the tried and tested methods that have been proven to yield the best outcomes for camellias.
Plant nurseries, commercial growers, and home gardeners all use these six strategies.
From Seed
Plants that closely match their parent, such as a uniform hedge, can be grown using the methods indicated below.
A good place to start is to simply experiment with seedling growth and not worry about reproducing the parent plant’s traits. This is an excellent place to start.
Seed-grown specimens have resulted in a wide variety of cultivars currently available. The possibilities presented by camellia seeds are virtually limitless. How much of a mystery does that seed conceal?
You may notice spherical, green seed pods the size of a large grape or a small apricot on the branches in late winter and early spring.
Once the flowers have been pollinated, the pods will begin to form. By autumn or winter, they may turn a dark brown to black color and split open, revealing the seeds inside.
It’s important to keep in mind the variety of seeds produced by different species, as well as their ripening times.
C. japonica pods can ripen as early as mid- to late-summer, making them an advantage over other species.
The seeds inside the pods will not germinate if they are forced open before they naturally split. The seeds can be saved by tying a piece of pantyhose or garden fabric loosely over the pods as they open, if you are concerned.
To get all of the seeds out, you may need to break or cut portion of the outer shell off of the pods once they’ve started to split on their own.
This will happen on its own with time, but if seeds are ripe, there’s no harm in assisting them along the way.
Prepare seeds for sowing by scarifying the seed coat as soon as possible after harvesting. Use sandpaper or a sharp knife to make a small nick in the seed coat and then rub the seed with it.
Water absorption can be aided by scarifying, which could lead to faster germination. Scarified seeds need to be steeped for twelve hours in warm water. A seed’s viability can be jeopardized if it becomes dry.
Putting the seeds in a plastic container and keeping them in the refrigerator for a few hours after harvest will keep them fresh until you’re ready to plant them.
Look closely and you’ll notice that each seed has a little depression or “eye” on one end. Because this is where the roots will grow, it is imperative that you put the seed with the eye directed downward.
One part soil or compost combined with one part peat moss and one part silica sand or perlite should be used as the planting media.
Plant seeds in starting cells half an inch deep and make sure they’re well watered. Wait for germination by keeping the soil slightly moist, but not wet, at all times.
Pots should be kept somewhere warm. It’s possible to grow sprouts in a plastic storage tote, which acts as a greenhouse.
Germination Tray with Dome
Ensure that the seedlings receive eight to ten hours of indirect sunshine and that the soil is moist but not saturated once they have emerged.
If this is not an option, seeds can be sown directly in the ground.
Take a look at our growing camellia guide for advice on where to put your plants, and how to keep them healthy. Spring may be too late for direct-sown seeds to sprout.
After sprouting their first true leaves, container-grown seedlings can be transplanted to their permanent location.
Gently remove the seedling and dirt from the pot and shake it off to expose your camellia’s roots. Trim the taproot, which is the system’s longest and thickest root, with pruning shears.
A more dense, fibrous root ball, which is better suited to container cultivation, is produced by cutting the taproot.
From Cuttings
As with other broadleaf shrubs, such as azaleas and roses, camellias can be grown by rooted stem cuttings. Propagation via cuttings is the quickest way available.
Make potting soil or compost with one part potting soil and one part perlite or coarse silica sand.
It is possible to grow multiple cuttings in a single pot, as long as you keep them at least two inches apart. To give the roots room to grow, containers should be four to six inches deep.
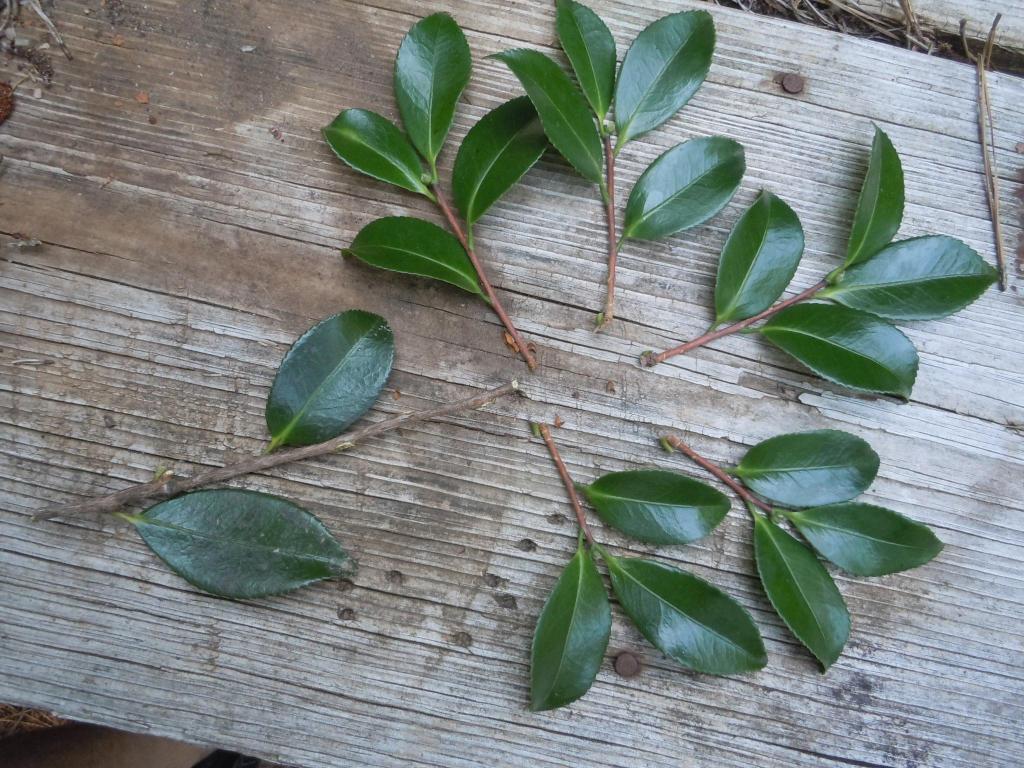
During the first few weeks of spring, look for new growth on the camellia and cut it off. Cuttings from dormant plants are more difficult to root than new growth.
Xem thêm : How To Propagate Cyclamen? Comprehensive Guide
Using a pair of pruning shears, cut the lateral branches away from the main branch at the first leaf node. You should be left with a few four-inch-long branches with at least a few leaves on each.
Remove all but the two leaves at the very end of the stem. Push the cuttings two to three inches deep into the planting media after dipping the cut end in rooting hormone powder.
The looser the soil, the better it is for rooted, so don’t press down on the planting media like you would with a seed or transplanted seedling. To dampen, mist the area with water.
In a clear, covered plastic storage tote, place the potted cuttings and store them in a warm, indirect-light area. Alternatively, you may be able to utilize a greenhouse or another warm, humid location that is well-shaded and receives plenty of sunlight.
A plastic bag can also be used to keep the cuttings and pots warm and moist by sealing the bag around the whole thing.
Every day, check the soil for moisture and spritz it with water if it feels dry. Cuttings that have been exposed to the elements are unlikely to grow.
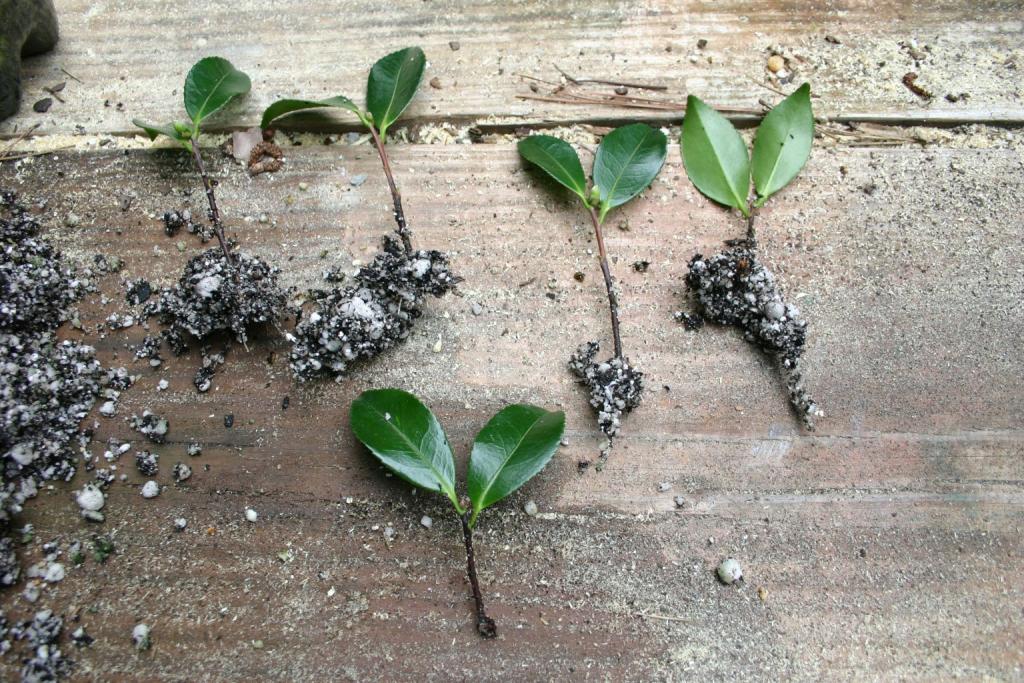
Root development can take anywhere from two to three months. Every time a cutting shows signs of growing a first bud, you know that the plants are starting to establish themselves.
It’s possible that some of your cuttings won’t take root despite your best efforts. Use potting medium specified above to transfer the plants to individual 8- or 10-inch pots after buds have formed.
Growth is a good sign that the cuttings are taking root and absorbing water and nutrients on their own, indicating that they are getting established.
New sets of leaves and roots have grown long enough to be transplanted out of the container, and this is the time to do it.
If plants are to be cultivated in pots, the taproot should be cut with garden shears.
Cuts to the taproot result in a more fibrous root system that has a wider spread and so requires less depth than a root system that is growing in the earth.
From Seedlings/Volunteers
You might find camellia seed in your garden or landscape if seed pods open. Pods develop at different times of the year according on the species.
Transplanting these seeds to a new area or container is possible if they sprout near the parent plant.
If you find any volunteer seedlings, dig them up carefully because the taproots can be quite deep.
Plan on transplanting your plant into a container, in which case you’ll need to fill the pot with a planting media made up of one part potting soil or compost, and the other portion either perlite or coarse silica sand.
There are a number of things you can do to help keep the plant’s nutrients available after it is transferred, like adding some decomposing leaves or mulch.
If you wish to maintain the plants in containers, cut off the end of the taproot with garden scissors to encourage the growth of a more fibrous root system. You can skip this step if you’re moving the plant to a new in-ground site.
A hole that is double the width and depth of the in-ground root system should be dug, backfilled lightly, and gently pressed down with your hands.
The roots of camellias should not be buried too deep, and they should be kept close to the surface of the ground.
To help the plants get used to their new surroundings, give them some water, but don’t overdo it, as camellias dislike having their roots moist.
A position with indirect sunshine or partial shade is ideal for containerized plants. Make sure that any surplus water drains away from the plants before watering them for the first time.
Grafted Rootstock
Grafting will produce a camellia with the same characteristics as the parent, and it will generally shorten the time it takes for a new plant to begin blooming.
Expect to wait several months until you begin to see the benefits of your grafted camellia’s labor of love.
Choose a rootstock plant with a stem diameter of one-half to one-inch in late winter or early spring. To chop off the tree’s trunk, use a pair of sharp pruning shears.
A 45-degree angle should be maintained from one side to the other. Trim the cut with a sharp knife to ensure a smooth finish. Make a vertical two-inch-long slot on the upper side of the cut with the knife.
Rubber mallets can be used as an alternative to knives when you can’t cut the desired length with the knife. If you tap too hard, you could split the trunk or perhaps break off a piece of it.
Once you’ve selected a healthy branch, trim it to about 3–6 inches in length to begin the propagation process. A bud and a few leaves are required for this cutting, which is called a scion.
To make it fit in the slot, cut the end of the cutting at a wedged angle. Slide the scion into the slot you made on the rootstock by gently pressing it in with your knife after opening the slot with the knife.
Grafting Wax for Trees by Treekote
You should ensure that the cambium layer (the bright green section of the branch just beneath the bark) aligns up with the scion and the stem of the rootstock. The graft will fail if this layer is not aligned on both sides.
Apply black electrical tape, garden cloth, or an elastic band to the graft site in order to keep it secure. To keep the graft moist and promote healing, place a mound of coarse, damp sand around the rootstock’s base.
To keep the graft warm and humid, it’s best to place it in a glass jar or a milk jug with the top cut off, or similar container. Make sure the container is firmly seated in the moist sand.
As soon as the graft begins to calluse, the plants will begin to grow together. It can take up to three months to complete this process. The grafted plant should be progressively removed from the container and kept in the shade as new growth occurs.
Recover the plant and attempt a couple more times if the graft shows signs of wilting when the container is removed. Protecting the plant from direct sunlight until it has a chance to grow is essential.
A site with partial shade or indirect sunlight is ideal for plants that will be kept in a container.
If you intend to move the plant into the ground, dig a hole that is twice as big and as deep as the pot’s root system.
To avoid burying the roots too deeply, start by adding a small mound of earth to the bottom of the hole. Backfill the hole with soil, using your hands to firmly compact it.
The root system’s highest point should be level with the ground. Camellias do not like to sit in water, so water well to settle the plant. Make sure, however, that any excess water drains away. Root rot can occur if there is a lack of drainage.
Layering
Layering can also be used to propagate camellias without the need for cuttings. You can induce the formation of roots on a branch while it is still linked to its parent using this strategy.
Because the branch will be rooted in the same growing conditions as the parent, this strategy usually works effectively. During the spring, when plants are actively growing, layering is most effective.
Choose a branch that is at least 18 to 24 inches long and has just sprung new growth. Reaching the earth will require bending the branch down.
Make an incision all the way around the branch’s circle with a sharp knife before cutting it away from its parent.
Make a second slice all the way around and remove the bark ring between the two about an inch below the first.
Any bright green cambium that has remained on the branch should be scraped off. Spritz the exposed area with rooting hormone powder.
As an alternative, use a wire, rock, or mounds of dirt to hold the branch in place, or bend it down and cover it with earth. If the branch is on the ground, rather than on top of grass, this method is more effective.
Once the roots have formed, the branch can be removed from the parent plant and the roots dug up from the ground, and the plant can then be relocated to its new site.
Select a location with similar growing conditions to the parent plant’s, such as some indirect sunshine or shade.
Xem thêm : How Many Bell Peppers Per Plant? All Questions Answered!
To enhance the amount of nutrients available to the plant, dig a hole that is a few inches wider and around the same depth as the root system. Make sure the roots aren’t buried too deep while planting the new plant.
Using your hands, compact the earth by pressing it firmly into the remaining space.
You should prepare a pot twice as broad and deep as the root system and fill it with enough potting mix to elevate the roots’ tops to the soil’s surface if you intend to pot up the cutting and keep it in a container.
Air Layering
There are a few important differences between air layering and the previous way of layering.
Prepare a branch that is 18 to 24 inches long in the spring by selecting a healthy branch and removing a ring of bark from it in the same manner as layered above.
Powdered rooting hormone can be applied to the exposed branch.
A piece of medium-weight plastic wrap is the perfect size for holding two handfuls of wet sphagnum moss in place. Make sure the plastic is wrapped tightly around the branch where the bark has been peeled.
If you don’t have moss on hand, you may use damp soil instead, but keep in mind that opening the bag to check for rooting and moisture can make things more messy.
You can use electrical tape or two twist ties to secure the plastic wrap to the branch, depending on your preference. If birds or other creatures are a concern, use aluminum foil to protect the area.
It’s also possible to utilize an air layering kit that’s available on Amazon to make the process easier.
Air Layering Kit
Check the medium in the pouch every week to make sure it’s still moist. In order to keep the soil moist during the roots process, add a couple eye droppers full of water.
Roots can take up to three months to grow, so keep an eye out for a change in the pouch’s stiffness. Soil or moss that has formed roots will be more stable.
It’s possible to remove the foil and inspect the moss through the plastic for signs of root growth. Do a visual check for roots every few weeks if you’re using a reusable layering device.
Branch can be cut from parent and planted in desired location when roots are visible.
Make sure to dig a hole that is twice as wide and twice as deep as the root system and place it in a spot that receives some shade or indirect sunshine.
Camellias do not like to be buried too deeply, so keep the roots near to the ground level when planting them.
After you’ve seated the roots, carefully compact the earth around them by pressing it down with your hands. Then, backfill the leftover space with soil. Water thoroughly to settle, but don’t let the roots sit in water for long periods of time.
Propagation Tips
- Only use seeds to propagate camellias if cloning the parent plant is not the goal.
- Use cuttings, layers, air layers, or grafting to propagate plants with similar qualities to their parent.
- Proper moisture levels are critical for all growth strategies.
- Before transplanting, give plants enough time to establish robust roots, which can take anywhere from a few weeks to a few months.
Grow an Entire Hedgerow or Create a Tea Garden from Just One Healthy Plant
Whether it’s in the fall, winter, or spring, the beauty of camellias has been a source of inspiration for artists and garden designers for ages.
With a little research and some patience, you may turn your ambition into a reality without spending a fortune. Simple, low-cost, and quick, this is a great way to amass a nice collection of plants.
Is this your first time cultivating camellias? Have you grown from seed in the past and gotten any unusual results? In the comments box below, please tell us what you think!
Things You Will Need
- shears for pruning
- Sand that’s a little lumpy.
- Mossy peat
- An item that is 4 to 6 inches deep.
- Hormone that promotes root growth
- a bag or film made of transparent plastic
- Mats for the garden’s heat
- Can of aerosol
ROOTING CAMELLIAS
In the area of camellia propagation, we have invested a lot of time and money on research and development, notably in the area of rooting cuttings. We’ve had a tremendous amount of success, and our loss rate has dropped to less than 4%. In the past, we’ve been reluctant to reveal our “secrets” until we’ve had enough time to test and check our approach thoroughly.
Cutting Preparation
Starting cuttings in late July or early August, when new growth has hardened off to at least 80% in our location, is generally the finest time for this process. By the middle of October, the “sticking” process should be complete. Thereafter the rooting process begins to be slowed down by factors such as local weather conditions and plant pathology. Because we’re in East Texas, the rooting season here may be longer than it is up north.
Rooting Medium
As a medium, we use 80 percent pine bark mulch that has been crushed for 2 to 3 years and 20 percent clean, sharp, coarse sand. Perlite is added to this mixture in order to increase volume by 25 to 40 percent. Dolomitic limestone has been added to this combination to get the pH level up to 6. Make sure to use a well-drained tray or container like a rose liner to keep the roots from tangling. For C. sasanquas and other small-leafed camellias, we use IOx20, 36 cell trays, and 24 cell trays.
Root Stimulant
The root stimulating solution that we use is something that we make from scratch. Mixture of approximately 0.5% IBA and 0.5% acetonitrile is used. De-ionized water with 25% NAA. Research Organics Corp. in Cleveland, OH, is where we get our IBA and NAA powders.
A water-thinner, Celluwet, is added next. It is manufactured by Griffin Laboratories, Valdosta, GA, and is available through the American Chemical Society (ACS). In order to keep the IBA-NAA solution in place on the stem of the cutting after it is placed in the rooting medium, we utilize it to thicken the solution.
Sticking and Environment
Rooting solution is applied to the cutting’s butt end and inserted into the moist medium. These trays contain this media. In a mist bed, we apply 5 to 10 seconds of mist every 8 to 10 minutes after the cuttings have been placed in the medium previously described. If you are unable to do so, place the cuttings in a high-humidity area. Keep the rooting place in a well-ventilated, shaded, and wind-protected location.
Rooting
Most cultivars should root in one and a half to two months under ideal circumstances. In six to eight months, you should be able to plant your cuttings. Rooting may take longer if one or more of the following conditions are present:
(1) A huge callus (“popcorn”) has formed on the cutting, which may delay roots. Cuts can be left in the bed;
They’ll take a stand. This is a necessary step for some varieties before they may take root.
The rooting ability of different camellia cultivars varies. It’s possible that those who are more sluggish will require a considerable amount of time.
“Bumping Up” Rooted Cuttings
Before putting a cutting in the ground, bump it up to a larger container if its roots appear robust and strong. Use our suggested pine bark mulch/sand/perlite soil mix, and you can probably bump them right into 3-gallon pots. We choose gallon jugs because they take up less room on the shelf. Depending on the growth pace, cultivar, and “happiness,” a rooted cutting should provide fruit in one to two years. Your camellias may not flower if you make them too happy. Plants, like humans, are similar to one other. If you treat them too nicely, they will not be effective.
How to Root Camellias from Cuttings: A Step-by-Step Guide
Cuttings are the cheapest and easiest way to propagate your camellias and get additional blooms out of them. Furthermore, no special instruments are required for this type of transmission. It’s time to plant your Camellia cuttings once they’ve developed roots under ideal conditions.
Cuttings of Camellia plants can be used to start new plants.
Step #1: Take cuttings
After the last few weeks of spring or early summer, it’s best to cut back on your bushes and shrubs. When taking cuttings from Camellias, select a stem that is in good health. If your stem has six nodes, make a slanted cut at the sixth leaf node. Then remove as many leaves as possible from the cuts, but leave at least two or three on top.
The more cuttings you can get, the better. Rooting or propagating Camellias will be easier if you use this method.
Step #2: Place your cuttings on a pot
Place your cuttings in a pot with a mixture of coarse sand, potting soil, peat moss, and perlite. Cuttings can be planted singly if you have a tiny pot, but if you have a larger planter, they can be planted 2 to 3 inches apart. Your cuttings should be placed at least 2 inches deep in the soil to ensure a long life.
Rooting hormone is another wonderful approach to speed up the rooting process. This will also boost the possibilities of your cutting making it through the process.
Step #3: Water your cuttings
Once the cuttings are in the pot, make sure to water them regularly to keep them from drying out. Overwatering can lead to root rot, so take care not to do so. At least once a week be plenty for watering once the plants are established or have grown a significant number of roots.
Transparent plastic can be used to keep the moisture of your cuttings in.
Step 4. Place in an area where it can receive sunlight
The photosynthesis of camellias is dependent on sunshine, however the plants dislike being exposed to this light directly. If you’re growing cuttings, be sure to arrange your pots in a location where they’ll receive plenty of direct sun.
Your Camellia cultivars should be able to establish roots in about a month and a half to a month and a half. During this time, you can begin to think about moving it to a permanent location.
Growing Camellias in Mini Greenhouses
Growing Camellias, which have specialized needs for growth, in a greenhouse is one of the greatest ways to use a greenhouse. To grow camellias, you need a lot of patience. You may, however, find that greenhouses make the procedure easier.

It’s far better to grow your camellias in a greenhouse than in the garden, so give it a try! Gardening with Camellias in a greenhouse has many advantages:
You can extend its flowering period
The easiest technique to lengthen the blooming time of your Camellias is to keep them inside a greenhouse. To ensure that your cultivars thrive, you can manage the temperature and humidity in the greenhouse. To ensure that your Camellias bloom even during the hottest months, you should consider installing a greenhouse.
Disease and pest prevention
Diseases and insect infestations such as algal leaf spot and canker are common concerns in Camellia plants; so are diseases like scale and aphids. It could lead to the plant’s demise if these are not controlled. These concerns can be mitigated, though, by using greenhouses, which can reduce the likelihood of them occurring in the first place.
Better light distribution
In order for camellias to thrive in the sun, however, they must avoid direct exposure. If you want to ensure that your plants receive the proper amount of sunlight, you can put them in a greenhouse. The greenhouse’s roof can deflect the sun’s rays and distribute them equally throughout the greenhouse. This shields your plant from the sun’s harsh beams.
Conclusion: How to Root Camellias from Cuttings
A great way to propagate your plant and get the same plant as the parent plant is to learn how to root Camellias from cuttings Keep in mind that they must meet certain growth needs in order to thrive. When it comes to growing Camellia cuttings, you can increase your chances of success by keeping them in a greenhouse where you can manage the temperature and humidity.
Nguồn: https://iatsabbioneta.org
Danh mục: Garden


