Every plant begins as a seed, and one method to learn how to get seeds ready for planting in a greenhouse is to experiment.
- How To Grow Purslane From Cuttings? A Few Tips to Remember
- What Helps Greenhouse Plants Stay Small? Helpful Information!
- How To Fix Calcium Deficiency In Pepper Plants? Garden Guide
- What Are The Optimal Temperatures In A Greenhouse For Growing Petunias
- When Is It Safe To Start Growing Seeds In Greenhouse? Helpful Information!
To get started, simply use some of the seeds that you just harvested. If you have seeds from last year that haven’t germinated, you may want to check them out first. You can moisten as few as 10 seeds or as many as 100 seeds on a paper towel before starting.
Bạn đang xem: How To Prepare The Seeds Of Crops Before Planting In A Greenhouse? Comprehensive Guide
Once you’ve folded the paper over the seeds, put the plastic bag with the seeds in a warmer location. Take out this paper and inspect your seeds twice a day, spraying them with water to keep the seeds moist. Count the number of seeds that have sprouted and then use that number to calculate the germination percentage. Let’s get right down to the business at hand.
How Do You Start A Greenhouse With Seeds?
Things You’ll Need
A bowl, a seed-starting tray, vermiculite and potting soil, a clear plastic bag for the seedlings, a heating mat, a spray bottle, a fan, fluorescent lights and larger containers are all you need to get started.
The Procedures
Your seed-starting mixture should be used to fill flower pots and seed-starting trays. As instructed on the seed packet, plant the seeds two to three per container at a depth of no more than 12 inch. Once the soil is moistened, spray the seeds to ensure they are evenly coated.
Cover your pots and trays with plastic wrap after these steps. A heating pad can be used to help the seed adjust the soil temperature in these sunny and warm situations. Remove the plastic wrap as soon as the seedlings appear.
Don’t overwater the planting mix, but also don’t allow it to become soggy. Then, with a pair of scissors, remove all but one seedling from each of the pots. Allow one to two weeks for the water-soluble fertilizer 5-10-5 to be applied throughout the fertilization procedure. All of these stages are covered in our other blog postings.
Water the seedling and the plants after fertilizing with a quarter of your fertilizer solution. Seedlings are ready to be transplanted outdoors and hardened off after eight weeks, provided the weather cooperates. If you don’t have room for them to expand, move them to a larger container.
How Do You Prepare A Greenhouse For Planting?
A greenhouse is a year-round building that can accommodate your crops’ demands regardless of the weather. According to a recent study, prepping a greenhouse for new plantings is a good idea throughout the winter months. This includes de-cluttering and other organizational practices.
Adding Greenhouse Vents
Many gardeners struggle with the problem of insufficient airflow. Slatted vents and two roof vents at the top of the structure are necessary to ensure adequate airflow, as are other ventilation options.
The Automatic Vent Openers
Automatic vent openers are a must-have for any serious gardener. Even if you forget to open the vents on warm days, this will ensure that warm air can still leave and prevent plants from shriveling to the point of death.
The Use Of Shade Netting
Make sure that you get shade netting for each side of the greenhouse in order to shield your plants from the strong summer sun. It is possible to install blinds in your home, but the cost is high and they may get in the way of your pots and growing bags. Use a cheap, washable shade paint instead of a more expensive one.
Installing Electricity
When it comes to the cost of putting power in your greenhouse, the benefits much outweigh the drawbacks. When using heated mats or propagators at night, you’ll be able to plug in the correct light source to work with it.
In the evenings, you can also use electric heaters thanks to their thermostat feature, which allows them to use electricity only when necessary. To avoid any problems, you should have professional electrician perform the installation for you.
Generating Heat
The use of a heat source can lengthen the growing season and allow you to grow a wider variety of plants. If you have a power source, the heater with an automatic thermostat will take care of your basic needs. In the winter, keep the greenhouse at a temperature of four degrees Celsius or higher and avoid allowing it to freeze.
Storing Water
Plants grown in a greenhouse require more water than those cultivated in a garden. If you are used to using tap water or rainwater for your plants, you can use a water butt connected to downpipes.
Clearing The Greenhouse
It’s a good idea to scrub the greenhouse of old plants that may be harboring diseases before you begin planting and spreading seeds. Before scrubbing shelves and staging with warm, soapy water, it’s a good idea to compost.
How Do You Prepare Seeds Before Planting?
Plants and herbs don’t require a master gardener to dazzle your guests; preparing seeds before planting is simple and may be done even by farmers who are just starting out in the field.
- Fold the top of the paper bag over the seeds in the seedpods. To get the seeds out of the pod, give the jar a good shake. The seed pods can be found by opening this package. As you pour seeds onto a piece of newspaper, toss them out.
- Fill your dish with cold water and add seeds with wet membranes, such as pumpkin seeds or tomato seeds, to get started. What you can do to remove the membrane from these seeds is to rub them with your fingertips. Do not forget to put the seeds in a piece of newspaper.
- In your glass jar, place sandpaper on both sides of the pot’s interior and the rough side facing inward toward the pot’s inside. Incorporate your seeds one variety at a time and secure the container with a lid. To scarify the seeds, shake the jar vigorously.
- Next, fill your bowl with water and put the seeds you’re going to plant into it, making sure they’re completely submerged. After soaking for two hours, scoop out the seeds and plant them in the ground. For each of the seed kinds, use a separate basin.
- After soaking, use your cleaning solution to kill germs and fungus on your vegetable seeds. Allow your seeds to soak in a tub of water and bleach for one to two minutes. Using a paper towel, spread out the seeds and let them dry.
When it comes to greenhouse seed preparation, the process may seem complicated at first, but with the appropriate planning and techniques, you can get the job done.
Choosing the Right Seed
Choosing the proper seed is one of the most critical considerations in successful vegetable production. When purchasing seeds, make sure they are of excellent quality, clean, and obtained from a reputed seed provider. Make sure to select kinds that are well suited to the area and are in line with the preferences of the local population.. Only a few exceptions are allowed for organic seed and seedlings, which must be certified organic.
The Right Environment to Germinate
When a seed is fully formed, the embryo and food reserves are wrapped up in a seed coat. When soil moisture and temperature conditions are ideal for seed germination, seeds typically “wake up” and begin sprouting. The germination requirements of each seed type vary, thus it’s crucial to know what each seed needs.
To germinate, seeds require the right temperature, moisture, air, and light. For germination, each seed has a temperature range in which it thrives (Table 1). The lowest temperature at which seeds will germinate successfully is known as the minimum temperature. Seeds can germinate at a maximum temperature of 100 degrees Fahrenheit. Seeds can be damaged or go into dormancy if the temperature is above or below this point. Germination is rapid and uniform at the right temperature.
In order for seeds to germinate, they must be exposed to both moisture as well as air. It’s critical to have good seed-to-soil contact. Direct sowing in the field necessitates a fine-textured seedbed with minimal compaction. Soilless media for greenhouse transplants should be well-watered and fluffy. To initiate the germination process, the seed needs a sufficient amount of moisture in the soil or growing medium. The seed will not be able to “breathe” if the soil or media is excessively damp or compacted. Seeds, like all living things, require oxygen for respiration, and soil air provides that oxygen.
Xem thêm : How Do I Keep My Roses Disease Free? Everything To Know!
The light needs of every type of seed are different. Light may even limit the germination of some seeds, as is the case with most. Light is required by some seeds in order to germinate. As seedlings emerge from the soil or growing media, they all require sunshine to thrive. Temperatures that are ideal for germination of popular vegetable crops are shown in Table 1.
Steps from Seed to Seedling
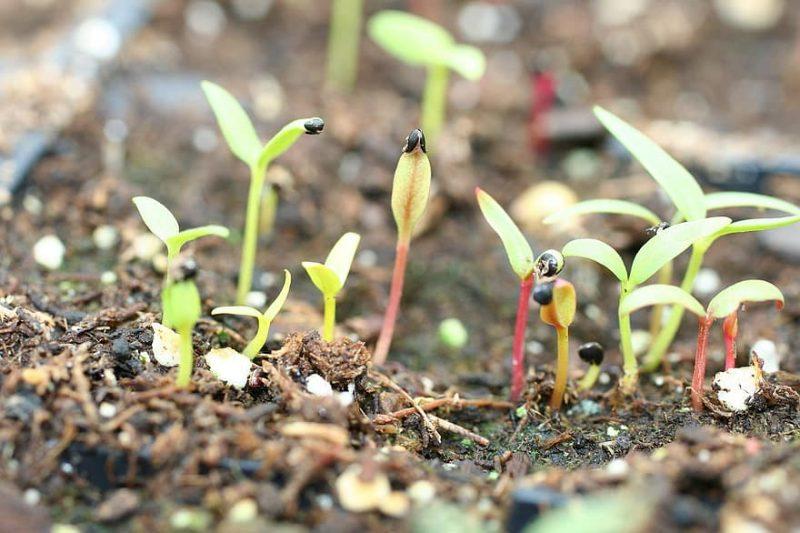
Upon contact with damp soil or other growing media, a seed coat begins to absorb water. Taking in additional water causes the seed to swell, causing the seed coat to split apart. A little stem and a small root make up the embryo inside the seed. The seed’s root is the first to sprout. When the plant is established, it begins receiving water from the soil through its roots.. After the seed’s root has absorbed water, the seed’s shoot emerges.
‘Dicots’ are the majority of the vegetable plants that we cultivate in our yard. Two seed leaves develop from the growing seed in the branch of a dicot. Squash and beans, along with a variety of other dicots (flowering plants), are also included in the dicotyledons. Onions and asparagus are examples of monocots, as are sweet corn and peppers. The developing stalk of a monocot’s seed has only one seed leaf. We refer to the plant as a seedling when the stalk, which has one or two seed leaves, emerges from the soil or growing medium. There are many illnesses and environmental factors that the seedling is susceptible to at this early period. Providing the right conditions for seedlings to thrive will ensure that they grow quickly and uniformly.
Managing for Optimal Germination and Seedling Development
Testing stored seeds for germination
In general, seeds that are purchased less than a year before planting have a much better chance of germinating. The problem with seed storage is that it can be done wrongly or for an excessive amount of time before the seeds lose their vigor and fail to germinate when planted. The viability of stored seed can be determined with a simple germination test. At least twenty-five seeds should be counted out for germination testing. For five to ten days, softly moisten a paper towel and wrap the seeds in it. Count the seeds that have germinated after removing the paper towel wrapper. Seeds that have germinated less than 85% of the time should be thrown away and replaced with new ones.
Uniform germination
Seeds need the right conditions to germinate quickly, and we’ve learned this the hard way. Regardless of whether seeds are planted in trays in the greenhouse or directly in the field, the goal is to ensure that all seeds germinate and grow at the same rate. A more manageable and better-producing crop is a uniform tray of transplants or a uniform seedling field. Seedlings of varying sizes can be produced as a result of uneven germination caused by delayed development, variations in soil moisture or temperature, or by sowing the seed at an uneven depth. To make matters worse, only half of the seedlings in a tray are large enough to be planted in the field, and the other half have roots that are too little to be easily removed from the tray cells.
Germination mats placed under the trays in the greenhouse help to speed up and ensure uniform germination. You can customize the temperature for different types of seeds with these mats. At 86°F, peppers germinate in 8 days, whereas at 58°F, it takes more than 13 days. Make sure you keep your crops at the right temperature (see Table 1). Keeping diseases at bay at the germination and seedling stage can be as simple as providing adequate air circulation.
There are no greenhouse conditions in the field, but we may take precautions to ensure that seeds sown straight into the ground sprout equally. With a fine-textured seed bed, you can ensure that your seeds have enough soil contact and that you can sow at a consistent depth. Seedling emergence and germination can be expedited by planting when soil temperatures are near their optimum. Sowing seeds in soil that is too cold might happen accidentally during the hurry of spring planting. Slow germination, weak and sick seedlings, and even plant mortality can occur as a result of poor seed germination. Planting should be postponed until soils have warmed up.
Seedling development
The ideal temperature for seedling growth may differ from the ideal temperature for seed germination. As shown in Table 2, it is better to grow seedlings in a greenhouse, where temperatures can be controlled, during the day and at night. Seedling growth is slowed by cooler temperatures, while it is accelerated by higher temperatures.
In order to thrive, all seedlings require a lot of light. During seedling growth, stems can become weak and “leggy” if light levels are too low or seedlings are too close together. If greenhouse light levels are poor, consider additional illumination.
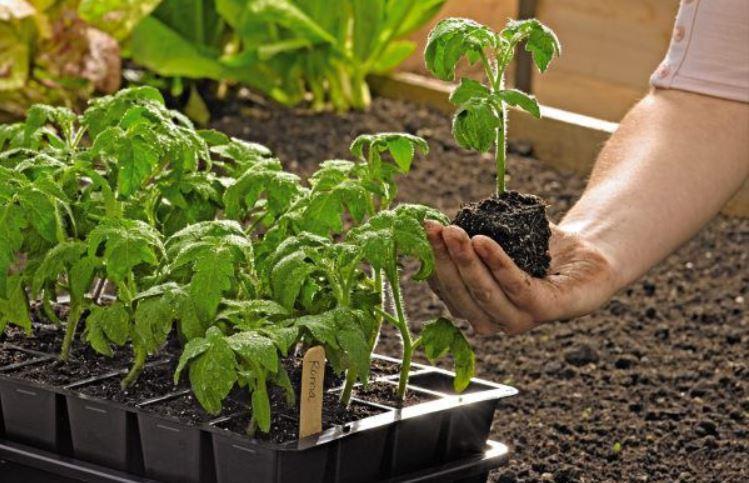
Seedling maturation and hardening off
Each crop has its own requirements for how long seedlings should be grown in the greenhouse before they can be transplanted to the field. It may take five to seven weeks to produce tomato and pepper seedlings, whereas cucumbers and squash seedlings are ready to be transplanted after three to four weeks in the greenhouse. Regardless of the method used, all transplants must be hardened off prior to being moved from the greenhouse to the field. Seedlings should gradually be exposed to the circumstances they will face in the field in order to harden them off. Generally speaking, transplants can be hardened off by lowering greenhouse temperatures and/or decreasing watering. Wilting is normal, but don’t let your plants go too far.
Set the trays outdoors of the greenhouse for five to seven days, weather permitting, before planting. Provide some shade for the seedlings during the first few days if it is really hot and sunny. They will be able to handle transplanting and continue to grow in the field without interruption if they are hardened off this way.
See ” Seed and Seedling Biology ” for further information.
Sustainable Production and Pest Management Innovations for Next Generation Young and Hispanic/Latino Specialty Crop Growers is supported by USDA Specialty Crop Block Grant Project ME#44166076.
Cold Frame
To put it simply, a cold frame is a shallow pit with a glass lid on top that is often framed in wood. There is a tendency for the north side of the frame to be taller than the south. Sunlight can permeate the interior and warm the seed trays, peat pots, or flowerpots that have been placed there. A cold frame may only raise the temperature by 10 degrees Fahrenheit over the outdoor temperature, but this is enough for cold-tolerant vegetable and flower seeds to germinate. There are a number of seeds that can sprout at temperatures as low as 40 degrees Fahrenheit, but the ideal temperature varies from 75 to 85 degrees Fahrenheit for these vegetables.
Hotbed Frame
A hotbed can be created by heating a cold frame with manure, heating coils, or even a light bulb. In order to use manure, dig the pit 30 inches deeper than you would dig a cold frame hole. Fill the pit with coarse gravel and compact it to a depth of six inches. 18 inches of partially composted manure, such as horse manure, should be placed at the bottom of the pit. Potting soil should be piled on top of the manure. Before adding seeds or seed trays to the hotbed, close the cover and let the soil cool to a temperature of 85 degrees Fahrenheit. Lift the cover if the soil temperature increases to more than 85 degrees. Use GFCI-protected outlets whenever you use heating elements or light fixtures.
Indoor Mini-Greenhouse
If your house is drafty or its temps are lower than what your seeds need to germinate, an indoor mini-greenhouse can be a lifesaver. At a temperature of 80 to 85 degrees Fahrenheit, seeds for tomatoes and peppers will germinate most effectively. It is possible to grow plants in a simple clear plastic container like the ones that are used to package fresh fruits and vegetables in supermarkets. The “greenhouse” is the clear lid. You may also create a mini-greenhouse out of a transparent container covered in plastic wrap.
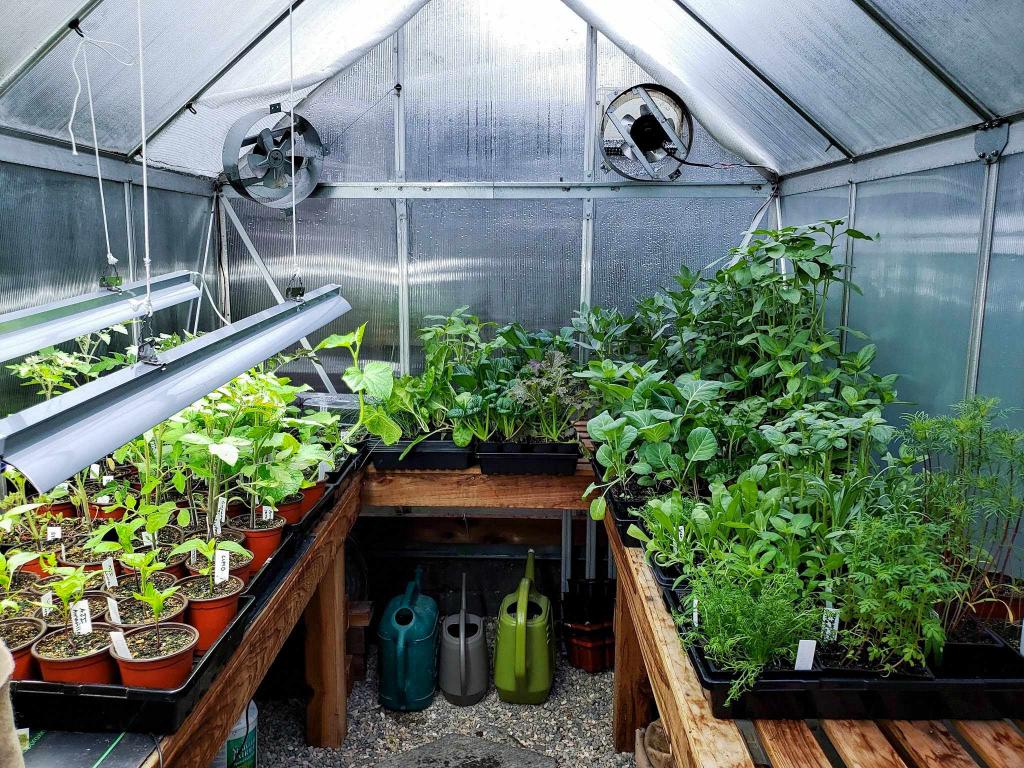
Freestanding Greenhouse
Depending on the size of the greenhouse, you can start many seeds on shelves or benches. To maintain a comfortable temperature, install heaters and fans throughout the home. On overcast days, fluorescent lighting provides more light for seedlings to thrive. Prior to sowing the seeds, thoroughly disinfect the greenhouse; the warm, moist conditions create an excellent setting for algae, fungi, gnats, and other pests.
Seed Starting
The seed-starting mix can be used to fill peat pots, flower pots, or seed-starting trays with water. In general, you should plant two or three seeds per pot at a depth of 1/8 to 1/2 inch, depending on the seed packaging instructions. Spray the seeds with water and bury them in the soil. Plastic wrap should be used to cover the pots or trays. Place them in a comfortable, well-lit area. You may control the temperature of the soil by using a seed beginning electric heating pad. Remove the plastic wrap as soon as the seedlings appear.
Moisten but not over-watering the planting mix is essential. With a pair of scissors, remove all but one seedling from each pot. Use a one-quarter strength 5-10-5 water-soluble fertilizer every one to two weeks to maintain a healthy crop. 1/4 cup of the fertilizer solution should be applied to each seedling before potting them up. After fertilizing, make sure to follow up with plenty of water. Harden off the seedlings and plant them outside, weather allowing, when they are eight weeks old. Otherwise, move them to a larger container so they can continue to expand.
Growing Media
pH and soluble salts should be checked before sowing both on-site and in a soil testing lab. The ideal growing medium for most crops is one with an alkaline pH of 5.7 to 6.2 and low soluble salts, such as peat moss. Soluble salts and pH are frequently implicated in seedling issues.
A commercial laboratory can also be used to test irrigation water. In this E-Gro segment, “Taking a Water Sample(link is external),” Brian Krug, UNH demonstrates how to take a water sample. (Continue reading)
In order to avoid damping off, use a biofungicide (protectant), either a commercial growing media with it already mixed into the medium or in the form of an application. An infection that affects seed germination as well as seedling growth is known as damping-off. The fungus Rhizoctonia and Alternaria, as well as the water molds Pythium and Phytophthora, are all responsible for damping off.
Actinovate SP, bacillus subtilis GB03 (Companion), and Trichoderma harzianum strain T-22 (Rootshield) can all be used for seedlings, as can Trichoderma virens strain G-41 (RootShield Plus+) (including vegetable seedlings). Please be aware that Actinovate SP and RootShield are OMRI-listed (organic).
How a mix is handled can have an impact on the mix’s amount of air and water. Seedlings need sufficient drainage and air space in order to thrive. Roots have a more difficult time penetrating media that has been compacted, resulting in poor root development. A little layer of growing material should be placed in containers, cell packs, and plug trays, and the surplus should be brushed away. Neither the medium nor the filled pots should be tamped down on the bench or packed down. The pots and trays should not be piled on top of each other.
Xem thêm : How To Plant Celosia? Everything You Need To Know
Before putting the mix into containers, make sure it’s completely dry. Water causes dry materials like peat to hydrate and expand. This swelling prevents the particles from nesting within one another, resulting in increased aeration. When it comes to plug manufacturing, this is extremely critical. Before putting the mixture into the container, it is necessary to add water to it. You should first wet and then mix the mixture before using it. Adding the water and then waiting at least two hours will aid the hydration process if that isn’t possible.
Is there a specific amount of water that should be added? Plug mixes should be made up of a 2:1 water to dry substrate mix (67 percent moisture content). Smaller cells require more water before planting, thus this rule of thumb is a good starting point.
Wet but not wet medium should be used. Squeezing a handful of the moistened medium is an easy way to determine the moisture content of the medium. There should be no drippings of water. The medium should keep its shape even after you open your hand. Too much moisture will cause it to crumble. It should crumble if you press on it just a little bit. The media will be less likely to shrink or settle if the correct amount of moisture is used.
Douglas A. Bailey and William C. Fonteno’s “Greenhouse Substrates and Fertilization(link is external)” is a good source for more information.
Containers
Containers of any shape or size can be used to grow transplants. Open seed flats or single-cell (plug) trays can be used for sowing seeds. Decide ahead of time whether seeds will be placed in one container and then transplanted to a finishing container, or whether germination and finishing will take place in separate containers.
Growers commonly row their seeds when using open seed flats. It is easier to deal with seedlings and damping-off disease since they are smaller. To make matters worse, overcrowding can lead to stretched plants and high humidity surrounding the seedlings, both of which can lead to illnesses like damping-off and make transplanting difficult.
Plug trays are used by many farmers to cultivate some crops. The deeper columns in plug trays with deeper cells have been found in studies to have improved drainage and oxygen in the medium. The depth of the plug tray isn’t as important as giving the right temperature and humidity during germination.
Sowing
There are many factors to consider while using plug trays. Those seeds that are placed near the cell’s perimeter are more likely to dry out.
Medium or coarse vermiculite can be used to generate a humid micro-environment while covering seed. Seed can be buried in vermiculite that is too fine. There are some seeds that need sunshine in order to germinate, thus they’re either lightly covered or left open. In order to keep them damp, use a misting system.
Avoid burying seed by watering plug flats evenly and gently, especially for seed that is extremely little. The amount of moisture given to the seed can have a significant impact on the success or failure of plug germination. Depending on the crop, the temperature and moisture requirements are different. It’s okay to let the growing media dry out between waterings once the seeds have germinated.
Transplant seed trays as soon as possible after planting into a humidity- and water-rich environment. It makes it easier to categorize crops based on their temperature requirements. Staying in the sowing area for too long will delay the germination of seeds.
Regardless of whether seeds are germinated on the bench or in germination chambers, they must be kept at a consistent temperature and moisture level to guarantee successful germination. There are a variety of commercially available germination chamber systems, as well as custom-built germination units. Root zone heating and bottom heating are popular methods for maintaining consistently warm temperatures in the growing environment. Underneath the plants, rubber tubing or mats filled with hot water are inserted. Top of bench has weed mat barrier to help diffuse heat while side skirts aid to trap heat. To prevent seedling stretching, flats should be removed from the germination chamber as soon as the radicles break through the seed coat. The secret to uniformity and success in your seeding technique is trial and error.
You should use as much moisture as necessary for germination in a germination chamber until you transfer the trays to your bench.
Fertilizing
The type of plant growth and the pH of the media are both affected by the fertilizer used. More shoot growth, softer plugs, fewer roots and a lower media pH can be achieved by using peat-lite fertilizers such as 20-10-20 in general crop production. A particular plug fertilizer like 13-2-13 (high nitrate, low phosphorus, plus minors) is preferred by most growers since it produces a more toned growth, healthier roots, and maintains a higher pH in the media.
Root rot can be slowed or even prevented by keeping an eye on the EC levels in the media. Once the cotyledons have opened, a dilute fertilizer program (25-50 ppm N) is often started and the rate of administration is gradually raised as the seedlings grow larger and approach transplantation.

Avoid burning sensitive young leaves and growing tips by thoroughly rinsing fertilizer off plants on sunny days. Salvia, coleus, ageratum, and snapdragons are all susceptible to this condition.
Seedling Problems and Possible Causes
Seedlings have a corkscrew tendency or lay down in the seedling tray or the radical hooks and grow over the soil surface without entering the soil.
Compacted media in the cell, excessive soluble salts, or high media pH are all possible reasons of this.
The problem is that the leaves are curling upwards.
Poor rooting and thicker roots point to high soluble salts or growing in an environment that is excessively dry or rich in sodium as possible causes (perhaps high levels in irrigation water). For shade plants, an inward curvature of the leaves suggests overexposure to light.
Leaves are cupping inwardly in a downward direction.
Overwatering or a broken heater could be the culprits, resulting in phytotoxicity and ethylene production.
Tip abortion and dark green foliage color provide a problem.
Excessive soluble salts and/or high ammonium could be the culprits.
Nguồn: https://iatsabbioneta.org
Danh mục: Garden


